Spring Boot从入门到精通(十一)集成Swagger框架,实现自动生成接口文档
Swagger是一个规范和完整的框架,用于生成、描述、调用和可视化 RESTful 风格的 Web 服务。Swagger 是一组开源项目,其中主要要项目如下:
Swagger-tools:提供各种与Swagger进行集成和交互的工具。例如模式检验
Swagger 1.2文档转换成Swagger 2.0文档等功能。
Swagger-core: 用于Java/Scala的的Swagger实现。与JAX-RS(Jersey、Resteasy、CXF…)、Servlets和Play框架进行集成。
Swagger-js: 用于JavaScript的Swagger实现。
Swagger-node-express: Swagger模块,用于node.js的Express web应用框架。
Swagger-ui:一个无依赖的HTML、JS和CSS集合,可以为Swagger兼容API动态生成优雅文档。
Swagger-codegen:一个模板驱动引擎,通过分析用户Swagger资源声明以各种语言生成客户端代码。
在项目开发中,Swagger 可以根据不同的业务代码实现自动生成API文档,提供给前端调用方在线测试,且自动显示返回采纳数JSON格式的字符串,从而节省后端与前端人员的沟通与调试成本。
Swagger 有一个最大的劣势就是“侵入性”模式,配置信息必须在具体代码中来实现,在下面的搭建过程中,大家就会明白说的是什么意思了。
新建Maven项目,在pom.xml文件引入依赖
方式一:使用官方推荐依赖,在pom.xml文件中添加Swagger包依赖,具体配置信息如下:
<?xml version="1.0" encoding="UTF-8"?><project xmlns="http://maven.apache.org/POM/4.0.0" xmlns:xsi="http://www.w3.org/2001/XMLSchema-instance"xsi:schemaLocation="http://maven.apache.org/POM/4.0.0 https://maven.apache.org/xsd/maven-4.0.0.xsd"><modelVersion>4.0.0</modelVersion><parent><groupId>org.springframework.boot</groupId><artifactId>spring-boot-starter-parent</artifactId><version>2.2.5.RELEASE</version><relativePath/> <!-- lookup parent from repository --></parent><groupId>com.example</groupId><artifactId>springboot-study-demo07</artifactId><version>0.0.1-SNAPSHOT</version><packaging>jar</packaging><name>springboot-study-demo07</name><description>Demo project for Spring Boot</description><properties><java.version>1.8</java.version></properties><dependencies><dependency><groupId>io.springfox</groupId><artifactId>springfox-swagger2</artifactId><version>2.9.2</version></dependency><dependency><groupId>io.springfox</groupId><artifactId>springfox-swagger-ui</artifactId><version>2.9.2</version></dependency><dependency><groupId>org.springframework.boot</groupId><artifactId>spring-boot-starter-web</artifactId></dependency><dependency><groupId>org.springframework.boot</groupId><artifactId>spring-boot-starter-test</artifactId><scope>test</scope><exclusions><exclusion><groupId>org.junit.vintage</groupId><artifactId>junit-vintage-engine</artifactId></exclusion></exclusions></dependency></dependencies><build><plugins><plugin><groupId>org.springframework.boot</groupId><artifactId>spring-boot-maven-plugin</artifactId></plugin></plugins></build></project>
方式二:使用第三方包引入依赖,在pom.xml文件中添加第三方swagger包依赖,具体配置信息如下:
<?xml version="1.0" encoding="UTF-8"?><project xmlns="http://maven.apache.org/POM/4.0.0" xmlns:xsi="http://www.w3.org/2001/XMLSchema-instance"xsi:schemaLocation="http://maven.apache.org/POM/4.0.0 https://maven.apache.org/xsd/maven-4.0.0.xsd"><modelVersion>4.0.0</modelVersion><parent><groupId>org.springframework.boot</groupId><artifactId>spring-boot-starter-parent</artifactId><version>2.2.5.RELEASE</version><relativePath/> <!-- lookup parent from repository --></parent><groupId>com.example</groupId><artifactId>springboot-study-demo07</artifactId><version>0.0.1-SNAPSHOT</version><packaging>jar</packaging><name>springboot-study-demo07</name><description>Demo project for Spring Boot</description><properties><java.version>1.8</java.version></properties><dependencies><dependency><groupId>com.spring4all</groupId><artifactId>swagger-spring-boot-starter</artifactId><version>1.9.1.RELEASE</version></dependency><dependency><groupId>org.springframework.boot</groupId><artifactId>spring-boot-starter-web</artifactId></dependency><dependency><groupId>org.springframework.boot</groupId><artifactId>spring-boot-starter-test</artifactId><scope>test</scope><exclusions><exclusion><groupId>org.junit.vintage</groupId><artifactId>junit-vintage-engine</artifactId></exclusion></exclusions></dependency></dependencies><build><plugins><plugin><groupId>org.springframework.boot</groupId><artifactId>spring-boot-maven-plugin</artifactId></plugin></plugins></build></project>
自定义Swagger配置信息
新建Swagger配置类,需要注意的是“Swagger scan base package”,这是扫描注解的配置,即API接口位置,对前端调用方提供服务接口的位置。
package com.yoodb.study.demo07.config;import org.springframework.context.annotation.Bean;import org.springframework.context.annotation.Configuration;import springfox.documentation.builders.ApiInfoBuilder;import springfox.documentation.builders.PathSelectors;import springfox.documentation.builders.RequestHandlerSelectors;import springfox.documentation.service.ApiInfo;import springfox.documentation.spi.DocumentationType;import springfox.documentation.spring.web.plugins.Docket;import springfox.documentation.swagger2.annotations.EnableSwagger2;@Configuration@EnableSwagger2public class SwaggerConfig {private ApiInfo apiInfo() {return new ApiInfoBuilder().title("API接口文档").description("“Java精选”微信公众号信息").version("1.0.0").build();}@Beanpublic Docket createRestApi() {return new Docket(DocumentationType.SWAGGER_2).apiInfo(apiInfo()).select().apis(RequestHandlerSelectors.basePackage("com.yoodb.study.demo07")) //API接口所在的包位置.paths(PathSelectors.any()).build();}}
新建Controller类文件
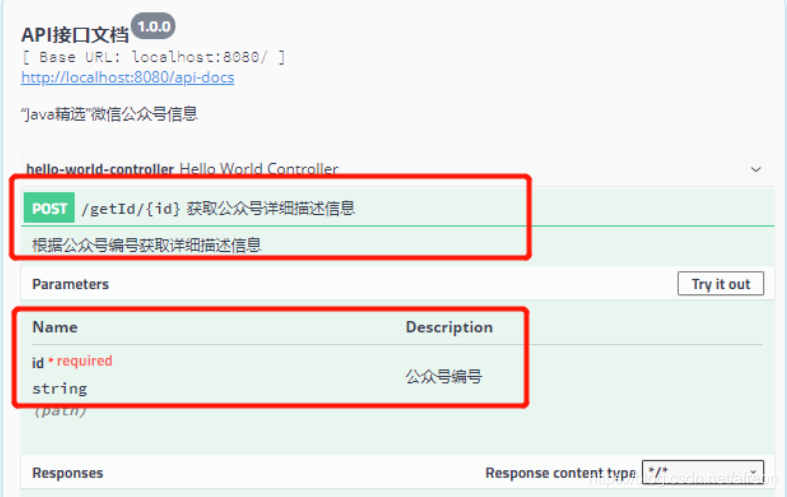
新建HelloWorldController类文件,创建GET和POST两种请求方法,以接口方式提供给前端调用,具体代码如下:
package com.yoodb.study.demo07;import io.swagger.annotations.*;import org.springframework.web.bind.annotation.GetMapping;import org.springframework.web.bind.annotation.PathVariable;import org.springframework.web.bind.annotation.PostMapping;import org.springframework.web.bind.annotation.RestController;@Api(value = "hello")@RestControllerpublic class HelloWorldController {/*** 根据公众号名称获取详细描述信息* @return*/@ApiOperation(value = "获取公众号详细描述信息", notes = "根据公众号名称获取详细描述信息")@ApiImplicitParam(name = "name", value = "公众号名称", required = true, dataType = "String", paramType = "path")@ApiResponses(value = {@ApiResponse(code = 200, message = "Successful — 请求已完成"),@ApiResponse(code = 400, message = "请求语法问题或无法满足请求"),@ApiResponse(code = 401, message = "Unauthorized,未授权访问"),@ApiResponse(code = 404, message = "服务器找不到资源;文件不存在"),@ApiResponse(code = 500, message = "服务器不能完成请求")})@GetMapping("getName/{name}")public String getName(@PathVariable(value = "name") String name) {return "关注微信公众号“" +name+ "”(w_z90110)," +"Spring Boot系列文章持续更新中," +"带你从入门到精通,玩转Spring Boot框架。";}/*** 根据公众号编号获取详细描述信息* @return*/@ApiOperation(value = "获取公众号详细描述信息", notes = "根据公众号编号获取详细描述信息")@ApiImplicitParam(name = "id", value = "公众号编号", required = true, dataType = "String", paramType = "path")@ApiResponses(value = {@ApiResponse(code = 200, message = "Successful — 请求已完成"),@ApiResponse(code = 400, message = "请求语法问题或无法满足请求"),@ApiResponse(code = 401, message = "Unauthorized,未授权访问"),@ApiResponse(code = 404, message = "服务器找不到资源;文件不存在"),@ApiResponse(code = 500, message = "服务器不能完成请求")})@PostMapping("getId/{id}")public String getId(@PathVariable(value = "id") String id) {return "关注微信公众号“Java精选”(" +id+ ")," +"Spring Boot系列文章持续更新中," +"带你从入门到精通,玩转Spring Boot框架。";}}
设置访问API文档
在application.yml配置文件中,增加配置信息如下:
springfox.documentation.swagger.v2.path: /api-docs
此配置信息是指以json串的形式访问request mapping,可以自定义,防止与自身代码冲突,使用位置参考截图所示(项目启动后通过地址访问该服务):

添加启动类文件
新建启动类文件,使用@EnableSwagger2注解,具体代码如下:
package com.yoodb.study.demo07;import org.springframework.boot.SpringApplication;import org.springframework.boot.autoconfigure.SpringBootApplication;import springfox.documentation.swagger2.annotations.EnableSwagger2;@SpringBootApplication@EnableSwagger2public class SpringbootStudyDemo07Application {public static void main(String[] args) {SpringApplication.run(SpringbootStudyDemo07Application.class, args);}}
完成上述代码配置后,启动Spring Boot程序,访问swagger地址:

Swagger常用注解
@Api:用在类上,说明该类的作用。以标记一个Controller类做为swagger文档资源,如果目前在找工作或者以后要跳槽考虑,可以搜索微信小程序“Java精选面试题”,内涵3000道初中高级面试题以及几千到选择题,选择题内涵答案解析,使用方式参考如下:
@Api(value = "hello")
@ApiOperation:用在方法上,说明方法的作用,Url资源的定义,使用方式参考如下:
@ApiOperation(value = "获取公众号详细描述信息", notes = "根据公众号名称获取详细描述信息")
@ApiImplicitParams : 用在方法上包含一组参数说明。
@ApiImplicitParam:用来注解来给方法入参增加说明。使用方式参考如下:
@ApiImplicitParam(name = "name", value = "公众号名称", required = true, dataType = "String", paramType = "path")
name:参数名
dataType:参数类型
required:参数是否必须传
value:说明参数的意思
defaultValue:参数的默认值
paramType:表示参数放在什么位置
paramType参数值包含如下:
header->请求参数的获取:@RequestHeader(代码中接收注解)
query->请求参数的获取:@RequestParam(代码中接收注解)
path(用于restful接口)–>请求参数的获取:@PathVariable(代码中接收注解)
body->请求参数的获取:@RequestBody(代码中接收注解)
form->(不常用)
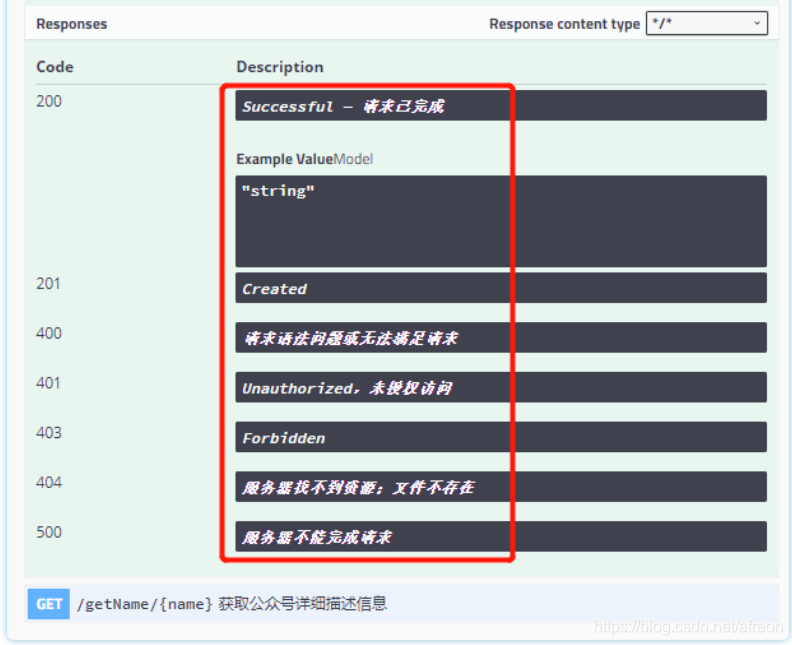
@ApiResponses:用于方法上,表示一组响应。
@ApiResponse:在@ApiResponses注解内,一般用于表达一个错误的响应信息,使用方式参考如下:
@ApiResponses(value = {@ApiResponse(code = 200, message = "Successful — 请求已完成"),@ApiResponse(code = 400, message = "请求语法问题或无法满足请求"),@ApiResponse(code = 401, message = "Unauthorized,未授权访问"),@ApiResponse(code = 404, message = "服务器找不到资源;文件不存在"),@ApiResponse(code = 500, message = "服务器不能完成请求")})
code->数字,提示状态码400
message->信息
response->抛出异常的类
@ApiModel:用于类,描述一个Model的信息,一般用在请求参数无法使用,表示对类进行说明,用于参数用实体类接收。
@ApiModelProperty:用于方法,描述一个model的属性,表示对model属性的说明或者数据操作更改。
本文篇文章的项目源码(springboot-study-demo07)地址:
Spring Boot从入门到精通(十一)集成Swagger框架,实现自动生成接口文档的更多相关文章
- Spring集成Swagger,Java自动生成Api文档
博主很懒... Swagger官网:http://swagger.io GitHub地址:https://github.com/swagger-api 官方注解文档:http://docs.swagg ...
- Spring Boot(九)Swagger2自动生成接口文档和Mock模拟数据
一.简介 在当下这个前后端分离的技术趋势下,前端工程师过度依赖后端工程师的接口和数据,给开发带来了两大问题: 问题一.后端接口查看难:要怎么调用?参数怎么传递?有几个参数?参数都代表什么含义? 问题二 ...
- Spring Boot Swagger2自动生成接口文档
一.简介 在当下这个前后端分离的技术趋势下,前端工程师过度依赖后端工程师的接口和数据,给开发带来了两大问题: 1.问题一.后端接口查看难:要怎么调用?参数怎么传递?有几个参数?参数都代表什么含义? 2 ...
- spring boot 中使用swagger 来自动生成接口文档
1.依赖包 <dependency> <groupId>io.springfox</groupId> <artifactId>springfox-swa ...
- SpringMVC集成springfox-swagger2自动生成接口文档
本节内容: 什么是Swaggger Springfox与Swagger的关系 SpringMVC集成springfox-swagger2 一.什么是Swaggger Swagger是一个流行的API开 ...
- Spring Boot 项目实战(三)集成 Swagger 及 JavaMelody
一.前言 上篇介绍了 Logback 的集成过程,总体已经达到了基本可用的项目结构.本篇主要介绍两个常用工具,接口文档工具 Swagger .项目监控工具 JavaMelody 的集成步骤. 二.Sw ...
- Spring Boot从入门到精通(六)集成Redis实现缓存机制
Redis(Remote Dictionary Server ),即远程字典服务,是一个开源的使用ANSI C语言编写.支持网络.可基于内存亦可持久化的日志型.Key-Value数据库,并提供多种语言 ...
- Spring Boot从入门到精通(七)集成Redis实现Session共享
单点登录(SSO)是指在多个应用系统中,登录用户只需要登录验证一次就可以访问所有相互信任的应用系统,Redis Session共享是实现单点登录的一种方式.本文是通过Spring Boot框架集成Re ...
- Spring Boot从入门到精通(五)多数据源配置实现及源码分析
多数据源配置在项目软件中是比较常见的开发需求,Spring和Spring Boot中对此都有相应的解决方案可供大家参考.在Spring Boot中,如MyBatis.JdbcTemplate以及Jpa ...
随机推荐
- Web端在线实时聊天,基于WebSocket(前后端分离)
这是一个简易的Demo,已经实现了基础的功能 之前一直想实现一个实时聊天的系统,一直没有去实践他.有一天吃饭的时候扫码点菜,几个人点菜能够实时更新,当时就在想,这应该是同一种技术. 刚好前段时间项目上 ...
- CosId 1.0.0 发布,通用、灵活、高性能的分布式 ID 生成器
CosId 通用.灵活.高性能的分布式 ID 生成器 介绍 CosId 旨在提供通用.灵活.高性能的分布式系统 ID 生成器. 目前提供了俩大类 ID 生成器:SnowflakeId (单机 TPS ...
- C#进阶学习4--反射(Reflection)
一.反射的定义 审查元数据并收集关于它的类型信息的能力. 二.基础概念 (1)Assembly:定义和加载程序集,加载在程序集中的所有模块以及从此程序集中查找类型并创建该类型的实例. (2)Modul ...
- Go基础语法0x01-数组
数组 1.Go数组简介 数组是Go语言编程中最常用的数据结构之一.顾名思义,数组就是指一系列同一类型数据的集合.数组中包含的每个数据被称为数组元素(element),一个数组包含的元素个数被称为数组的 ...
- yoyogo v1.7.4 发布,支持 grpc v1.3.8 & etcd 3.5.0
YoyoGo (Go语言框架)一个简单.轻量.快速.基于依赖注入的微服务框架( web .grpc ),支持Nacos/Consoul/Etcd/Eureka/k8s /Apollo等 . https ...
- 1.3.6、通过Path匹配
server: port: 8080 spring: application: name: gateway cloud: gateway: routes: - id: guo-system4 uri: ...
- 重学Docker
转了云方向,代码都少写了 1. 为什么出现Docker 以前开发项目有开发的环境.测试的环境.还有生产的环境,每经过一阶段就要迁移项目.不同的环境有不同的配置,可能导致不可预估的错误,运维要经常性的改 ...
- Codeforces Round #707 Editorial Div2 题解
CF1501 Div2 题解 CF1501A 这道题其实是一道英语阅读题,然后样例解释又不清晰,所以我看了好久,首先它告诉了你每个站点的预期到达时间 \(a_i\) ,以及每个站点的预期出发时间 \( ...
- C语言不明白
C语言查看多字节变量中每单个字节数据的方法代码: #include<stdio.h> void main() { int a=0x21109225;char* pAddress=(char ...
- DEV C++自定义函数顺序与printf用法
#include <stdio.h> //int gys(int a,int b);//函数声明 int main() { int a = 520; int c1=98; int c2=5 ...