掌握Spring条件装配的秘密武器
本文分享自华为云社区《Spring高手之路9——掌握Spring条件装配的秘密武器》,作者:砖业洋__。
在Spring框架中,条件装配是一个强大的功能,可以帮助我们更好地管理和控制Bean的创建过程。本文详细解释了如何使用Spring的@Profile和@Conditional注解实现条件装配,通过具体的示例可以更好地理解这两个注解的用法和适用场景。深入研究这些注解,可以帮助提升Spring应用开发的技能,更好地掌握Spring框架。
1. 条件装配
1.1 理解条件装配及其在Spring中的重要角色
在Spring框架中,条件装配(Conditional Configuration)是一个非常重要的特性,它允许开发者根据满足的条件,动态地进行Bean的注册或是创建。这样就可以根据不同的环境或配置,创建不同的Bean实例,这一特性对于创建可配置和模块化的应用是非常有用的。
Spring提供了一系列的注解来实现条件装配,包括:
@Profile:这是
Spring的注解,这个注解表示只有当特定的Profile被激活时,才创建带有该注解的Bean,我们可以在应用的配置文件中设置激活的Profile。@Conditional:这是
Spring的注解,它接受一个或多个Condition类,这些类需要实现Condition接口,并重写其matches方法。只有当所有Condition类的matches方法都返回true时,带有@Conditional注解的Bean才会被创建。
以下的注解是 Spring Boot 提供的,主要用于自动配置功能:
@ConditionalOnProperty:这个注解表示只有当一个或多个给定的属性有特定的值时,才创建带有该注解的
Bean。@ConditionalOnClass 和 @ConditionalOnMissingClass:这两个注解表示只有当
Classpath中有(或没有)特定的类时,才创建带有该注解的Bean。@ConditionalOnBean 和 @ConditionalOnMissingBean:这两个注解表示只有当
Spring ApplicationContext中有(或没有)特定的Bean时,才创建带有该注解的Bean。
通过组合这些注解,开发者可以实现复杂的条件装配逻辑,灵活地控制Spring应用的配置和行为。
2. @Profile
在 Spring 中,Profile 用于解决在不同环境下对不同配置的需求,它可以按照特定环境的要求来装配应用程序。例如我们可能有一套配置用于开发环境,另一套配置用于生产环境,就可以使用Profile,它可以在运行时决定哪个环境是活动的,进而决定注册哪些bean。
2.1 基于 @Profile 的实际应用场景
举个例子,我们可能需要使用不同的数据库或不同的服务端点。
这里我们可以以数据库配置为例。在开发环境、测试环境和生产环境中数据库可能是不同的,我们可以通过 @Profile 注解来分别配置这些环境的数据库。
@Configuration

public class DataSourceConfiguration {

    @Value("${spring.datasource.username}")

    private String username;

    @Value("${spring.datasource.password}")

    private String password;

    @Value("${spring.datasource.url}")

    private String url;

    @Bean

    @Profile("dev")

    public DataSource devDataSource() {

        return DataSourceBuilder.create()

                .username(username)

                .password(password)

                .url(url + "?useSSL=false&serverTimezone=Asia/Shanghai")

                .driverClassName("com.mysql.cj.jdbc.Driver")

                .build();

    }

    @Bean

    @Profile("test")

    public DataSource testDataSource() {

        return DataSourceBuilder.create()

                .username(username)

                .password(password)

                .url(url + "?useSSL=false&serverTimezone=Asia/Shanghai")

                .driverClassName("com.mysql.cj.jdbc.Driver")

                .build();

    }

    @Bean

    @Profile("prod")

    public DataSource prodDataSource() {

        return DataSourceBuilder.create()

                .username(username)

                .password(password)

                .url(url + "?useSSL=true&serverTimezone=Asia/Shanghai")

                .driverClassName("com.mysql.cj.jdbc.Driver")

                .build();

    }

}
实际开发中不同的环境有不同的Apollo配置,Apollo上写有数据库连接配置,生产和测试的代码不需要多个Bean,只需要加载不同的Apollo配置建立数据库连接即可。
Apollo是由携程框架部门开源的一款分布式配置中心,它能够集中化管理应用程序的配置信息。Apollo的主要目标是使应用程序可以在运行时动态调整其配置,而无需重新部署。Apollo和Spring的Profile解决的是同一个问题——如何管理不同环境的配置,但Apollo提供了更强大的功能,特别是在大规模和复杂的分布式系统中。另外,Apollo还支持配置的版本控制、审计日志、权限管理等功能,为配置管理提供了全面的解决方案。
2.2 理解 @Profile 的工作原理和用途
我们来用图书馆开放时间例子,并且使用 Spring Profiles 来控制开放时间的配置。
全部代码如下:
首先,我们需要一个表示开放时间的类 LibraryOpeningHours:
package com.example.demo.bean;

public class LibraryOpeningHours {

    private final String openTime;

    private final String closeTime;

    public LibraryOpeningHours(String openTime, String closeTime) {

        this.openTime = openTime;

        this.closeTime = closeTime;

    }

    @Override

    public String toString() {

        return "LibraryOpeningHours{" +

                "openTime='" + openTime + '\'' +

                ", closeTime='" + closeTime + '\'' +

                '}';

    }

}
然后,我们需要一个 Library 类来持有这个开放时间:
package com.example.demo.bean;

public class Library {

    private final LibraryOpeningHours openingHours;

    public Library(LibraryOpeningHours openingHours) {

        this.openingHours = openingHours;

    }

    public void displayOpeningHours() {

        System.out.println("Library opening hours: " + openingHours);

    }

}
接着,我们需要定义两个不同的配置,分别表示工作日和周末的开放时间:
package com.example.demo.configuration;

import com.example.demo.bean.Library;

import com.example.demo.bean.LibraryOpeningHours;

import org.springframework.context.annotation.Bean;

import org.springframework.context.annotation.Configuration;

import org.springframework.context.annotation.Profile;

@Configuration

@Profile("weekday")

public class WeekdayLibraryConfiguration {

    @Bean

    public LibraryOpeningHours weekdayOpeningHours() {

        return new LibraryOpeningHours("8:00 AM", "6:00 PM");

    }

    @Bean

    public Library library(LibraryOpeningHours openingHours) {

        return new Library(openingHours);

    }

}
工作日开放时间是早上8点晚上6点。
package com.example.demo.configuration;

import com.example.demo.bean.Library;

import com.example.demo.bean.LibraryOpeningHours;

import org.springframework.context.annotation.Bean;

import org.springframework.context.annotation.Configuration;

import org.springframework.context.annotation.Profile;

@Configuration

@Profile("weekend")

public class WeekendLibraryConfiguration {

    @Bean

    public LibraryOpeningHours weekendOpeningHours() {

        return new LibraryOpeningHours("10:00 AM", "4:00 PM");

    }

    @Bean

    public Library library(LibraryOpeningHours openingHours) {

        return new Library(openingHours);

    }

}
周末开放时间是早上10点,下午4点。
最后我们在主程序中运行,并通过选择不同的 Profile 来改变图书馆的开放时间:
package com.example.demo.application;

import com.example.demo.bean.Library;

import com.example.demo.configuration.WeekdayLibraryConfiguration;

import com.example.demo.configuration.WeekendLibraryConfiguration;

import org.springframework.context.annotation.AnnotationConfigApplicationContext;

public class DemoApplication {

    public static void main(String[] args) {

        AnnotationConfigApplicationContext context = new AnnotationConfigApplicationContext();

        context.getEnvironment().setActiveProfiles("weekday");

        context.register(WeekdayLibraryConfiguration.class, WeekendLibraryConfiguration.class);

        context.refresh();

        Library library = context.getBean(Library.class);

        library.displayOpeningHours();

    }

}
这里有小伙伴可能会疑问了,为什么setActiveProfiles之后还要有register和refresh方法?
setActiveProfiles方法用于指定哪些Profile处于活动状态,而仅仅设置活动的Profile并不会触发Spring容器去实例化相应的bean。
register方法是将配置类注册到Spring的应用上下文中,它并不会立即创建配置类中声明的bean,这些bean的创建过程是在上下文的refresh阶段中进行的。在这个阶段,Spring容器会读取所有的配置类,并对配置类中使用了@Bean注解的方法进行解析,然后才会创建并初始化这些bean。
所以,如果在调用refresh方法之前就尝试去获取配置类中的某个bean,就会找不到,因为那个bean可能还没有被创建。只有在上下文被刷新(也就是调用了refresh方法)之后,所有的bean才会被创建并注册到Spring容器中,然后才能通过上下文获取到这些bean。
运行结果:
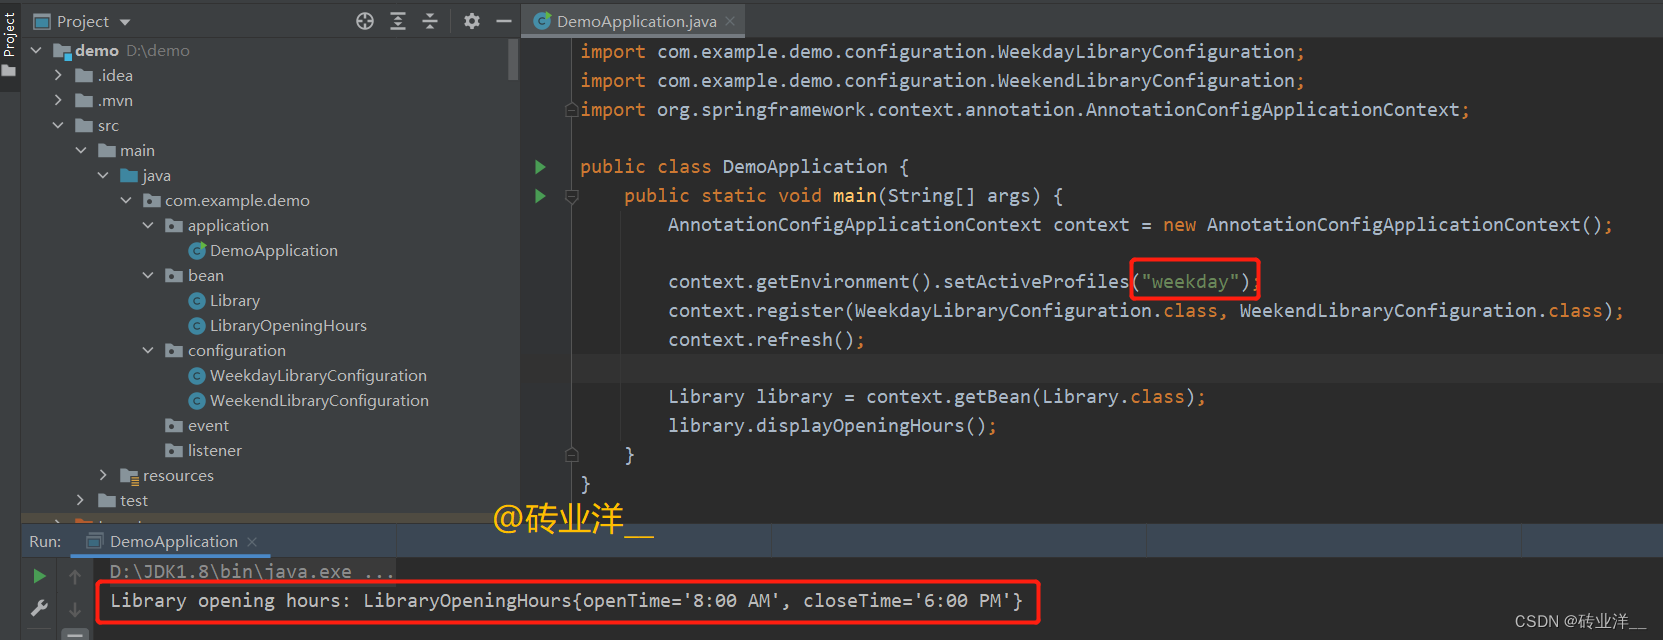
如果我们选择 "weekday" Profile,图书馆的开放时间就会是工作日的时间;如果我们选择 "weekend" Profile,图书馆的开放时间就会是周末的时间。
注意:register方法、@Component、@Bean、@Import都是注册Bean到Spring容器的方式,它们有不同的适用场景和工作方式:
register方法:这个方法用于将一个或多个配置类(即标注了
@Configuration注解的类)注册到Spring的ApplicationContext中。这个过程是将配置类的元信息添加到上下文中,但并不会立即实例化Bean。实际的Bean实例化过程会在ApplicationContext刷新时(即调用refresh方法时)发生,而且这个过程可能受到如@Profile,@Conditional等条件装配注解的影响。@Component:这是一个通用性的注解,可以用来标记任何类作为
Spring组件。如果一个被@Component注解的类在Spring的组件扫描路径下,那么Spring会自动创建这个类的Bean并添加到容器中。@Bean:这个注解通常用在配置类中的方法上。被
@Bean注解的方法表示了如何实例化、配置和初始化一个新的Bean对象。Spring IoC容器将会负责在适当的时候(在ApplicationContext刷新阶段)调用这些方法,创建Bean实例。@Import:这个注解用于在一个配置类中导入其他的配置类。通过使用这个注解,我们可以将
Bean的定义分散到多个配置类中,以实现更好的模块化和组织。
在Spring框架中,以上的这些方法和注解共同工作,提供了强大的依赖注入和管理能力,支持我们创建复杂的、模块化的应用。
在Spring框架中,refresh方法被用来启动Spring应用上下文的生命周期,它主导了ApplicationContext中Bean的解析、创建和初始化过程。以下是refresh方法在实际操作中的主要步骤:
读取所有已注册的配置类:
refresh方法首先会扫描ApplicationContext中所有已经注册的配置类(通常是标注了@Configuration注解的类)。它会寻找这些配置类中所有被@Bean注解标记的方法。解析
@Bean方法:对于每一个@Bean方法,Spring会根据方法的签名、返回类型、以及可能的其他注解(例如@Scope、@Lazy、@Profile等)来决定如何创建和配置对应的Bean。Bean的创建和依赖注入:基于解析得到的信息,Spring IoC容器会按需创建Bean的实例。在实例化Bean后,Spring还会处理这个Bean的依赖关系,即它会自动将这个Bean所依赖的其他Bean注入到它的属性或构造函数参数中。初始化:如果
Bean实现了InitializingBean接口或者定义了@PostConstruct注解的方法,那么在所有依赖注入完成后,Spring会调用这些初始化方法。
因此,在调用refresh方法之后,我们可以确信所有在配置类中定义的Bean都已经被正确地解析、创建、并注册到了Spring的ApplicationContext中。这包括了Bean的实例化、依赖注入,以及可能的初始化过程。
上面这些步骤不一定顺序执行,实际上,Spring的IoC容器在处理这些步骤时,可能会进行一些优化和调整。具体的处理顺序可能会受到以下因素的影响:
Bean的依赖关系:如果一个
Bean A依赖于另一个Bean B,那么Spring需要先创建和初始化Bean B,然后才能创建Bean A。这可能会导致Bean的创建顺序与它们在配置类中定义的顺序不同。Bean的生命周期和作用域:例如,如果一个
Bean是单例的(默认的作用域),那么它通常会在容器启动时就被创建。但如果它是原型的,那么它只有在被需要时才会被创建。条件注解:像
@Profile和@Conditional这样的条件注解也可能影响Bean的创建。如果条件未满足,对应的Bean将不会被创建。
虽然在一般情况下,Spring确实会按照"读取配置类——解析@Bean方法——创建Bean——依赖注入——初始化"这样的步骤来处理Bean的生命周期,但具体的处理过程可能会受到上面提到的各种因素的影响。
请记住这个图书馆开放时间例子,后面有不少举例围绕这个例子展开。
2.3 为什么要有@Profile,application不是有各种环境的配置文件吗?
application-dev.yml、application-test.yml和 application-prod.yml 这些配置文件可以用于在不同环境下指定不同的配置参数,比如数据库连接字符串、服务地址等等。
相比于application配置文件,@Profile 注解在 Spring 应用中提供了更高级别的环境差异控制,它可以控制整个 Bean 或者配置类,而不仅仅是配置参数。有了 @Profile,我们可以让整个 Bean 或配置类只在特定环境下生效,这意味着我们可以根据环境使用完全不同的 Bean 实现或者不同的配置方式。
举一个例子,考虑一个邮件服务,我们可能在开发环境中使用一个模拟的邮件服务,只是简单地把邮件内容打印出来,而在生产环境中我们可能需要使用一个实际的邮件服务。我们可以创建两个 Bean,一个用 @Profile("dev") 注解,一个用 @Profile("prod") 注解。这样,我们就可以在不改动其它代码的情况下,根据环境选择使用哪个邮件服务。
总的来说,application-{profile}.yml 文件和 @Profile 注解都是 Spring 提供的环境差异管理工具,它们分别用于管理配置参数和 Bean/配置类,根据应用的具体需求选择使用。
2.4 如何确定Spring中活动的Profile?
Spring可以通过多种方式来指定当前的活动Profile,优先级排序从高到低如下:
- ConfigurableEnvironment.setActiveProfiles
- JVM的-Dspring.profiles.active参数或环境变量SPRING_PROFILES_ACTIVE(仅Spring Boot可用)
- SpringApplicationBuilder.profiles(仅Spring Boot可用)
- SpringApplication.setDefaultProperties(仅Spring Boot可用)
- 配置文件属性spring.profiles.active
如果上面都有配置,那么优先级高的会覆盖优先级低的配置。
我们分别来看一下,这里都以2.1节的例子作为基础,只修改主程序,就不放其他重复代码了:
1.ConfigurableEnvironment.setActiveProfiles:
这个是Spring框架的API,所以不仅可以在Spring Boot中使用,也可以在原生Spring应用中使用,我们可以通过获取到的ApplicationContext环境设置活动的Profile。
package com.example.demo.application;

import com.example.demo.configuration.WeekdayLibraryConfiguration;

import org.springframework.context.annotation.AnnotationConfigApplicationContext;

public class DemoApplication {

    public static void main(String[] args) {

        AnnotationConfigApplicationContext context = new AnnotationConfigApplicationContext();

        context.getEnvironment().setActiveProfiles("weekday");

        context.register(WeekdayLibraryConfiguration.class);

        context.refresh();

        // 下面这行调试使用

        String[] beanDefinitionNames = context.getBeanDefinitionNames();

    }

}
运行结果:
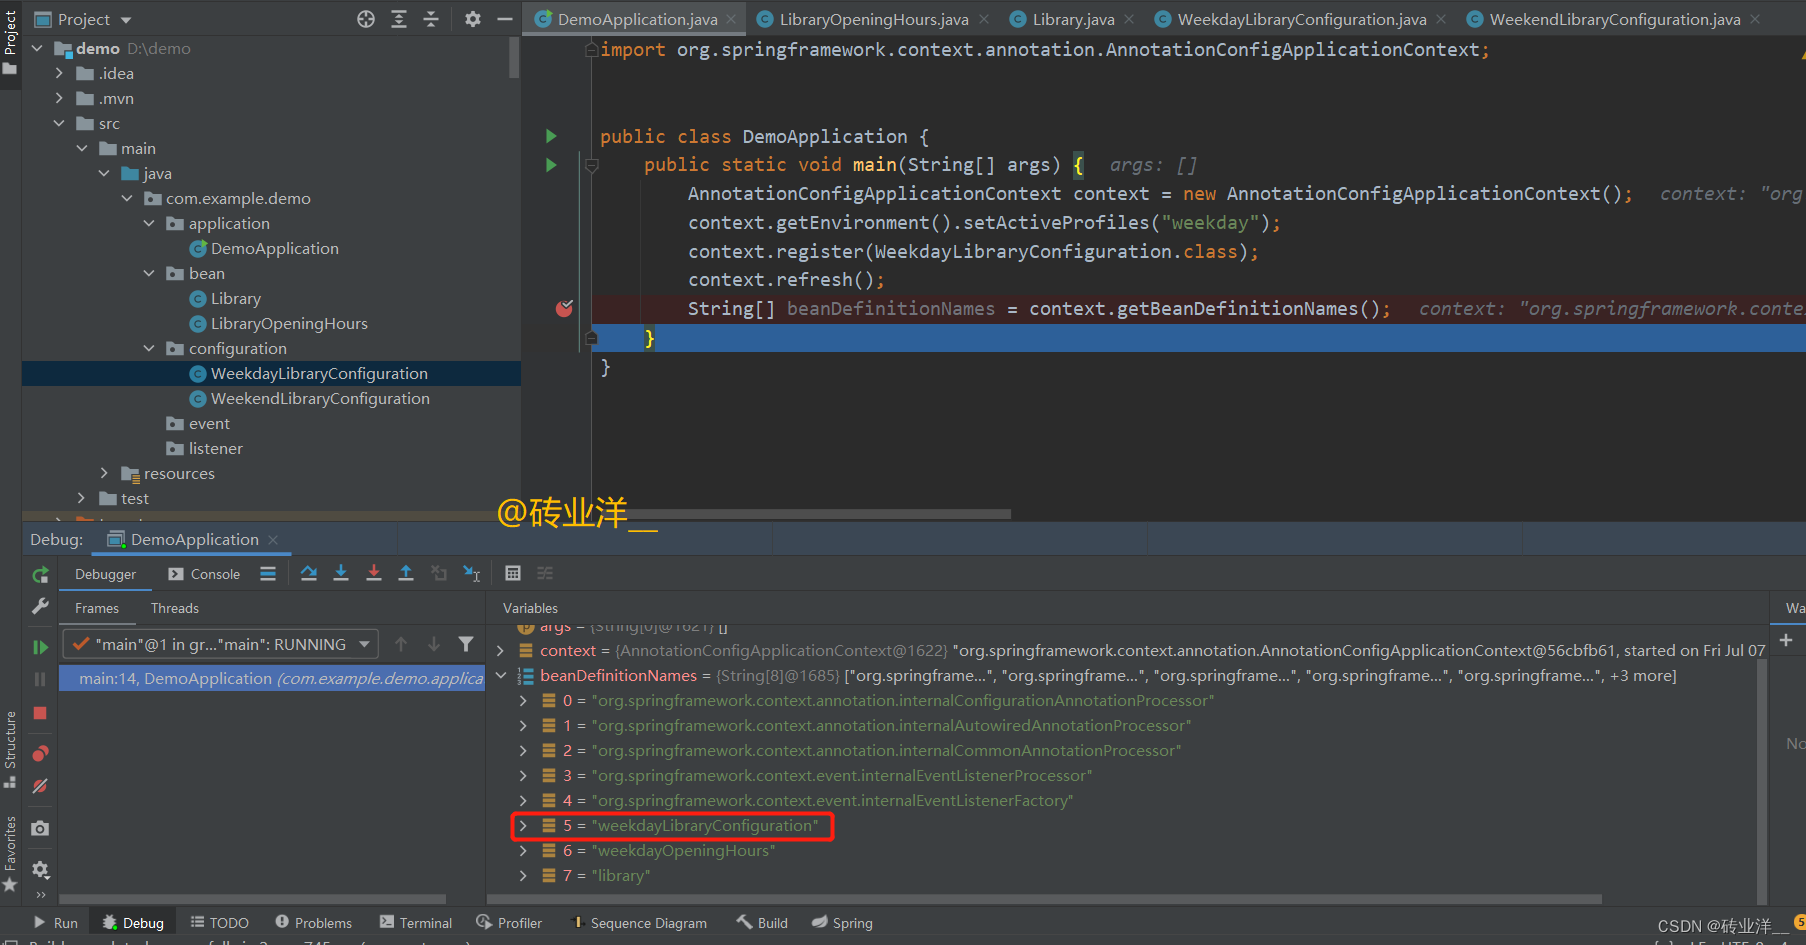
这里可以看到WeekdayLibraryConfiguration已经被创建,而WeekendLibraryConfiguration并没有创建。
2.JVM的-Dspring.profiles.active参数和环境变量SPRING_PROFILES_ACTIVE(仅Spring Boot可用)
这两个都是Spring Boot特性,在原生的Spring应用中并没有内置的支持,我们这里用Spring Boot的主程序演示
- 配置-Dspring.profiles.active参数
例如,在启动一个Spring Boot应用程序时,我们可以使用以下命令:
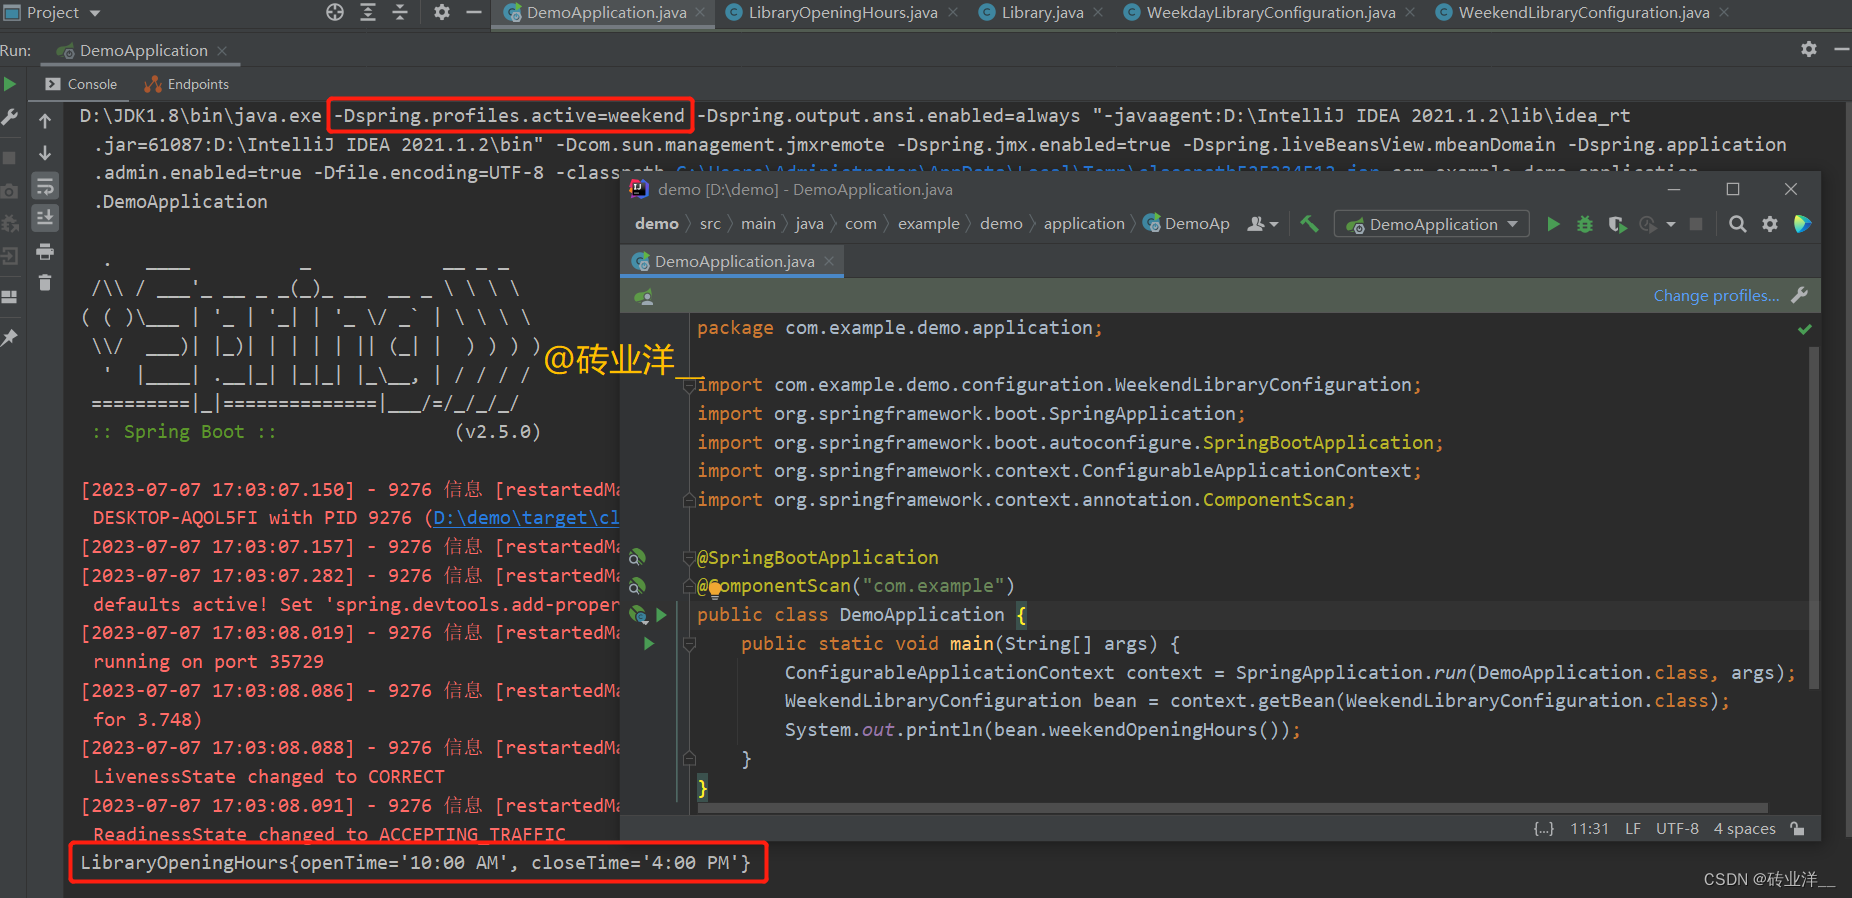
-Dspring.profiles.active=weekend
在这个例子中,-Dspring.profiles.active=weekend就是设置系统属性的部分,说明只有标记为@Profile("weekend")的Bean才会被创建和使用。
我们用上面2.1节的例子修改一下代码,设置一下系统属性
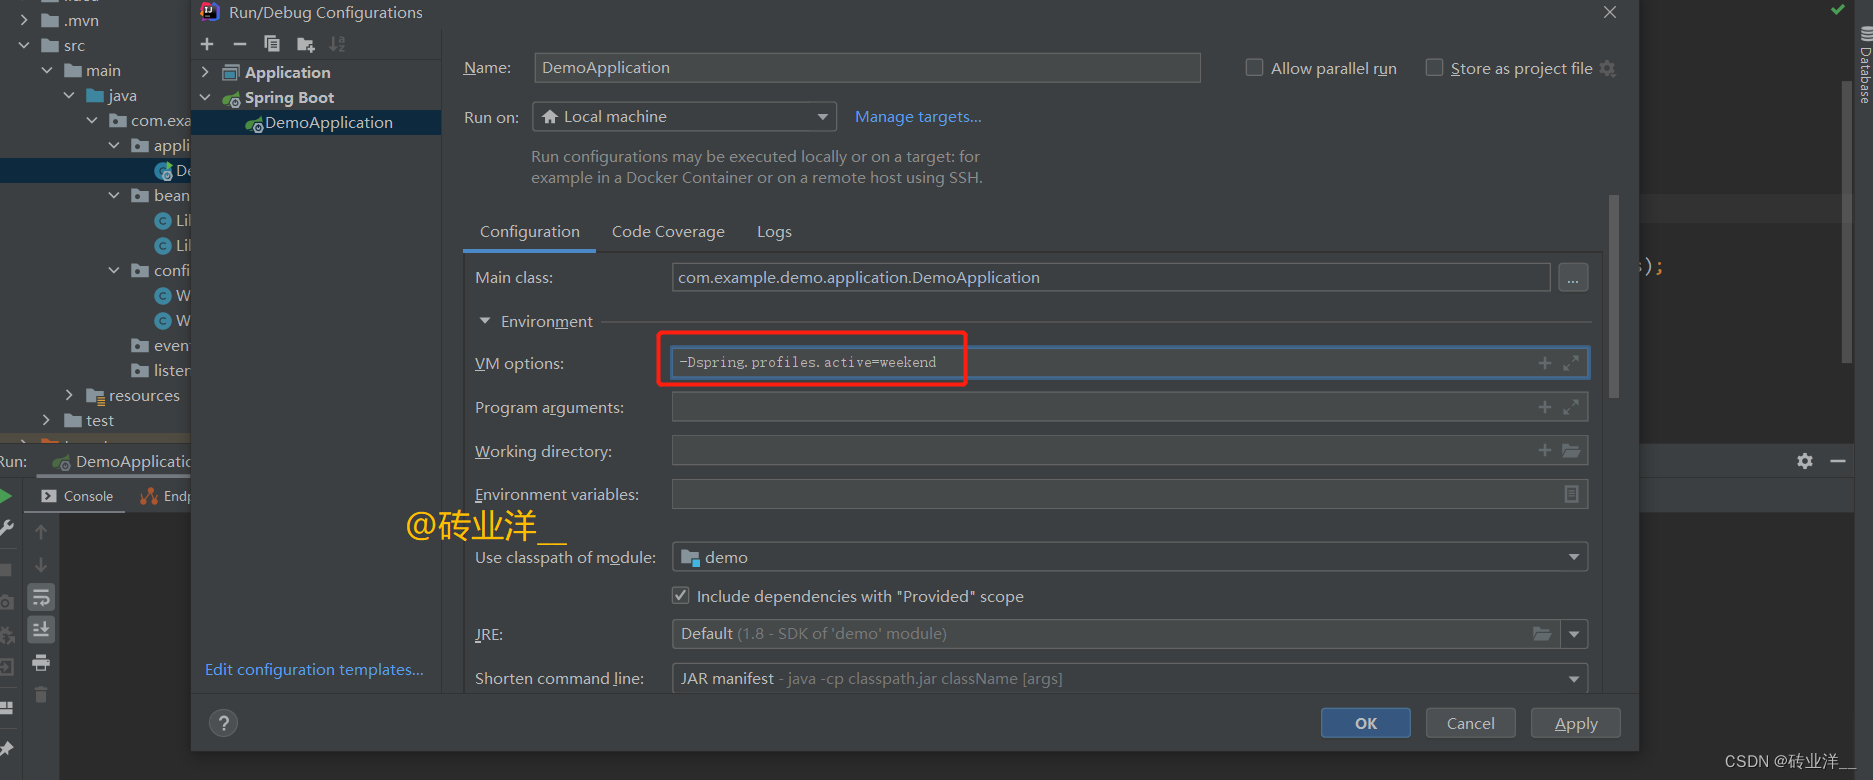
或者这么配置
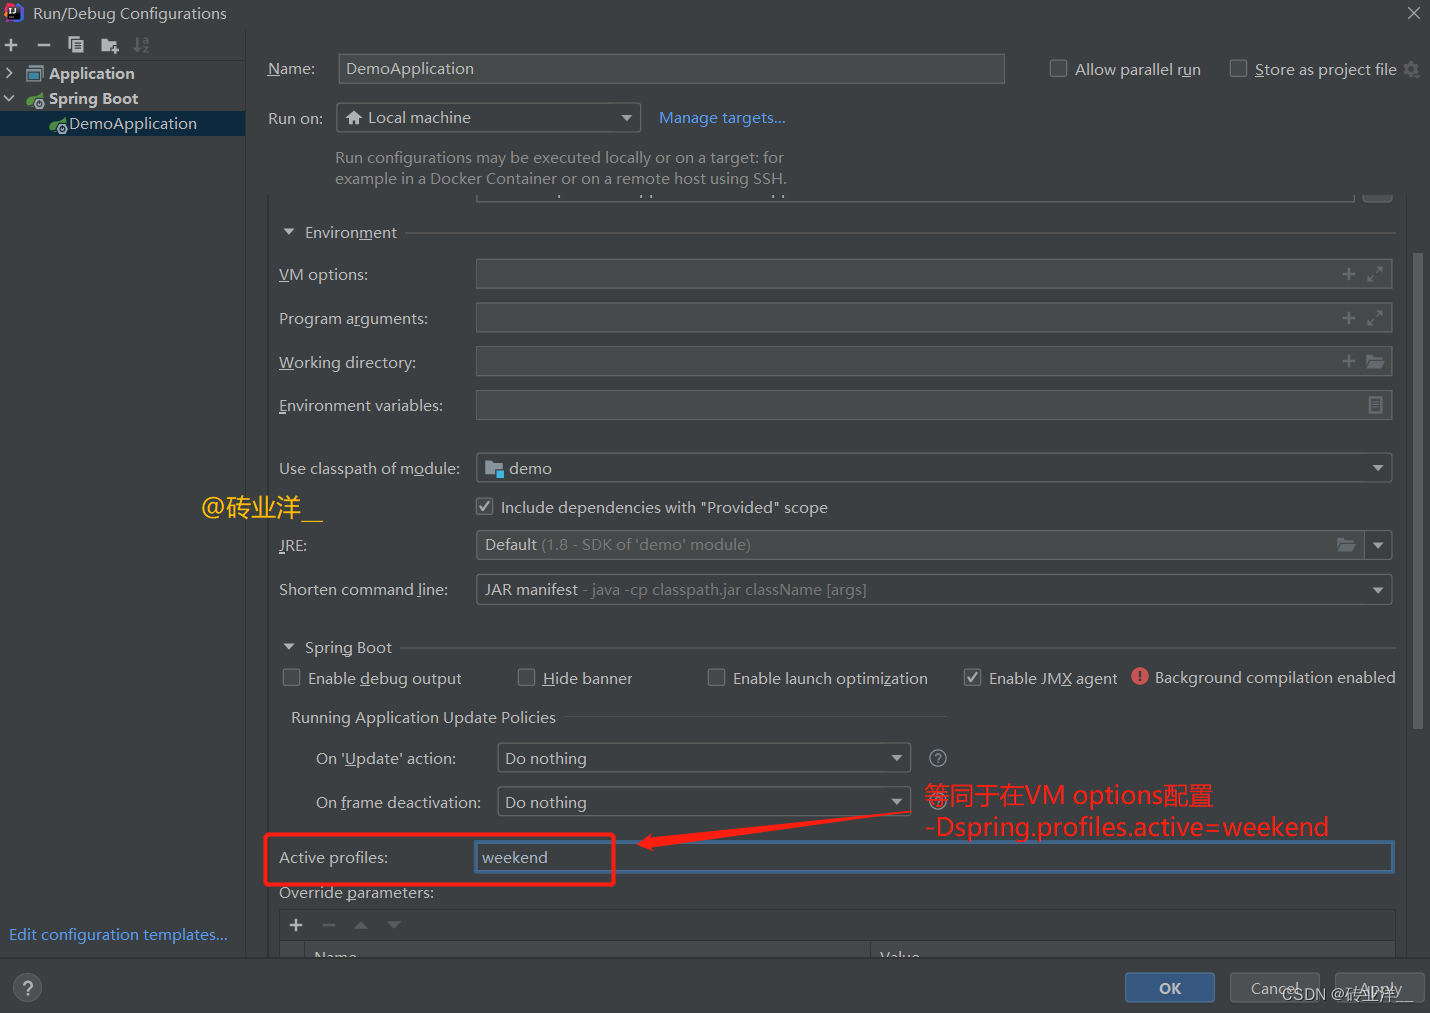
Spring Boot主程序:
package com.example.demo.application;

import com.example.demo.configuration.WeekendLibraryConfiguration;

import org.springframework.boot.SpringApplication;

import org.springframework.boot.autoconfigure.SpringBootApplication;

import org.springframework.context.ConfigurableApplicationContext;

import org.springframework.context.annotation.ComponentScan;

@SpringBootApplication

@ComponentScan("com.example")

public class DemoApplication {

    public static void main(String[] args) {

        ConfigurableApplicationContext context = SpringApplication.run(DemoApplication.class, args);

        WeekendLibraryConfiguration bean = context.getBean(WeekendLibraryConfiguration.class);

        System.out.println(bean.weekendOpeningHours());

    }

}
这里只有Profile为weekend的bean,而Profile为weekday的bean并没有创建,可以自行调试验证。
运行结果如下:
- 配置环境变量SPRING_PROFILES_ACTIVE
我们可以在操作系统的环境变量中设置SPRING_PROFILES_ACTIVE。
在Unix/Linux系统中,我们可以在启动应用程序之前,使用export命令来设置环境变量。例如:
export SPRING_PROFILES_ACTIVE=dev

java -jar myapp.jar
在Windows系统中,我们可以使用set命令来设置环境变量:
set SPRING_PROFILES_ACTIVE=dev

java -jar myapp.jar
3.SpringApplicationBuilder.profiles(仅Spring Boot可用)
package com.example.demo.application; import com.example.demo.configuration.WeekendLibraryConfiguration;
import org.springframework.boot.autoconfigure.SpringBootApplication;
import org.springframework.boot.builder.SpringApplicationBuilder;
import org.springframework.context.ConfigurableApplicationContext;
import org.springframework.context.annotation.ComponentScan; @SpringBootApplication
@ComponentScan("com.example")
public class DemoApplication {
public static void main(String[] args) {
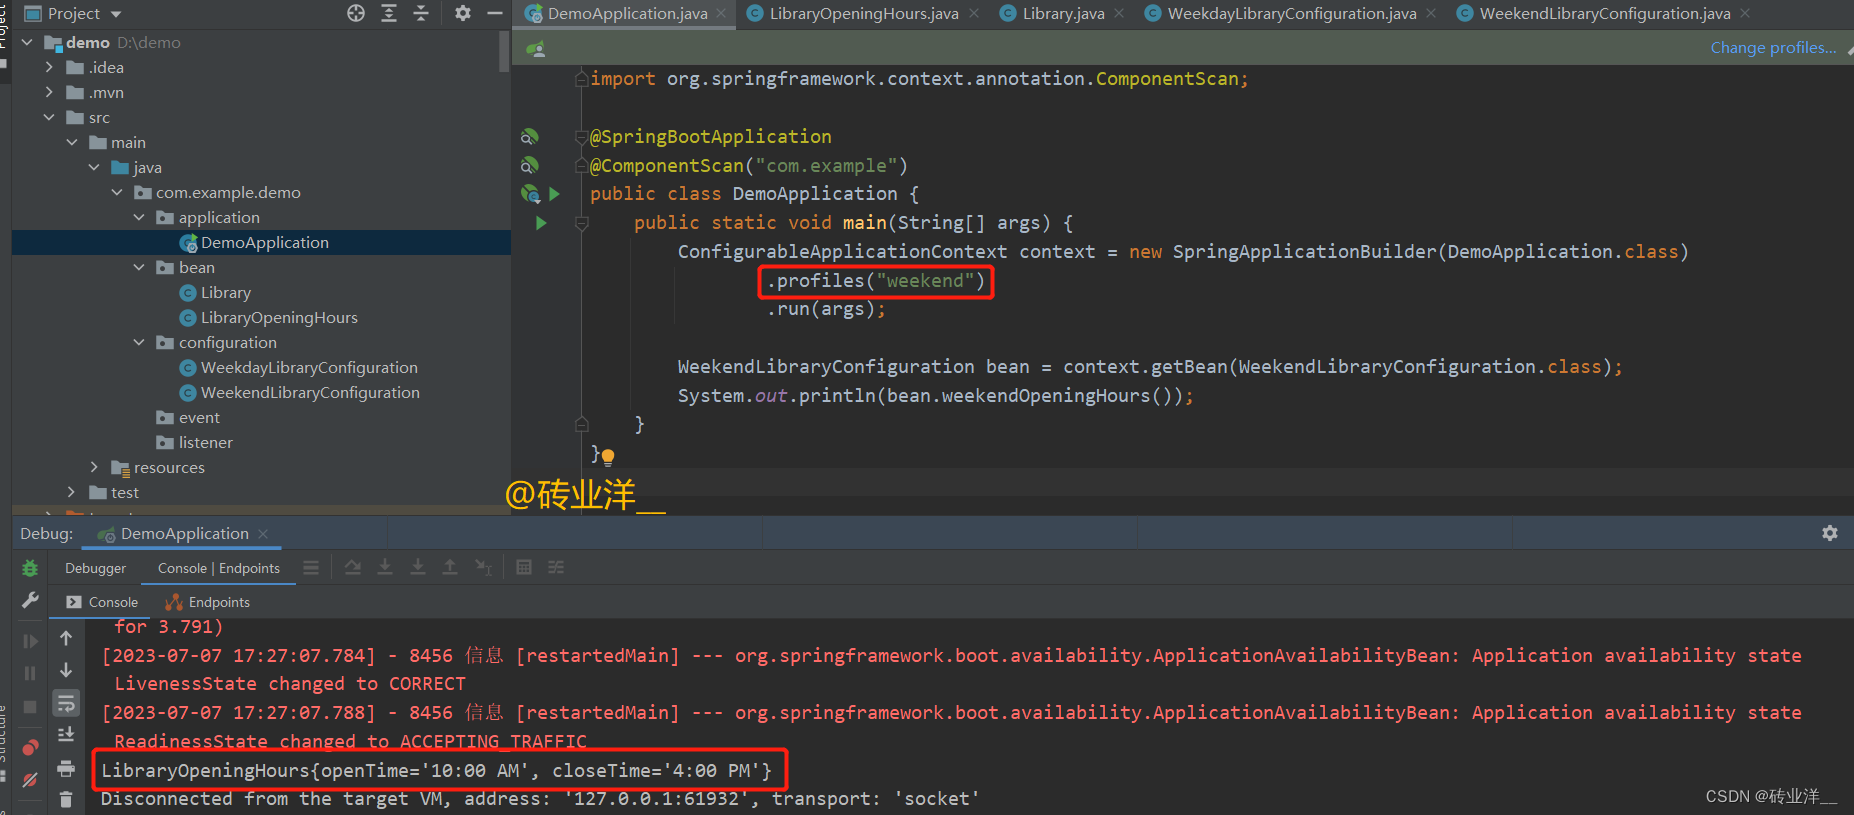
ConfigurableApplicationContext context = new SpringApplicationBuilder(DemoApplication.class)
.profiles("weekend")
.run(args); WeekendLibraryConfiguration bean = context.getBean(WeekendLibraryConfiguration.class);
System.out.println(bean.weekendOpeningHours());
}
}
运行结果:
4.SpringApplication.setDefaultProperties(仅Spring Boot可用)
SpringApplication.setDefaultProperties方法用于设置默认属性,它可以设置一系列的默认属性,其中就包括spring.profiles.active属性。当spring.profiles.active属性被设置后,Spring会将其视为当前的激活Profile。
主程序:
package com.example.demo.application;

import com.example.demo.configuration.WeekdayLibraryConfiguration;

import org.springframework.boot.SpringApplication;

import org.springframework.boot.autoconfigure.SpringBootApplication;

import org.springframework.context.ConfigurableApplicationContext;

import org.springframework.context.annotation.ComponentScan;

import javax.annotation.Resource;

import java.util.Properties;

@SpringBootApplication

@ComponentScan(basePackages = "com.example.demo")

public class DemoApplication {

    @Resource

    private WeekdayLibraryConfiguration weekdayLibraryConfiguration;

    public static void main(String[] args) {

        SpringApplication application = new SpringApplication(DemoApplication.class);

        Properties props = new Properties();

        props.put("spring.profiles.active", "weekday");

        application.setDefaultProperties(props);

        ConfigurableApplicationContext context = application.run(args);

        // 验证当前激活Profile

        String[] activeProfiles = context.getEnvironment().getActiveProfiles();

        for (String profile : activeProfiles) {

            System.out.println("当前活动Profile:" + profile);

        }

    }

}
运行结果:

5.配置文件属性spring.profiles.active配置文件
在application.properties或application.yml文件中,我们可以设置spring.profiles.active属性。
例如,在application.properties文件中,我们可以添加以下行:
spring.profiles.active=weekday
在application.yml文件中,我们可以添加以下内容:
spring:

  profiles:

    active: weekday
3. @Conditional
3.1 @Conditional注解及其用途
@Conditional是Spring 4.0中引入的一个核心注解,用于将Bean的创建与特定条件相关联。这种特性在Spring Boot中被大量使用,以便在满足特定条件时创建和装配Bean。
@Conditional注解接受一个或多个实现了Condition接口的类作为参数。Condition接口只有一个名为matches的方法,该方法需要返回一个布尔值以指示条件是否满足。如果matches方法返回true,则Spring会创建和装配标记为@Conditional的Bean;如果返回false,则不会创建和装配这个Bean。
@Conditional注解的应用非常灵活。它可以用于标记直接或间接使用@Component注解的类,包括但不限于@Configuration类。此外,它还可以用于标记@Bean方法,或者作为元注解组成自定义注解。
如果一个@Configuration类被@Conditional注解标记,那么与该类关联的所有@Bean方法,以及任何@Import和@ComponentScan注解,也都会受到相同的条件限制。这就意味着,只有当@Conditional的条件满足时,这些方法和注解才会被处理。
总的来说,@Conditional提供了一种强大的机制,可以用于基于特定条件来控制Bean的创建和装配。通过使用它,我们可以更灵活地控制Spring应用的配置,以便适应各种不同的运行环境和需求。
3.2 使用@Conditional实现条件装配
假设我们有一个图书馆应用程序,其中有两个类,Librarian和Library,我们希望只有当 Librarian 类存在时,Library 才被创建。这个时候@Profile就无法实现了,因为@Profile 无法检查其他 bean 是否存在。
全部代码如下:
首先,我们创建Librarian类:
package com.example.demo.bean;

public class Librarian {

}
创建Library类
package com.example.demo.bean;

public class Library {

    // Library class

    private final String libraryName;

    public Library(String libraryName) {

        this.libraryName = libraryName;

    }

    public void showLibraryName() {

        System.out.println("Library name: " + libraryName);

    }

}
接下来,我们创建一个条件类来检查Librarian的bean定义是否存在:
package com.example.demo.condition;

import org.springframework.context.annotation.Condition;

import org.springframework.context.annotation.ConditionContext;

import org.springframework.core.type.AnnotatedTypeMetadata;

public class LibrarianCondition implements Condition {

    @Override

    public boolean matches(ConditionContext context, AnnotatedTypeMetadata metadata) {

        return context.getBeanFactory().containsBeanDefinition("librarian");

    }

}
这里定义了一个名为LibrarianCondition的条件类,实现了Condition接口并重写了matches方法。在matches方法中,检查了Spring应用上下文中是否存在名为"librarian"的Bean定义。
然后,我们需要创建一个配置类,该配置类定义了一个条件,只有当Librarian bean存在时,Library bean才会被创建:
package com.example.demo.configuration; import com.example.demo.bean.Librarian;
import com.example.demo.bean.Library;
import com.example.demo.condition.LibrarianCondition;
import org.springframework.context.annotation.Bean;
import org.springframework.context.annotation.Conditional;
import org.springframework.context.annotation.Configuration; @Configuration
public class LibraryConfiguration { /**
* 通过注释或取消注释librarian方法,来改变Librarian bean的存在状态,从而观察对Library bean创建的影响。
*
* @return
*/
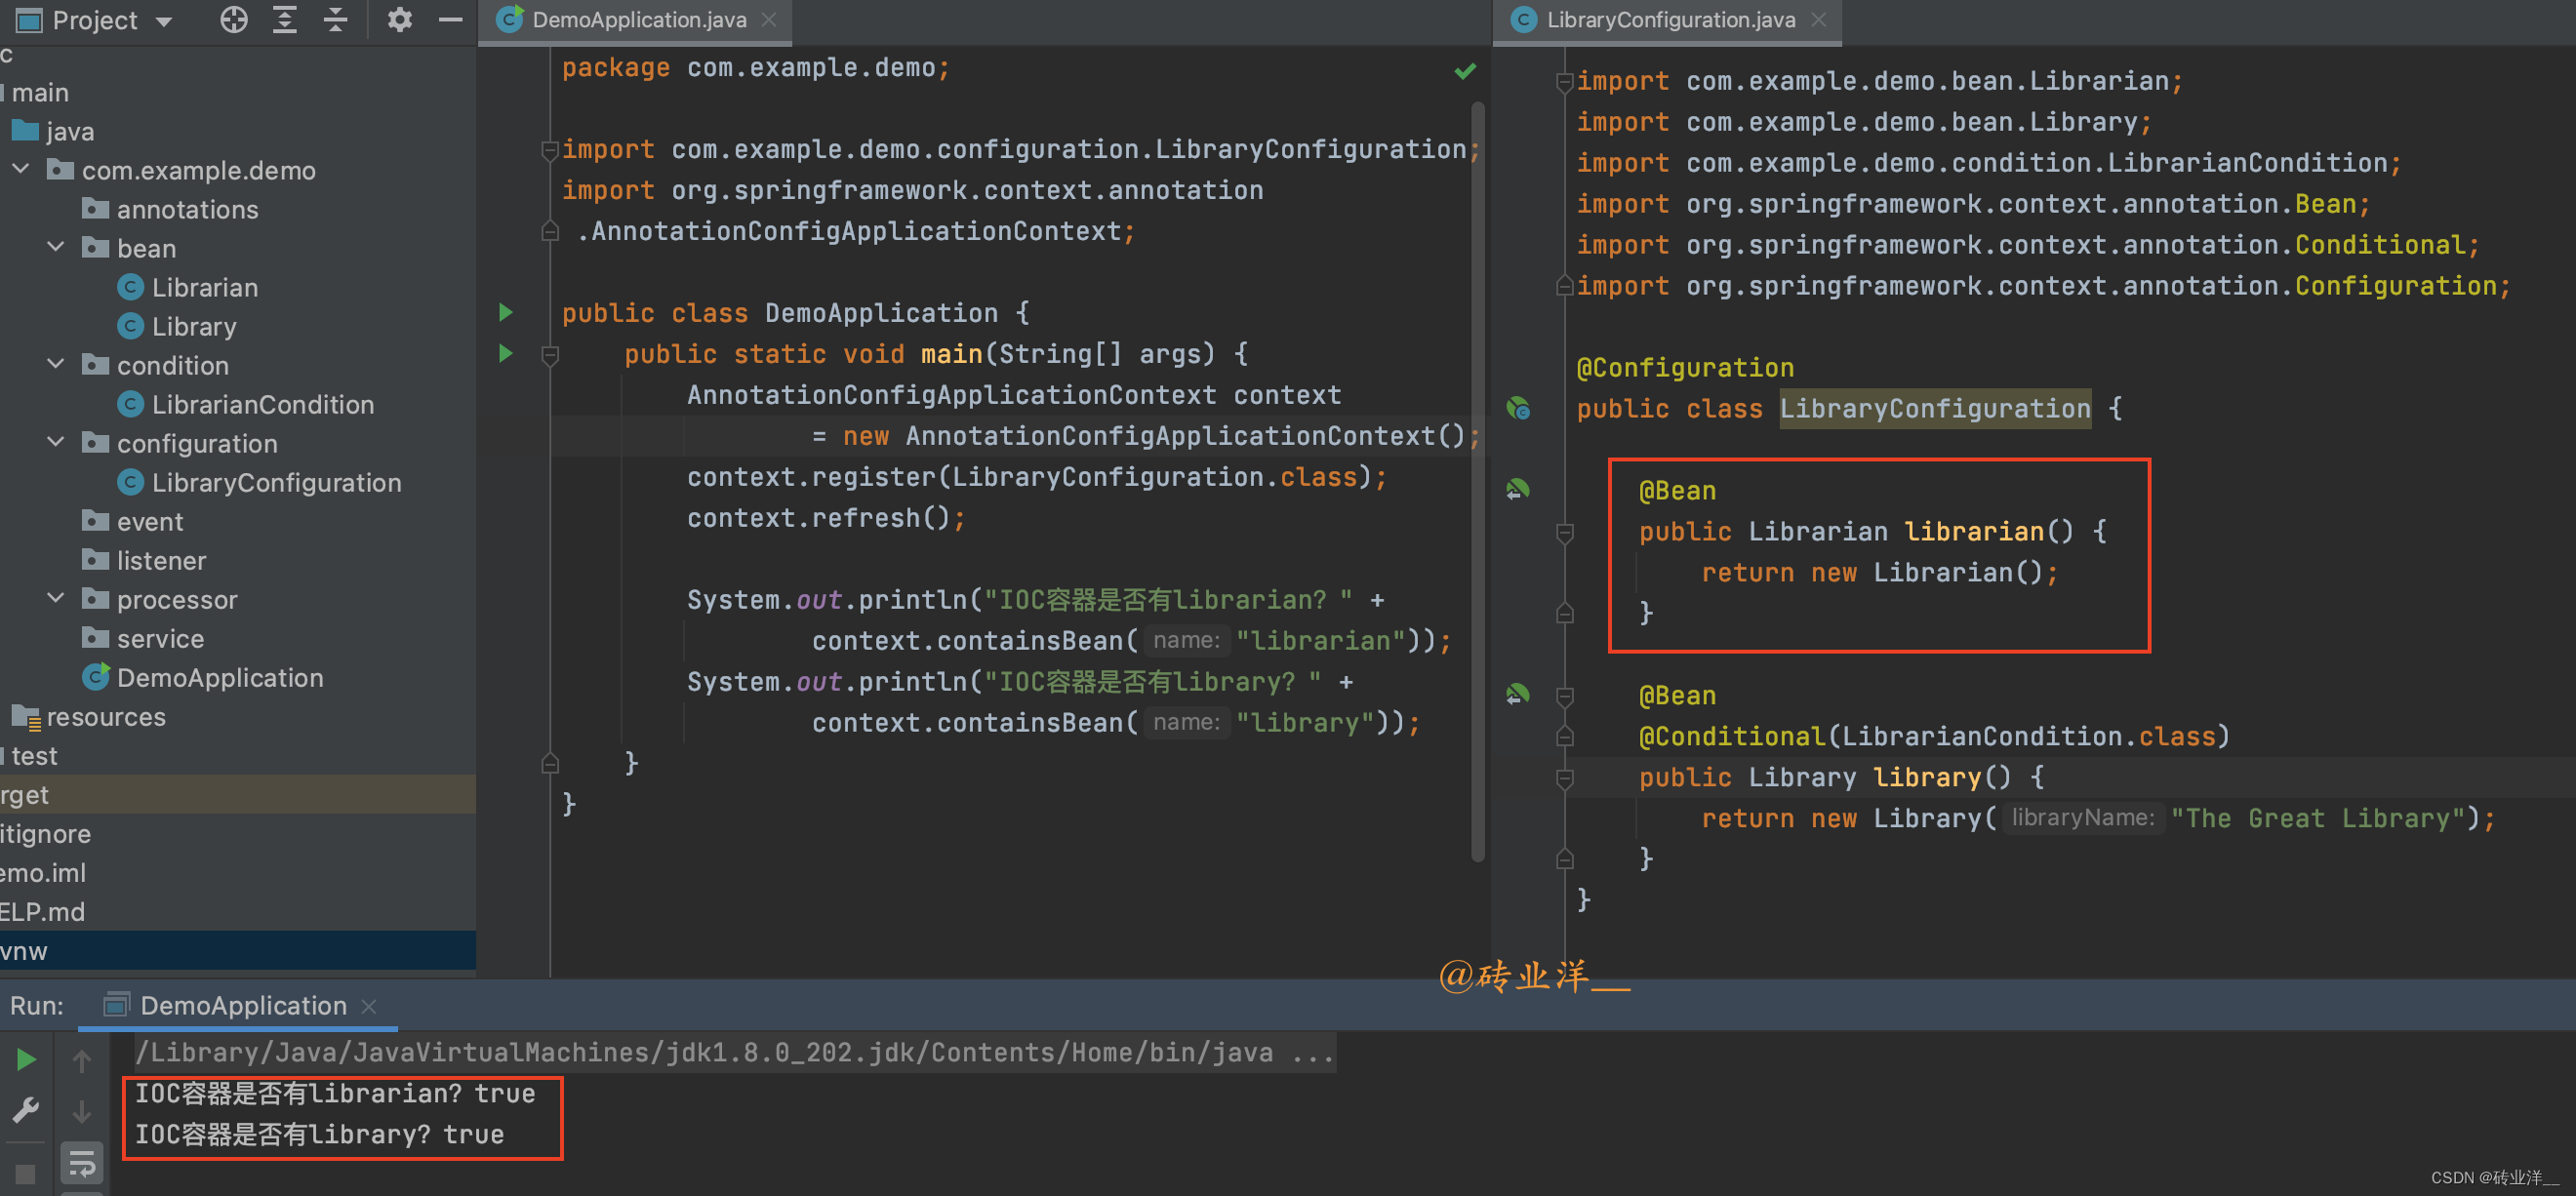
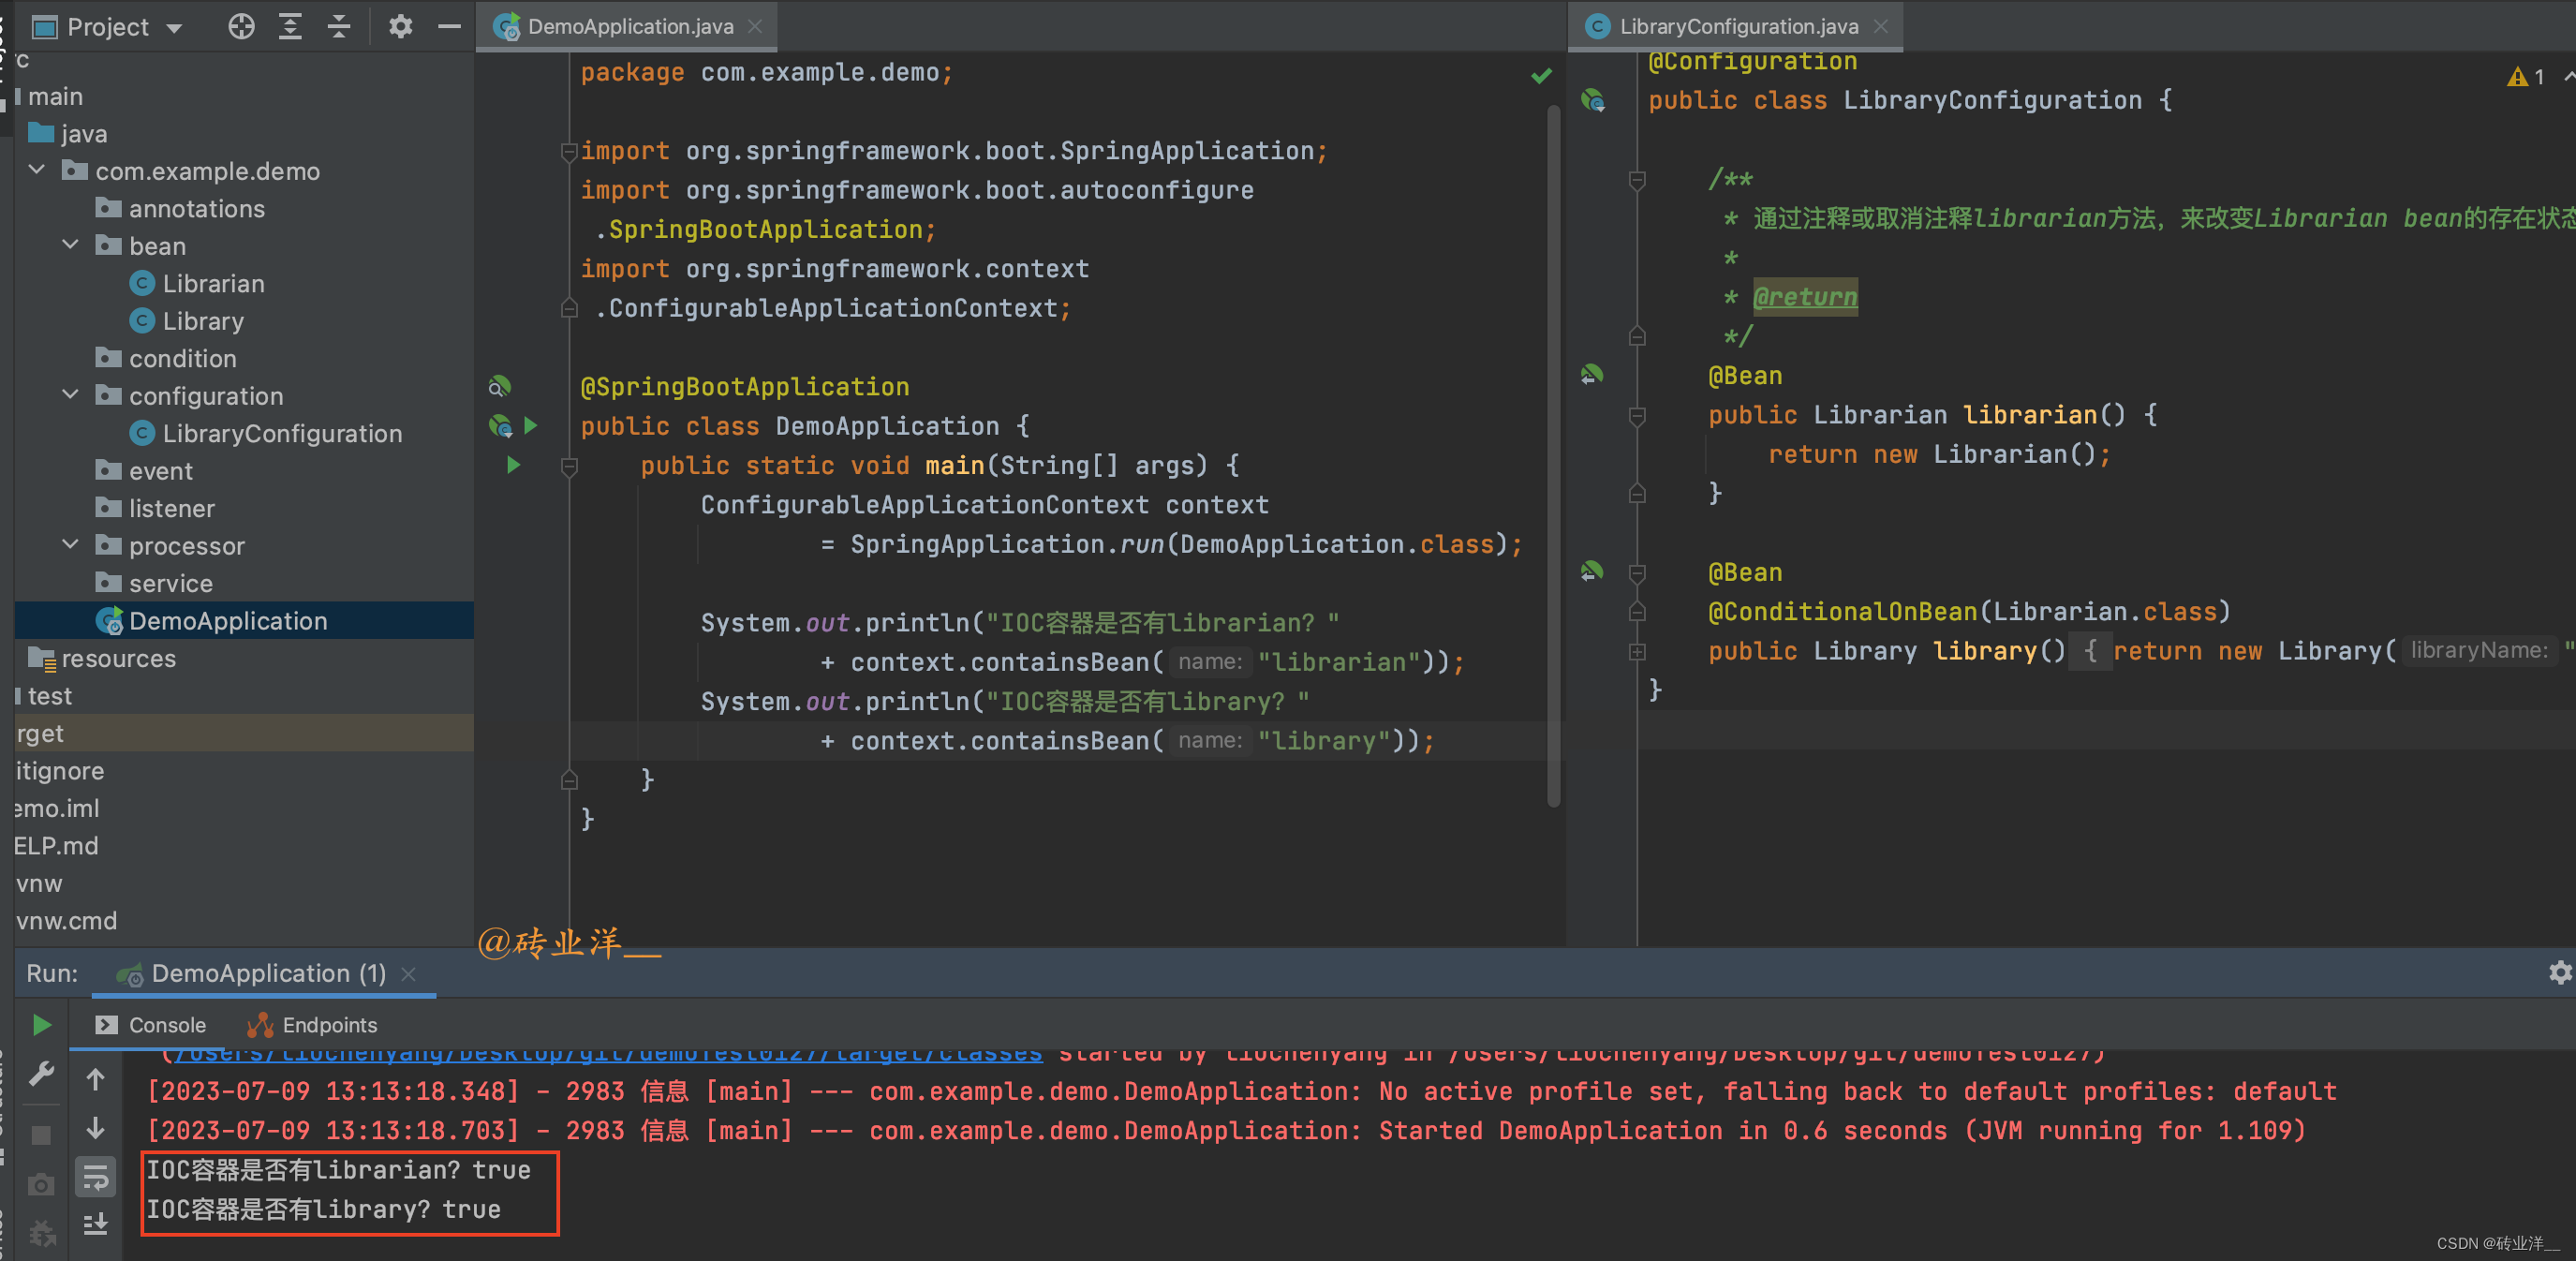
@Bean
public Librarian librarian() {
return new Librarian();
} @Bean
@Conditional(LibrarianCondition.class)
public Library library() {
return new Library("The Great Library");
}
}
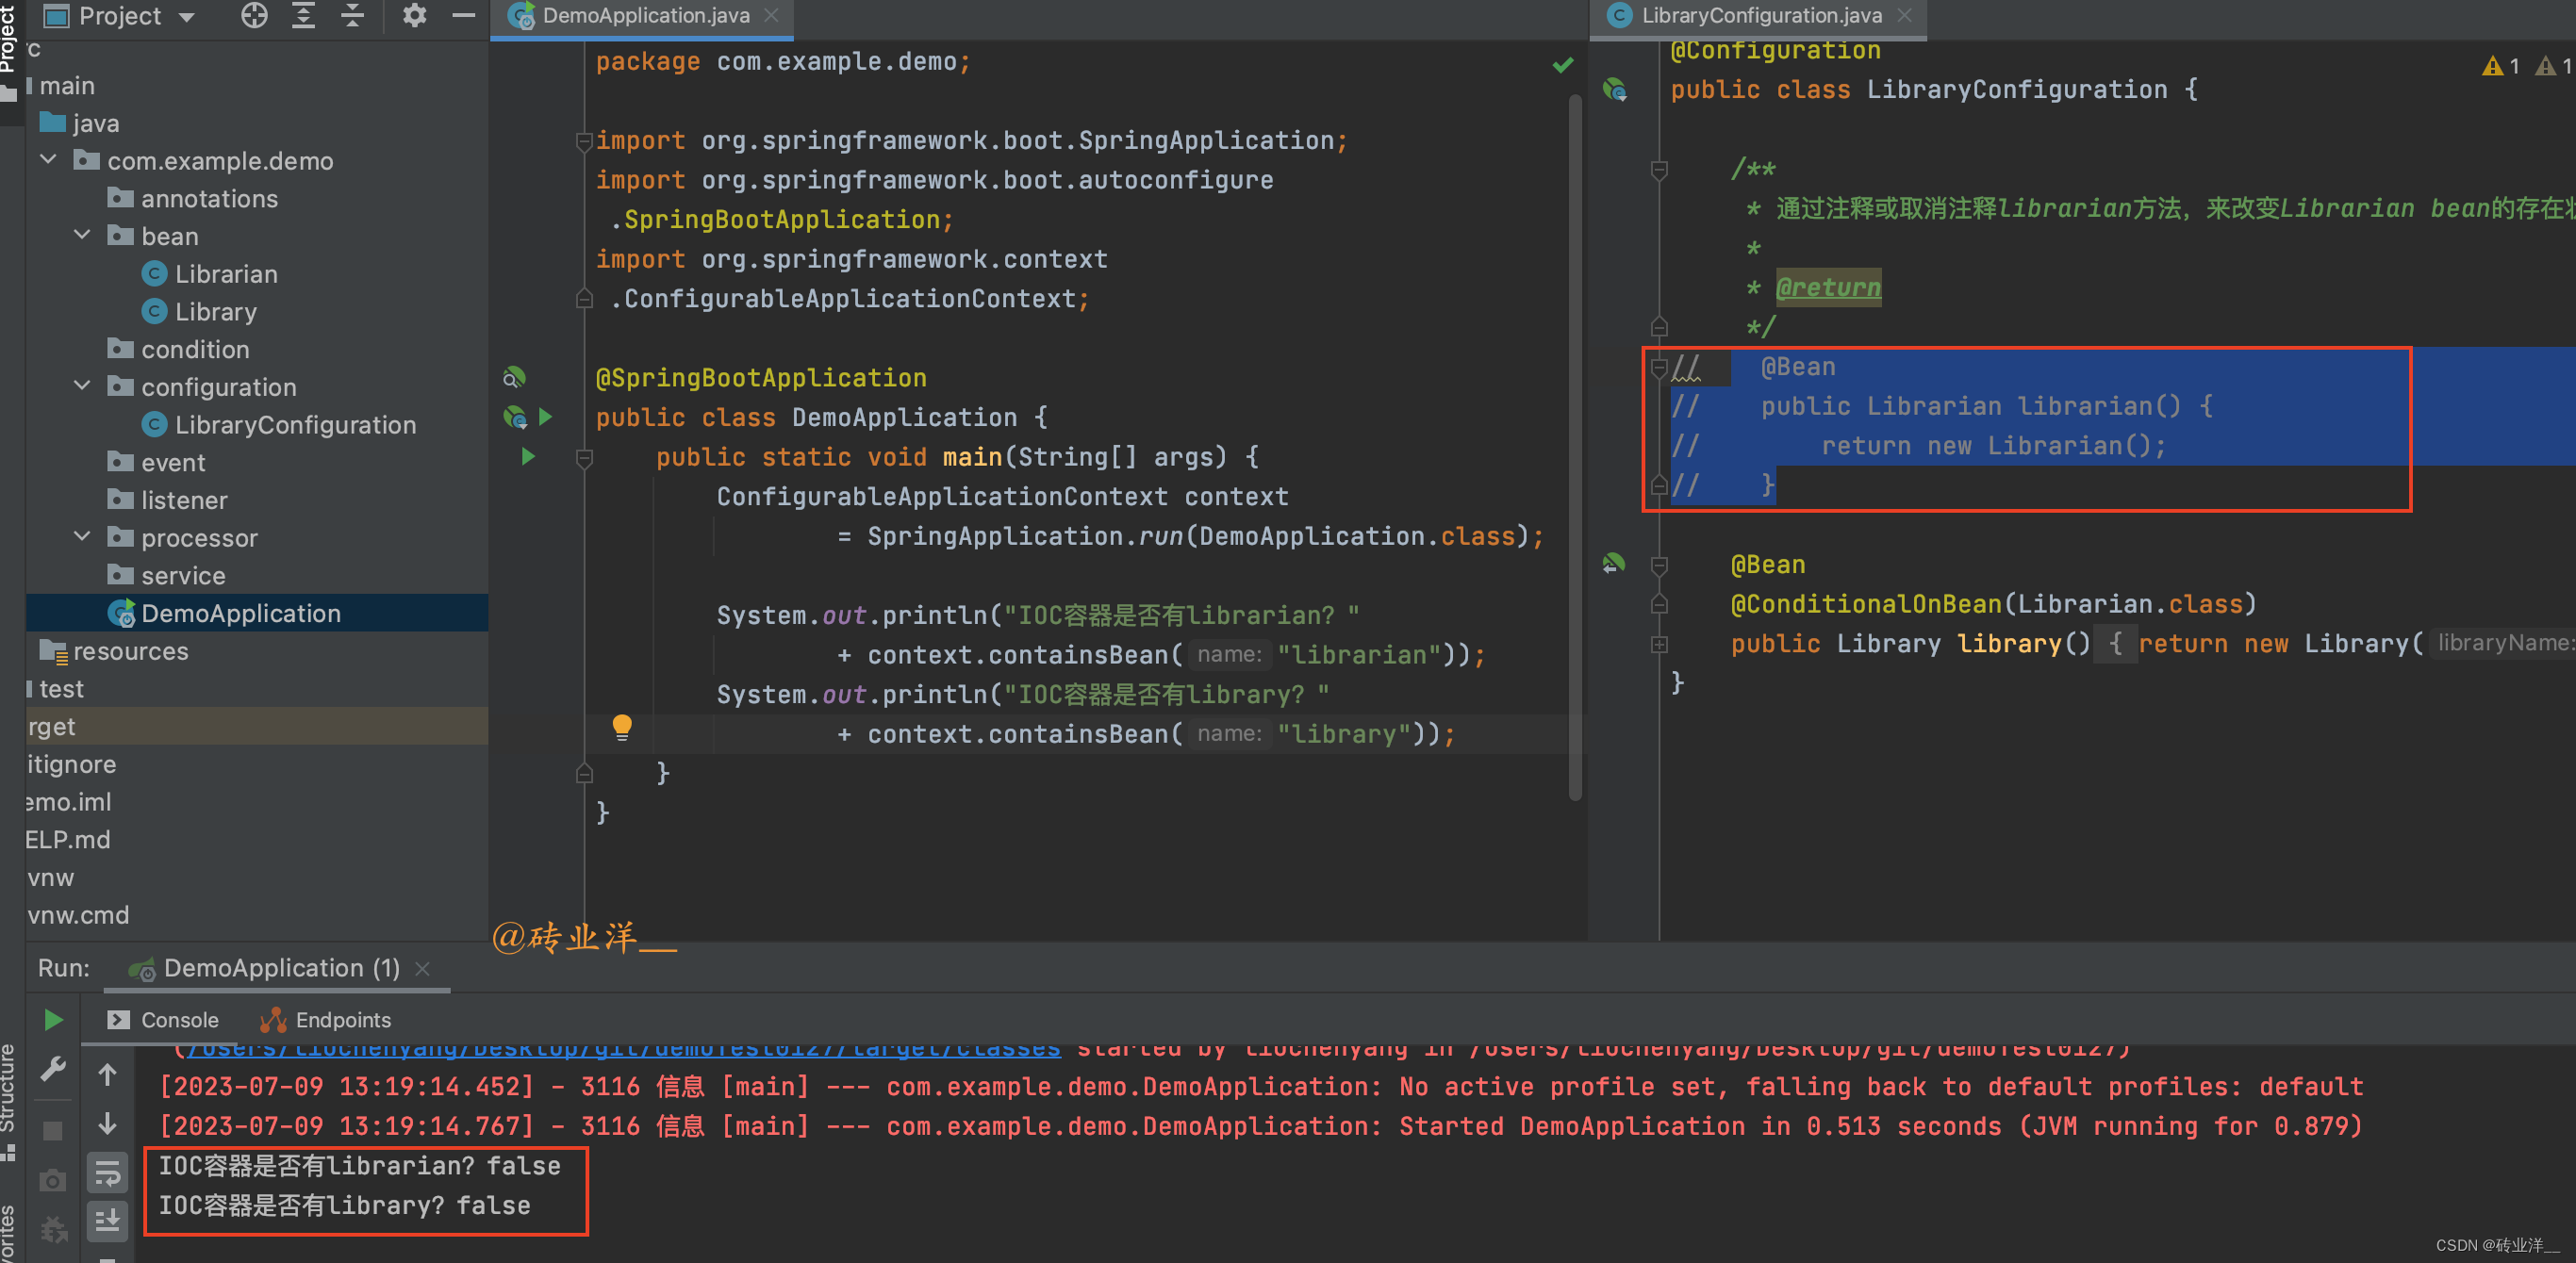
在上述代码中,在创建Library Bean的方法上,添加了@Conditional(LibrarianCondition.class)注解,指定了只有当 LibrarianCondition 返回 true 时,Library bean 才会被创建。然后,我们可以通过注释或取消注释 librarian() 方法来改变 Librarian bean 的存在状态,从而观察它对 Library bean 创建的影响。
最后,在主程序中,我们初始化Spring上下文并获取Library的bean:
package com.example.demo;

import com.example.demo.configuration.LibraryConfiguration;

import org.springframework.context.annotation.AnnotationConfigApplicationContext;

public class DemoApplication {

    public static void main(String[] args) {

        AnnotationConfigApplicationContext context = new AnnotationConfigApplicationContext();

        context.register(LibraryConfiguration.class);

        context.refresh();

        System.out.println("IOC容器是否有librarian?" + context.containsBean("librarian"));

        System.out.println("IOC容器是否有library?" + context.containsBean("library"));

    }

}
在这个例子中,Library的bean只有在Librarian的bean也存在的情况下才会被创建。
当Librarian存在时,输出为:
当Librarian不存在时,输出为:

3.2 @Conditional在Spring Boot中的应用
Spring Boot 在很多地方使用了 @Conditional 来实现条件化配置,我们分别来看一下。
3.2.1 @ConditionalOnBean 和 @ConditionalOnMissingBean
@ConditionalOnBean 和 @ConditionalOnMissingBean 是 Spring Boot 提供的一对条件注解,用于条件化的创建 Spring Beans,可以检查 Spring 容器中是否存在特定的bean。如果存在(或者不存在)这样的bean,那么对应的配置就会被启用(或者被忽略)。
具体来说:
@ConditionalOnBean:当
Spring容器中存在指定类型的Bean时,当前被标注的Bean才会被创建。@ConditionalOnMissingBean:当
Spring容器中不存在指定类型的Bean时,当前被标注的Bean才会被创建。
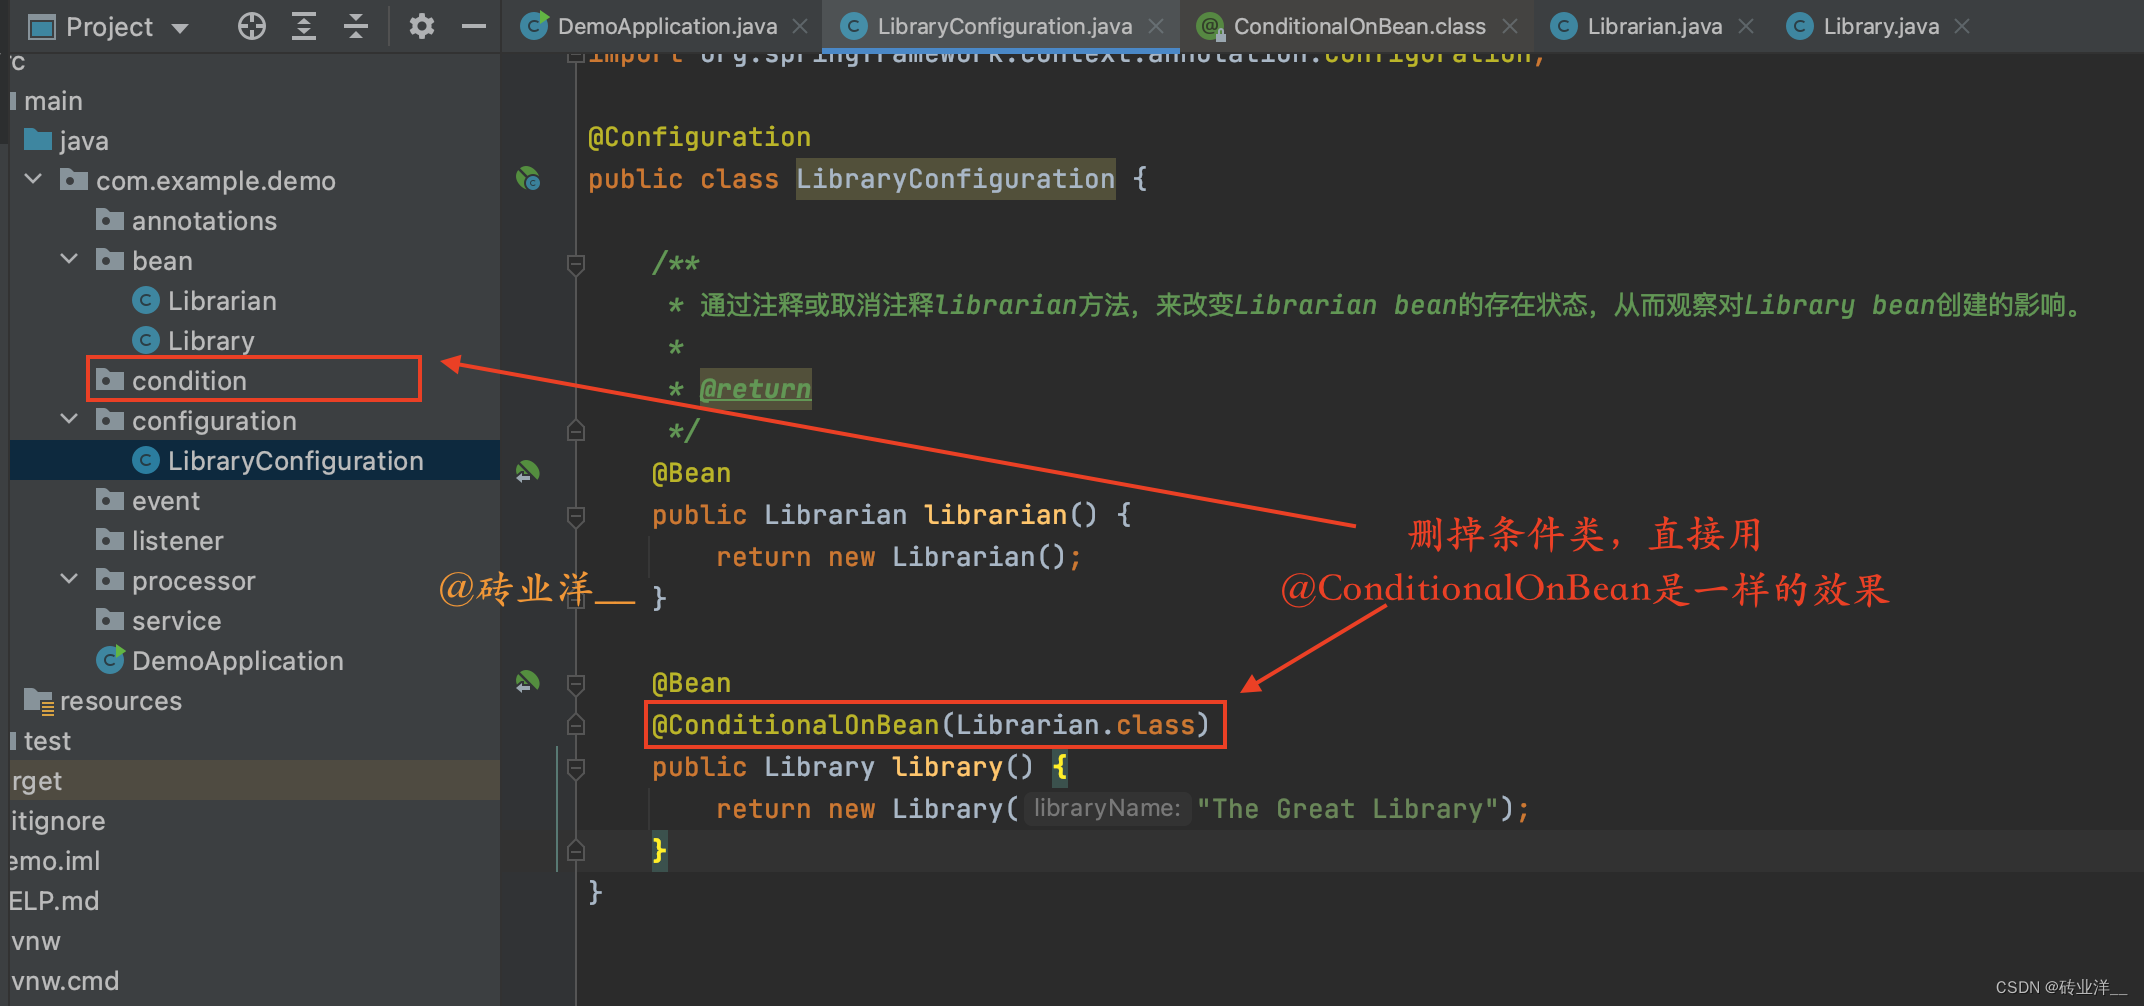
我们这里就选取@ConditionalOnBean注解进行讲解。把刚刚我们的配置类修改一下,我们删掉实现了Condition接口的条件判断类LibrarianCondition,将@Conditional 改为@ConditionalOnBean
package com.example.demo.configuration;

import com.example.demo.bean.Librarian;

import com.example.demo.bean.Library;

import org.springframework.boot.autoconfigure.condition.ConditionalOnBean;

import org.springframework.context.annotation.Bean;

import org.springframework.context.annotation.Configuration;

@Configuration

public class LibraryConfiguration {

    /**

     * 通过注释或取消注释librarian方法,来改变Librarian bean的存在状态,从而观察对Library bean创建的影响。

     *

     * @return

     */

    @Bean

    public Librarian librarian() {

        return new Librarian();

    }

    @Bean

    @ConditionalOnBean(Librarian.class)

    public Library library() {

        return new Library("The Great Library");

    }

}
如下图:
接着,将主程序改为Spring Boot再启动
package com.example.demo;

import org.springframework.boot.SpringApplication;

import org.springframework.boot.autoconfigure.SpringBootApplication;

import org.springframework.context.ConfigurableApplicationContext;

@SpringBootApplication

public class DemoApplication {

    public static void main(String[] args) {

        ConfigurableApplicationContext context = SpringApplication.run(DemoApplication.class);

        System.out.println("IOC容器是否有librarian?" + context.containsBean("librarian"));

        System.out.println("IOC容器是否有library?" + context.containsBean("library"));

    }

}
运行结果如下:
当Librarian存在时,输出为:
当Librarian不存在时,输出为:
有人可能会疑问了,会不会有这种可能,Librarian 在Library 后面才注册,导致这个条件会认为Librarian不存在?
答案是并不会。Spring 在处理 @Configuration 类时,会预先解析所有的 @Bean 方法,收集所有的 Bean 定义信息,然后按照依赖关系对这些 Bean 进行实例化。
那如果Librarian 不是写在配置类的,而是被@Component注解修饰的,会不会因为顺序问题导致条件判断为不存在?
即使 Librarian 类的定义被 @Component 注解修饰并通过组件扫描注册到 Spring 容器,Spring 仍然可以正确地处理依赖关系,它依赖的是 Bean 的定义,而不是 Bean 的实例化。
当 Spring 容器启动时,它会先扫描所有的 Bean 定义并收集信息,这包括由 @Configuration 类的 @Bean 方法定义的,还有通过 @Component,@Service,@Repository等注解和组件扫描机制注册的。
当执行到 @ConditionalOnBean 或者 @ConditionalOnMissingBean 的条件判断时,Spring 已经有了全局的视野,知道所有的 Bean 定义。所以,即使某个 Bean 是通过 @Component 注解定义并由组件扫描机制注册的,也不会因为顺序问题导致判断失败。同样的,@Conditional条件判断也不会存在这个问题。
总的来说,Spring 提供了强大的依赖管理和自动装配功能,可以确保 Bean 的各种条件判断,无论 Bean 是如何定义和注册的。
3.2.2 @ConditionalOnProperty
这个注解表示只有当一个或多个给定的属性有特定的值时,才创建带有该注解的Bean。
@ConditionalOnProperty是Spring Boot中的一个注解,用于检查某个配置属性是否存在,或者是否有特定的值,只有满足条件的情况下,被该注解标记的类或方法才会被创建或执行。这个注解可以用来在不同的环境下开启或关闭某些功能,或者调整功能的行为。
在实际的业务中,我们可能会根据配置的不同,决定是否启用某个Bean或者某个功能。以下面的代码为例:
@Configuration

public class MyConfiguration {

    @Bean

    @ConditionalOnProperty(name = "my.feature.enabled", havingValue = "true", matchIfMissing = true)

    public MyFeature myFeature() {

        return new MyFeature();

    }

}
在这个例子中,MyFeature这个Bean只有在配置文件中my.feature.enabled属性的值为true时才会被创建。如果配置文件中没有my.feature.enabled这个属性,那么因为matchIfMissing属性的值为true,MyFeature这个Bean依然会被创建。
这样,我们可以通过修改配置文件,灵活地开启或关闭某个功能,而不需要修改代码。比如,我们可能有一些在开发环境和生产环境下行为不同的功能,或者一些可以根据需求开启或关闭的可选功能。实际开发中这些功能也可以考虑使用Apollo,只需要在对应环境的Apollo配置即可获取对应属性值,从而实现不同功能。
3.2.3 @ConditionalOnClass 和 @ConditionalOnMissingClass
这两个注解可以检查Classpath中是否存在或不存在某个特定的类。
例如,我们可能有一个服务需要在Classpath中存在某个特定的类时才能正常工作,我们可以这样配置:
@Service

@ConditionalOnClass(name = "com.example.SomeClass")

public class MyService {

    // ...

}
在这个例子中,如果com.example.SomeClass存在于Classpath中,那么MyService就会被创建并添加到Spring的ApplicationContext中。如果这个类不存在,那么MyService就不会被创建。
同样地,我们也可以使用 @ConditionalOnMissingClass 注解来在某个特定的类不存在于Classpath时创建某个Bean,只需将上面的代码中的 @ConditionalOnClass 替换为 @ConditionalOnMissingClass 即可。
这个2个注解实际的业务开发中使用的情况比较少,因为它主要用于处理底层框架或者库的一些通用逻辑。但它在框架或库的开发中确实非常有用,让框架或库可以更加灵活地适应不同的使用环境和配置。
比如在 Spring Boot 中,很多自动配置类都会使用条件装配。比如 DataSourceAutoConfiguration 类,这个类负责自动配置数据库连接池,它使用 @ConditionalOnClass 注解来判断 Classpath 中是否存在相关的数据库驱动类,只有当存在相关的数据库驱动类时,才会进行自动配置。
再比如,我们可能开发了一个功能强大的日志记录库,它可以将日志记录到数据库,但是如果用户的项目中没有包含 JDBC 驱动,那么我们的库应该退化到只将日志记录到文件。这个时候就可以使用 @ConditionalOnClass 来检查是否存在 JDBC 驱动,如果存在则创建一个将日志记录到数据库的 Bean,否则创建一个将日志记录到文件的 Bean。
掌握Spring条件装配的秘密武器的更多相关文章
- spring的条件装配bean
1 应用程序环境的迁移 问题: 开发软件时,有一个很大的挑战,就是将应用程序从一个环境迁移到另一个环境. 例如,开发环境中很多方式的处理并不适合生产环境,迁移后需要修改,这个过程可能会莫名的出现很多b ...
- Spring Framework 条件装配 之 @Conditional
Spring Framework 条件装配 之 @Conditional 前言 了解SpringBoot的小伙伴对Conditional注解一定不会陌生,在SpringBoot项目中,Conditio ...
- Spring Boot 2 实践记录之 条件装配
实验项目是想要使用多种数据库访问方式,比如 JPA 和 MyBatis. 项目的 Service 层业务逻辑相同,只是具体实现代码不同,自然是一组接口,两组实现类的架构比较合理. 不过这种模式却有一个 ...
- Spring高级装配
Spring高级装配 目录 一.Profile(根据开发环境创建对应的bean) 二.条件化的创建bean(根据条件创建bean) 三.处理自动装配歧义性(指定首选bean.限定符限制bean) 四. ...
- Spring(3)——装配 Spring Bean 详解
装配 Bean 的概述 前面已经介绍了 Spring IoC 的理念和设计,这一篇文章将介绍的是如何将自己开发的 Bean 装配到 Spring IoC 容器中. 大部分场景下,我们都会使用 Appl ...
- Spring高级装配(一) profile
Spring高级装配要学习的内容包括: Spring profile 条件化的bean声明 自动装配与歧义性 bean的作用域 Spring表达式语言 以上属于高级一点的bean装配技术,如果你没有啥 ...
- 一步步从Spring Framework装配掌握SpringBoot自动装配
目录 Spring Framework模式注解 Spring Framework@Enable模块装配 Spring Framework条件装配 SpringBoot 自动装配 本章总结 Spring ...
- springBoot按条件装配:Condition
编码格式转换器接口 package com.boot.condition.bootconditionconfig.converter; /** * 编码格式转换器接口 */ public interf ...
- Spring自动装配----注解装配----Spring自带的@Autowired注解
Spring自动装配----注解装配----Spring自带的@Autowired注解 父类 package cn.ychx; public interface Person { public voi ...
- Spring Boot之从Spring Framework装配掌握SpringBoot自动装配
Spring Framework模式注解 模式注解是一种用于声明在应用中扮演“组件”角色的注解.如 Spring Framework 中的 @Repository 标注在任何类上 ,用于扮演仓储角色的 ...
随机推荐
- 2023-04-02:设计一个仓库管理器,提供如下的方法: 1) void supply(String item, int num, int price) 名字叫item的商品,个数num,价格pri
2023-04-02:设计一个仓库管理器,提供如下的方法: void supply(String item, int num, int price) 名字叫item的商品,个数num,价格price. ...
- 2020-11-26:go中,map的创建流程是什么?
福哥答案2020-11-26: [答案来自此链接:](https://www.bilibili.com/video/BV1Nr4y1w7aa?p=10)源码位于runtime/map.go文件中的ma ...
- 2021-04-21:手写代码:Dijkstra算法。
2021-04-21:手写代码:Dijkstra算法. 福大大 答案2021-04-21: Dijkstra算法是一种基于贪心策略的算法.每次新扩展一个路程最短的点,更新与其相邻的点的路程.时间紧,未 ...
- 2021-11-22:给定一个正数数组arr,表示每个小朋友的得分; 任何两个相邻的小朋友,如果得分一样,怎么分糖果无所谓,但如果得分不一样,分数大的一定要比分数少的多拿一些糖果; 假设所有的小朋友坐
2021-11-22:给定一个正数数组arr,表示每个小朋友的得分: 任何两个相邻的小朋友,如果得分一样,怎么分糖果无所谓,但如果得分不一样,分数大的一定要比分数少的多拿一些糖果: 假设所有的小朋友坐 ...
- 2021-11-10:O(1) 时间插入、删除和获取随机元素。实现RandomizedSet 类:RandomizedSet() 初始化 RandomizedSet 对象。bool insert(in
2021-11-10:O(1) 时间插入.删除和获取随机元素.实现RandomizedSet 类:RandomizedSet() 初始化 RandomizedSet 对象.bool insert(in ...
- 17.AQS中的Condition是什么?
欢迎关注:王有志 期待你加入Java人的提桶跑路群:共同富裕的Java人 今天来和大家聊聊Condition,Condition为AQS"家族"提供了等待与唤醒的能力,使AQS&q ...
- Sentinel基本使用与源码分析
系列文章目录和关于我 一丶什么是Sentinel Sentinel官网 Sentinel 是面向分布式.多语言异构化服务架构的流量治理组件,主要以流量为切入点,从流量路由.流量控制.流量整形.熔断降级 ...
- Ubuntu 对比 CentOS 后该如何选择?
大家阅读完以上文章觉得如何选择更适合自己?欢迎留言哦~ 本文章转载自 Linux 就该这么学(ID: linuxprobe),文章图片与文字版权属源公众号所有,未经允许,禁止二次转载. 我要投稿 本公 ...
- 专访泛境科技:如何借助3DCAT实时云渲染打造元宇宙解决方案
随着5G.VR/AR等技术的发展,元宇宙(Metaverse)这一概念越来越受到关注.元宇宙是一个由虚拟世界构成的网络空间,其中人们可以通过数字化的身份和形象进行各种社交.娱乐.创作和商业活动.元宇宙 ...
- mybatis拦截器实现数据权限
前端的菜单和按钮权限都可以通过配置来实现,但很多时候,后台查询数据库数据的权限需要通过手动添加SQL来实现. 比如员工打卡记录表,有id,name,dpt_id,company_id等字段,后两个表示 ...