MySQL系列之——错误日志(log_error)、二进制日志(binary logs)、慢日志(slow_log)
文章目录
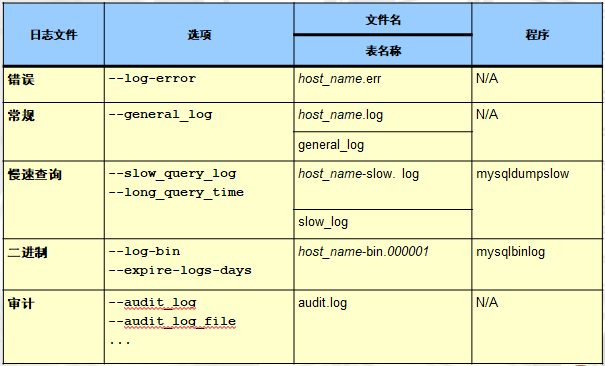
1.错误日志(log_error)
1.1 作用
记录启动\关闭\日常运行过程中,状态信息,警告,错误
1.2 错误日志配置
默认就是开启的:  /数据路径下/hostname.err

手工设定:

Master [(none)]>select @@log_error;

vim /etc/my.cnf

log_error=/var/log/mysql.log

log_timestamps=system

重启生效

show variables like 'log_error';
1.3 日志内容查看
主要关注[ERROR],看上下文
2. binlog(binary logs):二进制日志 *****
2.1 作用
(1)备份恢复必须依赖二进制日志

(2)主从环境必须依赖二进制日志
2.2 binlog配置 (5.7必须加server_id)
注意:MySQL默认是没有开启二进制日志的。

基础参数查看:

开关:

[(none)]>select @@log_bin;

日志路径及名字

[(none)]>select @@log_bin_basename;

服务ID号:

[(none)]>select @@server_id;

二进制日志格式:

[(none)]>select @@binlog_format;

双一标准之二:

[(none)]>select @@sync_binlog;
2.2.1 创建日志目录
mkdir /data/binlog

chown -R mysql.mysql /data/binlog
2.2.2 修改配置文件
vim /etc/my.cnf

server_id=6                                    ----->5.6中,单机可以不需要此参数

log_bin=/data/binlog/mysql-bin

binlog_format=row
2.2.3 重启数据库生效
[root@db01 mysql]# /etc/init.d/mysqld restart
2.2.4 参数说明
server_id=3306

主要是在主从复制过程中必须要加的,但是在5.7版本中,要用以下参数(log_bin),开启binlog日志,即使是单机也是必加的

log_bin=/data/binlog/mysql-bin

(1)开启二进制日志功能

(2)设置二进制日志目录及名称前缀

binlog_format=row

binlog的记录格式??
2.3 binlog记录了什么?
2.3.0 引入
binlog是SQL层的功能。记录的是变更SQL语句,不记录查询语句。
2.3.1 记录SQL语句种类
DDL :原封不动的记录当前DDL(statement语句方式)。

DCL :原封不动的记录当前DCL(statement语句方式)。

DML :只记录已经提交的事务DML
2.3.2 DML三种记录方式
binlog_format(binlog的记录格式)参数影响

(1)statement(5.6默认)SBR(statement based replication) :语句模式原封不动的记录当前DML。

(2)ROW(5.7 默认值) RBR(ROW based replication) :记录数据行的变化(用户看不懂,需要工具分析)

(3)mixed(混合)MBR(mixed based replication)模式  :以上两种模式的混合
2.3.3 面试题
SBR与RBR模式的对比

STATEMENT:可读性较高,日志量少,但是不够严谨

ROW      :可读性很低,日志量大,足够严谨

update t1 set xxx=xxx where id>1000   ? -->一共500w行,row模式怎么记录的日志

为什么row模式严谨?

id  name    intime

insert into t1 values(1,'zs',now())

我们建议使用:row记录模式
2.4 event(事件)是什么?
2.4.1 事件的简介
二进制日志的最小记录单元

对于DDL,DCL,一个语句就是一个event

对于DML语句来讲:只记录已提交的事务。

例如以下列子,就被分为了4个event

begin;      120  - 340

DML1        340  - 460

DML2        460  - 550

commit;     550  - 760
2.4.2 event的组成
三部分构成:

(1) 事件的开始标识

(2) 事件内容

(3) 事件的结束标识

Position:

开始标识: at 194

结束标识: end_log_pos 254

194? 254?

某个事件在binlog中的相对位置号

位置号的作用是什么?

为了方便我们截取事件
2.5 日志文件查看
2.5.1 查看日志的开启情况
log_bin参数设置的路径,可以找到二进制日志
Master [(none)]>show variables like '%log_bin%';

+---------------------------------+------------------------------+

| Variable_name                   | Value                        |

+---------------------------------+------------------------------+

| log_bin                         | ON                           |

| log_bin_basename                | /data/binlog/mysql-bin       |

| log_bin_index                   | /data/binlog/mysql-bin.index |

| log_bin_trust_function_creators | OFF                          |

| log_bin_use_v1_row_events       | OFF                          |

| sql_log_bin                     | ON                           |

+---------------------------------+------------------------------+

6 rows in set (0.01 sec)
2.5.2 查看一共多少个binlog
Master [(none)]>show binary logs;

+------------------+-----------+

| Log_name         | File_size |

+------------------+-----------+

| mysql-bin.000001 |       154 |

+------------------+-----------+

1 row in set (0.01 sec)

Master [(none)]>flush logs;

Query OK, 0 rows affected (0.03 sec)

Master [(none)]>flush logs;

Query OK, 0 rows affected (0.01 sec)

Master [(none)]>show binary logs;

+------------------+-----------+

| Log_name         | File_size |

+------------------+-----------+

| mysql-bin.000001 |       201 |

| mysql-bin.000002 |       201 |

| mysql-bin.000003 |       154 |

+------------------+-----------+

3 rows in set (0.00 sec)

Master [(none)]>
2.5.3 查看mysql正在使用的日志文件
Master [(none)]>show master status;

+------------------+----------+--------------+------------------+-------------------+

| File             | Position | Binlog_Do_DB | Binlog_Ignore_DB | Executed_Gtid_Set |

+------------------+----------+--------------+------------------+-------------------+

| mysql-bin.000003 |      154 |              |                  |                   |

+------------------+----------+--------------+------------------+-------------------+

Master [(none)]>
file:当前MySQL正在使用的文件名 Position:最后一个事件的结束位置号
2.6 日志内容查看
2.6.1 event查看
Master [binlog]>show binlog events in 'mysql-bin.000003';

+------------------+-----+----------------+-----------+-------------+----------------------------------------+

| Log_name         | Pos | Event_type     | Server_id | End_log_pos | Info                                   |

+------------------+-----+----------------+-----------+-------------+----------------------------------------+

| mysql-bin.000003 |   4 | Format_desc    |         6 |         123 | Server ver: 5.7.20-log, Binlog ver: 4  |

| mysql-bin.000003 | 123 | Previous_gtids |         6 |         154 |                                        |

| mysql-bin.000003 | 154 | Anonymous_Gtid |         6 |         219 | SET @@SESSION.GTID_NEXT= 'ANONYMOUS'   |

| mysql-bin.000003 | 219 | Query          |         6 |         319 | create database binlog                 |

| mysql-bin.000003 | 319 | Anonymous_Gtid |         6 |         384 | SET @@SESSION.GTID_NEXT= 'ANONYMOUS'   |

| mysql-bin.000003 | 384 | Query          |         6 |         486 | use `binlog`; create table t1 (id int) |

+------------------+-----+----------------+-----------+-------------+----------------------------------------+

Log_name:binlog文件名

Pos:开始的position    *****

Event_type:事件类型

Format_desc:格式描述,每一个日志文件的第一个事件,多用户没有意义,MySQL识别binlog必要信息

Server_id:mysql服务号标识

End_log_pos:事件的结束位置号 *****

Info:事件内容*****

补充:

SHOW BINLOG EVENTS

   [IN 'log_name']

   [FROM pos]

   [LIMIT [offset,] row_count]

[root@db01 binlog]# mysql -e "show binlog events in 'mysql-bin.000004'" |grep drop
2.6.2 binlog文件内容详细查看
mysqlbinlog /data/mysql/mysql-bin.000006

mysqlbinlog --base64-output=decode-rows -vvv /data/binlog/mysql-bin.000003

mysqlbinlog  -d binlog /data/binlog/mysql-bin.000003

[root@db01 binlog]# mysqlbinlog --start-datetime='2019-05-06 17:00:00' --stop-datetime='2019-05-06 17:01:00'  /data/binlog/mysql-bin.000004
2.7 基于Position号进行日志截取
核心就是找截取的起点和终点

--start-position=321

--stop-position=513

 mysqlbinlog --start-position=219 --stop-position=1347 /data/binlog/mysql-bin.000003 >/tmp/bin.sql

案例: 使用binlog日志进行数据恢复

模拟:

1.

[(none)]>create database binlog charset utf8;

2.

[(none)]>use binlog;

[binlog]>create table t1(id int);

3.

[binlog]>insert into t1 values(1);

[binlog]>commit;

[binlog]>insert into t1 values(2);

[binlog]>commit;

[binlog]>insert into t1 values(3);

[binlog]>commit;

4.

[binlog]>drop database binlog;

恢复:

[(none)]>show master status ;

[(none)]>show binlog events in 'mysql-bin.000004';

[root@db01 binlog]# mysqlbinlog --start-position=1227 --stop-position=2342 /data/binlog/mysql-bin.000004 >/tmp/bin.sql

[(none)]>set sql_Log_bin=0;

[(none)]>source /tmp/bin.sql

面试案例:

1. 备份策略每天全备,有全量的二进制日志

2.业务中一共10个库,其中一个被误drop了

3. 需要在其他9个库正常工作过程中进行数据恢复
2.8 binlog日志的GTID新特性
2.8.1 GTID 介绍
5.6 版本新加的特性,5.7中做了加强

5.6 中不开启,没有这个功能.

5.7 中的GTID,即使不开也会有自动生成

SET @@SESSION.GTID_NEXT= 'ANONYMOUS'
2.8.2. GTID(Global Transaction ID)
是对于一个已提交事务的编号,并且是一个全局唯一的编号。

它的官方定义如下:

GTID = source_id :transaction_id

7E11FA47-31CA-19E1-9E56-C43AA21293967:29
重要参数介绍:
vim /etc/my.cnf

gtid-mode=on

enforce-gtid-consistency=true

systemctl restart mysqld

Master [(none)]>create database gtid charset utf8;

Query OK, 1 row affected (0.01 sec)

Master [(none)]>show master status ;

+------------------+----------+--------------+------------------+----------------------------------------+

| File             | Position | Binlog_Do_DB | Binlog_Ignore_DB | Executed_Gtid_Set                      |

+------------------+----------+--------------+------------------+----------------------------------------+

| mysql-bin.000004 |      326 |              |                  | dff98809-55c3-11e9-a58b-000c2928f5dd:1 |

+------------------+----------+--------------+------------------+----------------------------------------+

1 row in set (0.00 sec)

Master [(none)]>use gtid

Database changed

Master [gtid]>create table t1 (id int);

Query OK, 0 rows affected (0.01 sec)

Master [gtid]>show master status ;

+------------------+----------+--------------+------------------+------------------------------------------+

| File             | Position | Binlog_Do_DB | Binlog_Ignore_DB | Executed_Gtid_Set                        |

+------------------+----------+--------------+------------------+------------------------------------------+

| mysql-bin.000004 |      489 |              |                  | dff98809-55c3-11e9-a58b-000c2928f5dd:1-2 |

+------------------+----------+--------------+------------------+------------------------------------------+

1 row in set (0.00 sec)

Master [gtid]>create table t2 (id int);

Query OK, 0 rows affected (0.01 sec)

Master [gtid]>create table t3 (id int);

Query OK, 0 rows affected (0.02 sec)

Master [gtid]>show master status ;

+------------------+----------+--------------+------------------+------------------------------------------+

| File             | Position | Binlog_Do_DB | Binlog_Ignore_DB | Executed_Gtid_Set                        |

+------------------+----------+--------------+------------------+------------------------------------------+

| mysql-bin.000004 |      815 |              |                  | dff98809-55c3-11e9-a58b-000c2928f5dd:1-4 |

+------------------+----------+--------------+------------------+------------------------------------------+

1 row in set (0.00 sec)

Master [gtid]>begin;

Query OK, 0 rows affected (0.00 sec)

Master [gtid]>insert into t1 values(1);

Query OK, 1 row affected (0.00 sec)

Master [gtid]>commit;

Query OK, 0 rows affected (0.00 sec)

Master [gtid]>show master status ;

+------------------+----------+--------------+------------------+------------------------------------------+

| File             | Position | Binlog_Do_DB | Binlog_Ignore_DB | Executed_Gtid_Set                        |

+------------------+----------+--------------+------------------+------------------------------------------+

| mysql-bin.000004 |     1068 |              |                  | dff98809-55c3-11e9-a58b-000c2928f5dd:1-5 |

+------------------+----------+--------------+------------------+------------------------------------------+

1 row in set (0.00 sec)

Master [gtid]>begin;

Query OK, 0 rows affected (0.00 sec)

Master [gtid]>insert into t2 values(1);

Query OK, 1 row affected (0.00 sec)

Master [gtid]>commit;

Query OK, 0 rows affected (0.01 sec)

Master [gtid]>show master status ;

+------------------+----------+--------------+------------------+------------------------------------------+

| File             | Position | Binlog_Do_DB | Binlog_Ignore_DB | Executed_Gtid_Set                        |

+------------------+----------+--------------+------------------+------------------------------------------+

| mysql-bin.000004 |     1321 |              |                  | dff98809-55c3-11e9-a58b-000c2928f5dd:1-6 |

+------------------+----------+--------------+------------------+------------------------------------------+

1 row in set (0.00 sec)
2.8.3. 基于GTID进行查看binlog
具备GTID后,截取查看某些事务日志:

--include-gtids

--exclude-gtids

mysqlbinlog --include-gtids='dff98809-55c3-11e9-a58b-000c2928f5dd:1-6' --exclude-gtids='dff98809-55c3-11e9-a58b-000c2928f5dd:4'  /data/binlog/mysql-bin.000004
2.8.4 GTID的幂等性
开启GTID后,MySQL恢复Binlog时,重复GTID的事务不会再执行了

就想恢复?怎么办?

--skip-gtids

mysqlbinlog --include-gtids='3ca79ab5-3e4d-11e9-a709-000c293b577e:4' /data/binlog/mysql-bin.000004 /data/binlog/mysql-bin.000004

set sql_log_bin=0;

source /tmp/binlog.sql

set sql_log_bin=1;
2.9 使用二进制日志恢复数据案例
2.9.1 故障环境介绍
创建了一个库  db, 导入了表t1 ,t1表中录入了很多数据

一个开发人员,drop database db;

没有备份,日志都在.怎么恢复?

思路:找到建库语句到删库之前所有的日志,进行恢复.(开启了GTID模式)

故障案例模拟:

(0) drop database if exists db ;

(1) create database db charset utf8;

(2) use db;

(3) create table t1 (id int);

(4) insert into t1 values(1),(2),(3);

(5) insert into t1 values(4),(5),(6);

(6) commit

(7) update t1 set id=30 where id=3;

(8) commit;

(9) delete from t1 where id=4;

(10)commit;

(11)insert into t1 values(7),(8),(9);

(12)commit;

(13)drop database db;

========================

drop database if exists db ;

create database db charset utf8;

use db;

create table t1 (id int);

insert into t1 values(1),(2),(3);

insert into t1 values(4),(5),(6);

commit;

update t1 set id=30 where id=3;

commit;

delete from t1 where id=4;

commit;

insert into t1 values(7),(8),(9);

commit;

drop database db;

=======

运行以上语句,模拟故障场景

需求:将数据库恢复到以下状态(提示第9步和第13步是误操作,其他都是正常操作)
2.9.2 恢复过程(无GTID时的恢复)
- 查看当前使用的 binlog文件
oldguo [db]>show master status ;

+------------------+----------+--------------+------------------+-------------------+

| File            | Position | Binlog_Do_DB | Binlog_Ignore_DB | Executed_Gtid_Set |

+------------------+----------+--------------+------------------+-------------------+

| mysql-bin.000006 |    1873 |              |                  |                  |

+------------------+----------+--------------+------------------+-------------------+

2.查看事件:

第一段:

| mysql-bin.000006 |  813 | Query      |        1 |        907 | use `db`; create table t1 (id int)                  |

| mysql-bin.000006 |  907 | Query      |        1 |        977 | BEGIN                                              |

| mysql-bin.000006 |  977 | Table_map  |        1 |        1020 | table_id: 77 (db.t1)                                |

| mysql-bin.000006 | 1020 | Write_rows  |        1 |        1070 | table_id: 77 flags: STMT_END_F                      |

| mysql-bin.000006 | 1070 | Table_map  |        1 |        1113 | table_id: 77 (db.t1)                                |

| mysql-bin.000006 | 1113 | Write_rows  |        1 |        1163 | table_id: 77 flags: STMT_END_F                      |

| mysql-bin.000006 | 1163 | Xid        |        1 |        1194 | COMMIT /* xid=74 */                                |

| mysql-bin.000006 | 1194 | Query      |        1 |        1264 | BEGIN                                              |

| mysql-bin.000006 | 1264 | Table_map  |        1 |        1307 | table_id: 77 (db.t1)                                |

| mysql-bin.000006 | 1307 | Update_rows |        1 |        1353 | table_id: 77 flags: STMT_END_F                      |

| mysql-bin.000006 | 1353 | Xid        |        1 |        1384 | COMMIT /* xid=77 */

mysqlbinlog --start-position=813 --stop-position=1384 /data/mysql/mysql-bin.000006 >/tmp/bin1.sql
第二段:
| mysql-bin.000006 | 1568 | Query      |        1 |        1638 | BEGIN                                              |

| mysql-bin.000006 | 1638 | Table_map  |        1 |        1681 | table_id: 77 (db.t1)                                |

| mysql-bin.000006 | 1681 | Write_rows  |        1 |        1731 | table_id: 77 flags: STMT_END_F                      |

| mysql-bin.000006 | 1731 | Xid        |        1 |        1762 | COMMIT /* xid=81 */

mysqlbinlog --start-position=1568 --stop-position=1762 /data/mysql/mysql-bin.000006 >/tmp/bin2.sql
3.恢复
set sql_log_bin=0;

source /tmp/bin1.sql

source /tmp/bin2.sql

set sql_log_bin=1;

oldguo [db]>select * from t1;

+------+

| id  |

+------+

|    1 |

|    2 |

|  30 |

|    4 |

|    5 |

|    6 |

|    7 |

|    8 |

|    9 |
2.9.3 有GTID的恢复:
(1)截取
mysqlbinlog --skip-gtids --include-gtids='3ca79ab5-3e4d-11e9-a709-000c293b577e:7-12' mysql-bin.000004> /tmp/bin.sql
(2)恢复
set sql_log_bin=0;

source /tmp/bin.sql
2.10二进制日志其他操作
2.10.1 自动清理日志
show variables like '%expire%';

expire_logs_days  0

自动清理时间,是要按照全备周期+1

set global expire_logs_days=8;

永久生效:

my.cnf

expire_logs_days=15;

企业建议,至少保留两个全备周期+1的binlog
2.10.2 手工清理
PURGE BINARY LOGS BEFORE now() - INTERVAL 3 day;

PURGE BINARY LOGS TO 'mysql-bin.000010';

注意:不要手工 rm binlog文件

1. my.cnf binlog关闭掉,启动数据库

2.把数据库关闭,开启binlog,启动数据库

删除所有binlog,并从000001开始重新记录日志
*reset master; 主从关系中,主库执行此操作,主从环境必崩
2.10.3 日志是怎么滚动
flush logs;

重启mysql也会自动滚动一个新的

日志文件达到1G大小(max_binlog_size)

| max_binlog_size                          | 1073741824

备份时,加入参数也可以自动滚动
3.slow_log 慢日志
3.1 作用:
记录慢SQL语句的日志,定位低效SQL语句的工具日志
3.2 开启慢日志(默认没开启)
开关:

slow_query_log=1

文件位置及名字

slow_query_log_file=/data/mysql/slow.log

设定慢查询时间:

long_query_time=0.1

没走索引的语句也记录:

log_queries_not_using_indexes

vim /etc/my.cnf

slow_query_log=1

slow_query_log_file=/data/mysql/slow.log

long_query_time=0.1

log_queries_not_using_indexes

systemctl restart mysqld
3.3 mysqldumpslow 分析慢日志
mysqldumpslow -s c -t 10 /data/mysql/slow.log

# 第三方工具(自己扩展)

https://www.percona.com/downloads/percona-toolkit/LATEST/

yum install perl-DBI perl-DBD-MySQL perl-Time-HiRes perl-IO-Socket-SSL perl-Digest-MD5

toolkit工具包中的命令:

./pt-query-diagest  /data/mysql/slow.log

Anemometer基于pt-query-digest将MySQL慢查询可视化
作者:wwwoldguocom链接:https://www.jianshu.com/p/00c54d2832ed来源:简书著作权归作者所有。商业转载请联系作者获得授权,非商业转载请注明出处。
e=/data/mysql/slow.log
long_query_time=0.1
log_queries_not_using_indexes
systemctl restart mysqld
## 3.3 mysqldumpslow 分析慢日志

```cpp

mysqldumpslow -s c -t 10 /data/mysql/slow.log

# 第三方工具(自己扩展)

https://www.percona.com/downloads/percona-toolkit/LATEST/

yum install perl-DBI perl-DBD-MySQL perl-Time-HiRes perl-IO-Socket-SSL perl-Digest-MD5

toolkit工具包中的命令:

./pt-query-diagest  /data/mysql/slow.log

Anemometer基于pt-query-digest将MySQL慢查询可视化
作者:wwwoldguocom链接:https://www.jianshu.com/p/00c54d2832ed来源:简书著作权归作者所有。商业转载请联系作者获得授权,非商业转载请注明出处。
MySQL系列之——错误日志(log_error)、二进制日志(binary logs)、慢日志(slow_log)的更多相关文章
- 日志记录:MySQL系列之十一
一.SQL命令历史 ~/.mysql_history 记录了在mysql中执行的命令历史 二.事务日志 transaction log:事务型存储引擎自行管理和使用 在一个事务提交后还没有存到磁盘的情 ...
- mysql之 日志体系(错误日志、查询日志、二进制日志、事务日志、中继日志)
一. mysql错误日志:错误日志记录的事件:a).服务器启动关闭过程中的信息b).服务器运行过程中的错误信息c).事件调试器运行一个事件时间生的信息d).在从服务器上启动从服务器进程时产生的信息lo ...
- mysql基础之日志管理(查询日志、慢查询日志、错误日志、二进制日志、中继日志、事务日志)
日志文件记录了MySQL数据库的各种类型的活动,MySQL数据库中常见的日志文件有 查询日志,慢查询日志,错误日志,二进制日志,中继日志 ,事务日志. 修改配置或者想要使配置永久生效需将内容写入配置文 ...
- mysql 开发进阶篇系列 39 mysql日志之二进制日志(binlog)
一.概述 二进制日志(binlog)记录了所有的DDL(数据定义语言)语句和DML(数据操纵语言)语句,但是不包括数据查询语句, 语句以"事件"的形式保存,它描述了数据的更改过程, ...
- MySQL系列(五)--二进制日志对主从复制的影响
MySQL复制是基于主库上的二进制日志来完成,复制是异步的,可能存在延迟 MySQL日志分为: 1.服务层日志:二进制日志.通用日志.慢查日志 2.存储引擎层日志:innodb中重做日志和回滚日志 二 ...
- MySQL系列详解三:MySQL中各类日志详解-技术流ken
前言 日志文件记录了MySQL数据库的各种类型的活动,MySQL数据库中常见的日志文件有 查询日志,慢查询日志,错误日志,二进制日志,中继日志 .下面分别对他们进行介绍. 查询日志 1.查看查询日志变 ...
- 实战:mysql检查物理磁盘中的二进制日志文件是否有丢失
版权声明:日常札记,乐于分享 https://blog.csdn.net/yangzhawen/article/details/32103555 场景:有时候由于磁盘损坏或人为原因错误删除了磁盘中的二 ...
- MySQL-五种日志(查询日志、慢查询日志、更新日志、二进制日志、错误日志)、备份及主从复制配置
开启查询日志: 配置文件my.cnf: log=/usr/local/mysql/var/log.log 开启慢查询: 配置文件my.cnf: log-slow-queries=/usr/local/ ...
- Mysql 系列 | 日志模块
了解了 SQL 执行的流程,知道每一条语句都经过连接器.查询存储.分析器.优化器.执行器最后到存储引擎的过程.查询语句是如此,更新语句也不例外. 不同的是,更新语句会修改表数据,这里就涉及到两个重要的 ...
- day43 mysql 基本管理,[破解密码以及用户权限设置]以及慢日志查询配置
配置文件:详细步骤, 1,找到mysql的安装包,然后打开后会看到一个my.ini命名的程序,把它拖拽到notepad++里面来打开,(应该是其他文本形式也可以打开,可以试一下),直接拖拽即可打开该文 ...
随机推荐
- VS2017登录账户提示升级Edge浏览器的问题
在win7系统登录VS2017账号总是提示要升级浏览器的问题,这里给大家提供一个解决办法,也是困扰我很久的问题.遇到这中问题,我们可以在VS工具->选项->账户,然后勾选在添加账户或对账户 ...
- 前端仿京东、天猫带搜索历史搜索栏搜索框searchBar
快速实现前端仿京东.天猫带搜索历史搜索栏搜索框searchBar, 使用简单便利, 请访问uni-app插件市场地址:https://ext.dcloud.net.cn/plugin?id=12529 ...
- GPT3的技术突破:实现更准确、更真实的语言生成
目录 1. 引言 2. 技术原理及概念 3. 实现步骤与流程 4. 应用示例与代码实现讲解 5. 优化与改进 6. 结论与展望 7. 附录:常见问题与解答 GPT-3 技术突破:实现更准确.更真实的语 ...
- React框架学习基础篇-HelloReact-01
一直想掌握一门前端技术,于是想跟着张天宇老师学习,便开始学习React,以此来记录一下我的学习之旅. 学习一门新的技术首先是去官网看看,React官网链接是[https://zh-hans.react ...
- Python运维开发之路《高阶函数》
一.列表生成式,迭代器&生成器 列表生成式 需求:data列表里有如下三个值,需要给每个值加1 1 data = [1,2,3] 2 list = map(lambda x:x+1,data) ...
- Apache Hudi 元数据字段揭秘
介绍 Apache Hudi 最初由Uber于 2016 年开发,旨在实现一个交易型数据湖,该数据湖可以快速可靠地支持更新,以支持公司拼车平台的大规模增长. Apache Hudi 现在被业内许多人广 ...
- Java版人脸跟踪三部曲之一:极速体验
欢迎访问我的GitHub 这里分类和汇总了欣宸的全部原创(含配套源码):https://github.com/zq2599/blog_demos 关于<Java版人脸跟踪三部曲>系列 -& ...
- 因为一条DDL,差点搞挂整个系统,这次真的长了教训
有一次在线上提了一个sql变更,就是下面这条, -- 修改字段的数据类型由varchar(500)变更为text ALTER TABLE t MODIFY COLUMN name text; 提完之后 ...
- 2023年icpc大学生程序设计竞赛-nhr
icpc的省赛是在洛阳举办,第一次出省,还是两天,第一次离开郑州去别的城市比赛,心情更多的是激动,非常感谢老师给了这次机会,第一天20号,打完热身赛之后回寝室,和队友一起看了一下去年省赛的题,感觉还是 ...
- JVM虚拟机栈
JVM虚拟机栈 1.概述 1.1背景 由于跨平台性的设计,Java的指令都是根据栈来设计的.不同平台CPU架构不同,所以不能设计为基于寄存器的. 优点是跨平台,指令集小,编译器容易实现,缺点是性能下降 ...