Elasticsdump 数据导入/导出
一.安装过程
当前工具主要是用来对ES中的数据进行数据导入/导出,以及对数据迁移相关,使用elasticdump工具需要使用到npm,所以需要安装相关的依赖 目前使用到的ES版本是 7.x
安装NODE
参考下面的连接
https://www.cnblogs.com/haima/p/11235640.html
通过npm安装elasticdump
windows 和 linux 安装方法相同
# 本地安装和全局安装的区别在于它是否自动给你设置环境变量,其他的没有区别

# 切换源为 taobao 源

$ npm set registry https://registry.npm.taobao.org/

# 本地安装

$ npm install elasticdump

$ ./bin/elasticdump --help

# 推荐全局安装

$ npm install elasticdump -g

$ elasticdump --help

$ elasticdump --version

6.87.1
注:当前工具的安装,我目前是安装在ES集群本地的,当然可以安装在其他节点,只要网络能够被访问,但是因为在本地,所以走本地网卡,速度比较快!
二.数据导出
查看es的版本
haima@haima-PC:/media/haima/DEEPINOS/haima/后台管理切go$ curl -XGET localhost:9200

{

  "name" : "1fdffa0a6059",

  "cluster_name" : "docker-cluster",

  "cluster_uuid" : "GIxmC3CbQViGwrugI37jEw",

  "version" : {

    "number" : "7.3.1",

    "build_flavor" : "default",

    "build_type" : "docker",

    "build_hash" : "4749ba6",

    "build_date" : "2019-08-19T20:19:25.651794Z",

    "build_snapshot" : false,

    "lucene_version" : "8.1.0",

    "minimum_wire_compatibility_version" : "6.8.0",

    "minimum_index_compatibility_version" : "6.0.0-beta1"

  },

  "tagline" : "You Know, for Search"

}

# basic认证访问方法

curl -XGET -u用户名:密码 https://127.0.0.1:45789
{

  "name" : "node-66-1",

  "cluster_name" : "es6-test",

  "cluster_uuid" : "coSES9c4Q8SzOLGDSBS5OA",

  "version" : {

    "number" : "6.2.4",

    "build_hash" : "ccec39f",

    "build_date" : "2018-04-12T20:37:28.497551Z",

    "build_snapshot" : false,

    "lucene_version" : "7.2.1",

    "minimum_wire_compatibility_version" : "5.6.0",

    "minimum_index_compatibility_version" : "5.0.0"

  },

  "tagline" : "You Know, for Search"

}
ES中将数据导出为本地JSON文件
wanghaima@wanghaima-PC MINGW64 /e/haima/work/李光伟导工控数据/工信部涉赌网站

$ elasticdump --input=https://127.0.0.1:45789/user --output=user.json --searchBody '{ "query": { "match_all": {} } }' --limit 1000

Sat, 06 Aug 2022 04:10:30 GMT | starting dump

Sat, 06 Aug 2022 04:10:31 GMT | Error Emitted => <html>

<head><title>401 Authorization Required</title></head>

<body>

<center><h1>401 Authorization Required</h1></center>

<hr><center>nginx/1.20.1</center>

</body>

</html>

Sat, 06 Aug 2022 04:10:31 GMT | Error Emitted => <html>

<head><title>401 Authorization Required</title></head>

<body>

<center><h1>401 Authorization Required</h1></center>

<hr><center>nginx/1.20.1</center>

</body>

</html>

Sat, 06 Aug 2022 04:10:31 GMT | Total Writes: 0

Sat, 06 Aug 2022 04:10:31 GMT | dump ended with error (get phase) => UNAUTHORIZED: <html>

<head><title>401 Authorization Required</title></head>

<body>

<center><h1>401 Authorization Required</h1></center>

<hr><center>nginx/1.20.1</center>

</body>

</html>
报错
浏览器中访问可以看出加了nginx 的 basic认证
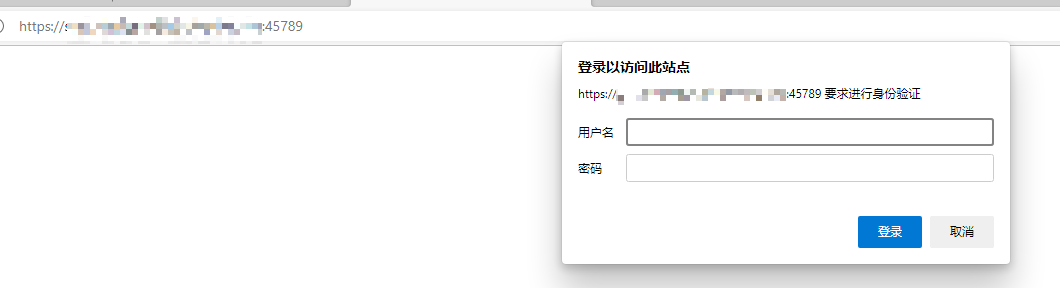
解决方法url加用户密码,运维提供
elasticdump --input=https://用户名:密码@127.0.0.1:45789/user --output=user.json --searchBody '{ "query": { "match_all": {} } }' --limit 1000
#无密码格式:elasticdump --input {protocol}://{host}:{port}/{index} --output ./test_index.json

#有密码格式:elasticdump --input {protocol}://{username:passwodd}@{host}:{port}/{index} --output ./test_index.json

#例子:将ES中的test_index 中的索引导出

#导出当前索引的mapping结构,存为本地文件

$ elasticdump --input http://127.0.0.1:9200/test3 --output ./test3_index_mapping.json --type=mapping

#导出当前索引下的所有真实数据 --limit 1000  每1000条一组导出

$ elasticdump --input http://127.0.0.1:9200/test3 --output ./test3_index.json --type=data --limit 1000

# 按查询条件导出数据,存为本地文件

$ elasticdump --input=http://127.0.0.1:9200/user,order --output=user_order.json --searchBody '{ "query": { "match_all": {} } }' --limit 1000

# 按查询条件导出指定字段数据,存为本地文件

$ elasticdump --input=http://127.0.0.1:9200/user,order --output=./ip200000_v1.json --searchBody '{"query":{"bool":{"must":[{"match_all":{}}],"must_not":[],"should":[]}},"_source":["ip"],"from":0,"size":200000,"sort":[],"aggs":{}}' --limit 1000

# includes 按查询条件导出数据,只导出指定字段(ip,port)数据,存到别一个mapping中(提前建好user_new索引)

$ elasticdump --input=http://127.0.0.1:9200/user --output=http://127.0.0.1:9200/user_new --searchBody '{"query":{"bool":{"must":[{"match_all":{}}],"must_not":[],"should":[]}},"_source":{"includes":["ip","port"]},"from":0,"size":200000,"sort":[],"aggs":{}}' --limit 1000

# excludes 按查询条件导出数据,排除指定字段(ip,port)数据,存到别一个mapping中(提前建好user_new索引)

$ elasticdump --input=http://127.0.0.1:9200/user --output=http://127.0.0.1:9200/user_new --searchBody '{"query":{"bool":{"must":[{"match_all":{}}],"must_not":[],"should":[]}},"_source":{"excludes":["ip","is_ipv6","v"]},"from":0,"size":200000,"sort":[],"aggs":{}}' --limit 1000
root@haima-PC:/usr/local/docker/efk# ll

总用量 20

drwxr-sr-x 3 root staff 4096 4月  11 01:08 .

drwxrwsrwx 8 root staff 4096 1月   3 20:30 ..

-rw-r--r-- 1 root staff  235 4月  11 01:08 test3_index.json

-rw-r--r-- 1 root staff  193 4月  11 00:15 test3_index_mapping.json
上面导出的两个文件都是在导入到
ES中所需要的,一个是mapping文件,另外一个是数据,当然mapping也可以自己手动建立
导出的test3_index_mapping.json mapping的内容
{"test_index":{"mappings":{"properties":{"age":{"type":"long"},"birth":{"type":"date"},"height":{"type":"long"},"name":{"type":"text","fields":{"keyword":{"type":"keyword","ignore_above":256}}}}}}}
导出的test3_index.json 数据的内容
{"_index":"test_index","_type":"_doc","_id":"2","_score":1,"_source":{"name":"lisi","age":20,"birth":"1997-01-05"}}

{"_index":"test_index","_type":"_doc","_id":"1","_score":1,"_source":{"age":10,"birth":"2010-10-20","name":"lisi","height":180}}
错误:在安装完成之后,进行首次使用过程中出现错误,错误主要是
CALL_AND_RETRY_LAST Allocation failed - JavaScript heap out of memory,出现当前错误
解决:试过多种方式,但是最终了能够使程序完整跑出来是因为将内存参数调大
#下面两个参数只需要设置一个,我两个都用过,目前记不清用的是哪个起的作用,应该是第一个,所以先设置第一个的参数

$ export NODE_OPTIONS--max-old-space-size=8192

$ export NODE_OPTIONS="--max-old-space-size=8192"
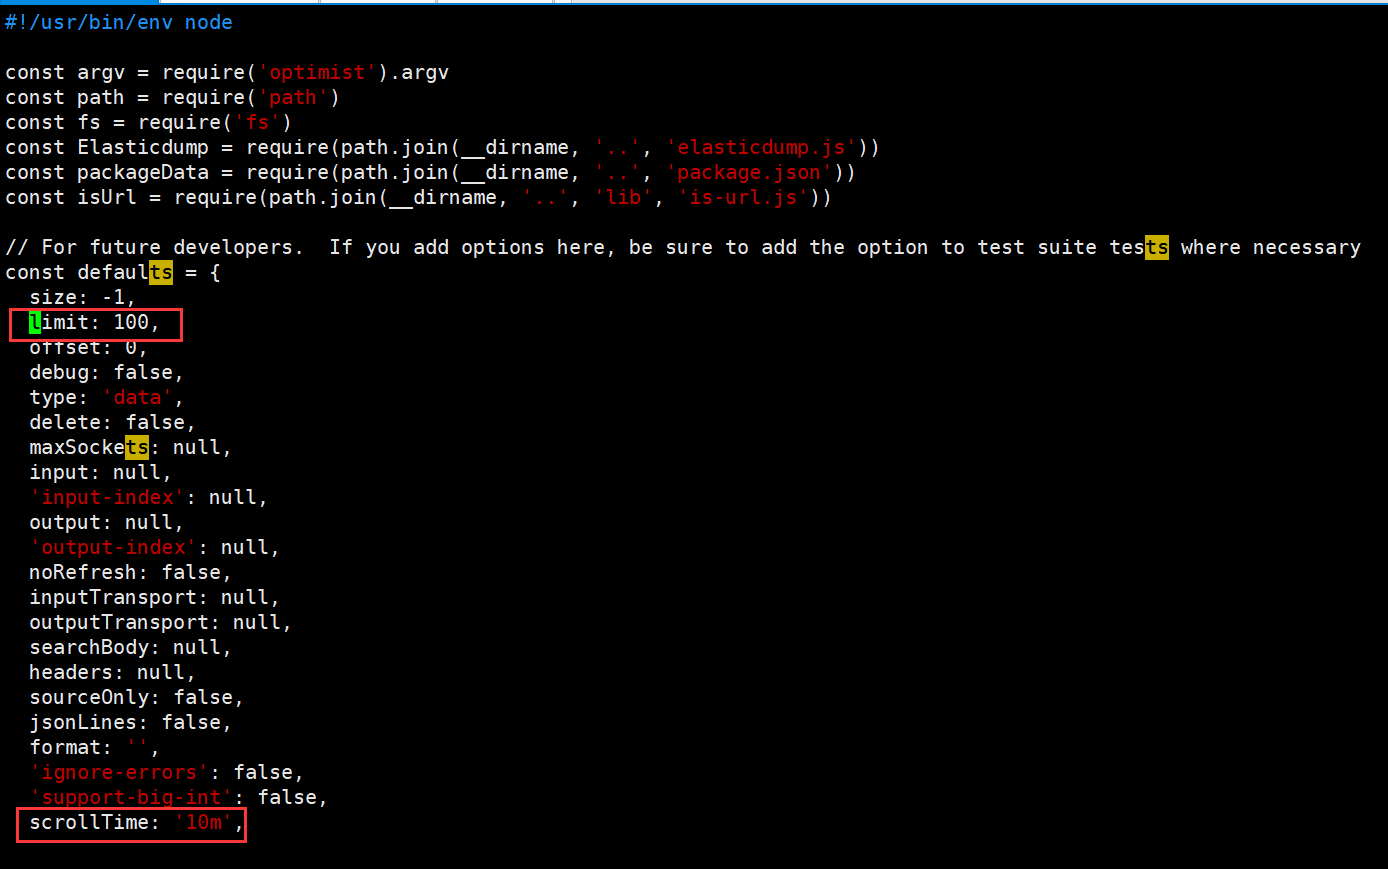
上面内容设置完成之后,还需要注意,在使用过程中需要注意,limit(默认值100)参数和scrollTime(默认值10m),这两个参数都有默认值,
limit:代表的是每次通过请求从ES中请求的数量,之前我将该参数设置为1000,但是出现了内存溢出,默认值就好
scrollTime:当前参数代表的是以当前数据生成一个类似镜像的东西,然后通过这个镜像去查询,如果是后面有新的数据进来是不会被纳入的,默认值是10m(分钟),也就是说,如果数据比较多,导出可能耗时比较久,那么可以将当前参数设置大一些,满足能够将数据导出完
如何修改参数:
/usr/local/node-v12.14.1-linux-x64/bin在安装目录下,找到
elasticdump脚本文件中,找到对应的参数进行修改vim /usr/local/node-v12.14.1-linux-x64/bin/elasticdump
通过直接命令跟参数的形式进行修改,如:
elasticdump --limit=200 --input http://127.0.0.1/test_index --output ./test_index
实操一
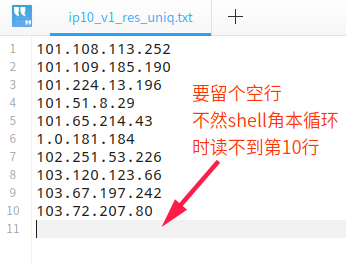
场景:shell脚本循环导出es数据,并获取ip
- ip10_v1_res_uniq.txt数据内容
- 脚本内容
#!/bin/bash

proc_cnt=0 # 计数器

filename=ip10_v1_res_uniq.txt # 要读取的文件

outfileNameTmp=es_ip_tmp10.json # 每次循环要输出的临时文件名

outfileName=es_ip10.json # 最终输出的文件名

cat $filename | while read LINE # 循环读取

do

  echo ""

  proc_cnt=`expr $proc_cnt + 1`

  echo "processing  $proc_cnt   $LINE"

  querystring="'{\"_source\":[\"ip\",\"p_category\",\"category\"],\"query\":{\"constant_score\":{\"filter\":{\"bool\":{\"must\":[{\"bool\":{\"filter\":{\"term\":{\"ip\":\"$LINE\"}}}}]}}}}}'"

  echo $querystring

  dumpstring="elasticdump --input=http://127.0.0.1:9200/user,order --output=$outfileNameTmp --searchBody $querystring --limit 1000"

  echo ""

  echo $dumpstring

  eval $dumpstring

  cat  $outfileNameTmp >> $outfileName #追加到临时文件尾部

  rm -rf $outfileNameTmp #删除临时文件

  sleep 0.05

done
- 运行脚本,导出的结果
{"_index":"user","_type":"_doc","_id":"187.53.206.3:520","_score":1,"_source":{"ip":"187.53.206.3"}}

{"_index":"user","_type":"_doc","_id":"190.233.65.119:520","_score":1,"_source":{"ip":"190.233.65.119"}}
- 从结果中提取ip
cat ip200000_v1.txt | awk -F'_source":{"ip":"' '{print $2}' | sort | uniq > ip200000_v1.txt_uniq_ip.txt`

# 参数说明

# ip200000_v1.txt要读取的文件

# -F 以_source":{"ip":"为分隔成n节

# {print $2} 取第二节的字符串

# sort 排序

# uniq 去重

# > 写入ip200000_v1.txt_uniq_ip.txt文件
运行上面语句输出结果
187.53.206.3"}}

190.233.65.119"}}
- 再次处理,以
"号为分隔成N节,取第一节的内容
cat ip200000_v1.txt_uniq_ip.txt | awk -F'\"' '{print $1}' > 1.txt
最终输出结果
187.53.206.3

190.233.65.119
- 按条件导出
#!/bin/bash

outfileNameTmp="es-export-agg-org-google-ip.json"

querystring="'{\"query\":{\"constant_score\":{\"filter\":{\"bool\":{\"must\":[{\"bool\":{\"should\":[{\"term\":{\"asn.as_organization\":\"GOOGLE\"}},{\"term\":{\"asn.as_organization\":\"GOOGLE-FIBER\"}}]}}]}}}},\"_source\":[\"ip\"]}'"

echo $querystring

dumpstring="elasticdump time node --max_old_space_size=16000  --noRefresh --input=http://120.52.152.4:19200/fofapro_subdomain,fofapro_service --sourceOnly --output=$outfileNameTmp --searchBody $querystring --limit 100000"

echo ""

echo $dumpstring

eval $dumpstring
实操二
shell角本导出es里的数据
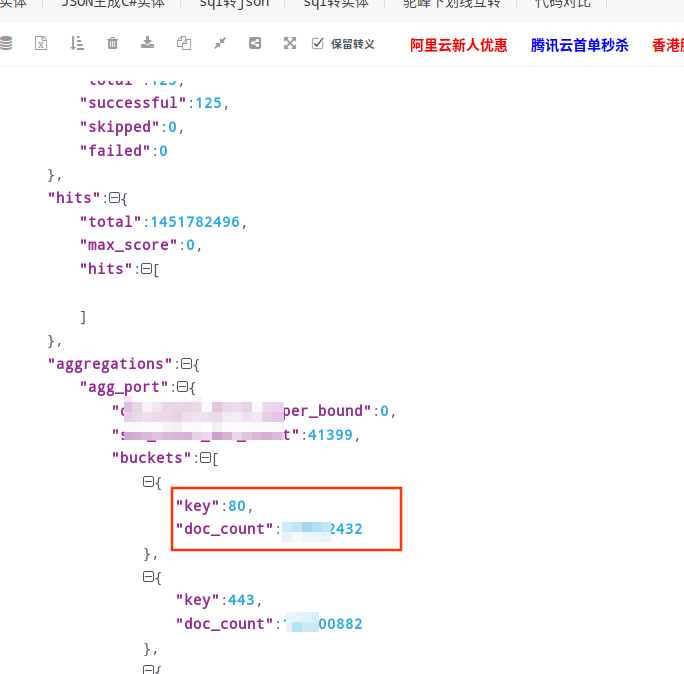
tmp_filename="es-export-port-agg.json"

curl -XPOST -H 'Content-Type: application/json' "127.0.0.1:9200/order,ips/_search" -d'

{

  "size": 0,

  "aggs": {

    "agg_port": {

      "terms": {

        "field": "port",

        "size": 9999

      }

    }

  }

}

' -o $tmp_filename

# if [ ! -f $tmp_filename ]; then

#    echo "$tmp_filename not exists!!!"

#    exit

# fi

# sed -i 's/}},{/}}\n{/g' $tmp_filename
效果:
实操三
tmp_filename="es-export-agg-protocol.json"

curl -XPOST -H 'Content-Type: application/json' "120.52.152.10:9201/fofapro_service/_search" -d'

{

  "_source": "protocol",

  "size": 1,

  "aggs": {

    "agg_protocols": {

      "terms": {

        "field": "protocol.raw",

        "size": 600

      }

    }

  }

}

' -o $tmp_filename

if [ ! -f $tmp_filename ]; then

   echo "$tmp_filename not exists!!!"

   exit

fi

sed -i 's/},{/},\n{/g' $tmp_filename
三.文件导入
本地json导入到es中
通过上面导出,已经导出了两个文件,一个是数据文件,一个是mapping文件,进行数据导入:
数据导入需要进行检查:
- 在需要导入的
ES创建索引,并且保持_index索引和type和mapping文件中的一致- 是否存在
mapping.json,这个取决于你是否导出,没倒出也可以自己手动建立,建立过程这里不细说- 是否存在相同索引(是否为同一ES中):存在需要修改导出的
mapping.json中的索引信息,不存在可以直接导入;- 如果是从文件导入,需要修改文件中的
_index和_type
2.1替换json文件中的es索引和type类型
sed -i s@{"_index":"user","_type":"user"@{"_index":"user_new","_type":"_doc"@g" user.json
数据导入:
# 创建索引

$ curl -XPUT http://127.0.0.1:9200/test_index

#因为导入的是mapping,所以设置type为mapping

$ elasticdump --input ./test3_index_mapping.json --output http://127.0.0.1:9200/ --type=mapping

#因为导入的是data(真实数据)所以设置type为data

$ elasticdump --input ./test3_index.json --output http://127.0.0.1:9200/ --type=data --limit 1000
执行过程:
# 创建索引

$ curl -XPUT http://127.0.0.1:9200/test_index

{"acknowledged":true,"shards_acknowledged":true,"index":"test_index"}

# 导入mapping

root@haima-PC:/usr/local/docker/efk# elasticdump --input ./test3_index_mapping.json --output http://127.0.0.1:9200/ --type=mapping

Sat, 10 Apr 2021 17:40:35 GMT | starting dump

Sat, 10 Apr 2021 17:40:35 GMT | got 1 objects from source file (offset: 0)

Sat, 10 Apr 2021 17:40:36 GMT | sent 1 objects to destination elasticsearch, wrote 1

Sat, 10 Apr 2021 17:40:36 GMT | got 0 objects from source file (offset: 1)

Sat, 10 Apr 2021 17:40:36 GMT | Total Writes: 1

Sat, 10 Apr 2021 17:40:36 GMT | dump complete

# 导入数据

root@haima-PC:/usr/local/docker/efk# elasticdump --input ./test3_index.json --output http://127.0.0.1:9200/ --type=data --limit 1000

Sat, 10 Apr 2021 17:43:54 GMT | starting dump

Sat, 10 Apr 2021 17:43:54 GMT | got 2 objects from source file (offset: 0)

Sat, 10 Apr 2021 17:43:55 GMT | sent 2 objects to destination elasticsearch, wrote 2

Sat, 10 Apr 2021 17:43:55 GMT | got 0 objects from source file (offset: 2)

Sat, 10 Apr 2021 17:43:55 GMT | Total Writes: 2

Sat, 10 Apr 2021 17:43:55 GMT | dump complete

# 删除索引

$ curl -XDELETE http://127.0.0.1:9200/test_index

{"acknowledged":true}
如上所示,为导入过程
导入导出具体参数要看数据量决定,并且要看单条数据大小决定参数的调整
如果导入时报如下错误
{

  _index: 'fofapro_subdomain',

  _type: 'subdomain',

  _id: 'https://rugscreen33.com',

  status: 403,

  error: {

    type: 'cluster_block_exception',

    reason: 'blocked by: [FORBIDDEN/12/index read-only / allow delete (api)];'

  }

}
本以为是ES所在的系统出现磁盘满了的问题,简单查看发现还有10G左右空间,占用95%的磁盘,删除后已用磁盘空间降至40%,但问题依然存在,
尝试重启单节点的ES,使用Kibana连接时同样报出了上边的提示,所以怀疑不是SkyWalking的ES客户端的问题,把目光定位在ES的索引上
经过尝试,最后使用以下命令解决,遂记之。
执行以下语句,再导入,问题解决
$ curl -XPUT -H "Content-Type: application/json" http://127.0.0.1:9200/_all/_settings -d '{"index.blocks.read_only_allow_delete": null}'
更多参考下面的连接
https://www.cnblogs.com/mojita/p/12011800.html
Elasticsdump 数据导入/导出的更多相关文章
- ITTC数据挖掘平台介绍(五) 数据导入导出向导和报告生成
一. 前言 经过了一个多月的努力,软件系统又添加了不少新功能.这些功能包括非常实用的数据导入导出,对触摸进行优化的画布和画笔工具,以及对一些智能分析的报告生成模块等.进一步加强了平台系统级的功能. 马 ...
- 从零自学Hadoop(16):Hive数据导入导出,集群数据迁移上
阅读目录 序 导入文件到Hive 将其他表的查询结果导入表 动态分区插入 将SQL语句的值插入到表中 模拟数据文件下载 系列索引 本文版权归mephisto和博客园共有,欢迎转载,但须保留此段声明,并 ...
- oracle数据导入/导出
Oracle数据导入导出imp/exp 功能:Oracle数据导入导出imp/exp就相当与oracle数据还原与备份. 大多情况都可以用Oracle数据导入导出完成数据的备份和还原(不会造成数据 ...
- Oracle数据导入导出
Oracle数据导入导出imp/exp 在oracle安装目录下有EXP.EXE与IMP.EXE这2个文件,他们分别被用来执行数据库的导入导出.所以Oracle数据导入导出imp/exp就相当与ora ...
- SQL SERVER 和ACCESS的数据导入导出
//批量导入Access string filepath = Server.MapPath("student.mdb"); stri ...
- 关于 Oracle 的数据导入导出及 Sql Loader (sqlldr) 的用法
在 Oracle 数据库中,我们通常在不同数据库的表间记录进行复制或迁移时会用以下几种方法: 1. A 表的记录导出为一条条分号隔开的 insert 语句,然后执行插入到 B 表中2. 建立数据库间的 ...
- Hive 实战(1)--hive数据导入/导出基础
前沿: Hive也采用类SQL的语法, 但其作为数据仓库, 与面向OLTP的传统关系型数据库(Mysql/Oracle)有着天然的差别. 它用于离线的数据计算分析, 而不追求高并发/低延时的应用场景. ...
- Winform开发框架之通用数据导入导出操作的事务性操作完善
1.通用数据导入导出操作模块回顾 在我的Winfrom开发框架里面,有一个通用的导入模块,它在默默处理这把规范的Excel数据导入到不同的对象表里面,一直用它来快速完成数据导入的工作.很早在随笔< ...
- MongoDB学习(三)数据导入导出及备份恢复
这几天想着公司要用MongoDB,自然就要用到数据导入导出,就自己学习了一下. 在Mongo学习(二)中就讲到了在bin目录下有一些工具,本篇就是使用这些工具进行数据的导入导出及备份恢复. 注意:以下 ...
- SQLServer 数据导入导出 SSIS 包 位置
笔记:sqlserver 在执行数据导入导出的时候,可以选择是否保存SSIS包,如果选择保存,在保存方式有:SQlserver .文件系统.如果选择sqlserver 则 包信息保存在 msdb 系统 ...
随机推荐
- #轮廓线dp#洛谷 1879 [USACO06NOV]Corn Fields G
题目 分析 考虑状压dp在\(n\leq 21\)的情况下会TLE, 设\(dp[n][m][S]\)表示当前正在处理\((n,m)\)这个格子 并且轮廓线状态为\(S\)的方案数, 考虑可行状态最多 ...
- OpenHarmony Camera源码分析
一.简介 当前,开源在科技进步和产业发展中发挥着越来越重要的作用,OpenAtom OpenHarmony(简称"OpenHarmony")赋予了开发者孕育创新的种子,也为数字化产 ...
- 1开幕在即 | “万物互联,使能千行百业”2022开放原子全球开源峰会OpenAtom OpenHarmony分论坛
7月27日下午,聚焦开源产业与生态的2022开放原子全球开源峰会OpenAtom OpenHarmony分论坛将在北京亦创国际会展中心盛大开幕. 作为OpenHarmony工作委员会联合生态合作伙伴为 ...
- HMS Core Discovery第13期直播预告——构建手游中的真实世界
[导读] 游戏的迭代升级不止在于玩法的创新,也体现在画质升级上.一款又一款次世代游戏运用各种顶尖渲染技术化身"显卡杀手"的同时,也让玩家们在体验过逼真渲染画质后大呼过瘾,技术的进步 ...
- 数据驱动ddt简单使用
安装 pip install ddt 数据驱动 ddt 可以使用的地方很多 比如: 1. 做接口测试的参数化 2. 读取自动化测试关键字模型的测试用例 等 demo import ddt, unit ...
- HarmonyOS创作激励计划启动:助力技术创作突破边界
即日起推出HarmonyOS创作激励计划,成功投稿并入选的文章将在HarmonyOS开发者公众号上线,9大技术社区同步宣发,不仅有丰厚稿酬,还有机会赢取创作奖品! 活动时间 即日起-2024年12 ...
- nginx重新整理——————nginx 的设计模型[八]
前言 简单介绍一下nginx的设计模型,对我们设计程序还是有一定帮助的. 正文 这里先列一下模型哈,后面有深入篇,介绍的比较清楚. nginx 的处理模型: nginx 进程模型: 可以看到下面列出了 ...
- c# ref和out 详解
前言 数据在内存中,存在两种状态,堆和栈中.堆中的数据是可以直接拿到的,一般称引用对象. 这些对象有一个特征,那就是经过函数处理之后,这些数据在主线程中改变了.好奇点好了,为什么栈中的数据就不会改变呢 ...
- js es6 介绍set,WeakSet
前言 介绍一下es6 的set 和 weakset 正文 set ES6 提供了新的数据结构 Set.它类似于数组,但是成员的值都是唯一的,没有重复的值. Set 本身是一个构造函数,用来生成 Set ...
- webkit简介
WebKit是一款开源的浏览器引擎,主要用于渲染HTML网页和执行JavaScript代码.WebKit起源于苹果公司,最初是为了开发Safari浏览器而创建的.现在,它已经成为许多浏览器(如苹果的S ...