Android--UI之Radio、Check、Toggle
前言
这篇博客讲解一下Android平台下,RadioButton、CheckBox以及ToggleButton三个控件的用法,因为这三个控件之中都存在一个选中或是没选中的状态,所以放在一起讲解。
这三个控件均是从Button之中间接继承而来的,所以一些Button中的设置都是通用的,如图文混排,动态修改显示内容,因为之前已经对这些内容进行了说明,如果不清楚朋友可以参见一下我的另外一篇博客,Android—UI之Button,所以这篇博客只是就这三个控件的常用方法进行简要说明,并给出示例。
CompoundButton
RadioButton(单选按钮)、CheckBox(复选按钮)、ToggleButton(开关按钮)都继承自android.widget.CompoundButton类,而CompoundButton又继承自Button类,在这个类中封装了一个checked属性,用于判断是否被选中,这也是它与Button的不同,对其进行了扩展,这个属性在这三个控件中的用法是一样的。
一般checked属性通过以下方式来设置与获取:
- android:checked/setChecked(boolean):设置是否被选中。
- isChecked():获取是否被选中。
RadioButton
RadioButton,为一个单选按钮,一般配合RadioGroup一起使用,在同一RadioGroup内,所有的RadioButton的选中状态为互斥,它们有且只有一个RadioButton被选中,但是在不同的RadioGroup中是不相互影响的。
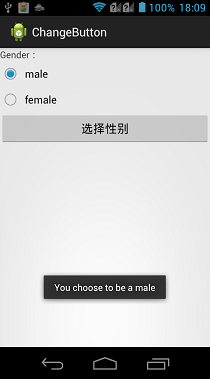
下面通过一个简单的示例来说明一下,在示例中会存在两个RadioButton,用于定义性别信息,当用户选中了某个后,点击按钮,把选中的信息提示到屏幕上。
布局代码:
 <?xml version="1.0" encoding="utf-8"?>

 <LinearLayout xmlns:android="http://schemas.android.com/apk/res/android"

     android:layout_width="match_parent"

     android:layout_height="match_parent"

     android:orientation="vertical" >

     <TextView

         android:layout_width="fill_parent"

         android:layout_height="wrap_content"

         android:text="Gender:" />

     <!-- 定义一个RadioGroup用于包装RadioButton -->

     <RadioGroup

         android:id="@+id/gender"

         android:layout_width="wrap_content"

         android:layout_height="wrap_content" >

         <RadioButton

             android:layout_width="wrap_content"

             android:layout_height="wrap_content"

             android:text="male" />

         <RadioButton

             android:layout_width="wrap_content"

             android:layout_height="wrap_content"

             android:text="female" />

     </RadioGroup>

     <Button

         android:id="@+id/btnGender"

         android:layout_width="fill_parent"

         android:layout_height="wrap_content"

         android:text="选择性别" />

 </LinearLayout>
实现代码:
 package com.example.changebutton;

 import android.app.Activity;

 import android.os.Bundle;

 import android.view.View;

 import android.widget.Button;

 import android.widget.RadioButton;

 import android.widget.RadioGroup;

 import android.widget.Toast;

 public class RadioButtonActivity extends Activity {

     private RadioGroup group;

     private Button btnGender;

     @Override

     protected void onCreate(Bundle savedInstanceState) {

         // TODO Auto-generated method stub

         super.onCreate(savedInstanceState);

         setContentView(R.layout.radiobutton_layout);

         group = (RadioGroup) findViewById(R.id.gender);

         btnGender = (Button) findViewById(R.id.btnGender);

         btnGender.setOnClickListener(new View.OnClickListener() {

             @Override

             public void onClick(View v) {

                 // 获取单选按钮的选项个数

                 int len = group.getChildCount();

                 String msgString = "";

                 for (int i = 0; i < len; i++) {

                     //RadioGroup中包含的子View就是一个RadioButton

                     RadioButton radiobutton = (RadioButton) group.getChildAt(i);

                     if (radiobutton.isChecked()) {

                         //如果被选中,则break循环,并且记录选中信息

                         msgString = "You choose to be a "

                                 + radiobutton.getText().toString();

                         break;

                     }

                 }

                 if (msgString.equals("")) {

                     Toast.makeText(RadioButtonActivity.this,

                             "Please select a gender!", Toast.LENGTH_SHORT)

                             .show();

                 } else {

                     Toast.makeText(RadioButtonActivity.this, msgString,

                             Toast.LENGTH_SHORT).show();

                 }

             }

         });

     }

 }
实现效果:
CheckBox
CheckBox是一个复选按钮,它的用法与RadioButton很像,但是与之不同的是,它可以多选,所以也无需用一个组控件包裹起来。
这里涉及了一动态添加UI控件的知识,在Android中动态增加控件一般有两种方式:
- 为需要操作的UI控件指定android:id属性,并且在Activity中通过setContentView()设置需要查找的布局文件。这样才可以在Activity中,使用findViewById(int)方法找到待操作的控件。
- 为需要操作的UI控件单独创建XML文件,在Activity中使用动态填充的方式:getLayoutInflater().inflate(int)的方式获取到XML文件定义的控件。
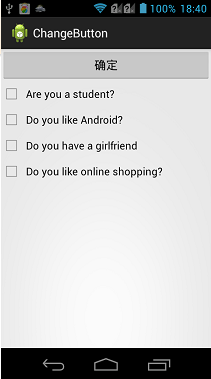
这里通过一个示例来说明CheckBox的使用,在示例中动态添加了CheckBox的选项,并且对其进行选中之后提示选中信息。上面两种方式都用用到,通过一个chooseMethod(boolean)区分。
布局代码:
 <?xml version="1.0" encoding="utf-8"?>

 <LinearLayout xmlns:android="http://schemas.android.com/apk/res/android"

     android:layout_width="match_parent"

     android:layout_height="match_parent"

     android:orientation="vertical"

     android:id="@+id/checkLayout">

     <!-- 这里只是定义了一个按钮,其他的CheckBox控件在代码中动态添加 -->

     <Button

         android:id="@+id/checkBtn"

         android:layout_width="fill_parent"

         android:layout_height="wrap_content"

         android:text="确定" />

 </LinearLayout>
如果使用动态填充的方式获取CheckBox的话,需要添加一个CheckBox的XML文件,代码如下:
 <?xml version="1.0" encoding="utf-8"?>

 <CheckBox xmlns:android="http://schemas.android.com/apk/res/android"

     android:layout_width="match_parent"

     android:layout_height="wrap_content"  >

 </CheckBox>
实现代码:
package com.example.changebutton; import java.util.ArrayList;
import java.util.List;
import android.app.Activity;
import android.app.AlertDialog;
import android.os.Bundle;
import android.view.View;
import android.view.View.OnClickListener;
import android.widget.Button;
import android.widget.CheckBox;
import android.widget.LinearLayout; public class CheckBoxActivity extends Activity implements OnClickListener { private List<CheckBox> checkBoxs = new ArrayList<CheckBox>();
private Button checkBtn; @Override
protected void onCreate(Bundle savedInstanceState) {
super.onCreate(savedInstanceState);
chooseMethod(false);
checkBtn = (Button) findViewById(R.id.checkBtn);
checkBtn.setOnClickListener(this);
} @Override
public void onClick(View v) {
String s = "";
//循环cheackBoxs
for (CheckBox c : checkBoxs) {
if (c.isChecked()) {
//如果选中就添加选中结果到msg中。
s += c.getText() + "\n";
}
}
if ("".equals(s)) {
s = "您没有选中选项!";
}
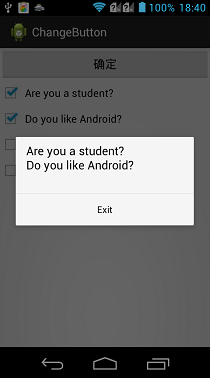
//使用对话框弹出选中的信息
new AlertDialog.Builder(this).setMessage(s)
.setPositiveButton("Exit", null).show();
} private void chooseMethod(boolean b) {
String[] checkboxText = new String[] { "You are student?",
"Do you like Android?", "Do you have a girlfriend",
"Do you like online shopping?" };
if (b) {
//使用本文中提到的第一种方式,通过Id动态加载
setContentView(R.layout.checkbox_layout);
//获取带填充的布局控件
LinearLayout linearLayout = (LinearLayout) this
.findViewById(R.id.checkLayout);
//根据数组,循环添加内容
for (int i = 0; i < checkboxText.length; i++) {
CheckBox checkbox = new CheckBox(this);
checkBoxs.add(checkbox);
checkBoxs.get(i).setText(checkboxText[i]);
//把CheckBox加入到布局控件中
linearLayout.addView(checkbox);
}
} else {
//通过动态填充的方式,找到布局文件
LinearLayout linearLayout = (LinearLayout) getLayoutInflater()
.inflate(R.layout.checkbox_layout, null);
for (int i = 0; i < checkboxText.length; i++) {
//在通过动态填充的方式找到CheckBox的文件
CheckBox checkbox = (CheckBox) getLayoutInflater().inflate(
R.layout.cheackbox, null);
checkBoxs.add(checkbox);
checkBoxs.get(i).setText(checkboxText[i]);
linearLayout.addView(checkbox);
}
//最后把这个布局文件加载显示
setContentView(linearLayout);
}
}
}
实现效果
ToggleButton
ToggleButton,一个开关按钮,有两个状态,大抵的用法与上面两个控件一直,可以通过两个属性显示不同状态时,控件内显示文字的内容不同,属性如下:
- android:textOff/setTextOff(CharSequence):设置关闭时显示内容。
- android:textOn/setTextOn(CharSequence):设置打开时显示内容。
ToggleButton,这个控件有一个OnCheckedChangeListener()事件,当开关的状态切换的时候会被触发,其中需要传递一个OnCheckedChangeListener接口的实现内,当被切换时,触发其中的onCheckedChange()方法,可以在其中写需要实现的功能代码。
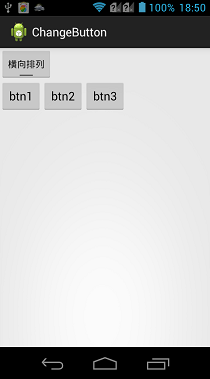
下面通过一个示例讲解一下ToggleButton的使用,使用一个toggleButton控件,控制一个LinearLayout的布局排列方式。
布局代码:
 <?xml version="1.0" encoding="utf-8"?>

 <LinearLayout xmlns:android="http://schemas.android.com/apk/res/android"

     android:layout_width="match_parent"

     android:layout_height="match_parent"

     android:orientation="vertical" >

     <ToggleButton

         android:id="@+id/togBtn"

         android:layout_width="wrap_content"

         android:layout_height="wrap_content"

         android:checked="true"

         android:textOff="横向排列"

         android:textOn="纵向排列" />

     <LinearLayout

         android:id="@+id/OriLayout"

         android:layout_width="match_parent"

         android:layout_height="match_parent"

         android:orientation="vertical" >

         <Button

             android:layout_width="wrap_content"

             android:layout_height="wrap_content"

             android:text="btn1" />

         <Button

             android:layout_width="wrap_content"

             android:layout_height="wrap_content"

             android:text="btn2" />

         <Button

             android:layout_width="wrap_content"

             android:layout_height="wrap_content"

             android:text="btn3" />

     </LinearLayout>

 </LinearLayout>
实现代码:
 package com.example.changebutton;

 import android.app.Activity;

 import android.os.Bundle;

 import android.widget.CompoundButton;

 import android.widget.CompoundButton.OnCheckedChangeListener;

 import android.widget.LinearLayout;

 import android.widget.ToggleButton;

 public class ToggleButtonActivity extends Activity {

     private ToggleButton togBtn;

     private LinearLayout linearLayout;

     @Override

     protected void onCreate(Bundle savedInstanceState) {

         // TODO Auto-generated method stub

         super.onCreate(savedInstanceState);

         setContentView(R.layout.toggle_layout);

         togBtn = (ToggleButton) findViewById(R.id.togBtn);

         linearLayout = (LinearLayout) this.findViewById(R.id.OriLayout);

         togBtn.setOnCheckedChangeListener(new OnCheckedChangeListener() {

             @Override

             public void onCheckedChanged(CompoundButton buttonView,

                     boolean isChecked) {

                 //通过判断是否选中,来设置LinearLayout的横向纵向排列

                 if (isChecked) {

                     linearLayout.setOrientation(1);

                 } else {

                     linearLayout.setOrientation(0);

                 }

             }

         });

     }

 }
实现效果:

总结
以上就讲解了一下CompoundButton抽象类下的三个实现控件类的使用,在Android-4.0之后,又新加入了一个控件Switch,对它的使用与之上介绍的三个控件类似,这里就不再详细讲解了。
请支持原创,尊重原创,转载请注明出处。谢谢。

Android--UI之Radio、Check、Toggle的更多相关文章
- android UI库
https://github.com/wasabeef/awesome-android-ui List of Android UI/UX Libraries A curated list of awe ...
- Android UI开发第三十篇——使用Fragment构建灵活的桌面
http://www.lupaworld.com/article-222973-1.html 当我们设计应用程序时,希望能够尽最大限度的适配各种设备,包括4寸屏.7寸屏. 10寸屏等等,Android ...
- 移动周报:十款最实用的Android UI设计工具
上一周可以说是一个不断Mark周,从最实用的Android UI设计工具.免费移动应用测试框架推荐,到HTML5开发框架等等,各种开发工具.框架精彩丰呈,看得小伙伴们是不亦乐乎.当然,还有不容错过的M ...
- Android UI WebView的使用:
Android UI WebView的使用: /** * @author smiling * @date 2016/10 */ 布局: <?xml version="1.0" ...
- GitHub上受欢迎的Android UI Library
GitHub上受欢迎的Android UI Library 内容 抽屉菜单 ListView WebView SwitchButton 按钮 点赞按钮 进度条 TabLayout 图标 下拉刷新 Vi ...
- Android UI相关开源项目库汇总
最近做了一个Android UI相关开源项目库汇总,里面集合了OpenDigg 上的优质的Android开源项目库,方便移动开发人员便捷的找到自己需要的项目工具等,感兴趣的可以到GitHub上给个st ...
- 【android开发】10款实用的Android UI工具,非常有用!
移动应用的UI设计就好似达摩克利斯之剑,一方面,一个视觉.交互.体验良好的UI可以加强应用在用户心目中的形象和识别性.而另一方面,一个体验糟糕的UI设计不仅无法让用户沉浸在应用中,还会造成用户对应用产 ...
- iPhone/iPad/Android UI尺寸规范 UI尺寸规范,UI图标尺寸,UI界面尺寸,iPhone6尺寸,iPhone6 Plus尺寸,安卓尺寸,iOS尺寸
iPhone/iPad/Android UI尺寸规范 UI尺寸规范,UI图标尺寸,UI界面尺寸,iPhone6尺寸,iPhone6 Plus尺寸,安卓尺寸,iOS尺寸 iPhone界面尺寸 设备 分辨 ...
- Android ui 测试课堂笔记
开始接触Android ui测试了,笔记如下 模拟器 Genemotion , the fastest android simulator in the world Android ui 测试工具 S ...
- Android UI 绘制过程浅析(五)自定义View
前言 这已经是Android UI 绘制过程浅析系列文章的第五篇了,不出意外的话也是最后一篇.再次声明一下,这一系列文章,是我在拜读了csdn大牛郭霖的博客文章<带你一步步深入了解View> ...
随机推荐
- Sublime Text 3安装emmet(ZenCoding)
1.安装 Package Ctrol: 使用 ctrl + - 打开控制台,输入以下代码 import urllib.request,os; pf = 'Package Control.sublime ...
- require.js模块化
require.js简单来说就是把js代码分装模块化了 模块化 模块就是实现特定功能的一组方法.只要把不同的函数(以及记录状态的变量)简单地放在一起,就算是一个模块. 我拿一个运动框架来解释一下req ...
- (摘录)Java 详解 JVM 工作原理和流程
作为一名Java使用者,掌握JVM的体系结构也是必须的. 说起Java,人们首先想到的是Java编程语言,然而事实上,Java是一种技术,它由四方面组成:Java编程语言.Java类文件格式.Java ...
- LoadRunner简单介绍----性能自动化测试工具
在做性能测试中,我认为技术可以说是武功心法,工具则是一把利剑,有一把好的利剑可以帮助自己更好的完成性能测试工作.在这里简单介绍一下LoadRunner,带大家一起来认识一下这把尚方宝剑. 一.性能测试 ...
- CPDA-战略管理
战略管理-PEST分析-市场分析-竞争环境分析-SWOT分析-内/外部因素评价矩阵-国际化/多元化战略 战略管理: 战略分析->战略制定->战略实施->战略评价->战略分析,四 ...
- Failed to mount component: template or render function not defined.
Failed to mount component: template or render function not defined. vue-loader13.0有一个变更就是默认启用了esModu ...
- flink 读取kafka 数据,partition分配
每个并发有个编号,只会读取kafka partition % 总并发数 == 编号 的分区 如: 6 分区, 4个并发 分区: p0 p1 p2 p3 p4 p5 并发: 0 1 2 3 ...
- vuex的getters处理数据
getters是用来处理state里的数据的 getters传递一个值state 例子: store.js import Vue from 'vue' import Vuex from 'vuex' ...
- select、poll、epoll
1.概念 select.poll.epoll都是事件触发机制,当等待的事件发生就触发进行处理,用于I/O复用 2.简单例子理解 3.select函数 3.1函数详解 int select(int ma ...
- CodeForces 935E Fafa and Ancient Mathematics (树形DP)
题意:给定一个表达式,然后让你添加 n 个加号,m 个减号,使得表达式的值最大. 析:首先先要建立一个表达式树,这个应该很好建立,就不说了,dp[u][i][0] 表示 u 这个部分表达式,添加 i ...