Spring 学习笔记一
1、IOC,DI。 2、装配bean基于xml(实例化,声明周期,后处理bean,属性注入)。3、装配bean基于注解
1 spring框架概述
1.1 什么是spring
l Spring是一个开源框架,Spring是于2003 年兴起的一个轻量级的Java 开发框架,由Rod Johnson 在
其著作Expert One-On-One J2EE Development and Design中阐述的部分理念和原型衍生而来。它是为了
解决企业应用开发的复杂性而创建的。框架的主要优势之一就是其分层架构,分层架构允许使用者选择使用
哪一个组件,同时为 J2EE 应用程序开发提供集成的框架。Spring使用基本的JavaBean来完成以前只可能由
EJB完成的事情。然而,Spring的用途不仅限于服务器端的开发。从简单性、可测试性和松耦合的角度而言,
任何Java应用都可以从Spring中受益。Spring的核心是控制反转(IoC)和面向切面(AOP)。简单来说,
Spring是一个分层的JavaSE/EE full-stack(一站式) 轻量级开源框架。
l 轻量级:与EJB对比,依赖资源少,销毁的资源少。
l 分层: 一站式,每一个层都提供的解决方案
web层:struts,spring-MVC
service层:spring
dao层:hibernate,mybatis , jdbcTemplate --> spring-data
1.2 spring由来
l Expert One-to-One J2EE Design and Development
l Expert One-to-One J2EE Development without EJB
1.3 spring核心
l Spring的核心是控制反转(IoC)和面向切面(AOP)
1.4 spring优点
|
l 方便解耦,简化开发 (高内聚低耦合)
l AOP编程的支持
l 声明式事务的支持
l 方便程序的测试
l 方便集成各种优秀框架
l 降低JavaEE API的使用难度
|
1.5 spring体系结构
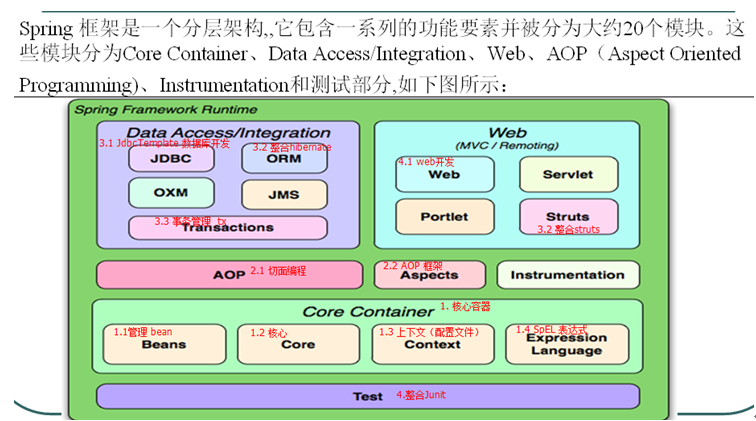
核心容器:beans、core、context、expression
2 入门案例:IoC【掌握】
2.1 导入jar包
l 4 + 1 : 4个核心(beans、core、context、expression) + 1个依赖(commons-loggins...jar)


2.2 目标类
l 提供UserService接口和实现类
l 获得UserService实现类的实例
之前开发中,直接new一个对象即可。
学习spring之后,将由Spring创建对象实例--> IoC 控制反转(Inverse of Control)
之后需要实例对象时,从spring工厂(容器)中获得,需要将实现类的全限定名称配置到xml文件中
|
public interface UserService { public void addUser(); } |
|
public class UserServiceImpl implements UserService { @Override public void addUser() { System.out.println("a_ico add user"); } } |
2.3 配置文件
l 位置:任意,开发中一般在classpath下(src)
l 名称:任意,开发中常用applicationContext.xml
l 内容:添加schema约束
约束文件位置:spring-framework-3.2.0.RELEASE\docs\spring-framework-reference\html\ xsd-config.html
 <?xml version="1.0" encoding="UTF-8"?>

 <beans xmlns="http://www.springframework.org/schema/beans"

        xmlns:xsi="http://www.w3.org/2001/XMLSchema-instance"

        xsi:schemaLocation="http://www.springframework.org/schema/beans

                               http://www.springframework.org/schema/beans/spring-beans.xsd">

     <!-- 配置service

         <bean> 配置需要创建的对象

             id :用于之后从spring容器获得实例时使用的

             class :需要创建实例的全限定类名

     -->

     <bean id="userServiceId" class="com.itheima.a_ioc.UserServiceImpl"></bean>

 </beans>
applicationContext.xml
2.4 测试
 @Test

     public void demo02(){

         //从spring容器获得

         //1 获得容器

         String xmlPath = "com/itheima/a_ioc/beans.xml";

         ApplicationContext applicationContext = new ClassPathXmlApplicationContext(xmlPath);

         //2获得内容 --不需要自己new,都是从spring容器获得

         UserService userService = (UserService) applicationContext.getBean("userServiceId");

         userService.addUser();

     }
TestDemo
3 入门案例:DI【掌握】
l DI Dependency Injection ,依赖注入
is a :是一个,继承。
has a:有一个,成员变量,依赖。
class B {
private A a; //B类依赖A类
}
依赖:一个对象需要使用另一个对象
注入:通过setter方法进行另一个对象实例设置。
l 例如:
class BookServiceImpl{
//之前开发:接口 = 实现类 (service和dao耦合)
//private BookDao bookDao = new BookDaoImpl();
//spring之后 (解耦:service实现类使用dao接口,不知道具体的实现类)
private BookDao bookDao;
setter方法
}
模拟spring执行过程
创建service实例:BookService bookService = new BookServiceImpl() -->IoC <bean>
创建dao实例:BookDao bookDao = new BookDaoImple() -->IoC
将dao设置给service:bookService.setBookDao(bookDao); -->DI <property>
3.1 目标类
l 创建BookService接口和实现类
l 创建BookDao接口和实现类
l 将dao和service配置 xml文件
l 使用api测试
3.1.1 dao
|
public interface BookDao { public void addBook(); } |
|
public class BookDaoImpl implements BookDao { @Override public void addBook() { System.out.println("di add book"); } } |
3.1.2 service
 public interface BookService {

    public abstract void addBook();

 }
IUserService
 public class BookServiceImpl implements BookService {

    // 方式1:之前,接口=实现类

 // private BookDao bookDao = new BookDaoImpl();

    // 方式2:接口 + setter

    private BookDao bookDao;

    public void setBookDao(BookDao bookDao) {

       this.bookDao = bookDao;

    }

    @Override

    public void addBook(){

       this.bookDao.addBook();

    }

 }
UserServiceIplm
3.2 配置文件
 <beans xmlns="http://www.springframework.org/schema/beans"

        xmlns:xsi="http://www.w3.org/2001/XMLSchema-instance"

        xsi:schemaLocation="http://www.springframework.org/schema/beans

                               http://www.springframework.org/schema/beans/spring-beans.xsd">

     <!--

     模拟spring执行过程

         创建service实例:BookService bookService = new BookServiceImpl()    IoC  <bean>

         创建dao实例:BookDao bookDao = new BookDaoImpl()            IoC

         将dao设置给service:bookService.setBookDao(bookDao);        DI   <property>

         <property> 用于进行属性注入

             name: bean的属性名,通过setter方法获得

                 setBookDao ##> BookDao  ##> bookDao

             ref :另一个bean的id值的引用

      -->

     <!-- 创建service -->

     <bean id="bookServiceId" class="com.itheima.b_di.BookServiceImpl">

         <property name="bookDao" ref="bookDaoId"></property>

     </bean>

     <!-- 创建dao实例 -->

     <bean id="bookDaoId" class="com.itheima.b_di.BookDaoImpl"></bean>

 </beans>
applicationContext.xml
3.3 测试
|
@Test public void demo01(){ //从spring容器获得 String xmlPath = "com/itheima/b_di/beans.xml"; ApplicationContext applicationContext = new ClassPathXmlApplicationContext(xmlPath); BookService bookService = (BookService) applicationContext.getBean("bookServiceId"); bookService.addBook(); } |
4 myeclipse schema xml提示
l 步骤一:确定xsd文件位置
spring-framework-3.2.0.RELEASE\schema\beans
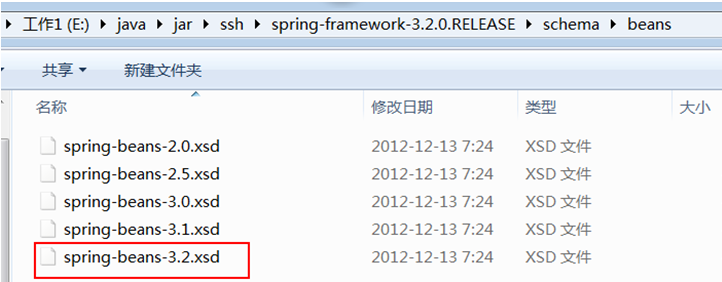
l 步骤二:复制路径

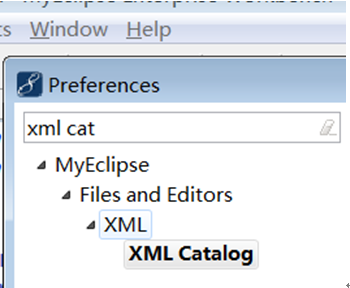
l 步骤三:搜索“xml catalog”
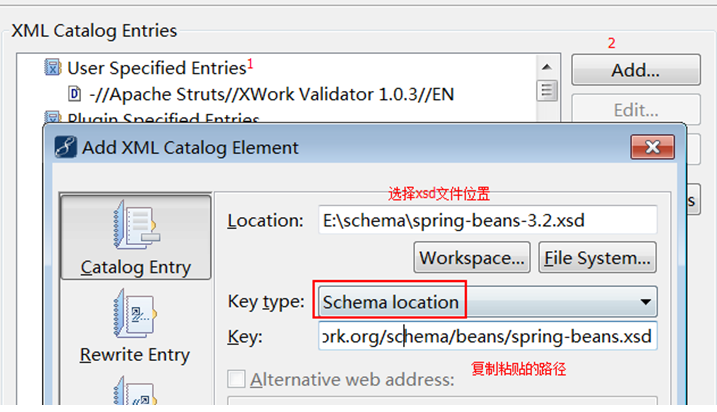
l 步骤四:添加约束提示
5 核心API
l api整体了解,之后不使用,在学习过程需要。
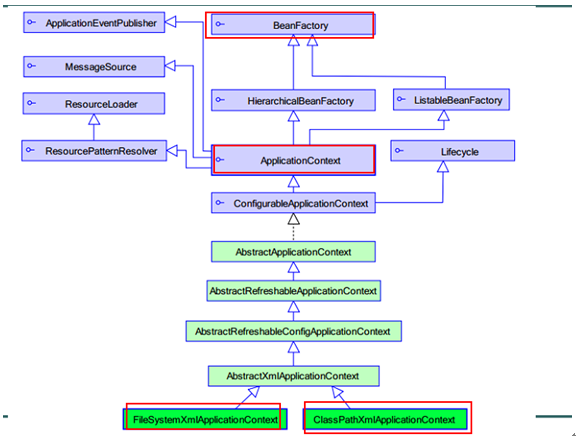
l BeanFactory :这是一个工厂,用于生成任意bean。
采取延迟加载,第一次getBean时才会初始化Bean
l ApplicationContext:是BeanFactory的子接口,功能更强大。(国际化处理、事件传递、Bean自动装配、各
种不同应用层的Context实现)。当配置文件被加载,就进行对象实例化。
ClassPathXmlApplicationContext 用于加载classpath(类路径、src)下的xml
加载xml运行时位置 --> /WEB-INF/classes/...xml
FileSystemXmlApplicationContext 用于加载指定盘符下的xml
加载xml运行时位置 --> /WEB-INF/...xml
通过java web ServletContext.getRealPath() 获得具体盘符
|
@Test public void demo02(){ //使用BeanFactory --第一次条用getBean实例化 String xmlPath = "com/itheima/b_di/beans.xml"; BeanFactory beanFactory = new XmlBeanFactory(new ClassPathResource(xmlPath)); BookService bookService = (BookService) beanFactory.getBean("bookServiceId"); bookService.addBook(); } |
6 装配Bean 基于XML
6.1 实例化方式
l 3种bean实例化方式:默认构造、静态工厂、实例工厂
6.1.1 默认构造
|
<bean id="" class=""> 必须提供默认构造 |
6.1.2 静态工厂
l 常用与spring整合其他框架(工具)
l 静态工厂:用于生成实例对象,所有的方法必须是static
|
<bean id="" class="工厂全限定类名" factory-method="静态方法"> |
6.1.2.1 工厂
|
public class MyBeanFactory { /** * 创建实例 * @return */ public static UserService createService(){ return new UserServiceImpl(); } } |
6.1.2.2 spring配置
|
<!-- 将静态工厂创建的实例交予spring class 确定静态工厂全限定类名 factory-method 确定静态方法名 --> <bean id="userServiceId" class="com.itheima.c_inject.b_static_factory.MyBeanFactory" factory-method="createService"></bean> |
6.1.3 实例工厂
l 实例工厂:必须先有工厂实例对象,通过实例对象创建对象。提供所有的方法都是“非静态”的。
6.1.3.1 工厂
|
/** * 实例工厂,所有方法非静态 * */ public class MyBeanFactory { /** * 创建实例 * @return */ public UserService createService(){ return new UserServiceImpl(); } } |
6.1.3.2 spring配置

|
<!-- 创建工厂实例 --> <bean id="myBeanFactoryId" class="com.itheima.c_inject.c_factory.MyBeanFactory"></bean> <!-- 获得userservice * factory-bean 确定工厂实例 * factory-method 确定普通方法 --> <bean id="userServiceId" factory-bean="myBeanFactoryId" factory-method="createService"></bean> |
6.2 Bean种类
l 普通bean:之前操作的都是普通bean。<bean id="" class="A"> ,spring直接创建A实例,并返回
l FactoryBean:是一个特殊的bean,具有工厂生成对象能力,只能生成特定的对象。
bean必须使用 FactoryBean接口,此接口提供方法 getObject() 用于获得特定bean。
<bean id="" class="FB"> 先创建FB实例,使用调用getObject()方法,并返回方法的返回值
FB fb = new FB();
return fb.getObject();
l BeanFactory 和 FactoryBean 对比?
BeanFactory:工厂,用于生成任意bean。
FactoryBean:特殊bean,用于生成另一个特定的bean。例如:ProxyFactoryBean ,此工厂
bean用于生产代理。<bean id="" class="....ProxyFactoryBean"> 获得代理对象实例。AOP使用
6.3 作用域
l 作用域:用于确定spring创建bean实例个数
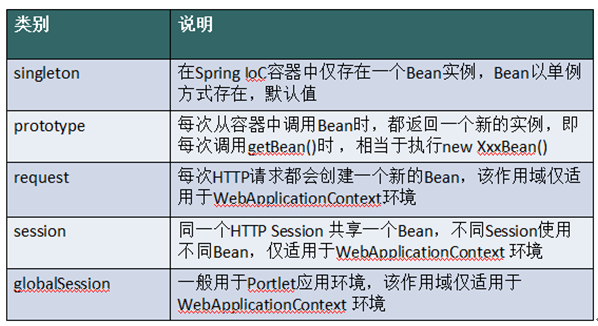
l 取值:
singleton 单例,默认值。
prototype 多例,每执行一次getBean将获得一个实例。例如:struts整合spring,配置action多例。
l 配置信息
|
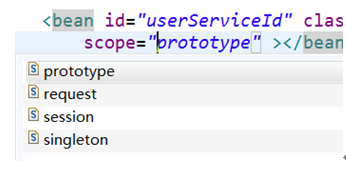
<bean id="" class="" scope=""> |
|
<bean id="userServiceId" class="com.itheima.d_scope.UserServiceImpl" scope="prototype" ></bean> |
6.4 生命周期
6.4.1 初始化和销毁
l 目标方法执行前后执行后,将进行初始化或销毁。
|
<bean id="" class="" init-method="初始化方法名称" destroy-method="销毁的方法名称"> |
6.4.1.1 目标类
|
public class UserServiceImpl implements UserService { @Override public void addUser() { System.out.println("e_lifecycle add user"); } public void myInit(){ System.out.println("初始化"); } public void myDestroy(){ System.out.println("销毁"); } } |
6.4.1.2 spring配置
|
<!-- init-method 用于配置初始化方法,准备数据等 destroy-method 用于配置销毁方法,清理资源等 --> <bean id="userServiceId" class="com.itheima.e_lifecycle.UserServiceImpl" init-method="myInit" destroy-method="myDestroy" ></bean> |
6.4.1.3 测试
|
@Test public void demo02() throws Exception{ //spring 工厂 String xmlPath = "com/itheima/e_lifecycle/beans.xml"; ClassPathXmlApplicationContext applicationContext = new ClassPathXmlApplicationContext(xmlPath); UserService userService = (UserService) applicationContext.getBean("userServiceId"); userService.addUser(); //要求:1.容器必须close,销毁方法执行; 2.必须是单例的(scope规定。) // applicationContext.getClass().getMethod("close").invoke(applicationContext); // * 此方法接口中没有定义,实现类提供 applicationContext.close(); } |
6.4.2 BeanPostProcessor 后处理Bean
l spring 提供一种机制,只要实现此接口BeanPostProcessor,并将实现类提供给spring容器,spring容器将自动执行,在初始化方法前执行before(),在初始化方法后执行after() 。 配置<bean class="">

l Factory hook(勾子) that allows for custom modification of new bean instances, e.g. checking for marker interfaces or wrapping them with proxies.
l spring提供工厂勾子,用于修改实例对象,可以生成代理对象,是AOP底层。
模拟
A a =new A();
a = B.before(a) --> 将a的实例对象传递给后处理bean,可以生成代理对象并返回。
a.init();
a = B.after(a);
a.addUser(); //生成代理对象,目的在目标方法前后执行(例如:开启事务、提交事务)
a.destroy()
6.4.2.1 编写实现类
 public class MyBeanPostProcessor implements BeanPostProcessor {

     @Override

     public Object postProcessBeforeInitialization(Object bean, String beanName) throws BeansException {

         System.out.println("前方法 : " + beanName);

         return bean;

     }

     @Override

     public Object postProcessAfterInitialization(final Object bean, String beanName) throws BeansException {

         System.out.println("后方法 : " + beanName);

         // bean 目标对象

         // 生成 jdk 代理

         return Proxy.newProxyInstance(

                     MyBeanPostProcessor.class.getClassLoader(),

                     bean.getClass().getInterfaces(),

                     new InvocationHandler(){

                         @Override

                         public Object invoke(Object proxy, Method method, Object[] args) throws Throwable {

                             System.out.println("------开启事务");

                             //执行目标方法

                             Object obj = method.invoke(bean, args);

                             System.out.println("------提交事务");

                             return obj;

                         }});

     }

 }
后处理bean的初始化事物处理实现类
6.4.2.2 配置
|
<!-- 将后处理的实现类注册给spring --> <bean class="com.itheima.e_lifecycle.MyBeanPostProcessor"></bean> |
l 问题1:后处理bean作用某一个目标类,还是所有目标类?
所有
l 问题2:如何只作用一个?
通过“参数2”beanName进行控制
6.5 属性依赖注入
l 依赖注入方式:手动装配 和 自动装配
l 手动装配:一般进行配置信息都采用手动
基于xml装配:构造方法、setter方法
基于注解装配:
l 自动装配:struts和spring 整合可以自动装配
byType:按类型装配
byName:按名称装配
constructor构造装配,
auto: 不确定装配。
6.5.1 构造方法
6.5.1.1 目标类
 public class User {

     private Integer uid;

     private String username;

     private Integer age;

     public User(Integer uid, String username) {

         super();

         this.uid = uid;

         this.username = username;

     }

     public User(String username, Integer age) {

         super();

         this.username = username;

         this.age = age;

     }
6.5.1.2 (构造函数的) spring配置
 <!-- 构造方法注入

         * <constructor-arg> 用于配置构造方法一个参数argument

             name :参数的名称

             value:设置普通数据

             ref:引用数据,一般是另一个bean id值

             index :参数的索引号,从0开始 。如果只有索引,匹配到了多个构造方法时,默认使用第一个。

             type :确定参数类型

         例如:使用名称name

             <constructor-arg name="username" value="jack"></constructor-arg>

             <constructor-arg name="age" value="18"></constructor-arg>

         例如2:【类型type 和  索引 index】

             <constructor-arg index="0" type="java.lang.String" value="1"></constructor-arg>

             <constructor-arg index="1" type="java.lang.Integer" value="2"></constructor-arg>

     -->

     <bean id="userId" class="com.itheima.f_xml.a_constructor.User" >

         <constructor-arg index="0" type="java.lang.String" value="1"></constructor-arg>

         <constructor-arg index="1" type="java.lang.Integer" value="2"></constructor-arg>

     </bean>
applicationContext.xml
6.5.2 setter方法
 <!-- setter方法注入

         * 普通数据

             <property name="" value="值">

             等效

             <property name="">

                 <value>值

         * 引用数据

             <property name="" ref="另一个bean">

             等效

             <property name="">

                 <ref bean="另一个bean"/>

     -->

     <bean id="personId" class="com.itheima.f_xml.b_setter.Person">

         <property name="pname" value="阳志"></property>

         <property name="age">

             <value>1234</value>

         </property>

         <property name="homeAddr" ref="homeAddrId"></property>

         <property name="companyAddr">

             <ref bean="companyAddrId"/>

         </property>

     </bean>

     <bean id="homeAddrId" class="com.itheima.f_xml.b_setter.Address">

         <property name="addr" value="阜南"></property>

         <property name="tel" value="911"></property>

     </bean>

     <bean id="companyAddrId" class="com.itheima.f_xml.b_setter.Address">

         <property name="addr" value="北京八宝山"></property>

         <property name="tel" value="120"></property>

     </bean>
applicationContext.xml
6.5.3 P命令空间[了解]
l 对“setter方法注入”进行简化,替换<property name="属性名">,而是在
<bean p:属性名="普通值" p:属性名-ref="引用值">
l p命名空间使用前提,必须添加命名空间(复制第一行空间,改名)

|
<bean id="personId" class="com.itheima.f_xml.c_p.Person" p:pname="禹太璞" p:age="22" p:homeAddr-ref="homeAddrId" p:companyAddr-ref="companyAddrId"> </bean> <bean id="homeAddrId" class="com.itheima.f_xml.c_p.Address" p:addr="DG" p:tel="东莞"> </bean> <bean id="companyAddrId" class="com.itheima.f_xml.c_p.Address" p:addr="DG" p:tel="岛国"> </bean> |
6.5.4 SpEL[了解]
l 对<property>进行统一编程,所有的内容都使用value
<property name="" value="#{表达式}">
#{123}、#{'jack'} : 数字、字符串
#{beanId} :另一个bean引用
#{beanId.propName} :操作数据
#{beanId.toString()} :执行方法
#{T(类).字段|方法} :静态方法或字段
|
<!-- <property name="cname" value="#{'jack'}"></property> <property name="cname" value="#{customerId.cname.toUpperCase()}"></property> 通过另一个bean,获得属性,调用的方法 <property name="cname" value="#{customerId.cname?.toUpperCase()}"></property> ?. 如果对象不为null,将调用方法 --> <bean id="customerId" class="com.itheima.f_xml.d_spel.Customer" > <property name="cname" value="#{customerId.cname?.toUpperCase()}"></property> <property name="pi" value="#{T(java.lang.Math).PI}"></property> </bean> |
6.5.5 集合注入
 <!--

         集合的注入都是给<property>添加子标签

             数组:<array>

             List:<list>

             Set:<set>

             Map:<map> ,map存放k/v 键值对,使用<entry>描述

             Properties:<props>  <prop key=""></prop>  【】

         普通数据:<value>

         引用数据:<ref>

     -->

     <bean id="collDataId" class="com.itheima.f_xml.e_coll.CollData" >

         <property name="arrayData">

             <array>

                 <value>DS</value>

                 <value>DZD</value>

                 <value>屌丝</value>

                 <value>屌中屌</value>

             </array>

         </property>

         <property name="listData">

             <list>

                 <value>与天南</value>

                 <value>问小天</value>

                 <value>李煜</value>

                 <value>曾小贤</value>

             </list>

         </property>

         <property name="setData">

             <set>

                 <value>何以</value>

                 <value>笑声</value>

                 <value>默默</value>

             </set>

         </property>

         <property name="mapData">

             <map>

                 <entry key="jack" value="杰克"></entry>

                 <entry>

                     <key><value>rose</value></key>

                     <value>肉丝</value>

                 </entry>

             </map>

         </property>

         <property name="propsData">

             <props>

                 <prop key="高富帅">嫐</prop>

                 <prop key="白富美">嬲</prop>

                 <prop key="男屌丝">挊</prop>

             </props>

         </property>

     </bean>
集合注入的配置文件代码
7 装配Bean 基于注解
l 注解:就是一个类,使用@注解名称
l 开发中:使用注解 取代 xml配置文件。
1. @Component取代<bean class="">
@Component("id") 取代 <bean id="" class="">
2.web开发,提供3个@Component注解衍生注解(功能一样)取代<bean class="">
@Repository :dao层
@Service:service层
@Controller:web层
3.依赖注入 ,给私有字段设置,也可以给setter方法设置
普通值:@Value("")
引用值:
方式1:按照【类型】注入
@Autowired
方式2:按照【名称】注入1
@Autowired
@Qualifier("名称")
方式3:按照【名称】注入2
@Resource("名称")
4.生命周期
初始化:@PostConstruct
销毁:@PreDestroy
5.作用域
@Scope("prototype") 多例
l 注解使用前提,添加命名空间,让spring扫描含有注解类

|
<beans xmlns="http://www.springframework.org/schema/beans" xmlns:xsi="http://www.w3.org/2001/XMLSchema-instance" xmlns:context="http://www.springframework.org/schema/context" xsi:schemaLocation="http://www.springframework.org/schema/beans http://www.springframework.org/schema/beans/spring-beans.xsd http://www.springframework.org/schema/context http://www.springframework.org/schema/context/spring-context.xsd"> <!-- 组件扫描,扫描含有注解的类 --> <context:component-scan base-package="com.itheima.g_annotation.a_ioc"></context:component-scan> </beans> |
Spring 学习笔记一的更多相关文章
- 【Spring学习笔记-MVC-3.1】SpringMVC返回Json数据-方式1-扩展
<Spring学习笔记-MVC>系列文章,讲解返回json数据的文章共有3篇,分别为: [Spring学习笔记-MVC-3]SpringMVC返回Json数据-方式1:http://www ...
- spring学习笔记(一) Spring概述
博主Spring学习笔记整理大部分内容来自Spring实战(第四版)这本书. 强烈建议新手购入或者需要电子书的留言. 在学习Spring之前,我们要了解这么几个问题:什么是Spring?Spring ...
- Java框架spring 学习笔记(十八):事务管理(xml配置文件管理)
在Java框架spring 学习笔记(十八):事务操作中,有一个问题: package cn.service; import cn.dao.OrderDao; public class OrderSe ...
- Spring学习笔记2——表单数据验证、文件上传
在上一章节Spring学习笔记1——IOC: 尽量使用注解以及java代码中,已经搭建了项目的整体框架,介绍了IOC以及mybatis.第二节主要介绍SpringMVC中的表单数据验证以及文件上传. ...
- 不错的Spring学习笔记(转)
Spring学习笔记(1)----简单的实例 --------------------------------- 首先需要准备Spring包,可从官方网站上下载. 下载解压后,必须的两个包是s ...
- 【Spring学习笔记-MVC-15.1】Spring MVC之异常处理=404界面
作者:ssslinppp 异常处理请参考前篇博客:<[Spring学习笔记-MVC-15]Spring MVC之异常处理>http://www.cnblogs.com/sssl ...
- 【Spring学习笔记-MVC-13.2】Spring MVC之多文件上传
作者:ssslinppp 1. 摘要 前篇文章讲解了单文件上传<[Spring学习笔记-MVC-13]Spring MVC之文件上传>http://www.cnblogs.co ...
- 【Spring学习笔记-MVC-9】SpringMVC数据格式化之日期转换@DateTimeFormat
作者:ssslinppp 1. 摘要 本文主要讲解Spring mvc数据格式化的具体步骤: 并讲解前台日期格式如何转换为java对象: 在之前的文章<[Spring学习笔记-MVC ...
- 【Spring学习笔记-MVC-5】利用spring MVC框架,实现ajax异步请求以及json数据的返回
作者:ssslinppp 时间:2015年5月26日 15:32:51 1. 摘要 本文讲解如何利用spring MVC框架,实现ajax异步请求以及json数据的返回. Spring MV ...
- 【Spring学习笔记-MVC-4】SpringMVC返回Json数据-方式2
<Spring学习笔记-MVC>系列文章,讲解返回json数据的文章共有3篇,分别为: [Spring学习笔记-MVC-3]SpringMVC返回Json数据-方式1:http://www ...
随机推荐
- python数据结构与算法第四天【代码执行时间测试模块】
#!/usr/bin/env python # _*_ coding:UTF-8 _*_ from timeit import Timer def foo(): ''' 使用append方式向列表添加 ...
- 老男孩python学习自修第二十三天【多线程】
1. 线程的创建与运行 #!/usr/bin/env python # _*_ coding:UTF-8 _*_ from threading import Thread def foo(param1 ...
- Java连接RabbitMQ之创建连接
依赖包: <dependencies> <dependency> <groupId>junit</groupId> <artifactId> ...
- python 读取csv 数据并画图分析
数据源 : https://pan.baidu.com/s/1eR593Uy 密码: yqjh python环境 python3 #encoding: utf-8 import csv impo ...
- jQuery AJAX获取JSON数据解析多种方式示例
<!DOCTYPE html PUBLIC "-//W3C//DTD XHTML 1.0 Transitional//EN" "http://www.w3.org/ ...
- Hadoop Brief
Hadoop是一个由Apache基金会所开发的分布式系统基础架构. 用户可以在不了解分布式底层细节的情况下,开发分布式程序.充分利用集群的威力进行高速运算和存储. [1] Hadoop实现了一个分布 ...
- Asp.Net Core 输出 Word
In one of the ASP.NET Core projects we did in the last year, we created an OutputFormatter to provid ...
- CF343D Water Tree
题目链接 题目翻译(摘自洛谷) 疯狂科学家Mike培养了一颗有根树,由n个节点组成.每个节点是一个要么装满水要么为空的贮水容器. 树的节点用1~n编号,其中根节点为1.对于每个节点的容器,其子节点的容 ...
- 轻量级浏览器Midori
导读 这是一个对再次回归的轻量级.快速.开源的 Web 浏览器 Midori 的快速回顾. 如果你正在寻找一款轻量级网络浏览器替代品,请试试 Midori. Midori是一款开源的网络浏览器,它更注 ...
- PHP——运行shell命令|脚本
内置函数 PHP | 系统程序执行 exec shell_exec passthru system 配置 打开php.ini配置文件,并从disable_function将用到的函数从禁用中删除,然后 ...
