Spring boot 使用多个RedisTemplate
问题描述
想在一个JAVA Class 向同一个Redis实例的不同 dbindex 写入数据,非常类似于StackOverflowe上的[How can select dbIndex when I use RedisTemplate in Spring-Data-Redis?。在这篇文章中描述了如何使用Spring boot访问Redis,在创建JedisConnectionFactory的时候指定dbindex:
JedisConnectionFactory factory = new JedisConnectionFactory();

...

factory.setDatabase(databaseId);//set dbindex
因此,大概思路是配置2个RedisTemplate,其中一个RedisTemplate负责访问dbindex=1的数据库;另一个RedisTemplate负责访问dbindex=3的数据库。
根据这篇文章,因此通过 @Bean(name=) 生成多个RedisTemplate。但是由于生成RedisTemplate需要传入JedisConnectionFactory实例,而我们是在JedisConnectionFactory中指定了访问Redis的哪个数据库(dbindex)。因此,就在创建JedisConnectionFactory实例的时候,使用 @Scope(scopeName = "prototype") 注解,这样的话Jedis连接工厂就不再是单例模式了。因此,就有两个JedisConnectionFactory实例,每个实例通过jedisConnectionFactory.setDatabase()设置不同的dbindex。这种方式可能非常愚蠢,会引起严重的性能问题。
下面,来看看具体是怎么配置的:
    @Scope(scopeName = "prototype")

    public JedisConnectionFactory jedisConnectionFactory() {

	JedisPoolConfig config = getRedisConfig();

	JedisConnectionFactory factory = new JedisConnectionFactory(config);

	factory.setUsePool(true);

	factory.setHostName(host);

	factory.setPort(port);

	return factory;

    }
每调用一次jedisConnectionFactory() 返回一个新的JedisConnectionFactory实例。
然后定义2个RedisTemplate Bean,jedisConnectionFactory.setDatabase() 方法分别设置不同的dbindex
 import org.slf4j.Logger;

import org.slf4j.LoggerFactory;

import org.springframework.beans.factory.annotation.Value;

import org.springframework.context.annotation.Bean;

import org.springframework.context.annotation.Configuration;

import org.springframework.context.annotation.Scope;

import org.springframework.data.redis.connection.jedis.JedisConnectionFactory;

import org.springframework.data.redis.core.RedisTemplate;

import org.springframework.data.redis.serializer.StringRedisSerializer;

import redis.clients.jedis.JedisPoolConfig;

import java.util.Map;

/**

 * Created by Administrator on 2018/4/9.

 */

@Configuration

public class LoginMacRedisConfig {

    private static final Logger logger = LoggerFactory.getLogger(LoginMacRedisConfig.class);

    @Value("1")

    private int logmacDatabaseId;

    @Value("3")

    private int mobmaskDatabaseId;

    @Bean

    public JedisPoolConfig getRedisConfig() {

	JedisPoolConfig config = new JedisPoolConfig();

	config.setMaxIdle(8);

	config.setMinIdle(0);

	return config;

    }

    @Scope(scopeName = "prototype")

    public JedisConnectionFactory jedisConnectionFactory() {

	JedisPoolConfig config = getRedisConfig();

	JedisConnectionFactory factory = new JedisConnectionFactory(config);

	factory.setUsePool(true);

	factory.setHostName(host);

	factory.setPort(port);

	return factory;

    }

    @Bean(name = "login_mac")

    public RedisTemplate<String, Map<String, String>> logmacRedisTemplate() {

	final RedisTemplate<String, Map<String, String>> template = new RedisTemplate<>();

	JedisConnectionFactory jedisConnectionFactory = jedisConnectionFactory();

	jedisConnectionFactory.setDatabase(logmacDatabaseId);

	template.setConnectionFactory(jedisConnectionFactory);

	logger.info("host:{}, port:{}, database:{}", jedisConnectionFactory.getHostName(),jedisConnectionFactory.getPort(), jedisConnectionFactory.getDatabase());

	StringRedisSerializer stringRedisSerializer = new StringRedisSerializer();

	template.setKeySerializer(stringRedisSerializer);

	template.setHashKeySerializer(stringRedisSerializer);

	template.setHashValueSerializer(stringRedisSerializer);

	return template;

    }

    @Bean(name = "mobile_mask")

    public RedisTemplate<String, Map<String, String>> mobileMaskRedisTemplate() {

	final RedisTemplate<String, Map<String, String>> template = new RedisTemplate<>();

	JedisConnectionFactory jedisConnectionFactory = jedisConnectionFactory();

	jedisConnectionFactory.setDatabase(mobmaskDatabaseId);

	template.setConnectionFactory(jedisConnectionFactory);

	logger.info("host:{}, port:{}, database:{}", jedisConnectionFactory.getHostName(),jedisConnectionFactory.getPort(), jedisConnectionFactory.getDatabase());

	StringRedisSerializer stringRedisSerializer = new StringRedisSerializer();

	template.setKeySerializer(stringRedisSerializer);

	template.setHashKeySerializer(stringRedisSerializer);

	template.setHashValueSerializer(stringRedisSerializer);

	return template;

    }

}
最后,再写一个Service类,就可以同时注入这两个RedisTemplate,操作同一个Redis服务器上的不同的dbindex了。
import org.springframework.beans.factory.annotation.Autowired;

import org.springframework.beans.factory.annotation.Qualifier;

import org.springframework.data.redis.core.HashOperations;

import org.springframework.data.redis.core.RedisTemplate;

import org.springframework.stereotype.Service;

import java.util.HashMap;

import java.util.Map;

/**

 * Created by Administrator on 2018/4/10.

 */

@Service

public class RedisTestService {

    @Autowired

    @Qualifier("login_mac")

    private RedisTemplate<String, Map<String, String>> template1;

    @Autowired

    @Qualifier("mobile_mask")

    private RedisTemplate<String, Map<String, String>> template2;

    public void write2Redis() {

	HashOperations<String, String, String> hashOperations = template1.opsForHash();

	Map<String, String> values = new HashMap<>();

	values.put("dbindex", "1");

	hashOperations.putAll("123", values);

	template2.opsForHash().put("123", "dbindex", "3");

    }

}

Application.java 启动类
@SpringBootApplication

public class Application implements CommandLineRunner{

    @Autowired

    private RedisTestService redisTestService;

    public static void main(String[] args) {

	SpringApplication.run(Application.class, args);

    }

    @Override

    public void run(String... strings) throws Exception {

	redisTestService.write2Redis();

    }

}
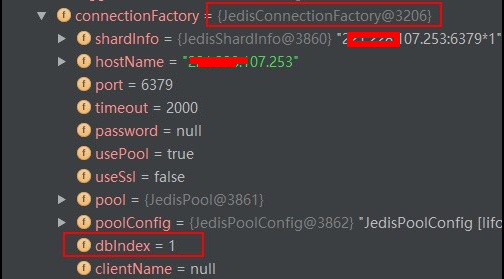
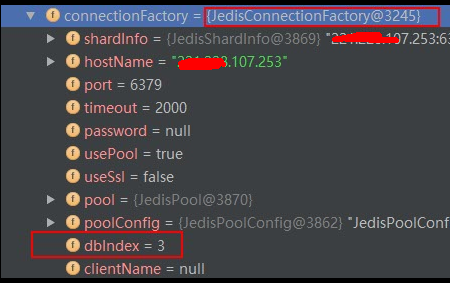
在redisTestService对象中:有两个RedisTemplate实例:

两个RedisTemplate实例分别封装了两个JedisConnectionFactory:


调试结果下:
2018-04-10 20:18:34.754 INFO 13512 --- [ main] c.y.t.c.redis.LoginMacRedisConfig : host:192.168.107.253, port:6379, database:1
2018-04-10 20:19:06.972 INFO 13512 --- [ main] c.y.t.c.redis.LoginMacRedisConfig : host:192.168.107.253, port:6379, database:3
最终查看写入Redis结果,可以看出:dbindex 1 和 dbindex 3 都分别成功写入了数据。
redis 192.168.107.253:6379> SELECT 1

OK

redis 192.168.107.253:6379[1]> KEYS *

1) "123"

redis 192.168.107.253:6379[1]> HGET 123 dbindex

"1"

redis 192.168.107.253:6379[1]> SELECT 3

OK

redis 192.168.107.253:6379[3]> KEYS *

1) "123"

redis 192.168.107.253:6379[3]> HGET 123 dbindex

"3"
额外补充
其实要在同一个应用中访问不同的dbindex,一种方式是使用JedisPool,JedisPool创建Jedis,然后调用select方法选择dbindex。具体实现可参考这篇文章。但这样的话,就不能使用RedisTemplate的各种方便的接口读写Redis了。
    @Bean

    public JedisPool redisPoolFactory() {

        JedisPool jedisPool = new JedisPool(jedisPoolConfig(), host, port);

        Jedis jedis = jedisPool.getResource();

        jedis.select(3);

        return jedisPool;

    }
其实是可以像说的:通过RedisConnectionCommand的 select 方法来选择dbindex的,但是还是同样的问题,用不了RedisTemplate。
RedisConnection redisConnection = redisTemplate.getConnectionFactory().getConnection();

DefaultStringRedisConnection stringRedisConnection = new   DefaultStringRedisConnection(redisConnection);

stringRedisConnection.select(2);

stringRedisConnection.set("test", "test");
另外这里也有一篇Spring Boot Redis多实例配置,也可以参考一下。Spring Boot 兼Redis新手,只能这样了。
原文:http://www.cnblogs.com/hapjin/p/8783084.html
Spring boot 使用多个RedisTemplate的更多相关文章
- 【spring boot】spring boot 基于redis pipeline 管道,批量操作redis命令
spring boot 2.x 使用RedisTemplate 操作 =================================== 1.pom.xml <!--spring2.0集成r ...
- SpringBoot(十一): Spring Boot集成Redis
1.在 pom.xml 中配置相关的 jar 依赖: <!-- 加载 spring boot redis 包 --> <dependency> <groupId>o ...
- spring boot整合reids 然后实现缓存分页(方法之一) 以及RedisTemplate存到reids 里面get 就消失的坑
业务需求 首页 实现缓存分页 spring boot 整合redis (我的是2.0.3版本的) 在pom 文件写上依赖包即可 <dependency><!--依赖包--> ...
- 曹工说Spring Boot源码(20)-- 码网灰灰,疏而不漏,如何记录Spring RedisTemplate每次操作日志
写在前面的话 相关背景及资源: 曹工说Spring Boot源码(1)-- Bean Definition到底是什么,附spring思维导图分享 曹工说Spring Boot源码(2)-- Bean ...
- 玩转spring boot——结合redis
一.准备工作 下载redis的windows版zip包:https://github.com/MSOpenTech/redis/releases 运行redis-server.exe程序 出现黑色窗口 ...
- spring boot(三):Spring Boot中Redis的使用
spring boot对常用的数据库支持外,对nosql 数据库也进行了封装自动化. redis介绍 Redis是目前业界使用最广泛的内存数据存储.相比memcached,Redis支持更丰富的数据结 ...
- Spring Boot简介
Spring Boot简介 Spring Boot是为了简化Spring开发而生,从Spring 3.x开始,Spring社区的发展方向就是弱化xml配置文件而加大注解的戏份.最近召开的SpringO ...
- Spring Boot 学习笔记--整合Redis
1.新建Spring Boot项目 添加spring-boot-starter-data-redis依赖 <dependency> <groupId>org.springfra ...
- Spring Boot 整合 Redis 实现缓存操作
摘要: 原创出处 www.bysocket.com 「泥瓦匠BYSocket 」欢迎转载,保留摘要,谢谢! 『 产品没有价值,开发团队再优秀也无济于事 – <启示录> 』 本文提纲 ...
随机推荐
- Hdoj 1248.寒冰王座 题解
Problem Description 不死族的巫妖王发工资拉,死亡骑士拿到一张N元的钞票(记住,只有一张钞票),为了防止自己在战斗中频繁的死掉,他决定给自己买一些道具,于是他来到了地精商店前. 死亡 ...
- Nowcoder | [题解-N165]牛客网NOIP赛前集训营-普及组(第二场)
啊...表示一大早还没睡醒就开始打比赛(开始前一分钟的我还在桌子上趴着休眠)...表示题目思路清奇(尤其C题)...但是我还是太蒻了...\(D\)题暴力都没打...题解正式开始之前先\(\%\)一下 ...
- dns配置文件
/etc/resolv.conf 该文件是DNS域名解析的配置文件,它的格式很简单,每行以一个关键字开头,后接配置参数. resolv.conf的关键字主要有四个,分别是: nameserver ...
- [CERC2017]Intrinsic Interval(神仙+线段树)
题目大意:给一个1-n的排列,有一堆询问区间,定义一个好的区间为它的值域区间长度等于它的区间长度,求包这个询问区间的最小好的区间. 题解 做法太神了,根本想不到. %%%i207m. 结论:当一个区间 ...
- centos7安装较高版本python3.5/3.6
应用环境: Centos7或者RHEL7下默认安装的python版本为2.7.x,更新不够及时,现在很多时候需要额外安装较高版本的python环境, 网上搜罗一圈总结记录一下常用两种方式: ① 源码编 ...
- poj 3080 Blue Jeans (暴力枚举子串+kmp)
Description The Genographic Project is a research partnership between IBM and The National Geographi ...
- webpack入门(七) API in LOADERS
介绍 loaders允许你用require() 预处理文件(preprocess files)或者加载他们,在其他的构建工具中,loaders就是一种像“任务(tasks)”的东西.他提供了一种处理前 ...
- (二)flask-sqlalchemy基本操作
对数据库基本操作 在Flask-SQLAlchemy中,插入.修改.删除操作,均由数据库会话管理. 会话用 db.session 表示.在准备把数据写入数据库前,要先将数据添加到会话中然后调用 db. ...
- socket,tcp,http三者之间的区别和原理
http.TCP/IP协议与socket之间的区别下面的图表试图显示不同的TCP/IP和其他的协议在最初OSI模型中的位置: 7 应用层 例如HTTP.SMTP.SNMP.FTP.Telnet.SIP ...
- Spring Data JPA Batch Insertion
转自:https://www.jeejava.com/spring-data-jpa-batch-insertion/ Spring Data JPA Batch Insertion will sho ...
