[App]Android Studio First App
准备着看Android Studio的体验如何。
通过Android Studio构建一个默认的项目,添加一些元素
<RelativeLayout

    xmlns:android="http://schemas.android.com/apk/res/android"

    xmlns:tools="http://schemas.android.com/tools" android:layout_width="match_parent"

    android:layout_height="match_parent" android:paddingLeft="@dimen/activity_horizontal_margin"

    android:paddingRight="@dimen/activity_horizontal_margin"

    android:paddingTop="@dimen/activity_vertical_margin"

    android:paddingBottom="@dimen/activity_vertical_margin" tools:context=".MainActivityFragment">

    <TextClock

        android:layout_width="wrap_content"

        android:layout_height="wrap_content"

        android:id="@+id/textClock"

        android:layout_marginStart="32dp"

        android:layout_toEndOf="@+id/img1" />

    <AnalogClock

        android:layout_width="wrap_content"

        android:layout_height="wrap_content"

        android:id="@+id/analogClock"

        android:layout_alignParentEnd="true" />

    <EditText

        android:layout_width="wrap_content"

        android:layout_height="wrap_content"

        android:inputType="textPassword"

        android:ems="10"

        android:id="@+id/editText"

        android:layout_alignTop="@+id/editText2"

        android:layout_alignStart="@+id/editText2"

        android:layout_marginTop="25dp"

        android:layout_marginRight="150dp" />

    <Button

        android:layout_width="wrap_content"

        android:layout_height="wrap_content"

        android:text="LoadImage"

        android:id="@+id/btnOk"

        android:onClick="btnOnClick"

        android:layout_alignParentStart="true" />

    <TextView

        android:layout_width="wrap_content"

        android:layout_height="wrap_content"

        android:text="UserName"

        android:id="@+id/userName"

        android:layout_alignBaseline="@+id/editText2"

        android:layout_alignBottom="@+id/editText2"

        android:layout_alignParentStart="true" />

    <TextView

        android:layout_width="wrap_content"

        android:layout_height="wrap_content"

        android:text="PassWord"

        android:id="@+id/pwd"

        android:layout_below="@+id/editText2"

        android:layout_alignParentStart="true" />

    <ImageView

        android:layout_width="wrap_content"

        android:layout_height="wrap_content"

        android:id="@+id/img1"

        android:layout_alignParentBottom="true"

        android:layout_alignEnd="@+id/editText"

        />

    <EditText

        android:layout_width="wrap_content"

        android:layout_height="wrap_content"

        android:inputType="textPersonName"

        android:text="Name"

        android:ems="10"

        android:id="@+id/editText2"

        android:layout_below="@+id/btnOk"

        android:layout_toEndOf="@+id/pwd"

        android:layout_marginRight="150dp" />

</RelativeLayout>
修改AndroidManifest.xml,由于该Demo涉及到从网络下载图片,所以需要添加INTERNET的权限。并设置
android.intent.action.MAIN
<?xml version="1.0" encoding="utf-8"?>

<manifest xmlns:android="http://schemas.android.com/apk/res/android"

    package="com.example.dawnwind.test2" >

<uses-permission android:name="android.permission.INTERNET" />

    <application

        android:allowBackup="true"

        android:icon="@mipmap/ic_launcher"

        android:label="Slark"

        android:theme="@style/AppTheme" >

        <activity

            android:name=".MainActivity"

            android:label="@string/app_name" >

            <intent-filter>

                <action android:name="android.intent.action.MAIN" />

                <category android:name="android.intent.category.LAUNCHER" />

            </intent-filter>

        </activity>

    </application>

</manifest>
然后修改逻辑代码:
package com.example.dawnwind.test2;

import java.io.InputStream;

import java.net.HttpURLConnection;

import java.net.MalformedURLException;

import java.net.URL;

import android.os.AsyncTask;

import android.support.v4.app.Fragment;

import android.os.Bundle;

import android.view.LayoutInflater;

import android.view.View;

import android.view.ViewGroup;

import android.view.View;

import android.widget.Button;

import android.widget.ImageView;

import android.graphics.Bitmap;

import android.graphics.BitmapFactory;

/**

 * A placeholder fragment containing a simple view.

 */

public class MainActivityFragment extends Fragment {

    private ImageView mImageView;

    private Button mBtnLoad;

    private int currentImg = 0;

    private String[] mimageList = new String[]{

       "http://www.bz55.com/uploads/allimg/150701/140-150F1141919-50.jpg",

       "http://b.img.wpxap.com/data/attachment/forum/201507/28/114816eq42vmkvkihsmt88.jpg",

       "http://ww3.sinaimg.cn/mw1024/5e9ffd77gw1euv1m3sbn4j211y0lcwla.jpg",

       "http://ww1.sinaimg.cn/mw1024/5e9ffd77jw1euqs0kiwkij20f00qo40w.jpg",

       "http://ww3.sinaimg.cn/mw1024/5e9ffd77jw1euh1p5we31j219c0pk479.jpg"

    };

    public MainActivityFragment() {

    }

    @Override

    public View onCreateView(LayoutInflater inflater, ViewGroup container,

                             Bundle savedInstanceState) {

        View viewItem = inflater.inflate(R.layout.fragment_main, container, false);

        mImageView = (ImageView)viewItem.findViewById(R.id.img1);

        mBtnLoad   = (Button)viewItem.findViewById(R.id.btnOk);

        // set onclick

        mBtnLoad.setOnClickListener(new View.OnClickListener()

        {

            @Override

            public void onClick(View v)

            {

                ++currentImg;

                if (currentImg >= mimageList.length)

                {

                    currentImg = 0;

                }

                //改变ImageView里显示的图片

                //mImageView.setImageResource(mimageList[currentImg]);

                // run asynctask

                new ImageLoaderTask().execute(mimageList[currentImg]);

                String s_info = "Load: " + String.valueOf(currentImg);

                mBtnLoad.setText(s_info);

            }

        });

        new ImageLoaderTask().execute(mimageList[0]);

        return viewItem;

    }

    // Not suggested to do network jobs in main thread, Thus create a child thread to do work

    class ImageLoaderTask extends AsyncTask<String, Void , Bitmap> {

        // Will run in sub-thread

        protected  Bitmap doInBackground(String... params) {

            return getHttpBitmap(params[0]);

        }

        // Will call in gui-thread

        protected void onPostExecute(Bitmap result) {

            mImageView.setImageBitmap(result);

        }

    }

    public static Bitmap getHttpBitmap(String url){

        URL myFileURL;

        Bitmap bitmap=null;

        try{

            myFileURL = new URL(url);

            //????

            HttpURLConnection conn=(HttpURLConnection)myFileURL.openConnection();

            //???????6000???conn.setConnectionTiem(0);????????

            conn.setConnectTimeout(6000);

            //?????????

            conn.setDoInput(true);

            //?????

            conn.setUseCaches(false);

            //???????????

            conn.connect();

            //?????

            InputStream is = conn.getInputStream();

            //??????

            bitmap = BitmapFactory.decodeStream(is);

            //?????

            is.close();

        }catch(Exception e){

            e.printStackTrace();

        }

        return bitmap;

    }

}
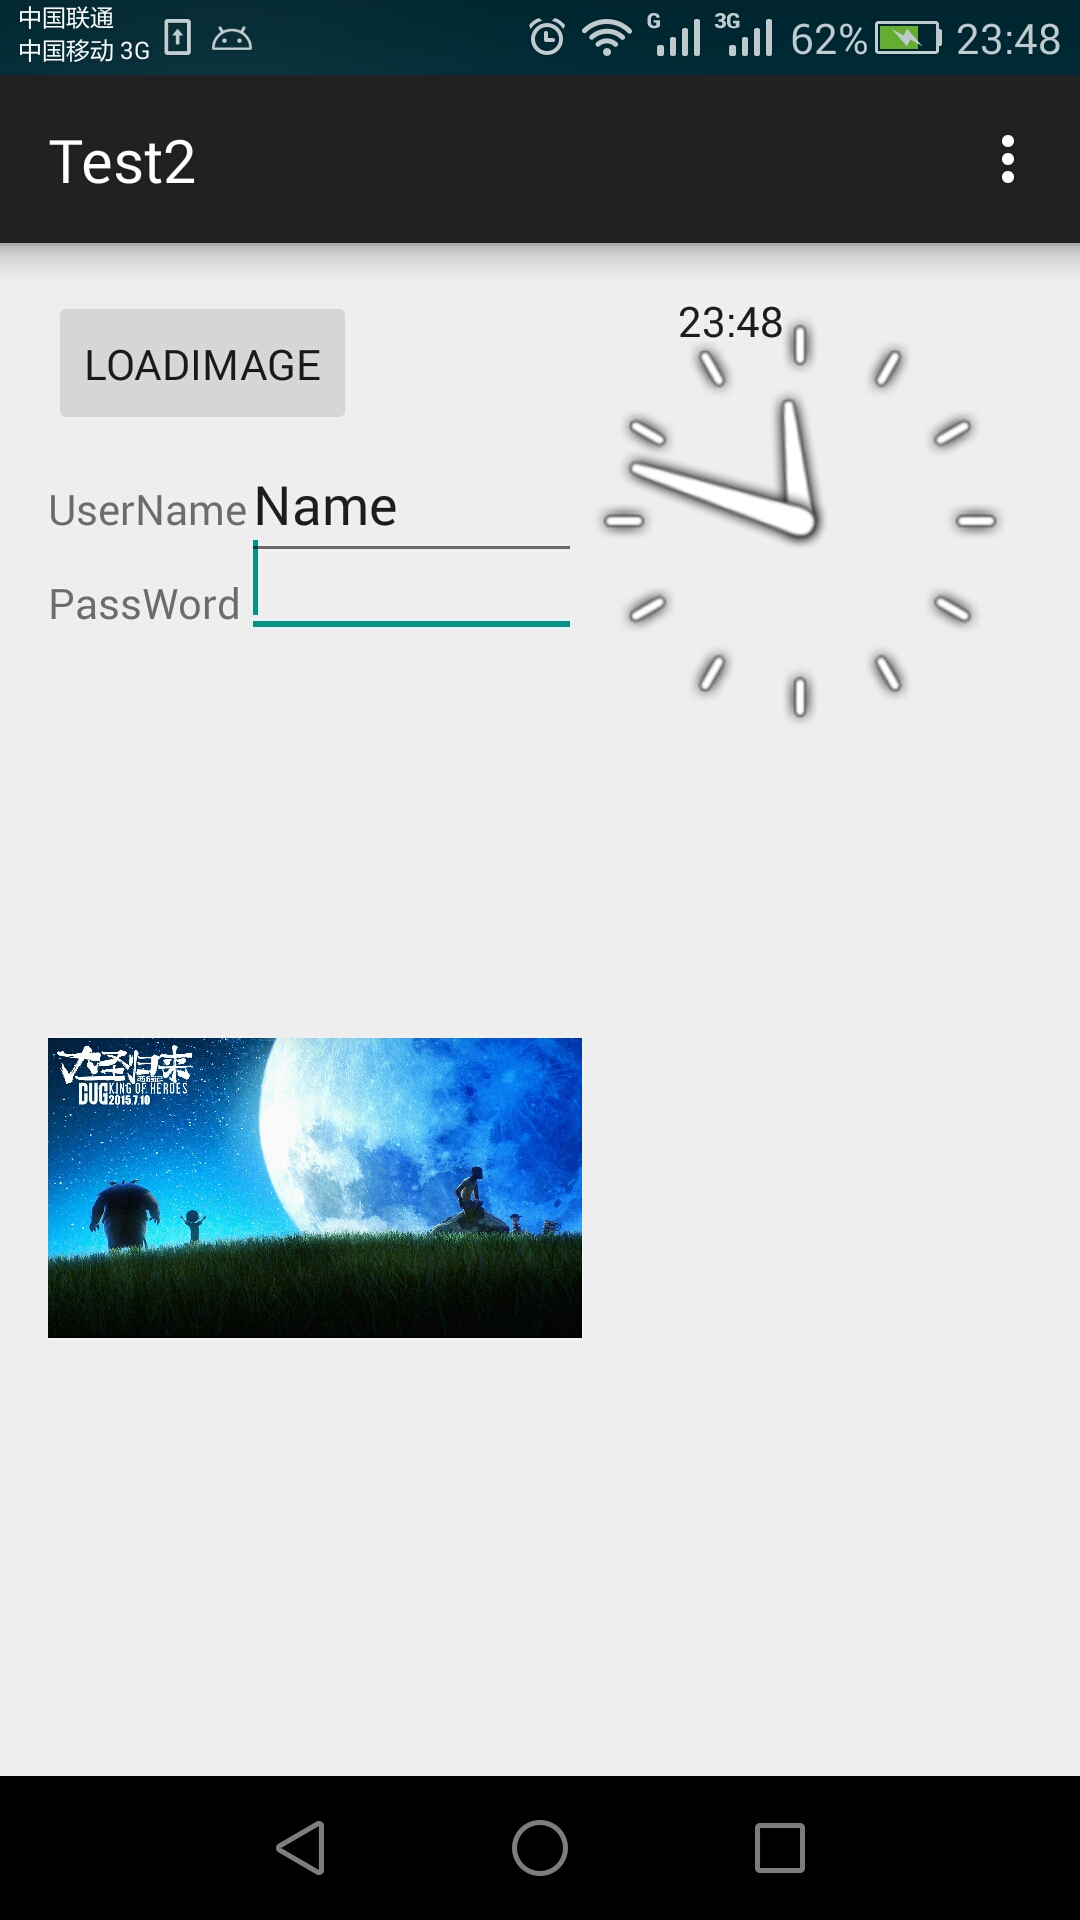
最终效果

[App]Android Studio First App的更多相关文章
- 【Android Studio安装部署系列】十八、Android studio更换APP应用图标
版权声明:本文为HaiyuKing原创文章,转载请注明出处! 概述 Android Studio新建项目后会有一个默认图标,那么如何更换图标呢? 替换图标 这个方案不建议直接在已有项目上更换图标,建议 ...
- 【风马一族_Android】Android Studio 给APP设置签名
在Android Studio中,给App签名,如果没有给App设置签名的话,Android Studio会主动给app设置一个默认的签名 接下来,介绍主动给App设置一个签名的整个步骤过程: 1) ...
- 使用android studio检测app内存泄漏【转载】
Android开发中难免会遇到各种内存泄漏,如果不及时发现处理,会导致出现内存越用越大,可能会因为内存泄漏导致出现各种奇怪的crash,甚至可能出现因内存不足而导致APP崩溃. 一般检测android ...
- 我的Android进阶之旅------>关于使用Android Studio替换App的launcher图标之后仍然显示默认的ic_launcher图标的解决方法
前言 最近做了一个App,之前开发该App的时候一直以来都是默认的launcher图标启动的, 今天美工换了一个App的launcher 图标,因此在Android Studio中将默认的lanche ...
- 【Android】Mac下Android Studio设置App启动页
先将启动页放到项目资源中,图片一般是1080*1920的jpg. 新建一个activity,如图: 创建成功之后,打开刚刚创建的activity,来进行代码的编写: public class BZLa ...
- 如何使用Android Studio提高App质量
Android Studio作为现在谷歌主推的Android开发功能,除了提供了大量的功能帮助快速开发Android代码之外,在代码质量控制方面也提供了很多工具,这些工具都放在Analyze菜单下, ...
- 解决小米手机Android Studio安装app 报错的问题It is possible that this issue is resolved by uninstalling an existi
问题描述 Android Studio升级到2.3版本之后,小米手机MIUI8不能运行Android Studio程序,报如下错误: Installation failed with message ...
- Android 解决小米手机Android Studio安装app 报错的问题It is possible that this issue is resolved by uninstalling an existi
Android Studio升级到2.3版本之后,小米手机MIUI8不能运行Android Studio程序,报如下错误: Installation failed with message Faile ...
- Android Studio修改app图标
1.将下载好的图片放到app\src\main\res\drawable目录下 2.在AndroidManifest.xml下加入一句 android:icon="@drawable/??? ...
随机推荐
- 在ARM Linux 使用 Valgrind
Linux valgrind 移植到ARM-Linux 一.Cross-Compile/交叉编译 (1)下载及解压Valgrind-3.11 (2)修改confirure 将armv7*)修改为ar ...
- ASP.NET获取服务器文件的物理路径
如下: string fullpath = context.Server.MapPath("hello.htm"); //得到hello.htm的全路径 string conten ...
- linux磁盘以及文件系统
df 查看磁盘总容量 -i 显示inodes号 -h 使用合适的单位显示磁盘大小 -m 以M为单位显示 -k 以K为单位显示 默认K显示 du 用来查看某个目录或者文件所占空间大小 参数:-abckm ...
- ci验证码
ci 之验证码 为了方便,把 system/system/helpers/captcha_helper.php复制放在 application/helpers/文件夹里面 手册上面推荐用数据库,但个人 ...
- overflow:hidden真的失效了吗
项目中常常有同学遇到这样的问题,现象是给元素设置了overflow:hidden,但超出容器的部分并没有被隐藏,难道是设置的hidden失效了吗? 其实看似不合理的现象背后都会有其合理的解释. 我们知 ...
- php异步请求(可以做伪线程)
$fp = fsockopen("www.baidu.com", 80, $errno, $errstr, 30); stream_set_blocking($fp,0); ...
- epoll和select区别
先说下本文框架,先是问题引出,然后概括两个机制的区别和联系,最后介绍每个接口的用法 一.问题引出 联系区别 问题的引出,当需要读两个以上的I/O的时候,如果使用阻塞式的I/O,那么可能长时间的阻塞在一 ...
- python基础教程笔记—画幅好画(详解)
今天写一下基础教程里面的第二个项目,主要使用python来做一个pdf的图,比较简单. 首先我们需要安装用到的模块pip install reportlab即可. 书上是用urlopen从往上下了一个 ...
- [python][flask][flask-SQLAlchemy]关于flask-SQLAlchemy的初级使用教程
鉴于网上关于flask-SQLAlchemy的实例使用教程参差不齐,于此写下工作学习过程中的使用过程,以便分享交流. 对于python关于flask有一定了解的高端玩家来说,请转至flask官方开发文 ...
- 浅谈JavaScript词法分析步骤
JavaScript代码运行前有一个类似编译的过程即词法分析,词法分析主要有三个步骤: 分析参数 再分析变量的声明 分析函数声明 具体步骤如下: 函数在运行的瞬间,生成一个活动对象(Active Ob ...