spring06Aop

1.实现前置增强 必须实现接口MethodBeforeAdvice接口
创建对应的文件
public interface Animal {//主业务接口

    void  eat();  //目标方法

    void  sleep();

}
Animal接口
public class Dog implements Animal {//目标对象

    /*

     * 专心我们的逻辑

     * 至于方法之前和方法之后要做的事情!我不关注!

     * Ioc:降低了主业务之间的耦合度

     * AOP:降低了主业务和交叉业务逻辑之间的耦合度

     */

    @Override

    public void eat() {

        System.out.println("Dog在吃骨头");

    }

    @Override

    public void sleep() {

         System.out.println("Dog睡觉");

    }

}
Dog实现类
public class AnimalBeforeAdvice implements MethodBeforeAdvice {

    /**

     * method:执行的方法

     * args:方法的参数

     * target:目标类对象

     */

    @Override

    public void before(Method method, Object[] args, Object target)

            throws Throwable {

        System.out.println("进入 了 前置 增强..............MethodBeforeAdvice");

    }

}
前置增强类
<?xml version="1.0" encoding="UTF-8"?>

<beans xmlns="http://www.springframework.org/schema/beans"

    xmlns:xsi="http://www.w3.org/2001/XMLSchema-instance"

    xmlns:p="http://www.springframework.org/schema/p"

    xmlns:c="http://www.springframework.org/schema/c"

    xmlns:context="http://www.springframework.org/schema/context"

    xsi:schemaLocation="

        http://www.springframework.org/schema/beans

         http://www.springframework.org/schema/beans/spring-beans.xsd

        http://www.springframework.org/schema/context

         http://www.springframework.org/schema/context/spring-context.xsd">

<!-- 配置 目标对象 -->

<bean id="dog" class="cn.bdqn.dao.impl.Dog"/>

<!-- 配置前置 增强 -->

<bean id="before" class="cn.bdqn.advice.AnimalBeforeAdvice"/>

<!--  生成 代理对象  -->

 <bean id="proxyFactoryBean" class="org.springframework.aop.framework.ProxyFactoryBean">

     <!-- 设置目标对象(被代理的对象)<property name="targetName" value="dog"/>  -->

   <property name="target" ref="dog"/>

      <!-- 设置增强方式 -->

   <property name="interceptorNames">

        <value>before</value>

   </property>

  </bean>

</beans>
applicationContext.xml文件
public class AnimalTest {

    @Test

    public  void  test01(){

        ApplicationContext context=

                new ClassPathXmlApplicationContext("applicationContext.xml");

        //使用代理对象进行操作

        Animal animal=(Animal) context.getBean("proxyFactoryBean");

        animal.eat();

        System.out.println("************");

        animal.sleep();

    }

}
测试类
2.实现后置增强 必须实现接口AfterReturningAdvice接口
public class AnimalAfterAdvice implements AfterReturningAdvice {

/**

 * returnValue:返回值 ,能获取返回值 但是如果对返回值进行了操作!没有意义!

 * afterReturning()就没有返回值

 */

    @Override

    public void afterReturning(Object returnValue, Method method,

            Object[] args, Object target) throws Throwable {

            System.out.println("执行了 后置 通知.................AfterReturningAdvice");

    }

}
后置增强类
<?xml version="1.0" encoding="UTF-8"?>

<beans xmlns="http://www.springframework.org/schema/beans"

    xmlns:xsi="http://www.w3.org/2001/XMLSchema-instance"

    xmlns:p="http://www.springframework.org/schema/p"

    xmlns:c="http://www.springframework.org/schema/c"

    xmlns:context="http://www.springframework.org/schema/context"

    xsi:schemaLocation="

        http://www.springframework.org/schema/beans

         http://www.springframework.org/schema/beans/spring-beans.xsd

        http://www.springframework.org/schema/context

         http://www.springframework.org/schema/context/spring-context.xsd">

<!-- 配置 目标对象 -->

<bean id="dog" class="cn.bdqn.dao.impl.Dog"/>

<!-- 配置前置 通知-->

<bean id="before" class="cn.bdqn.advice.AnimalBeforeAdvice"/>

<!-- 配置后置 通知-->

<bean id="after" class="cn.bdqn.advice.AnimalAfterAdvice"/>

<!--  生成 代理对象  -->

 <bean id="proxyFactoryBean" class="org.springframework.aop.framework.ProxyFactoryBean">

     <!-- 设置目标对象(被代理的对象)<property name="targetName" value="dog"/>  -->

   <property name="target" ref="dog"/>

      <!-- 设置增强方式     同时配置多个增强方式01 .value="before,after"-->

   <property name="interceptorNames" >

       <!--   02. 使用array

        <array>

          <value>before</value>

          <value>after</value>

        </array> -->

         <list>

          <value>before</value>

          <value>after</value>

        </list>

   </property>

  </bean>

</beans>
修改后的xml文件
测试代码不变 直接运行
3.实现环绕增强 必须实现接口MethodInterceptor接口
public class AnimalAroundAdvice implements MethodInterceptor {

/**

 *

 * 环绕增强  是在前置增强之后  和后置增强之前  执行!

 * 可以对方法的返回值进行一系列的操作

 */

    @Override

    public Object invoke(MethodInvocation invocation) throws Throwable {

         System.out.println("方法之前........MethodInterceptor");

         Object result = invocation.proceed();

          //判断是否有返回值

         if (result!=null) {

        result=((String)result).toUpperCase();

        }

         System.out.println("方法之后........MethodInterceptor");

        return result;

    }

}
环绕增强类
可以修改Animal中的任意一个方法带有返回值的进行测试! 如
public interface Animal {//主业务接口

    String  eat();  //目标方法

    void  sleep();

}
改变后的Animal接口
public class Dog implements Animal {//目标对象

    @Override

    public String eat() {

        System.out.println("Dog在吃骨头");

        return  "abcd";

    }

    @Override

    public void sleep() {

         System.out.println("Dog睡觉");

    }

}
改变后的Dog实现类
<?xml version="1.0" encoding="UTF-8"?>

<beans xmlns="http://www.springframework.org/schema/beans"

    xmlns:xsi="http://www.w3.org/2001/XMLSchema-instance"

    xmlns:p="http://www.springframework.org/schema/p"

    xmlns:c="http://www.springframework.org/schema/c"

    xmlns:context="http://www.springframework.org/schema/context"

    xsi:schemaLocation="

        http://www.springframework.org/schema/beans

         http://www.springframework.org/schema/beans/spring-beans.xsd

        http://www.springframework.org/schema/context

         http://www.springframework.org/schema/context/spring-context.xsd">

<!-- 配置 目标对象 -->

<bean id="dog" class="cn.bdqn.dao.impl.Dog"/>

<!-- 配置环绕 通知-->

<bean id="around" class="cn.bdqn.advice.AnimalAroundAdvice"/>

<!--  生成 代理对象  -->

 <bean id="proxyFactoryBean" class="org.springframework.aop.framework.ProxyFactoryBean">

   <property name="target" ref="dog"/>

   <property name="interceptorNames" >

         <list>

          <value>around</value>

        </list>

   </property>

  </bean>

</beans>
xml文件
    //测试返回值

    @Test

    public  void  test02(){

        ApplicationContext context=

                new ClassPathXmlApplicationContext("applicationContext.xml");

        //使用代理对象进行操作

        Animal animal=(Animal) context.getBean("proxyFactoryBean");

        System.out.println(animal.eat());

        System.out.println("************");

        animal.sleep();

    }
测试类
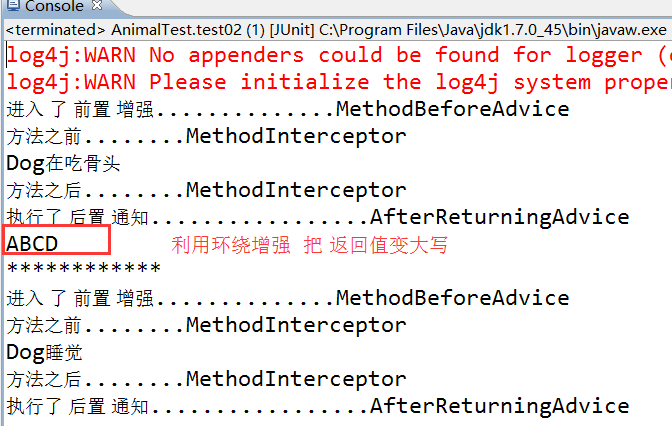
效果图
4.实现自定义增强
并不是所有的方法都需要增强,那么我们就需要自定义增强的方法
<?xml version="1.0" encoding="UTF-8"?>

<beans xmlns="http://www.springframework.org/schema/beans"

    xmlns:xsi="http://www.w3.org/2001/XMLSchema-instance"

    xmlns:p="http://www.springframework.org/schema/p"

    xmlns:c="http://www.springframework.org/schema/c"

    xmlns:context="http://www.springframework.org/schema/context"

    xsi:schemaLocation="

        http://www.springframework.org/schema/beans

         http://www.springframework.org/schema/beans/spring-beans.xsd

        http://www.springframework.org/schema/context

         http://www.springframework.org/schema/context/spring-context.xsd">

<!-- 配置 目标对象 -->

<bean id="dog" class="cn.bdqn.dao.impl.Dog"/>

<!-- 配置前置 通知-->

<bean id="before" class="cn.bdqn.advice.AnimalBeforeAdvice"/>

 <!-- 自定义通知的切入点  -->

 <bean id="myAdvice" class="org.springframework.aop.support.NameMatchMethodPointcutAdvisor">

    <property name="advice"  ref="before"></property>

     <property name="mappedNames">

       <list>

        <value>eat</value> <!-- eat之外的方法就不会有前置通知了  -->

       </list>

     </property>

 </bean>

<!--  生成 代理对象  -->

 <bean id="proxyFactoryBean" class="org.springframework.aop.framework.ProxyFactoryBean">

   <property name="target" ref="dog"/>

   <property name="interceptorNames" >

         <list>

          <value>myAdvice</value>  <!--引入自定义增强  -->

        </list>

   </property>

  </bean>

</beans>
修改后的xml文件
测试代码不变
spring06Aop的更多相关文章
随机推荐
- 交叉编译:cannot find /lib/libc.so.6 collect2: ld returned 1 exit status
1.有时候明明指定了交叉编译的动态库搜索路径,但有些库提示还是搜索不到,而且提示的搜索路径有点奇怪,不是指定的路径,比如: /opt/mips-4.4/bin/../lib/gcc/mips-linu ...
- [HTML5 Canvas学习]绘制矩形
1.使用strokeRect和fillRect方法绘制矩形 a.strokeRect是绘制一个不填充的矩形 b.fillRect是绘制一个填充的矩形 代码: <script> var ca ...
- windows8.1 下搭建配置apache+php+mysql
软件版本: apache:Apache 2.4.10 Win64 http://www.apachelounge.com/download/VC11/binaries/httpd-2.4.10- ...
- POJ2299 Ultra-QuickSort(归并排序求逆序数)
归并排序求逆序数 Time Limit:7000MS Memory Limit:65536KB 64bit IO Format:%I64d & %I64u Descri ...
- Scheme是什么、怎么自定义Scheme、JLRoutes的使用-备
转到移动端开发后居然现在才用到Scheme真是惭愧惭愧. URL Scheme是什么 相信大家都知道URL. http://www.apple.com就是一个URL. 而://之前的部分就称为Sche ...
- CentOS 6用snmp配合MRTG显示系统状态
1. 软件安装以yum的方式安装snmp/MRTG 安装SNMP(要记得安装net-snmp-utils,不然snmpwalk将不能使用)yum -y install net-snmp* 安装MRTG ...
- [Android] 输入系统(一)
Android输入系统是人与机器交互最主要的手段.我们通过按键或者触碰屏幕,会先经由linux产生中断,进行统一的处理过后,转换成Android能识别的事件信息,然后Android的输入系统去获取事件 ...
- 【jQuery】jQuery API 过 一 遍
closest, parents <!DOCTYPE html> <html> <head> <meta charset="utf-8"& ...
- Aggregating tests in suites
我们可以将来自不同类的test组成一个test suite.在JUnit 3.8.x我们使用 static Test suite()方法,但是在JUnit4我们使用在类前面加上注释 @RunWith( ...
- Git详解之二 Git基础
Git 基础 读完本章你就能上手使用 Git 了.本章将介绍几个最基本的,也是最常用的 Git 命令,以后绝大多数时间里用到的也就是这几个命令.读完本章,你就能初始化一个新的代码仓库,做一些适当配置: ...