SPI应用 用SPI总线读取气压传感器SCP1000的数据
Using SPI to read a Barometric Pressure Sensor
This example shows how to use the SPI (Serial Peripheral Interface) Communications Library to read data from a SCP1000 Barometric Pressure sensor. Please click here for more information on SPI.
Hardware Required 硬件准备
Arduino or Genuino board
SCP1000 Pressure Sensor Breakout Board
hook-up wires
Circuit 电路图
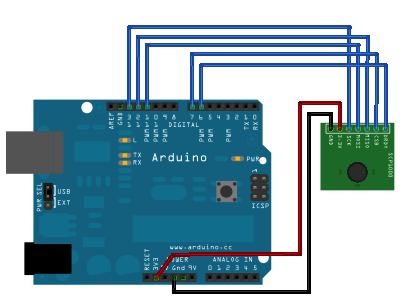
image developed using Fritzing. For more circuit examples, see the Fritzing project page
Schematic 原理图
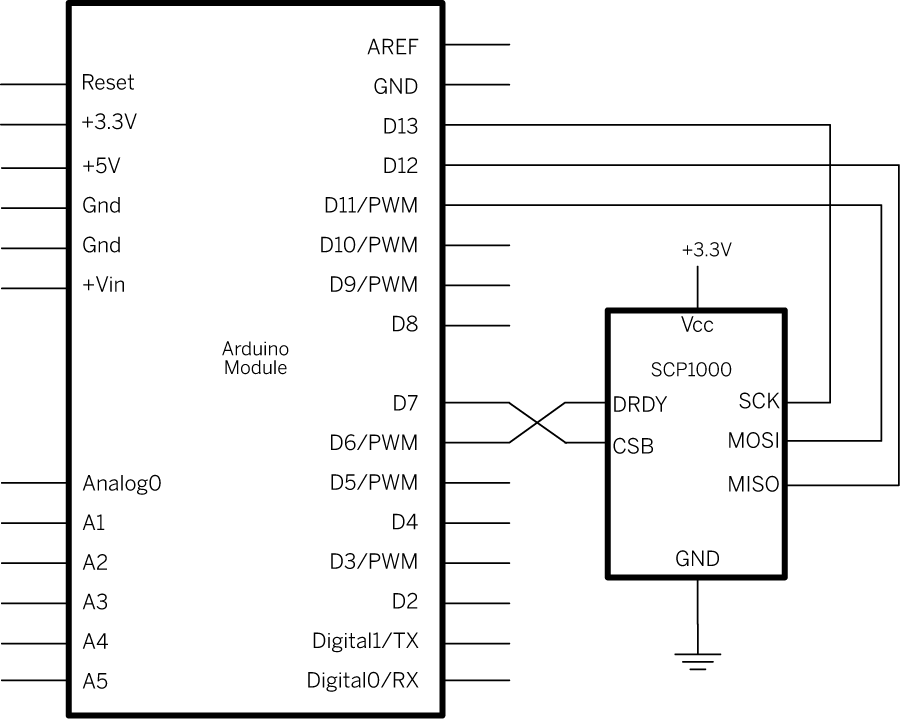
The SCP1000 barometric pressure sensor can read both air presure and temperature and report them via the SPI connection. For details of the control registers, see the SCP1000 data sheet.
SCP1000传感器可测量气压和温度,并通过SPI总线与控制器连接
Code 程序代码
The code below starts out by setting the SCP1000's configuration registers in the setup(). In the main loop, it sets the sensor to read in high resolution mode, meaning that it will return a 19-bit value, for the pressure reading, and 16 bits for the temperature. The actual reading in degrees Celsius is the 16-bit result divided by 20.
使用时首先用setup()对SCP1000的配置寄存器进行设置。测量结果包含19位的气压值,16位的温度值。摄氏度等于16位数据除以20。
Then it reads the temperature's two bytes. Once it's got the temperature, it reads the pressure in two parts. First it reads the highest three bits, then the lower 16 bits. It combines these two into one single long integer by bit shifting the high bits then using a bitwise OR to combine them with the lower 16 bits. The actual pressure in Pascal is the 19-bit result divide by 4.
读取压力值时,先读高3位,再读低16位,然后通过移位组成19位的整数。帕斯卡数等于19位数据除以4。
  1 /*

  2  SCP1000 Barometric Pressure Sensor Display

  3

  4  Shows the output of a Barometric Pressure Sensor on a

  5  Uses the SPI library. For details on the sensor, see:

  6  http://www.sparkfun.com/commerce/product_info.php?products_id=8161

  7  http://www.vti.fi/en/support/obsolete_products/pressure_sensors/

  8

  9  This sketch adapted from Nathan Seidle's SCP1000 example for PIC:

 10  http://www.sparkfun.com/datasheets/Sensors/SCP1000-Testing.zip

 11

 12  Circuit:  SCP1000与控制板的接线

 13  SCP1000 sensor attached to pins 6, 7, 10 - 13:

 14  DRDY: pin 6   dataReadyPin

 15  CSB: pin 7     chipSelectPin

 16  MOSI: pin 11

 17  MISO: pin 12

 18  SCK: pin 13

 19

 20  created 31 July 2010

 21  modified 14 August 2010

 22  by Tom Igoe

 23  */

 24 // the sensor communicates using SPI, so include the library:

 25 #include <SPI.h>

 26

 27 //Sensor's memory register addresses:

 28

 29 const int PRESSURE = 0x1F;      //3 most significant bits of pressure

 30 const int PRESSURE_LSB = 0x20;  //16 least significant bits of pressure

 31 const int TEMPERATURE = 0x21;   //16 bit temperature reading

 32 const byte READ = 0b11111100;     // SCP1000's read command  SCP1000的读指令

 33 const byte WRITE = 0b00000010;   // SCP1000's write command  SCP1000的写指令

 34

 35 // pins used for the connection with the sensor

 36 // the other you need are controlled by the SPI library):

 37 const int dataReadyPin = 6;

 38 const int chipSelectPin = 7;

 39 void setup()

 40

 41 {

 42   Serial.begin(9600);

 43   // start the SPI library:

 44   SPI.begin();

 45

 46   // initalize the  data ready and chip select pins:

 47   pinMode(dataReadyPin, INPUT);   //数据准备信号来自传感器

 48   pinMode(chipSelectPin, OUTPUT);   //芯片选择信号来自控制器

 49

 50   //Configure SCP1000 for low noise configuration:

 51   writeRegister(0x02, 0x2D);

 52   writeRegister(0x01, 0x03);

 53   writeRegister(0x03, 0x02);

 54   // give the sensor time to set up:

 55   delay(100);

 56 }

 57

 58

 59 void loop()

 60

 61  {

 62   //Select High Resolution Mode

 63   writeRegister(0x03, 0x0A);

 64

 65   // don't do anything until the data ready pin is high:

 66   if (digitalRead(dataReadyPin) == HIGH)

 67

 68 {

 69     //Read the temperature data

 70     int tempData = readRegister(0x21, 2);  //2个字节

 71     // convert the temperature to celsius and display it:

 72     float realTemp = (float)tempData / 20.0;   //转换为摄氏温度

 73     Serial.print("Temp[C]=");

 74     Serial.print(realTemp);

 75

 76

 77     //Read the pressure data highest 3 bits:

 78     byte  pressure_data_high = readRegister(0x1F, 1);

 79     pressure_data_high &= 0b00000111;    //you only needs bits 2 to 0

 80

 81     //Read the pressure data lower 16 bits:

 82     unsigned int  pressure_data_low = readRegister(0x20, 2);

 83     //combine the two parts into one 19-bit number:  并转换为帕斯卡

 84     long pressure = ((pressure_data_high << 16) | pressure_data_low) / 4;

 85     // display the temperature:

 86     Serial.println("\tPressure [Pa]=" + String(pressure));

 87   }

 88 }

 89

 90 //Read from or write to register from the SCP1000:

 91 unsigned int  readRegister(byte thisRegister, int bytesToRead)   //读SCP1000的寄存器

 92

 93 {

 94   byte inByte = 0;           // incoming byte from the SPI

 95   unsigned int result = 0;   // result to return

 96   Serial.print(thisRegister, BIN);

 97   Serial.print("\t");

 98   // SCP1000 expects the register name in the upper 6 bits

 99   // of the byte. So shift the bits left by two bits:

100   thisRegister = thisRegister << 2;

101   // now combine the address and the command into one byte

102   byte dataToSend = thisRegister & READ;   //  READ是读指令0b11111100

103   Serial.println(thisRegister, BIN);

104   // take the chip select low to select the device:

105   digitalWrite(chipSelectPin, LOW);

106   // send the device the register you want to read:

107   SPI.transfer(dataToSend);    //传送寄存器地址

108   // send a value of 0 to read the first byte returned:

109   result = SPI.transfer(0x00);   //传送0x00以得到第1个字节的数据

110   // decrement the number of bytes left to read:

111   bytesToRead--;

112   // if you still have another byte to read:

113   if (bytesToRead > 0)

114

115 {

116     // shift the first byte left, then get the second byte:

117     result = result << 8;

118     inByte = SPI.transfer(0x00);

119     // combine the byte you just got with the previous one:

120     result = result | inByte;

121     // decrement the number of bytes left to read:

122     bytesToRead--;

123   }

124   // take the chip select high to de-select:

125   digitalWrite(chipSelectPin, HIGH);

126   // return the result:

127   return (result);

128 }

129

130 //Sends a write command to SCP1000

131 void writeRegister(byte thisRegister, byte thisValue)    //写SCP1000的寄存器

132

133 {

134   // SCP1000 expects the register address in the upper 6 bits

135   // of the byte. So shift the bits left by two bits:

136   thisRegister = thisRegister << 2;

137   // now combine the register address and the command into one byte:

138   byte dataToSend = thisRegister | WRITE;  // WRITE是写指令0b00000010

139   // take the chip select low to select the device:

140   digitalWrite(chipSelectPin, LOW);

141   SPI.transfer(dataToSend);    //Send register location

142   SPI.transfer(thisValue);       //Send value to record into register

143   // take the chip select high to de-select:

144   digitalWrite(chipSelectPin, HIGH);

145 }

146

147
SPI应用 用SPI总线读取气压传感器SCP1000的数据的更多相关文章
- 【转载】IIC SPI UART串行总线
一.SPISPI(Serial Peripheral Interface,串行外设接口)是Motorola公司提出的一种同步串行数据传输标准,在很多器件中被广泛应用. 接口SPI接口经常被称为4线串行 ...
- SPI通信协议(SPI总线)学习
1.什么是SPI? SPI是串行外设接口(Serial Peripheral Interface)的缩写.是 Motorola 公司推出的一 种同步串行接口技术,是一种高速的,全双工,同步的通信总线. ...
- Linux驱动 - SPI驱动 之三 SPI控制器驱动
通过第一篇文章,我们已经知道,整个SPI驱动架构可以分为协议驱动.通用接口层和控制器驱动三大部分.其中,控制器驱动负责最底层的数据收发工作,为了完成数据的收发工作,控制器驱动需要完成以下这些功能:1. ...
- Dubbo 扩展点加载机制:从 Java SPI 到 Dubbo SPI
SPI 全称为 Service Provider Interface,是一种服务发现机制.当程序运行调用接口时,会根据配置文件或默认规则信息加载对应的实现类.所以在程序中并没有直接指定使用接口的哪个实 ...
- Java SPI 与 Dubbo SPI
SPI(Service Provider Interface)是JDK内置的一种服务提供发现机制.本质是将接口实现类的全限定名配置在文件中,并由服务加载器读取配置文件,加载实现类.这样可以在运行时,动 ...
- 联盛德 HLK-W806 (十一): 软件SPI和硬件SPI驱动ST7567液晶LCD
目录 联盛德 HLK-W806 (一): Ubuntu20.04下的开发环境配置, 编译和烧录说明 联盛德 HLK-W806 (二): Win10下的开发环境配置, 编译和烧录说明 联盛德 HLK-W ...
- Java spi 和Spring spi
service provider framework是一个系统, 实现了SPI, 在系统里多个服务提供者模块可以提供一个服务的实现, 系统让客户端可以使用这些实现, 从而实现解耦. 一个service ...
- SPI应用 用SPI控制一个数字电位器
Controlling a Digital Potentiometer Using SPI In this tutorial you will learn how to control the AD5 ...
- 联盛德 HLK-W806 (四): 软件SPI和硬件SPI驱动ST7735液晶LCD
目录 联盛德 HLK-W806 (一): Ubuntu20.04下的开发环境配置, 编译和烧录说明 联盛德 HLK-W806 (二): Win10下的开发环境配置, 编译和烧录说明 联盛德 HLK-W ...
随机推荐
- docker快速搭建php7.2-nginx开发环境
1.输入命令: docker search -s 100 php 搜索出下面图中列表,选择webdevops/php-nginx. 2.通过docker拉取webdevops/php-nginx镜像, ...
- Unity添加自定义拓展方法
Shepherdog|2014-04-08 10:50|16151次浏览|Unity(373)0 通常你会发现你不能修改正在使用的那些类,无论它是基础的数据类型还是已有框架的一部分,它提供的方法让你困 ...
- Timeline Event
https://forum.unity.com/threads/timeline-events.479400/
- 开源基于lua gc管理c++对象的cocos2dx lua绑定方案
cocos2dx目前lua对应的c++对象的生命周期管理,是基于c++析构函数的,也就是生命周期可能存在不一致,比如c++对象已经释放,而lua对象还存在,如果这时候再使用,会有宕机的风险,为此我开发 ...
- 程序员你的maven多模块项目如何对外输出为一个构件?
上图为常见的台式机,程序员,你看了有啥启发? 台式机生产线 我的maven代码工程 xxx 显示器 xxx-web 主机 xxx-app 键盘 xxx-domian 鼠标 xxx-infrastrat ...
- Commando War (贪心)
Waiting for orders we held in the wood, word from the front never came By evening the sound of the g ...
- Java 与 Mysql连接,并分页显示
这是我第一个上规模的Java项目,我们必须在一周内完成的作业,零基础学习Java,网上收集了很多资料,逐渐对面向对象的思想有所了解,但还是半灌水,后期打算结合项目系统地学习一遍Java.老师布置的任务 ...
- 线上环境去除console
npm i -D babel-plugin-transform-remove-console babel.config.js // 获取 VUE_APP_ENV 非 NODE_ENV,测试环境依然 c ...
- JVM学习第三天(JVM的执行子系统)之类加载机制补充
昨晚没看完,今天继续 系统的类加载器 对于任意一个类,都需要由加载它的类加载器和这个类本身一同确立其在Java虚拟机中的唯一性,每一个类加载器,都拥有一个独立的类名称空间.这句话可以表达得更通俗一些: ...
- 基础Html重点——防健忘
一.head标签重点 <head> <meta charset="utf-8"> <title>第二天课</title> <! ...