Android Bundle详解
http://blog.csdn.net/cswhale/article/details/39053411
1 Bundle介绍
Bundle主要用于传递数据;它保存的数据,是以key-value(键值对)的形式存在的。
我们经常使用Bundle在Activity之间传递数据,传递的数据可以是boolean、byte、int、long、float、double、string等基本类型或它们对应的数组,也可以是对象或对象数组。当Bundle传递的是对象或对象数组时,必须实现Serializable 或Parcelable接口。下面分别介绍Activity之间如何传递基本类型、传递对象。
2传递基本类型
Bundle提供了各种常用类型的putXxx()/getXxx()方法,用于读写基本类型的数据。Bundle操作基本数据类型的API表格如下所示:

写数据的方法如下:
- // "com.test" is the package name of the destination class
- // "com.test.Activity02" is the full class path of the destination class
- Intent intent = new Intent().setClassName("com.bundletest", "com.bundletest.Bundle02");
- Bundle bundle = new Bundle();
- bundle.putString("name", "skywang");
- bundle.putInt("height", 175);
- intent.putExtras(bundle);
- startActivity(intent);
- // end current class
- finish();
对应的读数据的方法如下:
- Bundle bundle = this.getIntent().getExtras();
- String name = bundle.getString("name");
- int height = bundle.getInt("height");
3传递Parcelable类型的对象
3.1 Parcelable说明
Parcelable是Android自定义的一个接口,它包括了将数据写入Parcel和从Parcel中读出的API。一个实体(用类来表示),如果需要封装到bundle消息中去,可以通过实现Parcelable接口来实现。
Parcelable和Serializable的API如下表:

3.2 Parcelable接口说明
- public interface Parcelable {
- //内容描述接口,基本不用管
- public int describeContents();
- //写入接口函数,打包
- public void writeToParcel(Parcel dest, int flags);
- //读取接口,目的是要从Parcel中构造一个实现了Parcelable的类的实例处理。因为实现类在这里还是不可知的,所以需要用到模板的方式,继承类名通过模板参数传入。
- //为了能够实现模板参数的传入,这里定义Creator嵌入接口,内含两个接口函数分别返回单个和多个继承类实例。
- public interface Creator<T> {
- public T createFromParcel(Parcel source);
- public T[] newArray(int size);
- }
- }
3.3 Parcelable接口的实现方法
从parcelable接口定义中,我们可以看到,实现parcelable接口,需要我们实现下面几个方法:
(01)describeContents方法。内容接口描述,默认返回0就可以;
(02)writeToParcel 方法。该方法将类的数据写入外部提供的Parcel中.即打包需要传递的数据到Parcel容器保存,以便从parcel容器获取数据,该方法声明如下:
writeToParcel(Parcel dest, int flags) 具体参数含义见doc文档
(3.)静态的Parcelable.Creator接口,本接口有两个方法:
createFromParcel(Parcelin) 从Parcel容器中读取传递数据值,封装成Parcelable对象返回逻辑层。
newArray(int size) 创建一个类型为T,长度为size的数组,仅一句话(returnnew T[size])即可。方法是供外部类反序列化本类数组使用。
4传递Serializable类型的对象
4.1 Serializable说明
Serializable是一个对象序列化的接口。一个类只有实现了Serializable接口,它的对象才是可序列化的。因此如果要序列化某些类的对象,这些类就必须实现Serializable接口。而实际上,Serializable是一个空接口,没有什么具体内容,它的目的只是简单的标识一个类的对象可以被序列化。
4.2 Serializable接口的实现方法
很简单,只要implements Serializable接口就可以了
5 demo演示程序
下面是对实现上述三种数据传递方式的BundleTest(demo程序)进行简要介绍
5.1 demo概要
BundleTest共包含了4个java文件和2个layout文件(main.xml和main2.xml)
Bundle01.java —— 默认的主Activity窗口。
Bundle02.java —— 主Activity用于跳转的目的窗口。
Book.java —— 实现Parcelable接口的类
Person.java —— 实现Serializable接口的类
main.xml —— Bundle01.java的layout文件
main2.xml —— Bundle02.java的layout文件
工程文件结构如下所示:

5.2代码
AndroidManifest.xml
- <?xml version="1.0" encoding="utf-8"?>
- <manifest xmlns:android="http://schemas.android.com/apk/res/android"
- package="com.bundletest"
- android:versionCode="1"
- android:versionName="1.0">
- <application android:icon="@drawable/icon" android:label="@string/app_name">
- <activity android:name=".Bundle01"
- android:label="@string/app_name">
- <intent-filter>
- <action android:name="android.intent.action.MAIN" />
- <category android:name="android.intent.category.LAUNCHER" />
- </intent-filter>
- </activity>
- <activity android:name=".Bundle02"> </activity>
- </application>
- <uses-sdk android:minSdkVersion="11" />
- </manifest>
main.xml
- <?xml version="1.0" encoding="utf-8"?>
- <LinearLayout xmlns:android="http://schemas.android.com/apk/res/android"
- android:orientation="vertical"
- android:layout_width="fill_parent"
- android:layout_height="fill_parent"
- >
- <TextView
- android:layout_width="fill_parent"
- android:layout_height="wrap_content"
- android:text="@string/app_01"
- />
- <Button
- android:id="@+id/btnBasic"
- android:layout_width="fill_parent"
- android:layout_height="wrap_content"
- android:text="@string/text_basic"
- />
- <Button
- android:id="@+id/btnPar"
- android:layout_width="fill_parent"
- android:layout_height="wrap_content"
- android:text="@string/text_par"
- />
- <Button
- android:id="@+id/btnSer"
- android:layout_width="fill_parent"
- android:layout_height="wrap_content"
- android:text="@string/text_ser"
- />
- </LinearLayout>
main2.xml
- <?xml version="1.0" encoding="utf-8"?>
- <LinearLayout xmlns:android="http://schemas.android.com/apk/res/android"
- android:orientation="vertical"
- android:layout_width="fill_parent"
- android:layout_height="fill_parent"
- >
- <TextView
- android:layout_width="fill_parent"
- android:layout_height="wrap_content"
- android:text="@string/app_02"
- />
- <Button
- android:id="@+id/btnBack"
- android:layout_width="fill_parent"
- android:layout_height="wrap_content"
- android:text="@string/text_jump_back"
- />
- </LinearLayout>
strings.xml
- <?xml version="1.0" encoding="utf-8"?>
- <resources>
- <string name="hello">Hello MyBundleTest!</string>
- <string name="app_name">MyBundleTest</string>
- <string name="app_01">Bundle_01</string>
- <string name="app_02">Bundle_02</string>
- <string name="text_basic">Bundle Basic Data</string>
- <string name="text_par">Bundle Parcelable Data</string>
- <string name="text_ser">Bundle Seriable Data</string>
- <string name="text_jump_back">Jump Back to Bundler01</string>
- </resources>
Bundle01.java
- package com.bundletest;
- import android.app.Activity;
- import android.os.Bundle;
- import android.view.View;
- import android.view.View.OnClickListener;
- import android.widget.Button;
- import android.content.Intent;
- import android.util.Log;
- public class Bundle01 extends Activity implements View.OnClickListener{
- private static final String TAG = "skywang-->Bundle01";
- private Button mBtnBasic = null;
- private Button mBtnPar = null;
- private Button mBtnSer = null;
- @Override
- public void onCreate(Bundle savedInstanceState) {
- super.onCreate(savedInstanceState);
- setContentView(R.layout.main);
- mBtnBasic = (Button) findViewById(R.id.btnBasic);
- mBtnBasic.setOnClickListener(this);
- mBtnPar = (Button) findViewById(R.id.btnPar);
- mBtnPar.setOnClickListener(this);
- mBtnSer = (Button) findViewById(R.id.btnSer);
- mBtnSer.setOnClickListener(this);
- }
- @Override
- public void onClick(View view) {
- switch (view.getId()) {
- case R.id.btnBasic:
- sendBasicDataThroughBundle();
- break;
- case R.id.btnPar:
- sendParcelableDataThroughBundle();
- break;
- case R.id.btnSer:
- sendSeriableDataThroughBundle();
- break;
- default:
- break;
- }
- }
- // sent basic data, such as int, strin, etc... through bundle
- private void sendBasicDataThroughBundle(){
- // "com.test" is the package name of the destination class
- // "com.test.Activity02" is the full class path of the destination class
- Intent intent = new Intent().setClassName("com.bundletest", "com.bundletest.Bundle02");
- Bundle bundle = new Bundle();
- bundle.putString("name", "skywang");
- bundle.putInt("height", 175);
- intent.putExtras(bundle);
- startActivity(intent);
- // end current class
- finish();
- }
- // sent object through Pacelable
- private void sendParcelableDataThroughBundle(){
- Intent intent = new Intent().setClassName("com.bundletest", "com.bundletest.Bundle02");
- Book mBook = new Book();
- mBook.setBookName("Android");
- mBook.setAuthor("skywang");
- mBook.setPublishTime(2013);
- Bundle mBundle = new Bundle();
- mBundle.putParcelable("ParcelableValue", mBook);
- intent.putExtras(mBundle);
- startActivity(intent);
- finish();
- }
- // sent object through seriable
- private void sendSeriableDataThroughBundle(){
- Intent intent = new Intent().setClassName("com.bundletest", "com.bundletest.Bundle02");
- Person mPerson = new Person();
- mPerson.setName("skywang");
- mPerson.setAge(24);
- Bundle mBundle = new Bundle();
- mBundle.putSerializable("SeriableValue",mPerson);
- intent.putExtras(mBundle);
- startActivity(intent);
- finish();
- }
- }
Bundle02.java
- package com.bundletest;
- import android.app.Activity;
- import android.os.Bundle;
- import android.view.View;
- import android.view.View.OnClickListener;
- import android.widget.Button;
- import android.content.Intent;
- import android.util.Log;
- public class Bundle02 extends Activity implements View.OnClickListener {
- private static final String TAG = "skywang-->Bundle02";
- private Button mBtnBack = null;
- @Override
- public void onCreate(Bundle savedInstanceState) {
- super.onCreate(savedInstanceState);
- setContentView(R.layout.main2);
- mBtnBack = (Button) findViewById(R.id.btnBack);
- mBtnBack.setOnClickListener(this);
- receiveBasicData();
- receiveParcelableData();
- receiveSeriableData();
- }
- private void receiveBasicData() {
- Bundle bundle = this.getIntent().getExtras();
- String name = bundle.getString("name");
- int height = bundle.getInt("height");
- if (name != null && height != 0)
- Log.d(TAG, "receice basic data -- " +
- "name="+name+", height="+height);
- }
- private void receiveParcelableData() {
- Book mBook = (Book)getIntent().getParcelableExtra("ParcelableValue");
- if (mBook != null)
- Log.d(TAG, "receice parcel data -- " +
- "Book name is: " + mBook.getBookName()+", "+
- "Author is: " + mBook.getAuthor() + ", "+
- "PublishTime is: " + mBook.getPublishTime());
- }
- private void receiveSeriableData() {
- Person mPerson = (Person)getIntent().getSerializableExtra("SeriableValue");
- if (mPerson != null)
- Log.d(TAG, "receice serial data -- " +
- "The name is:" + mPerson.getName() + ", "+
- "age is:" + mPerson.getAge());
- }
- @Override
- public void onClick(View view) {
- switch (view.getId()) {
- case R.id.btnBack:
- {
- // "com.test" is the package name of the destination class
- // "com.test.Activity01" is the full class path of the destination class
- Intent intent = new Intent().setClassName("com.bundletest", "com.bundletest.Bundle01");
- startActivity(intent);
- // end current class
- finish();
- }
- break;
- default:
- break;
- }
- }
- }
Book.java
- package com.bundletest;
- import android.os.Parcel;
- import android.os.Parcelable;
- public class Book implements Parcelable {
- private String bookName;
- private String author;
- private int publishTime;
- public String getBookName() {
- return bookName;
- }
- public void setBookName(String bookName) {
- this.bookName = bookName;
- }
- public String getAuthor() {
- return author;
- }
- public void setAuthor(String author) {
- this.author = author;
- }
- public int getPublishTime() {
- return publishTime;
- }
- public void setPublishTime(int publishTime) {
- this.publishTime = publishTime;
- }
- public static final Parcelable.Creator<Book> CREATOR = new Creator<Book>() {
- @Override
- public Book createFromParcel(Parcel source) {
- Book mBook = new Book();
- mBook.bookName = source.readString();
- mBook.author = source.readString();
- mBook.publishTime = source.readInt();
- return mBook;
- }
- @Override
- public Book[] newArray(int size) {
- return new Book[size];
- }
- };
- @Override
- public int describeContents() {
- return 0;
- }
- @Override
- public void writeToParcel(Parcel parcel, int flags) {
- parcel.writeString(bookName);
- parcel.writeString(author);
- parcel.writeInt(publishTime);
- }
- }
Person.java
- package com.bundletest;
- import java.io.Serializable;
- public class Person implements Serializable {
- private static final long serialVersionUID = 1L;
- private String name;
- private int age;
- public String getName() {
- return name;
- }
- public void setName(String name) {
- this.name = name;
- }
- public int getAge() {
- return age;
- }
- public void setAge(int age) {
- this.age = age;
- }
- }
5.3输出图片
Bundle01.java对应的界面如下:

点击“Bundle Basic Data”、“Bundle Parcelable Data”、“Bundle Seriable Data”均跳转到如下界面,但它们对应的logcat信息不同。

点击“Bundle Basic Data”的logcat如下:

点击“Bundle Parcelable Data”的logcat如下:

点击“Bundle Seriable Data”的logcat如下:

转自:http://www.cnblogs.com/skywang12345/archive/2013/03/06/3165555.html
|
Android中Bundle类的作用 Bundle类用作携带数据,它类似于Map,用于存放key-value名值对形式的值 |
今天发现自己连Bundle类都没有搞清楚,于是花时间研究了一下。
根据google官方的文档(http://developer.android.com/reference/android/os/Bundle.html)
Bundle类是一个key-value对,“A mapping from String values to various Parcelable types.”
类继承关系:
Java.lang.Object
Android.os.Bundle
Bundle类是一个final类:
public final class
Bundle
extends Objectimplements Parcelable Cloneable
两个activity之间的通讯可以通过bundle类来实现,做法就是:
(1)新建一个bundle类
- Bundle mBundle = new Bundle();
(2)bundle类中加入数据(key -value的形式,另一个activity里面取数据的时候,就要用到key,找出对应的value)
- mBundle.putString("Data", "data from TestBundle");
(3)新建一个intent对象,并将该bundle加入这个intent对象
- Intent intent = new Intent();
- intent.setClass(TestBundle.this, Target.class);
- intent.putExtras(mBundle);
完整代码如下:
android mainfest.xml如下:
- <?xml version="1.0" encoding="utf-8"?>
- <manifest xmlns:android="http://schemas.android.com/apk/res/android"
- package="com.tencent.test"
- android:versionCode="1"
- android:versionName="1.0">
- <application android:icon="@drawable/icon" android:label="@string/app_name">
- <activity android:name=".TestBundle"
- android:label="@string/app_name">
- <intent-filter>
- <action android:name="android.intent.action.MAIN" />
- <category android:name="android.intent.category.LAUNCHER" />
- </intent-filter>
- </activity>
- <activity android:name=".Target"></activity>
- </application>
- <uses-sdk android:minSdkVersion="7" />
- </manifest>
两个类如下:intent从TestBundle类发起,到Target类。
类1:TestBundle类:
- import android.app.Activity;
- import android.content.Intent;
- import android.os.Bundle;
- import android.view.View;
- import android.view.View.OnClickListener;
- import android.widget.Button;
- public class TestBundle extends Activity {
- private Button button1;
- private OnClickListener cl;
- public void onCreate(Bundle savedInstanceState) {
- super.onCreate(savedInstanceState);
- setContentView(R.layout.main);
- button1 = (Button) findViewById(R.id.button1);
- cl = new OnClickListener(){
- @Override
- public void onClick(View arg0) {
- // TODO Auto-generated method stub
- Intent intent = new Intent();
- intent.setClass(TestBundle.this, Target.class);
- Bundle mBundle = new Bundle();
- mBundle.putString("Data", "data from TestBundle");//压入数据
- intent.putExtras(mBundle);
- startActivity(intent);
- }
- };
- button1.setOnClickListener(cl);
- }
- }
类2: Target
- import android.app.Activity;
- import android.os.Bundle;
- public class Target extends Activity{
- public void onCreate(Bundle savedInstanceState) {
- super.onCreate(savedInstanceState);
- setContentView(R.layout.target);
- <span style="color:#ff6600;">Bundle bundle = getIntent().getExtras(); </span> //得到传过来的bundle
- String data = bundle.getString("Data");//读出数据
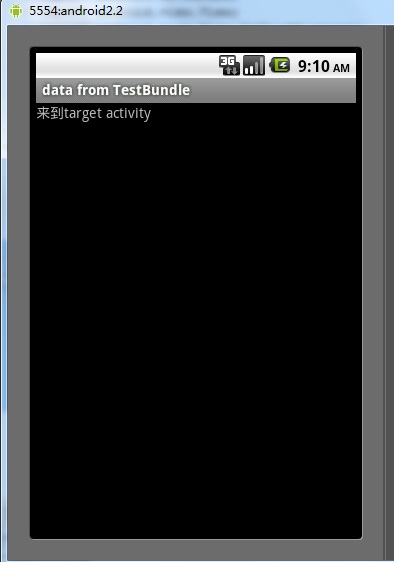
- setTitle(data);
- }
- }
布局文件:
main.xml
- <?xml version="1.0" encoding="utf-8"?>
- <LinearLayout xmlns:android="http://schemas.android.com/apk/res/android"
- android:orientation="vertical"
- android:layout_width="fill_parent"
- android:layout_height="fill_parent"
- >
- <TextView
- android:layout_width="fill_parent"
- android:layout_height="wrap_content"
- android:text="@string/hello"
- />
- <Button
- android:layout_width="fill_parent"
- android:layout_height="wrap_content"
- android:text="@string/button"
- android:id = "@+id/button1"
- />
- </LinearLayout>
target.xml
- <?xml version="1.0" encoding="utf-8"?>
- <LinearLayout xmlns:android="http://schemas.android.com/apk/res/android"
- android:orientation="vertical"
- android:layout_width="fill_parent"
- android:layout_height="fill_parent"
- >
- <TextView
- android:layout_width="fill_parent"
- android:layout_height="wrap_content"
- android:text="@string/target"
- />
- </LinearLayout>
String.xml
- <?xml version="1.0" encoding="utf-8"?>
- <resources>
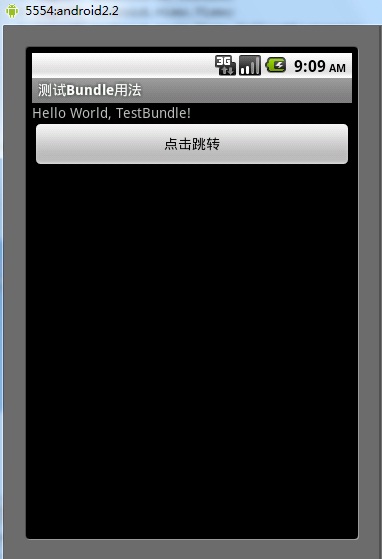
- <string name="hello">Hello World, TestBundle!</string>
- <string name="app_name">测试Bundle用法</string>
- <string name="button">点击跳转</string>
- <string name="target">来到target activity</string>
- </resources>
结果:

跳转结果:

http://blog.csdn.net/luman1991/article/details/52887533
Android Bundle详解的更多相关文章
- Android——Android Bundle详解(转)
Android Bundle详解 1 Bundle介绍 Bundle主要用于传递数据:它保存的数据,是以key-value(键值对)的形式存在的. 我们经常使用Bundle在Activity之间传递数 ...
- Android Notification 详解(一)——基本操作
Android Notification 详解(一)--基本操作 版权声明:本文为博主原创文章,未经博主允许不得转载. 微博:厉圣杰 源码:AndroidDemo/Notification 文中如有纰 ...
- Android Notification 详解——基本操作
Android Notification 详解 版权声明:本文为博主原创文章,未经博主允许不得转载. 前几天项目中有用到 Android 通知相关的内容,索性把 Android Notificatio ...
- Android ActionBar详解
Android ActionBar详解 分类: Android2014-04-30 15:23 1094人阅读 评论(0) 收藏 举报 androidActionBar 目录(?)[+] 第4 ...
- Android菜单详解(四)——使用上下文菜单ContextMenu
之前在<Android菜单详解(二)——创建并响应选项菜单>和<Android菜单详解(三)——SubMenu和IconMenu>中详细讲解了选项菜单,子菜单和图标菜单.今天接 ...
- 【转】Android菜单详解——理解android中的Menu--不错
原文网址:http://www.cnblogs.com/qingblog/archive/2012/06/08/2541709.html 前言 今天看了pro android 3中menu这一章,对A ...
- Android 布局详解
Android 布局详解 1.重用布局 当一个布局文件被多处使用时,最好<include>标签来重用布局. 例如:workspace_screen.xml的布局文件,在另一个布局文件中被重 ...
- Android进阶(十四)Android Adapter详解
Android Adapter详解 Android是完全遵循MVC模式设计的框架,Activity是Controller,layout是View.因为layout五花八门,很多数据都不能直接绑定上去, ...
- Android HandlerThread详解
概述 Android HandlerThread使用,自带Looper消息循环的快捷类. 详细 代码下载:http://www.demodashi.com/demo/10628.html 原文地址: ...
随机推荐
- h5与c3权威指南笔记--css3结构性伪类选择器root,not,empty,target
root:将样式绑定到根元素(html中的根元素是<html></html>) 举个栗子 :root{ background-color: yellow; } body{ ba ...
- 编程语言 Node.js中使用到的npm工具
啥是npm? npm就是(node package manager)包结点管理器,它随同Node.js一起安装的,由于新版的nodejs已经集成了npm,所以之前npm也一并安装好了. 同样可以通过输 ...
- Java导出Excel的Springmvc实例
@RequestMapping(value = "downloadExcel", method = RequestMethod.GET) public String downl ...
- activemq读取剩余消息队列中消息的数量
先上原文链接: http://blog.csdn.net/bodybo/article/details/5647968 ActiveMQ在C#中的应用 ActiveMQ是个好东东,不必多说.Acti ...
- SQL Server数据库————模糊查询和聚合函数
***********模糊查询*********/ 关键字: like (!!!!字符串类型) in (,,) 匹配()内的某个具体值(括号里可以写多个值) between... and.. 在某两 ...
- SpringBoot文档
一.Spring Boot 入门 1.Hello World探究 1.POM文件 1.父项目 <parent> <groupId>org.springframework.b ...
- samba介绍和安装
samba基本介绍 为什么需要samba 早期网络文件数据在不同主机之间传输大都可以使用Ftp完成,不过ftp使用有个小小的问题,它不能让你之间修改主机上的文件.要想修改必须要通过下载——修改——上传 ...
- Unity3D介绍
Unity3D介绍:Unity3D是一个游戏开发引擎 由Unity Technologies开发的一个让玩家轻松创建诸如三维视频游戏.建筑可视化.实时三维动画等类型互动内容的多平台的综合型游戏开发工具 ...
- Elastic Stack-Elasticsearch使用介绍(三)
一.前言 上一篇说了这篇要讲解Search机制,但是在这个之前我们要明白下文件是怎么存储的,我们先来讲文件的存储然后再来探究机制: 二.文档存储 之前说过文档是存储在分片上的,这里要思考一个问 ...
- 关于取li中的value
HTML的li标签的属性value是有规定的:规定列表项目的数字,所以它的value只能是数字.像字符和第一数字为0的都不取非要用li的话可以 var uid = $('#userid').attr( ...
