SpringBoot自动装配源码解析
序:众所周知spring-boot入门容易精通难,说到底spring-boot是对spring已有的各种技术的整合封装,因为封装了所以使用简单,也因为封装了所以越来越多的"拿来主义"者们不愿意去关注其具体实现!为了更好的使用spring-boot所以必要的源码探索是非常有必要的!今天开始探索的第一步:自动装配原理-----------------(此处默认各位看官熟悉spring的各种基础注解)
1.要谈自动装配我们需要从项目的初始注解入手:@SpringBootApplication
 @Target({ElementType.TYPE})

 @Retention(RetentionPolicy.RUNTIME)

 @Documented

 @Inherited

 @SpringBootConfiguration

 @EnableAutoConfiguration

 @ComponentScan(

     excludeFilters = {@Filter(

     type = FilterType.CUSTOM,

     classes = {TypeExcludeFilter.class}

 ), @Filter(

     type = FilterType.CUSTOM,

     classes = {AutoConfigurationExcludeFilter.class}

 )}

 )

 public @interface SpringBootApplication {

     ... }
2.这个下面实现自动装配的注解为:@EnableAutoConfiguration
 @Target({ElementType.TYPE})

 @Retention(RetentionPolicy.RUNTIME)

 @Documented

 @Inherited

 @AutoConfigurationPackage

 @Import({AutoConfigurationImportSelector.class})

 public @interface EnableAutoConfiguration {

     String ENABLED_OVERRIDE_PROPERTY = "spring.boot.enableautoconfiguration";

     Class<?>[] exclude() default {};

     String[] excludeName() default {};

 }
3.在这个注解下我们需要关注两个注解:@AutoConfigurationPackage、@Import({AutoConfigurationImportSelector.class})
a.我们先来看看@AutoConfigurationPackage
 @Target({ElementType.TYPE})

 @Retention(RetentionPolicy.RUNTIME)

 @Documented

 @Inherited

 @Import({Registrar.class})

 public @interface AutoConfigurationPackage {

 }
这个下面引入了:Registrar
 static class Registrar implements ImportBeanDefinitionRegistrar, DeterminableImports {

         Registrar() {

         }

         public void registerBeanDefinitions(AnnotationMetadata metadata, BeanDefinitionRegistry registry) {

             AutoConfigurationPackages.register(registry, (new AutoConfigurationPackages.PackageImport(metadata)).getPackageName());

         }

         public Set<Object> determineImports(AnnotationMetadata metadata) {

             return Collections.singleton(new AutoConfigurationPackages.PackageImport(metadata));

         }

     }
这是AutoConfigurationPackage的一个静态类,标蓝处的动作为为指定@ComponentScan的扫描路径,此处打断点启动项目我们可以发现这个为项目的顶级包名。(这个下面不做深入介绍,此内容不属于本文重点,有兴趣自行深入了解)如图:
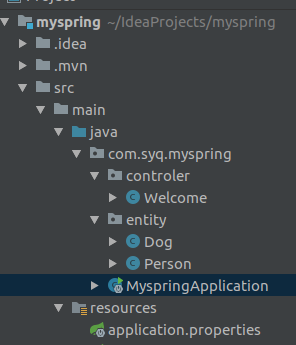
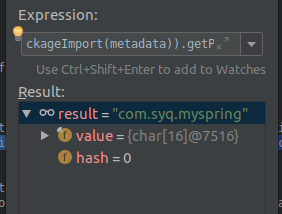
这儿确保了将项目目录下所有的bean注入到容器
b.接下来我们看看引入的AutoConfigurationImportSelector(个人觉得这个是自动配置的灵魂)
public class AutoConfigurationImportSelector implements DeferredImportSelector, BeanClassLoaderAware, ResourceLoaderAware, BeanFactoryAware, EnvironmentAware, Ordered {

    private static final AutoConfigurationImportSelector.AutoConfigurationEntry EMPTY_ENTRY = new AutoConfigurationImportSelector.AutoConfigurationEntry();

    private static final String[] NO_IMPORTS = new String[0];

    private static final Log logger = LogFactory.getLog(AutoConfigurationImportSelector.class);

    private static final String PROPERTY_NAME_AUTOCONFIGURE_EXCLUDE = "spring.autoconfigure.exclude";

    private ConfigurableListableBeanFactory beanFactory;

    private Environment environment;

    private ClassLoader beanClassLoader;

    private ResourceLoader resourceLoader;
  ....

    protected AutoConfigurationImportSelector.AutoConfigurationEntry getAutoConfigurationEntry(AutoConfigurationMetadata autoConfigurationMetadata, AnnotationMetadata annotationMetadata) {

        if (!this.isEnabled(annotationMetadata)) {

            return EMPTY_ENTRY;

        } else {

            AnnotationAttributes attributes = this.getAttributes(annotationMetadata);

            List<String> configurations = this.getCandidateConfigurations(annotationMetadata, attributes);

            configurations = this.removeDuplicates(configurations);

            Set<String> exclusions = this.getExclusions(annotationMetadata, attributes);

            this.checkExcludedClasses(configurations, exclusions);

            configurations.removeAll(exclusions);

            configurations = this.filter(configurations, autoConfigurationMetadata);

            this.fireAutoConfigurationImportEvents(configurations, exclusions);

            return new AutoConfigurationImportSelector.AutoConfigurationEntry(configurations, exclusions);

        }

    }

  ....

}
此处是去获取真正自动配置类的集合,我们需要关注标蓝的方法:
 protected List<String> getCandidateConfigurations(AnnotationMetadata metadata, AnnotationAttributes attributes) {

         List<String> configurations = SpringFactoriesLoader.loadFactoryNames(this.getSpringFactoriesLoaderFactoryClass(), this.getBeanClassLoader());

         Assert.notEmpty(configurations, "No auto configuration classes found in META-INF/spring.factories. If you are using a custom packaging, make sure that file is correct.");

         return configurations;

     }
还看不出来什么,还需要往下走一层:
 public static List<String> loadFactoryNames(Class<?> factoryClass, @Nullable ClassLoader classLoader) {

         String factoryClassName = factoryClass.getName();

         return (List)loadSpringFactories(classLoader).getOrDefault(factoryClassName, Collections.emptyList());

     }

     private static Map<String, List<String>> loadSpringFactories(@Nullable ClassLoader classLoader) {

         MultiValueMap<String, String> result = (MultiValueMap)cache.get(classLoader);

         if (result != null) {

             return result;

         } else {

             try {

                 Enumeration<URL> urls = classLoader != null ? classLoader.getResources("META-INF/spring.factories") : ClassLoader.getSystemResources("META-INF/spring.factories");

                 LinkedMultiValueMap result = new LinkedMultiValueMap();

                 while(urls.hasMoreElements()) {

                     URL url = (URL)urls.nextElement();

                     UrlResource resource = new UrlResource(url);

                     Properties properties = PropertiesLoaderUtils.loadProperties(resource);

                     Iterator var6 = properties.entrySet().iterator();

                     while(var6.hasNext()) {

                         Entry<?, ?> entry = (Entry)var6.next();

                         String factoryClassName = ((String)entry.getKey()).trim();

                         String[] var9 = StringUtils.commaDelimitedListToStringArray((String)entry.getValue());

                         int var10 = var9.length;

                         for(int var11 = 0; var11 < var10; ++var11) {

                             String factoryName = var9[var11];

                             result.add(factoryClassName, factoryName.trim());

                         }

                     }

                 }

                 cache.put(classLoader, result);

                 return result;

             } catch (IOException var13) {

                 throw new IllegalArgumentException("Unable to load factories from location [META-INF/spring.factories]", var13);

             }

         }

     }
我们可以发现spring-boot会去META-INF/spring.factories找org.springframework.boot.autoconfigure.EnableAutoConfiguration的value.这个的具体位置如图:
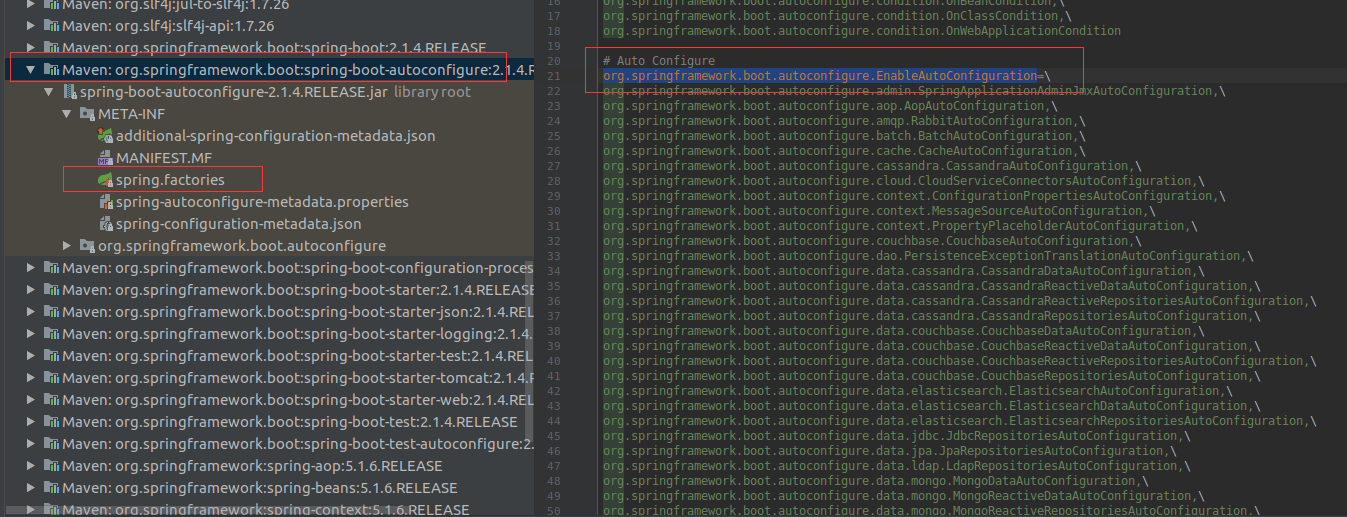
这个下面配置了所有自动配置,以其中一个为例(其余类似),分析其可配参数。(AopAutoConfiguration)
 @Configuration

 @ConditionalOnClass({EnableAspectJAutoProxy.class, Aspect.class, Advice.class, AnnotatedElement.class})

 @ConditionalOnProperty(

     prefix = "spring.aop",

     name = {"auto"},

     havingValue = "true",

     matchIfMissing = true

 )

 public class AopAutoConfiguration {

     public AopAutoConfiguration() {

     }

     @Configuration

     @EnableAspectJAutoProxy(

         proxyTargetClass = true

     )

     @ConditionalOnProperty(

         prefix = "spring.aop",

         name = {"proxy-target-class"},

         havingValue = "true",

         matchIfMissing = true

     )

     public static class CglibAutoProxyConfiguration {

         public CglibAutoProxyConfiguration() {

         }

     }

     @Configuration

     @EnableAspectJAutoProxy(

         proxyTargetClass = false

     )

     @ConditionalOnProperty(

         prefix = "spring.aop",

         name = {"proxy-target-class"},

         havingValue = "false",

         matchIfMissing = false

     )

     public static class JdkDynamicAutoProxyConfiguration {

         public JdkDynamicAutoProxyConfiguration() {

         }

     }

 }
我们可以在spring-configuration-metadata.json中找到其对应的配置如下:
{

      "name": "spring.aop.proxy-target-class",

      "type": "java.lang.Boolean",

      "description": "Whether subclass-based (CGLIB) proxies are to be created (true), as opposed to standard Java interface-based proxies (false).",

      "defaultValue": true

    },
介绍到这里spring-boot的自动装配过程我们就基本看完了~
SpringBoot自动装配源码解析的更多相关文章
- SpringBoot源码学习1——SpringBoot自动装配源码解析+Spring如何处理配置类的
系列文章目录和关于我 一丶什么是SpringBoot自动装配 SpringBoot通过SPI的机制,在我们程序员引入一些starter之后,扫描外部引用 jar 包中的META-INF/spring. ...
- springboot自动配置源码解析
springboot版本:2.1.6.RELEASE SpringBoot 自动配置主要通过 @EnableAutoConfiguration, @Conditional, @EnableConfig ...
- SpringBoot自动装配-源码分析
1. 简介 通过源码探究SpringBoot的自动装配功能. 2. 核心代码 2.1 启动类 我们都知道SpringBoot项目创建好后,会自动生成一个当前模块的启动类.如下: import org. ...
- SpringBoot自动装配源码
前几天,面试的时候被问到了SpringBoot的自动装配的原理.趁着五一的假期,就来整理一下这个流程. 我这里使用的是idea创建的最简单的SpringBoot项目. 我们都知道,main方法是jav ...
- SpringBoot自动配置源码调试
之前对SpringBoot的自动配置原理进行了较为详细的介绍(https://www.cnblogs.com/stm32stm32/p/10560933.html),接下来就对自动配置进行源码调试,探 ...
- SpringBoot启动代码和自动装配源码分析
随着互联网的快速发展,各种组件层出不穷,需要框架集成的组件越来越多.每一种组件与Spring容器整合需要实现相关代码.SpringMVC框架配置由于太过于繁琐和依赖XML文件:为了方便快速集成第三 ...
- Springboot打包执行源码解析
一.打包 Springboot打包的时候,需要配置一个maven插件[spring-boot-maven-plugin] <build> <plugins> <plugi ...
- SpringBoot 源码解析 (五)----- Spring Boot的核心能力 - 自动配置源码解析
在上一篇博客中分析了springBoot启动流程,大体的轮廓只是冰山一角.今天就来看一下springBoot的亮点功能:自动化装配功能. 先从@SpringBootApplication开始.在启动流 ...
- 原创001 | 搭上SpringBoot自动注入源码分析专车
前言 如果这是你第二次看到师长的文章,说明你在觊觎我的美色!O(∩_∩)O哈哈~ 点赞+关注再看,养成习惯 没别的意思,就是需要你的窥屏^_^ 本系列为SpringBoot深度源码专车系列,第一篇发车 ...
随机推荐
- MySQL 数据库设计总结
本文由云+社区发表 作者:漆洪凯 规则1:一般情况可以选择MyISAM存储引擎,如果需要事务支持必须使用InnoDB存储引擎. 注意:MyISAM存储引擎 B-tree索引有一个很大的限制:参与一个索 ...
- MySQL 笔记整理(16) --“order by”是怎么工作的?
笔记记录自林晓斌(丁奇)老师的<MySQL实战45讲> (本篇内图片均来自丁奇老师的讲解,如有侵权,请联系我删除) 16) --“order by”是怎么工作的? 在林老师的课程中,第15 ...
- 杂牌机搞机之旅(二)————移植TWRP第三方Recovery并刷入
原本想把杂牌机作为android破解和开发的测试机,破解的话肯定是安装框架的嘛,毕竟有些是要涉及到脱壳 . 但是,我尝试安装xposed的时候,手机卡在了开机界面,也就是magisk出现了错误,如果想 ...
- 算法题:实现一个IP白名单过滤器
最近看到一则招聘的JD,附了一个算法题的链接,原题如下: 请实现一个IP白名单过滤算法,实现以下接口 boolean addWhiteIpAddress(String ip); boolean ...
- php去除数组中重复值,并返回结果!
array_unique(array) 只能处理value只有单个的数组. 去除有多个value数组,可以使用如下函数实现: function more_array_unique($arr=array ...
- 折腾Java设计模式之单例模式
博文原址:折腾Java设计模式之单例模式 单例模式 Ensure a class has only one instance, and provide a global point of access ...
- Java设计模式---桥接Bridge模式
参考于 : 大话设计模式 马士兵设计模式视频 写在开头: 桥接模式主要用于一件事物分成了两个维度,进行排列组合,比如礼物,可以分成优雅的礼物(抽象),花(具体),排列组合优雅的花! 1.为什么使用桥接 ...
- 人脸检测识别,人脸检测,人脸识别,离线检测,C#源码
百度网盘地址 微云地址 使用虹软人工智能开放平台技术开发完成
- mssql sqlserver with cte表达式(递归)找出最顶值的方法分享
摘要: 下文通过递归的方式找出最顶级部门的方法分享,如下所示: 实验环境:sql server 2008 R2 下文通过cte-with表达式实现递归,获取一个公司的顶级部门,如下所示 例:部门表 c ...
- Java:全局变量(成员变量)与局部变量
分类细则: 变量按作用范围划分分为全局变量(成员变量)和局部变量 成员变量按调用方式划分分为实例属性与类属性 (有关实例属性与类属性的介绍见另一博文https://blog.csdn.net/Drag ...