day12-实现Spring底层机制-02
实现Spring底层机制-02
3.实现任务阶段1
3.1知识拓展-类加载器
- Java的类加载器有三种:
- Bootstrap类加载器 ----- 对应路径 jre/lib
- Ext类加载器 ----- 对应路径 jre/lib/ext
- App类加载器 ----- 对应路径 classpath
- classpath 类路径,就是java.exe执行时,指定的路径。
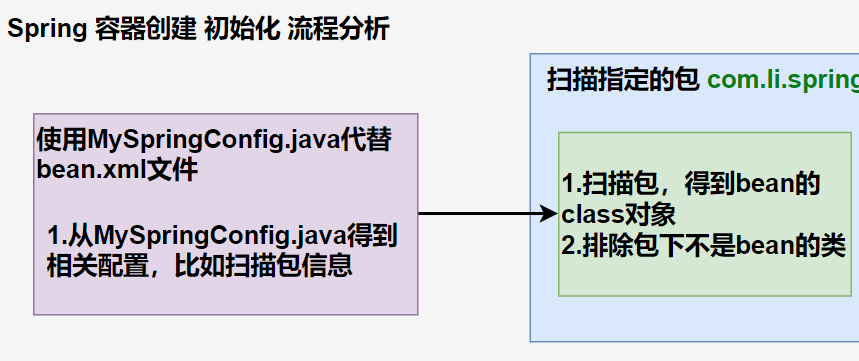
3.2分析
阶段1目标:编写自己的spring容器,实现扫描包,得到bean的class对象
3.3代码实现
1.创建新的maven项目,注意把项目的 language level 改为支持 java8
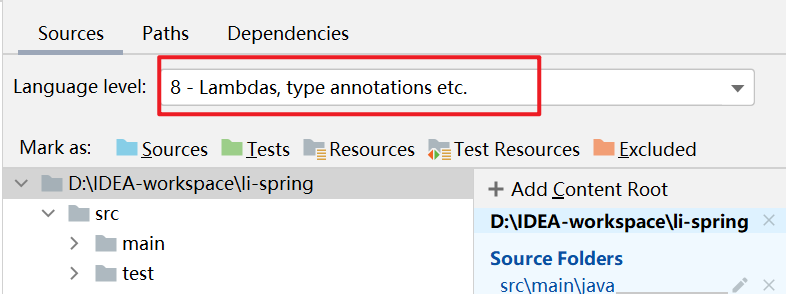
在pom.xml文件中指定编译版本:
<properties>

    <maven.compiler.source>8</maven.compiler.source>

    <maven.compiler.target>8</maven.compiler.target>

</properties>
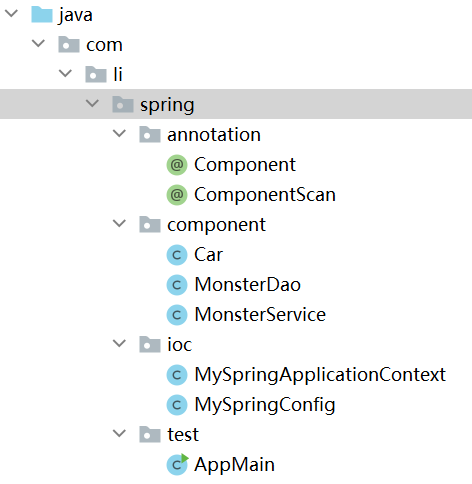
2.创建的架构如下:
3.自定义ComponentScan注解,用于标记要扫描的包
package com.li.spring.annotation;

import java.lang.annotation.ElementType;

import java.lang.annotation.Retention;

import java.lang.annotation.RetentionPolicy;

import java.lang.annotation.Target;

/**

 * @author 李

 * @version 1.0

 * 模仿spring原生注解,自定义一个注解

 * 1. @Target(ElementType.TYPE) 指定ComponentScan注解可以修饰TYPE元素

 * 2. @Retention(RetentionPolicy.RUNTIME) 指定ComponentScan注解 的保留范围

 * 3. String value() default "";  表示 ComponentScan 可以传入一个value值

 */

@Target(ElementType.TYPE)

@Retention(RetentionPolicy.RUNTIME)

public @interface ComponentScan {

    //通过value指定要扫描的包

    String value() default "";

}
4.自定义Component注解,用于标记要扫描的类
package com.li.spring.annotation;

import java.lang.annotation.ElementType;

import java.lang.annotation.Retention;

import java.lang.annotation.RetentionPolicy;

import java.lang.annotation.Target;

@Target(ElementType.TYPE)

@Retention(RetentionPolicy.RUNTIME)

public @interface Component {

    //通过value给要注入的bean指定名字

    String value() default "";

}
5.自定义配置类,相当于原生spring的容器配置文件
package com.li.spring.ioc;

import com.li.spring.annotation.ComponentScan;

/**

 * @author 李

 * @version 1.0

 * 这是一个配置类,作用类似我们原生 spring 的容器配置文件 beans.xml

 */

@ComponentScan(value = "com.li.spring.component")

public class MySpringConfig {

}
6.自定义spring容器,类似原生ioc容器。(未完成)
目前的功能:
(1)在初始化时,根据传入的配置类.class文件,读取要扫描的包路径
(2)遍历包路径下的文件,找出需要注入的bean
package com.li.spring.ioc;

import com.li.spring.annotation.Component;

import com.li.spring.annotation.ComponentScan;

import java.io.File;

import java.net.URL;

/**

 * @author 李

 * @version 1.0

 * MySpringApplicationContext 类的作用类似Spring原生的ioc容器

 */

public class MySpringApplicationContext {

    private Class configClass;

    //构造器

    public MySpringApplicationContext(Class configClass) {

        this.configClass = configClass;

        //步骤一:获取要扫描的包

        //1.先得到 MySpringConfig配置类的注解 @ComponentScan(value = "com.li.spring.component")

        ComponentScan componentScan =

                (ComponentScan) this.configClass.getDeclaredAnnotation(ComponentScan.class);

        //2.通过 componentScan的 value=>得到要扫描的包路径

        String path = componentScan.value();

        System.out.println("要扫描的包=" + path);

        //步骤二:得到要扫描的包下的所有资源(类.class)

        //1.得到类的加载器-->App 类加载器

        ClassLoader classLoader = MySpringApplicationContext.class.getClassLoader();

        //2.通过类的加载器获取到要扫描的包的资源 url=>类似一个路径

        path = path.replace(".", "/");//将原先路径的.替换成/ ==> com/li/component

        URL resource = classLoader.getResource(path);

        //resource=file:/D:/IDEA-workspace/spring/out/production/spring/com/li/component

        System.out.println("resource=" + resource);

        //3.将要加载的资源(.class)路径下的文件进行遍历

        File file = new File(resource.getFile());

        if (file.isDirectory()) {

            File[] files = file.listFiles();//将当前目录下的所有文件放到files数组中(这里没有实现递归)

            for (File f : files) {

                //System.out.println("============");

                //System.out.println("AbsolutePath=" + f.getAbsolutePath());

                //获取文件的绝对路径

                String fileAbsolutePath = f.getAbsolutePath();

                //只处理.class文件

                if (fileAbsolutePath.endsWith(".class")) {

                    //步骤三:获取全类名反射对象,并放入容器中

                    //将其转变为 com.li.spring.component.MyComponent.class 形式

                    //1.先获取到类名

                    String className = fileAbsolutePath.substring(

                            fileAbsolutePath.lastIndexOf("\\") + 1,

                            fileAbsolutePath.indexOf(".class"));

                    //2.获取类的完整路径(全类名)

                    // path.replace("/", ".") => com.li.component

                    String classFullName = path.replace("/", ".") + "." + className;

                    //3.判断该class文件是否要注入到容器中(该类是否有特定注解)

                    try {

                        /*

                        得到该类的Class对象:

                        (1)Class.forName(className) 可以反射加载类

                        (2)classLoader.loadClass(className)也可以反射类的Class

                        主要区别是:(1)的方式会调用该类的静态方法,(2)的方法不会

                         */

                        //因为这里只是要判断该类有没有注解,因此使用比较轻量级的方式

                        Class<?> clazz = classLoader.loadClass(classFullName);

                        //判断该类是否有特定注解

                        if (clazz.isAnnotationPresent(Component.class)) {

                            //以 Component注解为例,如果有其他注解,逻辑一致

                            //如果该类使用了 @Component ,说明是spring bean

                            System.out.println("是一个spring bean=" + clazz + " 类名=" + className);

                        } else {

                            //如果没有使用,则说明不是spring bean

                            System.out.println("不是一个 spring bean=" + clazz + " 类名=" + className);

                        }

                    } catch (Exception e) {

                        e.printStackTrace();

                    }

                }

            }

            System.out.println("===========================");

        }

    }

    //编写方法,返回容器对象

    public Object getBean(String name) {

        return null;

    }

}
7.创建两个自定义 Spring bean,一个普通类作为测试
(1)MonsterService
package com.li.spring.component;

import com.li.spring.annotation.Component;

/**

 * @author 李

 * @version 1.0

 * MonsterService 是一个 Service

 * 1.如果指定了value,那么在注入spring容器时,以你指定的为准

 * 2.如果没有指定value,则使用类名(首字母小写)作为默认名

 */

@Component(value = "monsterService") //将 MonsterService注入到自己的spring容器中

public class MonsterService {

}
(2)MonsterDao
package com.li.spring.component;

import com.li.spring.annotation.Component;

/**

 * @author 李

 * @version 1.0

 */

@Component(value = "monsterDao")

public class MonsterDao {

}
(3)Car,普通类
package com.li.spring.component;

/**

 * @author 李

 * @version 1.0

 */

public class Car {

}
8.进行测试
package com.li.spring.test;

import com.li.spring.ioc.MySpringApplicationContext;

import com.li.spring.ioc.MySpringConfig;

/**

 * @author 李

 * @version 1.0

 */

public class AppMain {

    public static void main(String[] args) {

        MySpringApplicationContext ioc =

                new MySpringApplicationContext(MySpringConfig.class);

    }

}
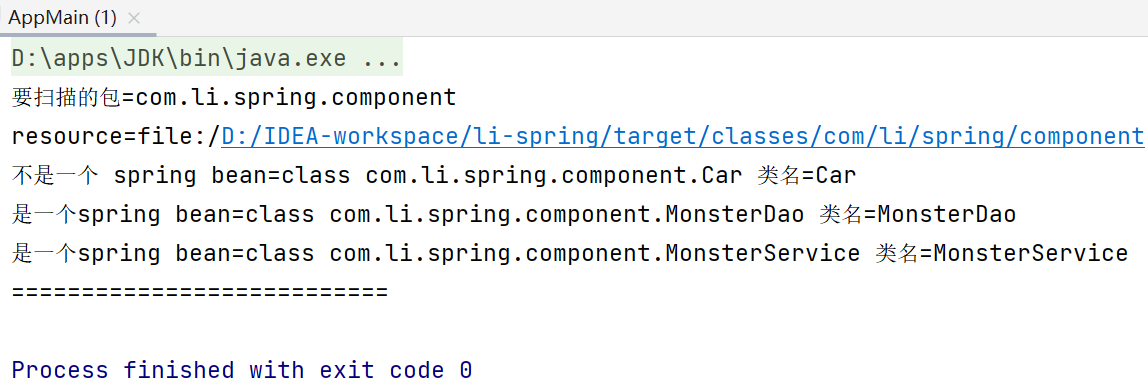
测试结果:成功区分指定包下的 bean 和普通类
4.实现任务阶段2
4.1分析
阶段2目标:扫描指定包,将bean信息封装到BeanDefinition对象,并放入到Map
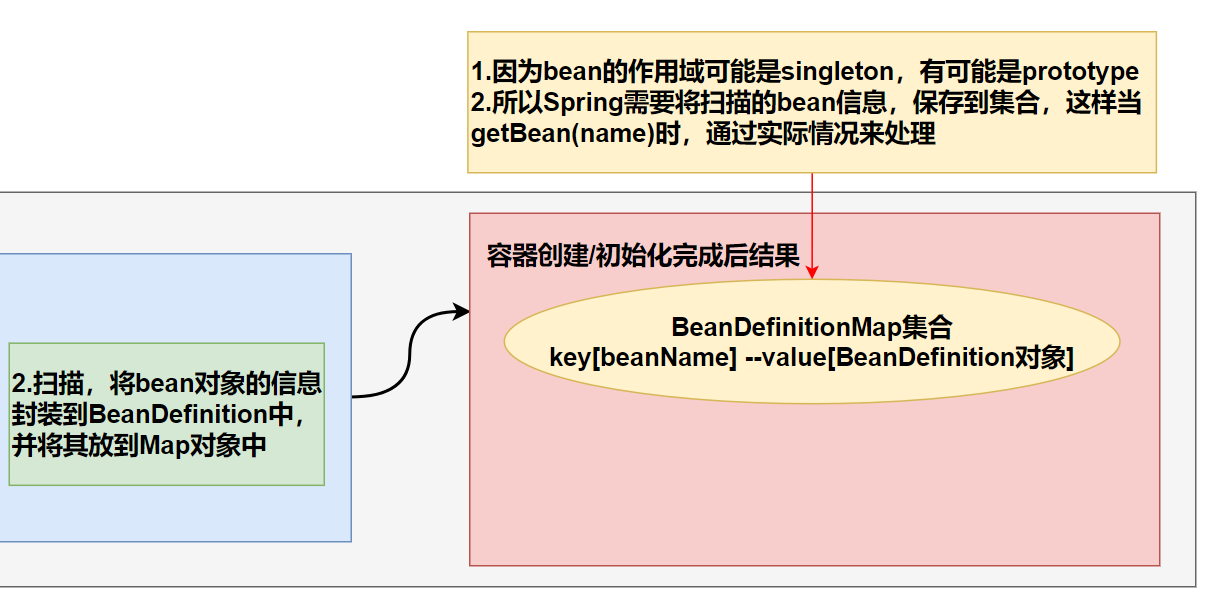
BeanDefinitionMap以k-v形式存放bean对象的信息。
- key为bean对象的id
- value为BeanDefinition对象,该对象存放bean信息。如果bean为prototype,应保存bean的class对象,这样在调用getBean()方法时可以动态创建对象。
新添加的注解和类:
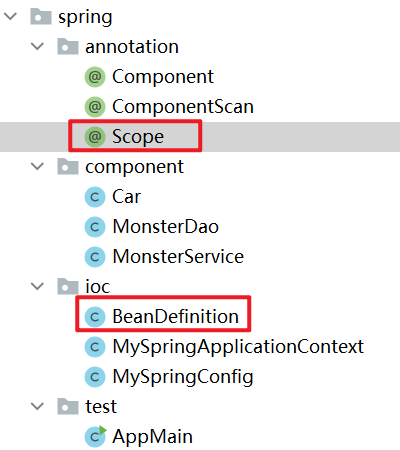
4.2代码实现
1.自定义注解,用于指定 bean 是单例还是多例
package com.li.spring.annotation;

import java.lang.annotation.ElementType;

import java.lang.annotation.Retention;

import java.lang.annotation.RetentionPolicy;

import java.lang.annotation.Target;

/**

 * @author 李

 * @version 1.0

 * Scope 用于指定 bean的作用范围 [singleton/prototype]

 */

@Target(ElementType.TYPE)

@Retention(RetentionPolicy.RUNTIME)

public @interface Scope {

    //通过 value 指定 bean 是 singleton 或 prototype

    String value() default "";

}
2.修改MonsterService,添加Scope注解

3.BeanDefinition 用于封装/记录 Bean对象的信息
package com.li.spring.ioc;

/**

 * @author 李

 * @version 1.0

 * 用于封装/记录 Bean对象的信息:

 * 1.scope

 * 2.Bean对应的 Class对象,用于反射生成对应对象

 */

public class BeanDefinition {

    private String scope;

    private Class clazz;

    public String getScope() {

        return scope;

    }

    public void setScope(String scope) {

        this.scope = scope;

    }

    public Class getClazz() {

        return clazz;

    }

    public void setClazz(Class clazz) {

        this.clazz = clazz;

    }

    @Override

    public String toString() {

        return "BeanDefinition{" +

                "scope='" + scope + '\'' +

                ", clazz=" + clazz +

                '}';

    }

}
4.修改自定义spring容器 MySpringApplicationContext
增加的功能:
(1)定义属性beanDefinitionMap,用于存放BeanDefinition对象,BeanDefinition对象存储bean信息,包括bean是单例还是多例,bean的class对象
(2)将MySpringApplicationContext构造器的所有代码封装成一个方法。
部分代码:
package com.li.spring.ioc;

//...

/**

 * @author 李

 * @version 1.0

 * MySpringApplicationContext 类的作用类似Spring原生的ioc容器

 */

public class MySpringApplicationContext {

    private Class configClass;

    //定义属性 BeanDefinitionMap->存放BeanDefinition对象

    private ConcurrentHashMap<String, BeanDefinition> beanDefinitionMap = new ConcurrentHashMap<>();

    //构造器

    public MySpringApplicationContext(Class configClass) {

        beanDefinitionByScan(configClass);

        System.out.println("beanDefinitionMap=" + beanDefinitionMap);

    }

    //该方法完成对指定包的扫描,并将Bean信息封装到BeanDefinition对象,再放入map中

    public void beanDefinitionByScan(Class configClass) {

        //步骤一:获取要扫描的包

        //...

        //步骤二:得到要扫描的包下的所有资源(类.class)

        //...

        //步骤三:获取全类名反射对象,并放入容器中

        //...

        //判断该类是否有特定注解

        if (clazz.isAnnotationPresent(Component.class)) {

            //如果该类使用了 @Component ,说明是spring bean

            System.out.println("是一个spring bean=" + clazz + " 类名=" + className);

            //-------------------新增代码----------------------

            //得到 BeanName-key

            //1.得到 Component 注解

            Component componentAnnotation = clazz.getDeclaredAnnotation(Component.class);

            //2.得到Component注解的value值

            String beanName = componentAnnotation.value();

            //如果没有指定,就使用类名(首字母小写)作为beanName

            if ("".equals(beanName)) {

                beanName = StringUtils.uncapitalize(className);

            }

            //将 Bean信息封装到 BeanDefinition对象-value

            BeanDefinition beanDefinition = new BeanDefinition();

            beanDefinition.setClazz(clazz);

            //1.获取scope

            if (clazz.isAnnotationPresent(Scope.class)) {

                //如果配置了Scope,就设置配置的值

                Scope scopeAnnotation = clazz.getDeclaredAnnotation(Scope.class);

                beanDefinition.setScope(scopeAnnotation.value());

            } else {

                //如果没有配置Scope,就设置默认值singleton

                beanDefinition.setScope("singleton");

            }

            //将beanDefinition对象放入Map中

            beanDefinitionMap.put(beanName, beanDefinition);

            //--------------------新增代码------------------------

        } else {

            //如果没有使用,则说明不是spring bean

            System.out.println("不是一个 spring bean=" + clazz + " 类名=" + className);

        }

    } catch (Exception e) {

        e.printStackTrace();

    }

}

System.out.println("===========================");

}}}

    //编写方法,返回容器对象

    public Object getBean(String name) {

        return null;

    }

}
ps:这里使用了一个工具包
<dependencies>

    <dependency>

        <groupId>commons-lang</groupId>

        <artifactId>commons-lang</artifactId>

        <version>2.6</version>

    </dependency>

</dependencies>
5.为了测试,将MonsterService的@Component的value注释

6.测试类
//...

public class AppMain {

    public static void main(String[] args) {

        MySpringApplicationContext ioc =

                new MySpringApplicationContext(MySpringConfig.class);

    }

}
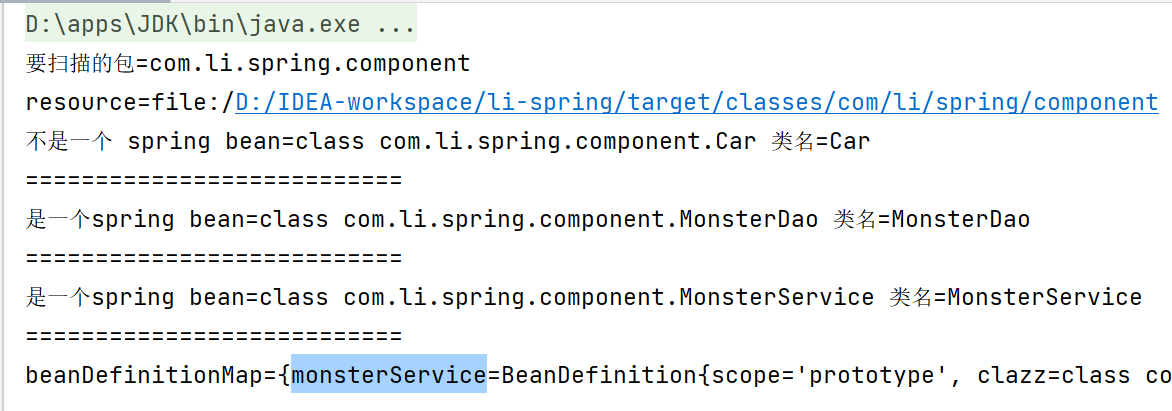
测试结果:成功扫描指定包,并将bean对象的信息放入到beanDefinitionMap中,没有指定beanId的对象以默认规则作为id。
5.实现任务阶段3
5.1分析
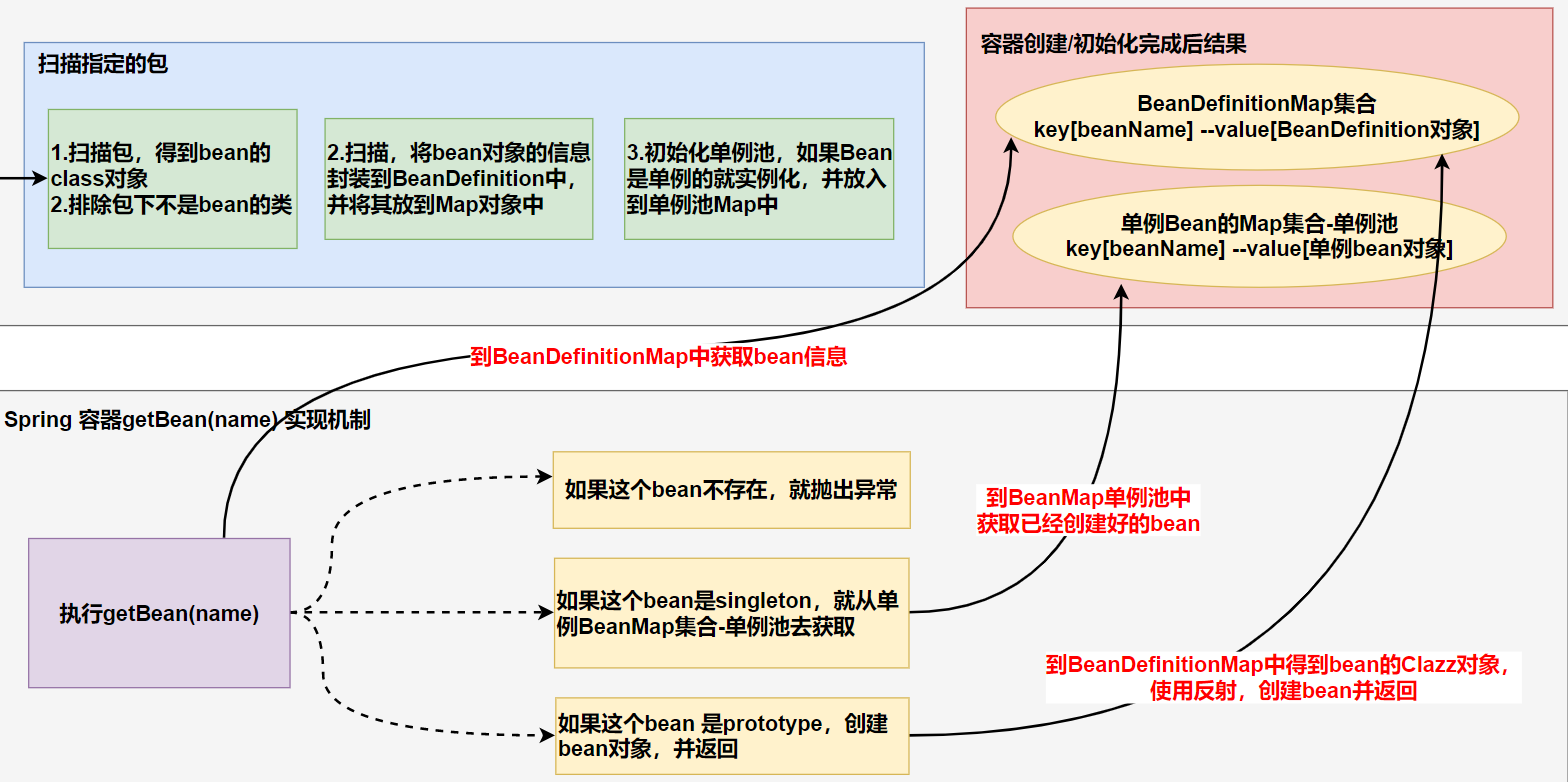
阶段3目标:初始化bean单例池,并完成getBean方法,createBean方法
5.2代码实现
1.修改自定义spring容器 MySpringApplicationContext
增加的功能:
(1)增加方法createBean(),用于通过反射创建bean对象
(2)在构造方法中,初始化单例池:如果bean是单例,就通过createBean()将其实例化,然后放入单例池。
(3)实现getBean方法:通过beanName,返回bean对象。
部分代码:
//构造器

public MySpringApplicationContext(Class configClass) {

    beanDefinitionByScan(configClass);

    //后期封装成方法---------

    Enumeration<String> keys = beanDefinitionMap.keys();

    //遍历

    while (keys.hasMoreElements()) {

        //得到 beanName

        String beanName = keys.nextElement();

        //通过beanName得到对应的 beanDefinition 对象

        BeanDefinition beanDefinition = beanDefinitionMap.get(beanName);

        //判断该 bean 是单例还是多例

        if ("singleton".equals(beanDefinition.getScope())) {

            //将该bean实例放入到singletonObjects中

            singletonObjects.put(beanName, createBean(beanDefinition));

        }

    }

    System.out.println("singletonObjects 单例池=" + singletonObjects);

    //------------

    System.out.println("beanDefinitionMap=" + beanDefinitionMap);

}

//完成createBean(BeanDefinition)方法

public Object createBean(BeanDefinition beanDefinition) {

    //得到Bean的class对象

    Class clazz = beanDefinition.getClazz();

    try {

        //反射创建bean实例

        Object instance = clazz.getDeclaredConstructor().newInstance();

        return instance;

    } catch (InstantiationException e) {

        e.printStackTrace();

    } catch (IllegalAccessException e) {

        e.printStackTrace();

    } catch (InvocationTargetException e) {

        e.printStackTrace();

    } catch (NoSuchMethodException e) {

        e.printStackTrace();

    }

    //如果反射对象失败

    return null;

}

//编写方法,返回容器对象

public Object getBean(String name) {

    //传入的beanName是否在 beanDefinitionMap中存在

    if (beanDefinitionMap.containsKey(name)) {//存在

        //从 beanDefinitionMap中获取 beanDefinition对象

        BeanDefinition beanDefinition = beanDefinitionMap.get(name);

        if ("singleton".equalsIgnoreCase(beanDefinition.getScope())) {

            //如果是单例 bean,直接从单例池获取

            return singletonObjects.get(name);

        } else {//如果不是单例,调用createBean(),反射创建对象

            return createBean(beanDefinition);

        }

    } else {//不存在

        //抛出空指针异常

        throw new NullPointerException("不存在该bean=" + name);

    }

}
2.测试类
//...

public class AppMain {

    public static void main(String[] args) {

        MySpringApplicationContext ioc =

                new MySpringApplicationContext(MySpringConfig.class);

        //Object xxx = ioc.getBean("xxx");//抛出空指针异常

        //多实例对象的获取

        MonsterService monsterService = (MonsterService) ioc.getBean("monsterService");

        MonsterService monsterService2 = (MonsterService) ioc.getBean("monsterService");

        System.out.println("monsterService=" + monsterService);

        System.out.println("monsterService2=" + monsterService2);

        //单实例对象的获取

        MonsterDao monsterDao = (MonsterDao) ioc.getBean("monsterDao");

        MonsterDao monsterDao2 = (MonsterDao) ioc.getBean("monsterDao");

        System.out.println("monsterDao=" + monsterDao);

        System.out.println("monsterDao2=" + monsterDao);

    }

}
测试结果:在创建MySpringApplicationContext对象时,成功初始化了单例池,beanDefinitionMap。并根据beanName返回bean对象。MonsterService添加了Scope=“prototype”注解,因此每一次获取的对象都是不同的。

6.实现任务4
6.1分析
阶段4目标:完成依赖注入
6.2代码实现
1.自定义注解AutoWired,用于标记需要依赖注入的属性
package com.li.spring.annotation;

import java.lang.annotation.ElementType;

import java.lang.annotation.Retention;

import java.lang.annotation.RetentionPolicy;

import java.lang.annotation.Target;

/**

 * @author 李

 * @version 1.0

 */

@Target({ElementType.METHOD, ElementType.FIELD})

@Retention(RetentionPolicy.RUNTIME)

public @interface AutoWired {

    //如果为true,就完成依赖注入

    boolean required() default true;

}
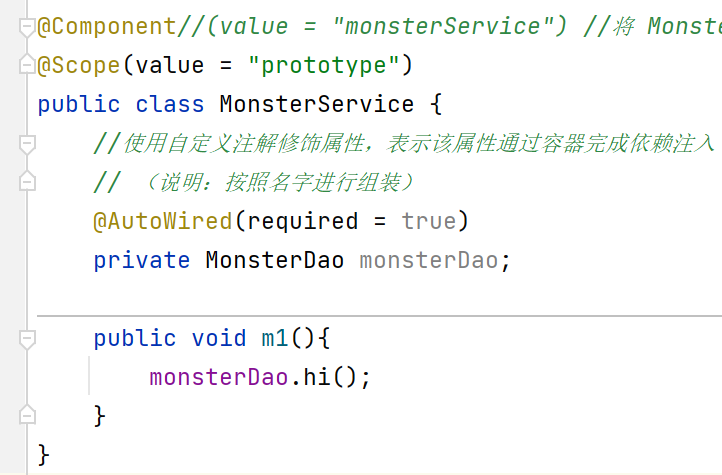
2.为了测试,在MonsterDao,MonsterService中添加测试代码。
(1)修改MonsterDao,在该类中增加方法

(2)修改MonsterService,在该类中添加属性monsterDao,并使用AutoWired注解修饰。在方法m1()中调用属性对象的方法。
3.修改自定义spring容器 MySpringApplicationContext (部分代码)
修改方法createBean(),因为依赖注入需要在反射创建bean对象时完成。
//完成createBean(BeanDefinition)方法

public Object createBean(BeanDefinition beanDefinition) {

    //得到Bean的class对象

    Class clazz = beanDefinition.getClazz();

    try {

        //反射创建bean实例

        Object instance = clazz.getDeclaredConstructor().newInstance();

        //todo 这里要加入依赖注入的业务逻辑

        //1.遍历当前要创建对象的所有属性字段

        for (Field declaredField : clazz.getDeclaredFields()) {

            //2.判断字段是否有AutoWired注解

            if (declaredField.isAnnotationPresent(AutoWired.class)) {

                //判断是否需要自动装配

                AutoWired autoWiredAnnotation =

                        declaredField.getAnnotation(AutoWired.class);

                if (autoWiredAnnotation.required()) {

                    //3.得到字段的名称

                    String name = declaredField.getName();

                    //4.通过getBean()方法获取要组装的对象

                    //如果name对应的对象时单例的,就到单例池去获取,如果是多例的,就反射创建并返回

                    Object bean = getBean(name);

                    //5.进行组装

                    //暴破

                    declaredField.setAccessible(true);

                    declaredField.set(instance, bean);

                }

            }

        }

        return instance;

    } catch (InstantiationException e) {

        e.printStackTrace();

    } catch (IllegalAccessException e) {

        e.printStackTrace();

    } catch (InvocationTargetException e) {

        e.printStackTrace();

    } catch (NoSuchMethodException e) {

        e.printStackTrace();

    }

    //如果反射对象失败

    return null;

}
4.测试类
//...

public class AppMain {

    public static void main(String[] args) {

        MySpringApplicationContext ioc =

                new MySpringApplicationContext(MySpringConfig.class);

        MonsterService monsterService = (MonsterService) ioc.getBean("monsterService");

        monsterService.m1();

    }

}
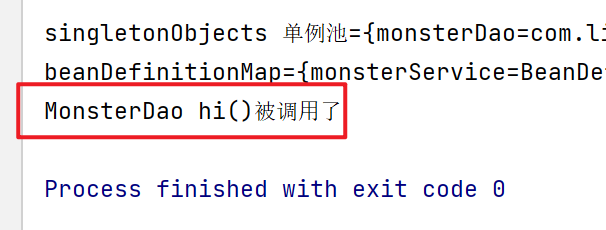
测试结果:自动装配成功
day12-实现Spring底层机制-02的更多相关文章
- Hibernate工作原理及为什么要用?. Struts工作机制?为什么要使用Struts? spring工作机制及为什么要用?
三大框架是用来开发web应用程序中使用的.Struts:基于MVC的充当了其中的试图层和控制器Hibernate:做持久化的,对JDBC轻量级的封装,使得我们能过面向对象的操作数据库Spring: 采 ...
- spring工作机制及为什么要用?
spring工作机制及为什么要用?1.spring mvc请所有的请求都提交给DispatcherServlet,它会委托应用系统的其他模块负责对请求进行真正的处理工作.2.DispatcherSer ...
- 如何妙用Spring 数据绑定机制?
前言 在剖析完 「Spring Boot 统一数据格式是怎么实现的? 」文章之后,一直觉得有必要说明一下 Spring's Data Binding Mechanism 「Spring 数据绑定机制」 ...
- 4-3 Spring MVC框架-02
Spring MVC框架-02 Ⅰ.RESTful基础 是一种设计风格和开发方式 1.get和post请求区别: get post 获取请求 上传请求 请求参数在地址栏URL 请求参数在请求体里面 U ...
- Spring 事务机制详解
原文出处: 陶邦仁 Spring事务机制主要包括声明式事务和编程式事务,此处侧重讲解声明式事务,编程式事务在实际开发中得不到广泛使用,仅供学习参考. Spring声明式事务让我们从复杂的事务处理中得到 ...
- spring工作机制
Hibernate.struts,还差一个spring 就一起发出去.. spring工作机制及为什么要用? 1.springmvc请所有的请求都提交给DispatcherServlet,它会委托应用 ...
- [转]STL 容器一些底层机制
1.vector 容器 vector 的数据安排以及操作方式,与 array 非常相似.两者的唯一区别在于空间的运用的灵活性.array 是静态空间,一旦配置了就不能改变,vector 是动态数组.在 ...
- Spring 事务机制详解(事务的隔离性和传播性)
原文出处: 陶邦仁 Spring事务机制主要包括声明式事务和编程式事务,此处侧重讲解声明式事务,编程式事务在实际开发中得不到广泛使用,仅供学习参考. Spring声明式事务让我们从复杂的事务处理中得到 ...
- Spring事件机制详解
一.前言 说来惭愧,对应Spring事件机制之前只知道实现 ApplicationListener 接口,就可以基于Spring自带的事件做一些事情(如ContextRefreshedEvent),但 ...
- C++ STL容器底层机制
1.vector容器 vector的数据安排以及操作方式,与array非常相似.两者的唯一区别在于空间的运用的灵活性.array是静态空间,一旦配置了就不能改变.vector是动态空间,随着元素的加入 ...
随机推荐
- 时序数据库TDengine 详细安装+集成流程+问题解决
官方文档:https://docs.taosdata.com/get-started/package/ 点击进入 产品简介 TDengine 是一款高性能.分布式.支持 SQL 的时序数据库 (Dat ...
- Linux环境下执行脚本重启Weblogic控制台中部署的应用程序
之前有写过一篇博文介绍切换登录方式的脚本,脚本中存在一个缺点:仍需手动去Weblogic控制台重启应用程序:本文即介绍如何在脚本中更新Weblogic控制台中部署的应用程序. 一.配置Weblogic ...
- docker清空网络配置
docker 网络 故障 相同的 ip 绑定给了 两个 网卡, 需要 清空 网络 ip addr | grep 10.79 inet 10.79.106.1/24 brd 10.79.106.255 ...
- Revit2021保姆级安装教程
Revit2021 WIN10 64位安装步骤: 1.先使用"百度网盘客户端"下载Revit_2021软件安装包到电脑磁盘里,并解压缩,安装全程需连接网络,然后双击打开Revit_ ...
- mysql 基础明细
1.mysql 没有 TOP,用limit实现 2.mysql having 聚合之后,对组操作,和GROUP By搭配 mysql where 聚合之前,对表和视图操作 3.where 子句的作用 ...
- Spring Cloud Circuit Breaker 使用示例
Spring Cloud Circuit Breaker 使用示例 作者: Grey 原文地址: 博客园:Spring Cloud Circuit Breaker 使用示例 CSDN:Spring C ...
- 【DL论文精读笔记】ResNet
Abstract 利用残差学习架构释放深度 152层深度是VGG的8倍,且复杂度更低 ImageNet上的错误率3.57% 在ILSVRC和2015COCO竞赛,在多项任务拿到第一 3.1 Intro ...
- webapi+vue跨域session丢失解决方法
前后端分离中在webapi设置可以跨域,在web.config文件中添加 <httpProtocol> <customHeaders> <ad ...
- 研究光度立体法阶段性小结和优化(可20ms获取4个2500*2000灰度图的Normal Map)。
这个东西是我接触的第一个非2D方面的算法,到目前为止其实也没有完全搞定,不过可能短时间内也无法突破.先把能搞定的搞定吧. 这个东西也有一大堆参考资料,不过呢,搜来搜去其实也就那些同样的东西,个人觉得就 ...
- X活手环的表盘自定义修改
文章用到的所有工具及软件成品 前言 前几天我在某宝买了一个智能手环,无奈软件中的表盘太少,所有我想着修改一下app中的资源文件. 反编译APK 这里反编译APK用apktool工具就可以. apkto ...
