Docker如何使用nginx搭建tomcat集群
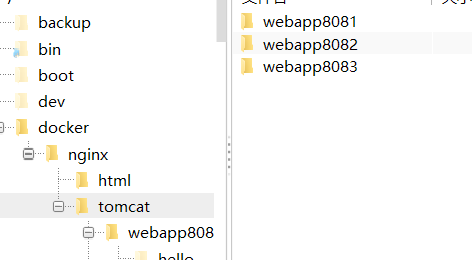
首先创建tomcat的文件夹 ,
为了方便docker的配置 我这里直接在根目录中创建
第一步:创建文件夹:发布文件夹
mkdir -p /docker/tomcat/webapp8081
mkdir -p /docker/tomcat/webapp8082
mkdir -p /docker/tomcat/webapp8083

第二步:创建Tomcat容器(端口 可以根据自己的实际更换)
docker run -d --name tomcat8081 -p 8081:8080 -v /docker/tomcat/webapp8081:/usr/local/tomcat/webapps/ tomcat
docker run -d --name tomcat8082 -p 8082:8080 -v /docker/tomcat/webapp8082:/usr/local/tomcat/webapps/ tomcat
docker run -d --name tomcat8083 -p 8083:8080 -v /docker/tomcat/webapp8083:/usr/local/tomcat/webapps/ tomcat
创建完成后使用 docker ps 命令进行查看是否创建成功 并且使用

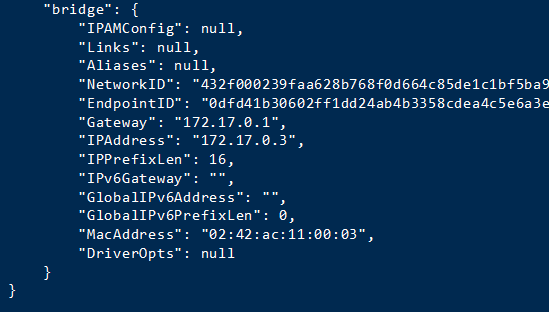
第三步:查看tomcat的IP 使用命令依次查询 这里只使用第一个举例
docker inspect tomcat8081

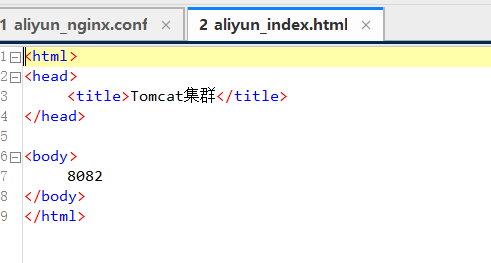
第四步:为了方便测试 我这里就不上传war包了,直接 在里面创建了一个hello/index.html 文件

注意:如果Nginx为Docker容器,必须使用Tomact容器IP,否则连不上
首先在官网上下载nginx的官方版本
点击右边导航栏的download,进入下载界面 选择对应的版本 进行下载,我这里就使用nginx-1.6.2.tar

下载完成后,将文件放到自定义的文件夹,我这里放到/usr/local/tools/nginx-1.6.2

使用 这个命令将nginx 解压:
tar vxf nginx-1.6.2.tar.gz
解压完成后,我这里是返回根目录,在根目录创建一个宿主文件夹,目的是为了创建文件,使得nginx可以挂载(你也可以自定义)
创建宿主文件夹 这里
mkdir -p /docker/nginx/
vim /docker/nginx/nginx.conf
mkdir -p /docker/nginx/html
拷贝页面你解压的negix中的html文件夹中的index.html 50x.html到/docker/nginx/html文件夹中
这里提供一种negix的conf文件,以为加上注解 所以格式可能会发生改变 记得把注解删了
Nginx.conf:
user root;
worker_processes 2; #这里设置你的线程数
#error_log logs/error.log;
#error_log logs/error.log notice;
#error_log logs/error.log info;
#pid logs/nginx.pid;
events {
worker_connections 1024; #最大连接数量
}
http {
include mime.types;
default_type application/octet-stream;
upstream mytomcat{
server 172.17.0.3:8080 weight=10;
# 另外mytomcat 这里名字和下方的名字保持一致 这里需要和你的tomcat IP保持一致
server 172.17.0.4:8080 weight=50;
server 172.17.0.5:8080 weight=10;
}
#log_format main '$remote_addr - $remote_user [$time_local] "$request" '
# '$status $body_bytes_sent "$http_referer" '
# '"$http_user_agent" "$http_x_forwarded_for"';
#access_log logs/access.log main;
sendfile on;
#tcp_nopush on;
#keepalive_timeout 0;
keepalive_timeout 65;
#gzip on;
server {
listen 80;
server_name mytomcat;
#charset koi8-r;
#access_log logs/host.access.log main;
location / {
# root html;
# index index.html index.htm;
proxy_connect_timeout 50;
proxy_read_timeout 10;
proxy_send_timeout 20;
proxy_pass http://mytomcat;
}
#error_page 404 /404.html;
# redirect server error pages to the static page /50x.html
#
error_page 500 502 503 504 /50x.html;
location = /50x.html {
root html;
}
# proxy the PHP scripts to Apache listening on 127.0.0.1:80
#
#location ~ \.php$ {
# proxy_pass http://127.0.0.1;
#}
# pass the PHP scripts to FastCGI server listening on 127.0.0.1:9000
#
#location ~ \.php$ {
# root html;
# fastcgi_pass 127.0.0.1:9000;
# fastcgi_index index.php;
# fastcgi_param SCRIPT_FILENAME /scripts$fastcgi_script_name;
# include fastcgi_params;
#}
# deny access to .htaccess files, if Apache's document root
# concurs with nginx's one
#
#location ~ /\.ht {
# deny all;
#}
}
# another virtual host using mix of IP-, name-, and port-based configuration
#
#server {
# listen 8000;
# listen somename:8080;
# server_name somename alias another.alias;
# location / {
# root html;
# index index.html index.htm;
# }
#}
# HTTPS server
#
#server {
# listen 443 ssl;
# server_name localhost;
# ssl_certificate cert.pem;
# ssl_certificate_key cert.key;
# ssl_session_cache shared:SSL:1m;
# ssl_session_timeout 5m;
# ssl_ciphers HIGH:!aNULL:!MD5;
# ssl_prefer_server_ciphers on;
# location / {
# root html;
# index index.html index.htm;
# }
#}
}
使用docker 启动
创建并运行容器
81:是外网访问的端口 这里可以根据实际做修改
/docker/nginx/nginx.conf 本地的宿主文件
/etc/nginx/nginx.conf 解压的目录(也可以不更改)
/docker/nginx/html 本地的宿主文件
/usr/share/nginx/html 解压的目录
docker run -d --name nginx81 -p 81:80 -v /docker/nginx/nginx.conf:/etc/nginx/nginx.conf -v /docker/nginx/html:/usr/share/nginx/html nginx
测试
http://39.106.147.162:8085/hello/index.html 我这里配置的是8085端口 直接访问

Docker如何使用nginx搭建tomcat集群的更多相关文章
- Docker Compose部署 nginx代理Tomcat集群
一.简介 使用Docker镜像部署Nginx代理的多个Tomcat集群: 使用Dockerfile构建nginx镜像 使用Dockerfile构建tomcat镜像 mysql镜像使用docker hu ...
- 利用nginx搭建tomcat集群
1.tomcat集群 利用nginx对请求进行分流,将请求平均的分给不同的tomcat去处理,减少单个tomcat的负载量,提高tomcat的响应速度. 2.创建多个tomcat服务器(同一个服务器上 ...
- 使用nginx搭建tomcat集群配置
软件准备: (1)jdk-8u73-linux-x64.tar.gz (2)apache-tomcat-7.0.57.tar.gz (3)nginx-1.7.7.tar.gz 准备3台Linux机器, ...
- Docker+nginx搭建tomcat集群
1.环境准备: a.宿主机CentOS7 b.连接工具FinalShell c.镜像nginx1.20.1,tomcat (镜像拉取:docker pull 镜像名称) 2.创建nginx文件夹,to ...
- docker+nginx搭建tomcat集群(附录)——nginx.conf文件
附录:nginx.conf修改后的文件内容 user root;worker_processes 2; #error_log logs/error.log;#error_log logs/error. ...
- Tengine(nginx) 搭建Tomcat集群
好久没有更新学习的内容了,就是得强迫自己写点东西 记录自己的学习,才能更好的进步! Tengine是由淘宝网发起的Web服务器项目.它在Nginx的基础上,针对大访问量网站的需求,添加了很多高级功能和 ...
- Docker Compose 一键部署Nginx代理Tomcat集群
Docker Compose 一键部署Nginx代理Tomcat集群 目录结构 [root@localhost ~]# tree compose_nginx_tomcat/ compose_nginx ...
- nginx的简单使用和使用nginx在windows上搭建tomcat集群
nginx是一款轻量级的web服务器,常用的作用为服务器/反向代理服务器以及电子邮件(IMAP/POP3)代理服务器 1.为什么我们要使用Nginx? 反向代理: 反向代理(Reverse Proxy ...
- 使用Nginx搭建Tomcat9集群,Redis实现Session共享
使用Nginx搭建Tomcat9集群,Redis实现Session共享 1.tomcat准备 首先准备两个tomcat9 ,修改配置文件server.xml 如果在多个服务器上分别启动tomcat 则 ...
随机推荐
- 【代码学习】PYTHON 生成器
一.生成器 一遍循环一遍计算的机制,称为生成器 二.生成器的特点: 1.节约内存 2.迭代到下一次的调用时,所使用的参数都是第一次所保留下的,即是说,在整个所有函数调用的参数都是第一次所调用时保留的, ...
- next_permutation的使用-Hdu1027
Ignatius and the Princess II Time Limit: 2000/1000 MS (Java/Others) Memory Limit: 65536/32768 K ( ...
- 吴裕雄 python 神经网络——TensorFlow 数据集高层操作
import tempfile import tensorflow as tf train_files = tf.train.match_filenames_once("E:\\output ...
- Post请求的两种编码格式:application/x-www-form-urlencoded和multipart/form-data
在常见业务开发中,POST请求常常在这些地方使用:前端表单提交时.调用接口代码时和使用Postman测试接口时.我们下面来一一了解: 一.前端表单提交时 application/x-www-form- ...
- 杭电2033 人见人爱A+B
人见人爱A+B Time Limit: 2000/1000 MS (Java/Others) Memory Limit: 65536/32768 K (Java/Others)Total Sub ...
- springboot 打包成jar
1.pom.xml配置 <build> <plugins> <plugin> <groupId>org.apache.maven.plugins< ...
- pip-9.0.1更新到pip-10.0.1遇到的问题
使用 pip 安装第三方库时,报错: You are using pip version 9.0.3, however version 10.0.1 is available. You should ...
- stm32CubeMx lwip + freeRTOS
MCU: STM32F429IGT6 工具:STM32CubeMx 版本号 5.0.0 Keil uVersion5 目的:使用LWIP 实现简单的网络连通 一 简介 LWIP(Light Wei ...
- OpenCV学习 - 图片集合成视频
这个很简单,没什么好说的...这里给出学习手册: 1.官方教程:https://docs.opencv.org 2.这个是一些video相关的API参考:https://docs.opencv.org ...
- tomcat配置限制ip和建立图片服务器
1.配置限制ip访问 打开 tomcat里conf文件下的server.xml 在<Host name="localhost" appBase="webapps&q ...
