【linux】【mysql】mysql主从数据库
系统环境:Centos7
主:192.168.8.162
从:192.168.8.127
前提条件
a.关闭防火墙
- systemctl stop firewalld
关闭防火墙开机自启
- systemctl disable firewalld
b.关闭selinux
- vi /etc/selinux/config
将SELINUX=enforcing改为SELINUX=disabled
设置后需要重启才能生效
本文参考:CSDN“我的小熊不见了”博主,原文链接:https://blog.csdn.net/qq1311256696/article/details/90747435
首先两台数据库安装mysql8.0
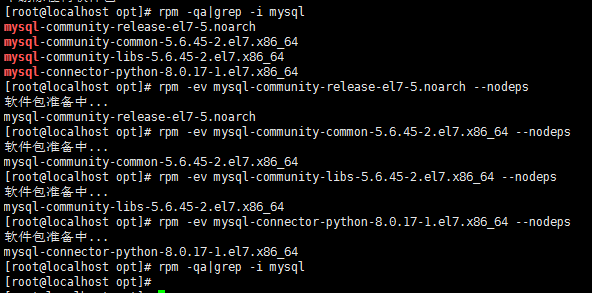
1.查看本机是否安装mariadb
rpm -qa|grep mariadbrpm -e--nodeps 文件名
- rpm -qa | grep -i mysql
find / -namemysql
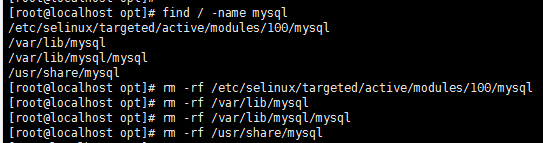
- rm -rf /etc/my.cnf
3.安装mysql8.0的yum源
- yum -y install https://dev.mysql.com/get/mysql80-community-release-el7-1.noarch.rpm
执行 yum search mysql 如果出现 mysql-community-server.x86_64 则安装源成功

4.安装mysql8.0
- yum -y install mysql-community-server.x86_64
5.启动mysql
- systemctl start mysqld
开机自启:systemctl enable mysqld
6.查看mysql版本
- mysql -V

7.设置mysql密码
- cat /var/log/mysqld.log

!/dChNphO81E mysql随机生成的密码
修改密码
- mysqladmin -u root -p password

9.主库配置
创建一个复制用户,授予用户 slave REPLICATION SLAVE权限和REPLICATION CLIENT权限,用于在主从库之间同步数据。
- mysql -uroot -p
- USE mysql;
- CREATE USER slave IDENTIFIED BY 'Slave@123';
GRANT REPLICATION SLAVE, REPLICATION CLIENT ON *.* TO 'slave'@'%';
- FLUSH PRIVILEGES;
vi /etc/my.cnf
添加
server-id=162
log-bin=/var/lib/mysql/mysql-bin
重启数据库
- systemctl restart mysqld
连接数据库
- mysql -uroot -p
查看日志情况
- SHOW MASTER STATUS;

记录下File和Position的值
10.从库配置
- vi /etc/my.cnf
添加 server-id=127
重启数据库
- systemctl restart mysqld
连接数据库
- mysql -uroot -p
停止主从
- stop slave
从数据连接主数据库:
- change master to master_host='192.168.8.162', master_user='slave', master_password='Slave@123', master_port=3306, master_log_file='mysql-bin.000002', master_log_pos= 1013, master_connect_retry=30;
- host、user、password、port为主库的ip、用户名和密码、端口
master_log_file为从主库哪个日志读数据即上文中的File
master_log_pos为从哪里开始读即上文中的Position
master_connect_retry为超时重试时间
开始主从
- start slave
查看同步状态
- show slave status \G;
SlaveIORunning 和 SlaveSQLRunning 都是Yes说明主从复制已经开启。
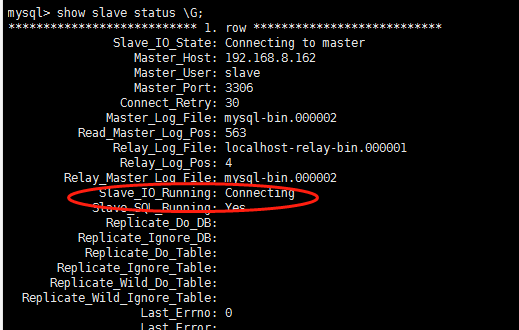
若 Slave_IO_Running为Connecting可能是mysql8的密码规则问题
主数据库修改slave的密码规则即可:
- ALTER USER 'slave'@'%' IDENTIFIED WITH mysql_native_password BY 'Slave@123';
mysql> stop slave;

Query OK,  rows affected (0.00 sec)

mysql> change master to master_host='192.168.8.162', master_user='slave', master_password='Slave@123', master_port=, master_log_file='mysql-bin.000002', master_log_pos= , master_connect_retry=;

Query OK,  rows affected,  warnings (0.01 sec)

mysql> show slave statu \G;

ERROR  (): You have an error in your SQL syntax; check the manual that corresponds to your MySQL server version for the right syntax to use near 'statu' at line

ERROR:

No query specified

mysql> show slave status \G;

*************************** . row ***************************

               Slave_IO_State:

                  Master_Host: 192.168.8.162

                  Master_User: slave

                  Master_Port:

                Connect_Retry:

              Master_Log_File: mysql-bin.

          Read_Master_Log_Pos:

               Relay_Log_File: localhost-relay-bin.

                Relay_Log_Pos:

        Relay_Master_Log_File: mysql-bin.

             Slave_IO_Running: No

            Slave_SQL_Running: No

              Replicate_Do_DB:

          Replicate_Ignore_DB:

           Replicate_Do_Table:

       Replicate_Ignore_Table:

      Replicate_Wild_Do_Table:

  Replicate_Wild_Ignore_Table:

                   Last_Errno:

                   Last_Error:

                 Skip_Counter:

          Exec_Master_Log_Pos:

              Relay_Log_Space:

              Until_Condition: None

               Until_Log_File:

                Until_Log_Pos:

           Master_SSL_Allowed: No

           Master_SSL_CA_File:

           Master_SSL_CA_Path:

              Master_SSL_Cert:

            Master_SSL_Cipher:

               Master_SSL_Key:

        Seconds_Behind_Master: NULL

Master_SSL_Verify_Server_Cert: No

                Last_IO_Errno:

                Last_IO_Error: error connecting to master 'slave@192.168.8.162:3306' - retry-time:  retries:  message: Authentication plugin 'caching_sha2_password' reported error: Authentication requires secure connection.

               Last_SQL_Errno:

               Last_SQL_Error:

  Replicate_Ignore_Server_Ids:

             Master_Server_Id:

                  Master_UUID:

             Master_Info_File: mysql.slave_master_info

                    SQL_Delay:

          SQL_Remaining_Delay: NULL

      Slave_SQL_Running_State:

           Master_Retry_Count:

                  Master_Bind:

      Last_IO_Error_Timestamp:  ::

     Last_SQL_Error_Timestamp:

               Master_SSL_Crl:

           Master_SSL_Crlpath:

           Retrieved_Gtid_Set:

            Executed_Gtid_Set:

                Auto_Position:

         Replicate_Rewrite_DB:

                 Channel_Name:

           Master_TLS_Version:

       Master_public_key_path:

        Get_master_public_key:

            Network_Namespace:

 row in set (0.00 sec)

ERROR:

No query specified

mysql> start slave;

Query OK,  rows affected (0.01 sec)

mysql> show slave status \G;

*************************** . row ***************************

               Slave_IO_State: Waiting for master to send event

                  Master_Host: 192.168.8.162

                  Master_User: slave

                  Master_Port:

                Connect_Retry:

              Master_Log_File: mysql-bin.

          Read_Master_Log_Pos:

               Relay_Log_File: localhost-relay-bin.

                Relay_Log_Pos:

        Relay_Master_Log_File: mysql-bin.

             Slave_IO_Running: Yes

            Slave_SQL_Running: Yes

              Replicate_Do_DB:

          Replicate_Ignore_DB:

           Replicate_Do_Table:

       Replicate_Ignore_Table:

      Replicate_Wild_Do_Table:

  Replicate_Wild_Ignore_Table:

                   Last_Errno:

                   Last_Error:

                 Skip_Counter:

          Exec_Master_Log_Pos:

              Relay_Log_Space:

              Until_Condition: None

               Until_Log_File:

                Until_Log_Pos:

           Master_SSL_Allowed: No

           Master_SSL_CA_File:

           Master_SSL_CA_Path:

              Master_SSL_Cert:

            Master_SSL_Cipher:

               Master_SSL_Key:

        Seconds_Behind_Master:

Master_SSL_Verify_Server_Cert: No

                Last_IO_Errno:

                Last_IO_Error:

               Last_SQL_Errno:

               Last_SQL_Error:

  Replicate_Ignore_Server_Ids:

             Master_Server_Id:

                  Master_UUID: 0d26dbd8-d501-11e9-9f3d-000c29e24dcf

             Master_Info_File: mysql.slave_master_info

                    SQL_Delay:

          SQL_Remaining_Delay: NULL

      Slave_SQL_Running_State: Slave has read all relay log; waiting for more updates

           Master_Retry_Count:

                  Master_Bind:

      Last_IO_Error_Timestamp:

     Last_SQL_Error_Timestamp:

               Master_SSL_Crl:

           Master_SSL_Crlpath:

           Retrieved_Gtid_Set:

            Executed_Gtid_Set:

                Auto_Position:

         Replicate_Rewrite_DB:

                 Channel_Name:

           Master_TLS_Version:

       Master_public_key_path:

        Get_master_public_key:

            Network_Namespace:

 row in set (0.00 sec)

ERROR:

No query specified
11.测试主从数据库
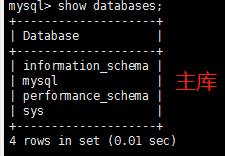
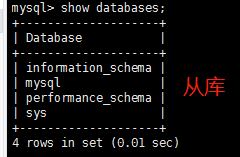
主库创建test数据库
- create database test;

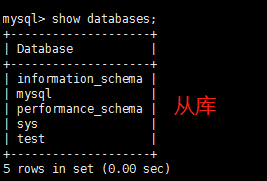
测试完成!
如果想只同步某一个数据库
可以在主库的my.cnf
添加
binlog-do-db:binlog日志记录哪个db
或者在从库的my.cnf添加
replicate-do-db:需要复制的数据库名
replicate-ignore-db:不需要复制的数据库名
【linux】【mysql】mysql主从数据库的更多相关文章
- Mysql的主从数据库没有同步的解决办法
Mysql的主从数据库没有同步的解决办法 今天发现Mysql的主从数据库没有同步 先上Master库: mysql>show processlist; 查看下进程是否Sleep太多.发现很正常. ...
- 解决Mysql的主从数据库没有同步的两种方法
今天发现Mysql的主从数据库没有同步 先上Master库: mysql>show processlist; 查看下进程是否Sleep太多.发现很正常.show master status; ...
- mysql配置主从数据库
1.目的 1.1 实现数据备份 1.2 项目访问时可以实现读写分离,提高访问和操作数据的速度<读写分离好处> 2.背景 这次的主从配置主要实现主库数据的改变可以实现同步到从库中: 此次试验 ...
- wamp mysql 创建主从数据库
这跟你是不是wmap没有关系的, wamp是一个集成环境,只是一次性帮你创建一个web服务器而已 下面给你些配置 一.登录Master服务器,修改my.ini ,添加如下内容: [wampmysqld ...
- mysql服务器主从数据库同步配置(转)
<a href=""></a> <p>首先需要在同一个局域网内的两台机器(当然也可以用一台机器虚拟两台机器出来),都安装上mysql服务.< ...
- MySQL搭建主从数据库 实现读写分离
首先声明,实际生产中,网站为了提高用户体验,性能等,将数据库实现读写分离是有必要的,我们让主数据库去写入数据,然后当用户查询的时候,然后在从数据库读取数据,故能减轻数据库的压力,实现良好的用户体验! ...
- mysql服务器主从数据库同步配置
首先需要在同一个局域网内的两台机器(当然也可以用一台机器虚拟两台机器出来),都安装上mysql服务. 主机A: 192.168.1.100 从机B: 192.168.1.101 可以有多台从机. 1. ...
- mysql主从数据库不同步的2种解决方法(转)
今天发现Mysql的主从数据库没有同步 先上Master库: mysql>show processlist; 查看下进程是否Sleep太多.发现很正常. show master status; ...
- mysql主从数据库不同步的2种解决方法 (转载)
今天发现Mysql的主从数据库没有同步 先上Master库: mysql>show processlist; 查看下进程是否Sleep太多.发现很正常. show master status; ...
- Linux下MySQL数据库主从同步配置
说明: 操作系统:CentOS 5.x 64位 MySQL数据库版本:mysql-5.5.35 MySQL主服务器:192.168.21.128 MySQL从服务器:192.168.21.129 准备 ...
随机推荐
- springCould:使用Feign 实现声明式服务调用
一.Spring Cloud Feign概念引入通过前面的随笔,我们了解如何通过Spring Cloud ribbon进行负责均衡,如何通过Spring Cloud Hystrix进行服务断路保护,两 ...
- 浏览器兼容问题-vue.js
前端时间和其他公司人合作,认识了vue.起初我们做手机端一般用这个技术.后来发现在web也可以使用. 然后自己摸索了下,发现这个技术对于数据的绑定果真很神奇,所在在一些绑定数据比较多,比较零散的画面时 ...
- Netty源码分析 (二)----- ServerBootstrap
BootStrap在netty的应用程序中负责引导服务器和客户端.netty包含了两种不同类型的引导: 1. 使用服务器的ServerBootStrap,用于接受客户端的连接以及为已接受的连接创建子通 ...
- 关于Socket、TCP/IP、HTTP、FTP及网络编程
来源:陶邦仁 链接:http://blog.jobbole.com/99694/ 既然是网络传输,涉及几个系统之间的交互,那么首先要考虑的是如何准确的定位到网络上的一台或几台主机,再者如何进行可靠高效 ...
- LuoGu-P2863牛的舞会The Cow Prom[tarjan 缩点模板]
传送门:https://www.luogu.org/problemnew/show/P2863 思路:tarjan模板题,之前会的tarjan,一直想学缩点到底是什么操作,发现就是把同组的放在一个数组 ...
- Rikka with Prefix Sum(组合数学)
Rikka with Prefix Sum 题目描述 Prefix Sum is a useful trick in data structure problems. For example, giv ...
- The Sultan's Successors UVA - 167
the squares thus selected sum to a number at least as high as one already chosen by the Sultan. (For ...
- 接口压测工具WRK的学习与使用
之前一直在使用jmeter,第一次接触wrk,记录下使用过程以便自己再次使用. 首先,WRK是linux系统上才可以使用的工具,我也不想剑走偏锋的去研究如何让wrk可以在windows系统上使用. 临 ...
- 《Fluent Python》---一个关于memoryview例子的理解过程
近日,在阅读<Fluent Python>的第2.9.2节时,有一个关于内存视图的例子,当时看的一知半解,后来查了一些资料,现在总结一下,以备后续查询: 示例复述 添加了一些额外的代码,便 ...
- Erlang 不同版本内容
OTP 22.0 Erlang/OTP 22是一个新的主要版本,具有新的特性和改进,同时也具有不兼容性. 要更深入地了解OTP 22发行版的亮点,您可以阅读我们的博客: http://blog.erl ...