Storm 系列(六)—— Storm 项目三种打包方式对比分析
一、简介
在将 Storm Topology 提交到服务器集群运行时,需要先将项目进行打包。本文主要对比分析各种打包方式,并将打包过程中需要注意的事项进行说明。主要打包方式有以下三种:
- 第一种:不加任何插件,直接使用 mvn package 打包;
- 第二种:使用 maven-assembly-plugin 插件进行打包;
- 第三种:使用 maven-shade-plugin 进行打包。
以下分别进行详细的说明。
二、mvn package
2.1 mvn package的局限
不在 POM 中配置任何插件,直接使用 mvn package 进行项目打包,这对于没有使用外部依赖包的项目是可行的。
但如果项目中使用了第三方 JAR 包,就会出现问题,因为 mvn package 打包后的 JAR 中是不含有依赖包的,如果此时你提交到服务器上运行,就会出现找不到第三方依赖的异常。
如果你想采用这种方式进行打包,但是又使用了第三方 JAR,有没有解决办法?答案是有的,这一点在官方文档的Command Line Client 章节有所讲解,主要解决办法如下。
2.2 解决办法
在使用 storm jar 提交 Topology 时,可以使用如下方式指定第三方依赖:
- 如果第三方 JAR 包在本地,可以使用
--jars指定; - 如果第三方 JAR 包在远程中央仓库,可以使用
--artifacts指定,此时如果想要排除某些依赖,可以使用^符号。指定后 Storm 会自动到中央仓库进行下载,然后缓存到本地; - 如果第三方 JAR 包在其他仓库,还需要使用
--artifactRepositories指明仓库地址,库名和地址使用^符号分隔。
以下是一个包含上面三种情况的命令示例:
./bin/storm jar example/storm-starter/storm-starter-topologies-*.jar \
org.apache.storm.starter.RollingTopWords blobstore-remote2 remote  \
--jars "./external/storm-redis/storm-redis-1.1.0.jar,./external/storm-kafka/storm-kafka-1.1.0.jar" \
--artifacts "redis.clients:jedis:2.9.0,org.apache.kafka:kafka_2.10:0.8.2.2^org.slf4j:slf4j-log4j12" \
--artifactRepositories "jboss-repository^http://repository.jboss.com/maven2, \
HDPRepo^http://repo.hortonworks.com/content/groups/public/"
这种方式是建立在你能够连接到外网的情况下,如果你的服务器不能连接外网,或者你希望能把项目直接打包成一个 ALL IN ONE 的 JAR,即包含所有相关依赖,此时可以采用下面介绍的两个插件。
三、maven-assembly-plugin插件
maven-assembly-plugin 是官方文档中介绍的打包方法,来源于官方文档:Running Topologies on a Production Cluster
If you're using Maven, the Maven Assembly Plugin can do the packaging for you. Just add this to your pom.xml:
<plugin>
<artifactId>maven-assembly-plugin</artifactId>
<configuration>
 <descriptorRefs>
   <descriptorRef>jar-with-dependencies</descriptorRef>
 </descriptorRefs>
 <archive>
   <manifest>
     <mainClass>com.path.to.main.Class</mainClass>
   </manifest>
 </archive>
</configuration>
</plugin>
Then run mvn assembly:assembly to get an appropriately packaged jar. Make sure you exclude the Storm jars since the cluster already has Storm on the classpath.
官方文档主要说明了以下几点:
- 使用 maven-assembly-plugin 可以把所有的依赖一并打入到最后的 JAR 中;
- 需要排除掉 Storm 集群环境中已经提供的 Storm jars;
- 通过
<mainClass>标签指定主入口类; - 通过
<descriptorRef>标签指定打包相关配置。
jar-with-dependencies 是 Maven预定义 的一种最基本的打包配置,其 XML 文件如下:
<assembly xmlns="http://maven.apache.org/ASSEMBLY/2.0.0"
          xmlns:xsi="http://www.w3.org/2001/XMLSchema-instance"
          xsi:schemaLocation="http://maven.apache.org/ASSEMBLY/2.0.0
                              http://maven.apache.org/xsd/assembly-2.0.0.xsd">
    <id>jar-with-dependencies</id>
    <formats>
        <format>jar</format>
    </formats>
    <includeBaseDirectory>false</includeBaseDirectory>
    <dependencySets>
        <dependencySet>
            <outputDirectory>/</outputDirectory>
            <useProjectArtifact>true</useProjectArtifact>
            <unpack>true</unpack>
            <scope>runtime</scope>
        </dependencySet>
    </dependencySets>
</assembly>
我们可以通过对该配置文件进行拓展,从而实现更多的功能,比如排除指定的 JAR 等。使用示例如下:
1. 引入插件
在 POM.xml 中引入插件,并指定打包格式的配置文件为 assembly.xml(名称可自定义):
<build>
    <plugins>
        <plugin>
            <artifactId>maven-assembly-plugin</artifactId>
            <configuration>
                <descriptors>
                    <descriptor>src/main/resources/assembly.xml</descriptor>
                </descriptors>
                <archive>
                    <manifest>
                        <mainClass>com.heibaiying.wordcount.ClusterWordCountApp</mainClass>
                    </manifest>
                </archive>
            </configuration>
        </plugin>
    </plugins>
</build>
assembly.xml 拓展自 jar-with-dependencies.xml,使用了 <excludes> 标签排除 Storm jars,具体内容如下:
<assembly xmlns="http://maven.apache.org/ASSEMBLY/2.0.0"
          xmlns:xsi="http://www.w3.org/2001/XMLSchema-instance"
          xsi:schemaLocation="http://maven.apache.org/ASSEMBLY/2.0.0
                              http://maven.apache.org/xsd/assembly-2.0.0.xsd">

    <id>jar-with-dependencies</id>

    <!--指明打包方式-->
    <formats>
        <format>jar</format>
    </formats>

    <includeBaseDirectory>false</includeBaseDirectory>
    <dependencySets>
        <dependencySet>
            <outputDirectory>/</outputDirectory>
            <useProjectArtifact>true</useProjectArtifact>
            <unpack>true</unpack>
            <scope>runtime</scope>
            <!--排除 storm 环境中已经提供的 storm-core-->
            <excludes>
                <exclude>org.apache.storm:storm-core</exclude>
            </excludes>
        </dependencySet>
    </dependencySets>
</assembly>在配置文件中不仅可以排除依赖,还可以排除指定的文件,更多的配置规则可以参考官方文档:Descriptor Format
2. 打包命令
采用 maven-assembly-plugin 进行打包时命令如下:
# mvn assembly:assembly 打包后会同时生成两个 JAR 包,其中后缀为 jar-with-dependencies 是含有第三方依赖的 JAR 包,后缀是由 assembly.xml 中 <id> 标签指定的,可以自定义修改。提交该 JAR 到集群环境即可直接使用。

四、maven-shade-plugin插件
4.1 官方文档说明
第三种方式是使用 maven-shade-plugin,既然已经有了 maven-assembly-plugin,为什么还需要 maven-shade-plugin,这一点在官方文档中也是有所说明的,来自于官方对 HDFS 整合讲解的章节Storm HDFS Integration,原文如下:
When packaging your topology, it's important that you use the maven-shade-plugin as opposed to the maven-assembly-plugin.
The shade plugin provides facilities for merging JAR manifest entries, which the hadoop client leverages for URL scheme resolution.
If you experience errors such as the following:
java.lang.RuntimeException: Error preparing HdfsBolt: No FileSystem for scheme: hdfsit's an indication that your topology jar file isn't packaged properly.
If you are using maven to create your topology jar, you should use the following
maven-shade-pluginconfiguration to create your topology jar。
这里第一句就说的比较清晰,在集成 HDFS 时候,你必须使用 maven-shade-plugin 来代替 maven-assembly-plugin,否则会抛出 RuntimeException 异常。
采用 maven-shade-plugin 打包有很多好处,比如你的工程依赖很多的 JAR 包,而被依赖的 JAR 又会依赖其他的 JAR 包,这样,当工程中依赖到不同的版本的 JAR 时,并且 JAR 中具有相同名称的资源文件时,shade 插件会尝试将所有资源文件打包在一起时,而不是和 assembly 一样执行覆盖操作。
4.2 配置
采用 maven-shade-plugin 进行打包时候,配置示例如下:
<plugin>
    <groupId>org.apache.maven.plugins</groupId>
    <artifactId>maven-shade-plugin</artifactId>
    <configuration>
        <createDependencyReducedPom>true</createDependencyReducedPom>
        <filters>
            <filter>
                <artifact>*:*</artifact>
                <excludes>
                    <exclude>META-INF/*.SF</exclude>
                    <exclude>META-INF/*.sf</exclude>
                    <exclude>META-INF/*.DSA</exclude>
                    <exclude>META-INF/*.dsa</exclude>
                    <exclude>META-INF/*.RSA</exclude>
                    <exclude>META-INF/*.rsa</exclude>
                    <exclude>META-INF/*.EC</exclude>
                    <exclude>META-INF/*.ec</exclude>
                    <exclude>META-INF/MSFTSIG.SF</exclude>
                    <exclude>META-INF/MSFTSIG.RSA</exclude>
                </excludes>
            </filter>
        </filters>
        <artifactSet>
            <excludes>
                <exclude>org.apache.storm:storm-core</exclude>
            </excludes>
        </artifactSet>
    </configuration>
    <executions>
        <execution>
            <phase>package</phase>
            <goals>
                <goal>shade</goal>
            </goals>
            <configuration>
                <transformers>
                    <transformer
                       implementation="org.apache.maven.plugins.shade.resource.ServicesResourceTransformer"/>
                    <transformer
                       implementation="org.apache.maven.plugins.shade.resource.ManifestResourceTransformer">
                    </transformer>
                </transformers>
            </configuration>
        </execution>
    </executions>
</plugin>
以上配置示例来源于 Storm Github,这里做一下说明:
在上面的配置中,排除了部分文件,这是因为有些 JAR 包生成时,会使用 jarsigner 生成文件签名(完成性校验),分为两个文件存放在 META-INF 目录下:
- a signature file, with a .SF extension;
- a signature block file, with a .DSA, .RSA, or .EC extension;
如果某些包的存在重复引用,这可能会导致在打包时候出现 Invalid signature file digest for Manifest main attributes 异常,所以在配置中排除这些文件。
4.3 打包命令
使用 maven-shade-plugin 进行打包的时候,打包命令和普通的一样:
# mvn package打包后会生成两个 JAR 包,提交到服务器集群时使用 非 original 开头的 JAR。

五、结论
通过以上三种打包方式的详细介绍,这里给出最后的结论:建议使用 maven-shade-plugin 插件进行打包,因为其通用性最强,操作最简单,并且 Storm Github 中所有examples 都是采用该方式进行打包。
六、打包注意事项
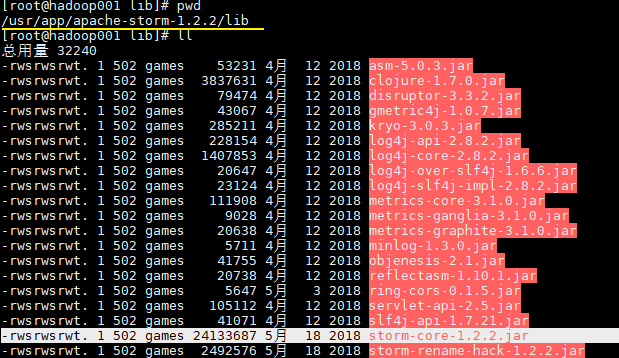
无论采用任何打包方式,都必须排除集群环境中已经提供的 storm jars。这里比较典型的是 storm-core,其在安装目录的 lib 目录下已经存在。

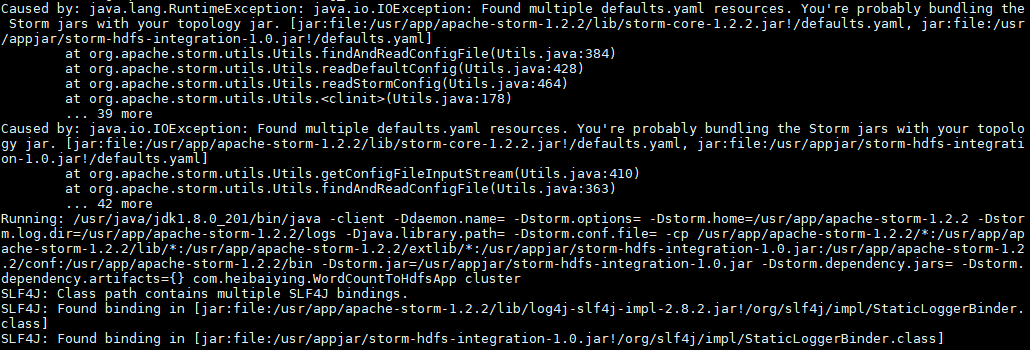
如果你不排除 storm-core,通常会抛出下面的异常:
Caused by: java.lang.RuntimeException: java.io.IOException: Found multiple defaults.yaml resources.
You're probably bundling the Storm jars with your topology jar.
[jar:file:/usr/app/apache-storm-1.2.2/lib/storm-core-1.2.2.jar!/defaults.yaml,
jar:file:/usr/appjar/storm-hdfs-integration-1.0.jar!/defaults.yaml]
        at org.apache.storm.utils.Utils.findAndReadConfigFile(Utils.java:384)
        at org.apache.storm.utils.Utils.readDefaultConfig(Utils.java:428)
        at org.apache.storm.utils.Utils.readStormConfig(Utils.java:464)
        at org.apache.storm.utils.Utils.<clinit>(Utils.java:178)
        ... 39 more
参考资料
关于 maven-shade-plugin 的更多配置可以参考: maven-shade-plugin 入门指南
更多大数据系列文章可以参见 GitHub 开源项目: 大数据入门指南
Storm 系列(六)—— Storm 项目三种打包方式对比分析的更多相关文章
- Storm 学习之路(六)—— Storm项目三种打包方式对比分析
一.简介 在将Storm Topology提交到服务器集群运行时,需要先将项目进行打包.本文主要对比分析各种打包方式,并将打包过程中需要注意的事项进行说明.主要打包方式有以下三种: 第一种:不加任何插 ...
- Entity Framework 5.0系列之EF概览-三种编程方式
概述 在开发面向数据的软件时我们常常为了解决业务问题实体.关系和逻辑构建模型而费尽心机,ORM的产生为我们提供了一种优雅的解决方案.ADO.NET Entity Framework是.NET开发中一种 ...
- Maven三种打包方式jar war pom
1.pom工程 用在父级工程或聚合工程中.用来做jar包的版本控制.必须指明这个聚合工程的打包方式为pom 2.war工程 将会打包成war,发布在服务器上的工程.如网站或服务.在SpringBoot ...
- Weblogic部署项目三种方式
在weblogic中部署项目通常有三种方式:第一,在控制台中安装部署:第二,将部署包放在domain域中autodeploy目录下部署:第三,使用域中配置文件config.xml 进行项目的部署. 控 ...
- 在Tomcat下部属项目三种方式:
在Tomcat下部属项目三种方式: 1直接复制: 2. 通过配置虚拟路径的方式 直接修改配置文件 写到tomcat/conf/server.xml 找到<H ...
- SignalR代理对象异常:Uncaught TypeError: Cannot read property 'client' of undefined 推出的结论 SignalR 简单示例 通过三个DEMO学会SignalR的三种实现方式 SignalR推送框架两个项目永久连接通讯使用 SignalR 集线器简单实例2 用SignalR创建实时永久长连接异步网络应用程序
SignalR代理对象异常:Uncaught TypeError: Cannot read property 'client' of undefined 推出的结论 异常汇总:http://www ...
- 并发编程系列小结(线程安全,synchronized,脏读,线程间的通信wait/notify,线程的三种实现方式Demo,可替代wait/notify的方法)
线程安全: 当多个线程访问某一个类(对象或方法)时,这个类始终都能表现出正确的行为,那么这个类(对象或方法就是线程安全的) synchronized: 可以在任意对象或方法上加锁,而加锁的这段代码称为 ...
- spring-boot的三种启动方式[z]
https://blog.csdn.net/u011425751/article/details/79507386 有段时间没有写博客了,也在努力的从传统单机开发向分布式系统过度,所以再次做一些笔记, ...
- 【转】vue.js三种安装方式
Vue.js(读音 /vjuː/, 类似于 view)是一个构建数据驱动的 web 界面的渐进式框架.Vue.js 的目标是通过尽可能简单的 API 实现响应的数据绑定和组合的视图组件.它不仅易于上手 ...
随机推荐
- CentOS 7服务器安装brook和bbr加速
一.安装Brook 执行一键部署脚本 $ wget -N --no-check-certificate wget -N --no-check-certificate https://raw.githu ...
- 分享我的GD32F450的IAP过程
最近一个项目使用GD32F450VI+ESP8266需要做远程升级,基本参考正点原子IAP的那一章节,但是在GD32F450上却遇到了问题,无法跳转,然后使用正点原子的开发板stm32f429,以及s ...
- 2月9日 《Java 8实战》读后感
第一部分 基础知识 第3章 Lambda表达式 使用函数式接口 Predicate Consumer Function 第二部分 函数式数据处理 第4章 引入流 第5章 使用流 第6章 用流收集数据 ...
- element ui 退出功能
<template> <el-container class="home-wrapper"> <el-header> <el-row ty ...
- 源码解读 Spring Boot Profiles
前言 上文<一文掌握 Spring Boot Profiles> 是对 Spring Boot Profiles 的介绍和使用,因此本文将从源码角度探究 Spring Boot Profi ...
- cs231n---循环神经网络
1 RNN介绍 (1)一对多,多对一,多对多的任务 传统的神经网络只能处理一对一的任务,而RNN可以处理一对多,多对一,多对多的任务: 其中,一些典型的应用如下: Image Captioning:i ...
- 004——Netty之高性能IO(Reactor)
一.原始方式 方法一: # 使用while循环,不断监听端口是否有新的套接字链接 while(true){ socket = accept(); handle(socket) } # 做法局限:处理效 ...
- Element-UI 2.4.11 版本 使用注意(发现一点更新一点)
1.$Vue.$refs.addForm.resetFields() 的resetFields()方法重置到默认值并不是 ,你在form绑定对象上写的默认值 ,而是这个form被渲染出来之后第一次赋到 ...
- Juniper初始化之配置管理接口
一.实验环境 Juniper vSRX 12.1 二.配置管理口步骤 2.0 console进入命令行窗口,初始化用户root,密码为空 2.1 配置接口IP地址 set interfaces ge- ...
- K8S学习笔记之filebeat采集K8S微服务java堆栈多行日志
0x00 背景 K8S内运行Spring Cloud微服务,根据定制容器架构要求log文件不落地,log全部输出到std管道,由基于docker的filebeat去管道采集,然后发往Kafka或者ES ...
