Java多线程编程(二)对象及变量的并发访问
一、synchronized同步方法
1.方法内的变量为线程安全
“非线程安全”问题存在于“实例变量”中,如果是方法内部的私有变量,则不存在“非线程安全”问题,所得结果也就是“线程安全”的了。
示例:由于HasSelfPrivateNum类中的addI(String username)方法的num变量是方法内部的变量,而方法内部的变量是私有的,所以两个线程在分开调用时不会出现非线程安全问题。
package service;

public class HasSelfPrivateNum {

    public void addI(String username) {

        try {

            int num = 0;

            if (username.equals("a")) {

                num = 100;

                System.out.println("a set over!");

                Thread.sleep(2000);

            } else {

                num = 200;

                System.out.println("b set over!");

            }

            System.out.println(username + " num=" + num);

        } catch (InterruptedException e) {

            e.printStackTrace();

        }

    }

}
package extthread;

import service.HasSelfPrivateNum;

public class ThreadA extends Thread {

    private HasSelfPrivateNum numRef;

    public ThreadA(HasSelfPrivateNum numRef) {

        super();

        this.numRef = numRef;

    }

    @Override

    public void run() {

        super.run();

        numRef.addI("a");

    }

}
package extthread;

import service.HasSelfPrivateNum;

public class ThreadB extends Thread {

    private HasSelfPrivateNum numRef;

    public ThreadB(HasSelfPrivateNum numRef) {

        super();

        this.numRef = numRef;

    }

    @Override

    public void run() {

        super.run();

        numRef.addI("b");

    }

}
package test;

import service.HasSelfPrivateNum;

import extthread.ThreadA;

import extthread.ThreadB;

public class Run {

    public static void main(String[] args) {

        HasSelfPrivateNum numRef = new HasSelfPrivateNum();

        ThreadA athread = new ThreadA(numRef);

        athread.start();

        ThreadB bthread = new ThreadB(numRef);

        bthread.start();

    }

}
a set over!

b set over!

b num=200

a num=100
2.实例变量非线程安全
如果多个线程共同访问1个对象中的实例变量,则有可能出现“非线程安全”问题。
如果访问的对象有多个实例变量,则有可能出现交叉的情况。
如果访问的对象仅有1个实例变量,则有可能出现覆盖的情况。
示例1:修改1中的示例的HasSelfPrivateNum类,使得num变量置于addI()方法外,其他保持不变。从输出结果可以看出,过程应该是,首先a线程把num值置为100,然后休眠,在休眠的过程中,b线程把num值置为200,然后a线程再输出num值,就导致了a线程输出的num值也是200。
package service;

public class HasSelfPrivateNum {

    private int num = 0;

    public void addI(String username) {

        try {

            if (username.equals("a")) {

                num = 100;

                System.out.println("a set over!");

                Thread.sleep(2000);

            } else {

                num = 200;

                System.out.println("b set over!");

            }

            System.out.println(username + " num=" + num);

        } catch (InterruptedException e) {

            e.printStackTrace();

        }

    }

}
a set over!

b set over!

b num=200

a num=200
示例2:修改上例,在方法声明上加上synchronized关键字。从输出结果可以看出,再输出a set over!后等待了2秒才输出第二行,这也就是同步访问,先打印出a,然后打印出b。在两个线程访问同一个对象中的同步方法时一定是线程安全的。
a set over!

a num=100

b set over!

b num=200
3.多个对象多个锁
示例:线程A和B不变,addI方法同步,main方法中创建了两个HasSelfPrivateNum类的对象。从输出结果可以看出,两个线程分别访问同一个类的两个不同实例的相同名称的同步方法,效果却是以异步的方式运行得。由于创建了2个业务对象,在系统中产生出2个锁,所以是异步的,打印的效果就是先打印b然后是a。
这里令人疑惑的是,addI方法明明使用了synchronized关键字,为什么还是异步交叉打印的呢?原因是,关键字synchronized取得的锁都是对象锁,而不是 把一段代码或方法当作锁,哪个线程先执行带synchronized关键字的方法,哪个线程就持有该方法所属对象的锁Lock,那么其他线程只能呈等待状态,前期是多个线程访问的是同一个对象。但如果多个线程访问多个对象,则虚拟机会创建多个锁。
package service;

public class HasSelfPrivateNum {

    private int num = 0;

    synchronized public void addI(String username) {

        try {

            if (username.equals("a")) {

                num = 100;

                System.out.println("a set over!");

                Thread.sleep(2000);

            } else {

                num = 200;

                System.out.println("b set over!");

            }

            System.out.println(username + " num=" + num);

        } catch (InterruptedException e) {

            e.printStackTrace();

        }

    }

}
package test;

import service.HasSelfPrivateNum;

import extthread.ThreadA;

import extthread.ThreadB;

public class Run {

    public static void main(String[] args) {

        HasSelfPrivateNum numRef1 = new HasSelfPrivateNum();

        HasSelfPrivateNum numRef2 = new HasSelfPrivateNum();

        ThreadA athread = new ThreadA(numRef1);

        athread.start();

        ThreadB bthread = new ThreadB(numRef2);

        bthread.start();

    }

}
a set over!

b set over!

b num=200

a num=100
4.synchronized方法与锁对象
示例1:证明线程锁的是对象。方法不加synchronized关键字。前两行一起打印,后两行一起打印,中间间隔5秒。
package extobject;

public class MyObject {

    public void methodA() {

        try {

            System.out.println("begin methodA threadName="+ Thread.currentThread().getName());

            Thread.sleep(5000);

            System.out.println("end");

        } catch (InterruptedException e) {

            e.printStackTrace();

        }

    }

}
package extthread;

import extobject.MyObject;

public class ThreadA extends Thread {

    private MyObject object;

    public ThreadA(MyObject object) {

        super();

        this.object = object;

    }

    @Override

    public void run() {

        super.run();

        object.methodA();

    }

}
package extthread;

import extobject.MyObject;

public class ThreadB extends Thread {

    private MyObject object;

    public ThreadB(MyObject object) {

        super();

        this.object = object;

    }

    @Override

    public void run() {

        super.run();

        object.methodA();

    }

}
package test.run;

import extobject.MyObject;

import extthread.ThreadA;

import extthread.ThreadB;

public class Run {

    public static void main(String[] args) {

        MyObject object = new MyObject();

        ThreadA a = new ThreadA(object);

        a.setName("A");

        ThreadB b = new ThreadB(object);

        b.setName("B");

        a.start();

        b.start();

    }

}
begin methodA threadName=A

begin methodA threadName=B

end

end
示例2:证明线程锁的是对象。方法加synchronized关键字。第一行与第二行时间间隔5秒,第三行与第四行时间间隔5秒。说明调用synchronized关键字声明的方法一定是排队运行的,另外,只有共享资源的读写访问才需要同步化,如果不是共享资源,那么根本就没有同步的必要。
begin methodA threadName=A

end

begin methodA threadName=B

end
示例3:两个线程访问同一个对象的两个同步和不同步的方法。两个线程分别调用两种方法,方法b不加synchronized关键字。从输出时间可以看出,一共用了5秒,原因是虽然A线程先持有了object对象的锁,但B线程完全可以异步调用非synchronized类型的方法。
package extobject;

public class MyObject {

    synchronized public void methodA() {
        try {
            System.out.println("begin methodA threadName="+ Thread.currentThread().getName()
                             + " begin time="+ System.currentTimeMillis());
            Thread.sleep(5000);
            System.out.println("methodA end endTime=" + System.currentTimeMillis());
        } catch (InterruptedException e) {
            e.printStackTrace();
        }
    }

    public void methodB() {
        try {
            System.out.println("begin methodB threadName="+ Thread.currentThread().getName()
                            + " begin time="+ System.currentTimeMillis());
            Thread.sleep(5000);
            System.out.println("methodB end endTime=" + System.currentTimeMillis());
        } catch (InterruptedException e) {
            e.printStackTrace();
        }
    }

}
begin methodA threadName=A begin time=1525311747307
begin methodB threadName=B begin time=1525311747307
methodB end endTime=1525311752307
methodA end endTime=1525311752307
示例4:两个线程访问同一个对象的两个同步的方法。两个线程分别调用两种方法,方法b加synchronized关键字。从输出时间可以看出,先打印a然后打印b,一共花了10秒的时间。A线程先持有object对象的Lock锁,B线程如果在这时调用object对象中的synchronized类型的方法,则需要等待,也就是同步。
begin methodA threadName=A begin time=1525311629523

methodA end endTime=1525311634524

begin methodB threadName=B begin time=1525311634524

methodB end endTime=1525311639524
5.脏读
脏读就是在读取实例变量时,要读取的值已经被其他线程更改过了。
示例1:getValue()方法不加synchronized关键字。从结果可以看出,在setValue()方法中,首先修改了username,然后休眠5秒,在休眠的过程中getValue()方法已经执行完成了,就造成了只修改名字没有修改密码的情况
package extthread;

import entity.PublicVar;

public class ThreadA extends Thread {

    private PublicVar publicVar;

    public ThreadA(PublicVar publicVar) {

        super();

        this.publicVar = publicVar;

    }

    @Override

    public void run() {

        super.run();

        publicVar.setValue("B", "BB");

    }

}
package entity;

public class PublicVar {

    public String username = "A";

    public String password = "AA";

    synchronized public void setValue(String username, String password) {

        try {

            this.username = username;

            Thread.sleep(5000);

            this.password = password;

            System.out.println("setValue method thread name="

                              + Thread.currentThread().getName()

                              + " username="+ username

                              + " password=" + password);

        } catch (InterruptedException e) {

            e.printStackTrace();

        }

    }

    public void getValue() {

        System.out.println("getValue method thread name="+ Thread.currentThread().getName()

                         + " username=" + username

                         + " password=" + password);

    }

}
package test;

import entity.PublicVar;

import extthread.ThreadA;

public class Test {

    public static void main(String[] args) {

        try {

            PublicVar publicVarRef = new PublicVar();

            ThreadA thread = new ThreadA(publicVarRef);

            thread.start();

            Thread.sleep(200);//打印结果受此值大小影响

            publicVarRef.getValue();

        } catch (InterruptedException e) {

            e.printStackTrace();

        }

    }

}
getValue method thread name=main username=B password=AA

setValue method thread name=Thread-0 username=B password=BB
示例2:getValue()方法加synchronized关键字。setValue()方法和getValue()方法被依次执行,就不存在脏读的情况。总结一下,脏读一定会出现操作实例变量的情况下,这就是不同线程“争抢”实例变量的结果。
setValue method thread name=Thread-0 username=B password=BB

getValue method thread name=main username=B password=BB
6.synchronized锁重入
关键字synchronized拥有锁重入的功能,也就是在使用synchronized时,当一个线程得到一个对象锁后,再次请求次对象锁时是可以再次得到该对象的锁的。这也证明了在一个synchronized方法/块的内部调用本类的其他synchronized方法/块时,是永远可以得到锁的。
示例1:“可重入锁”的意思是,自己可以再次获取自己的内部锁。比如有1条线程获得了某个对象的锁,此时这个对象锁还没有释放,当其再次想要获得这个对象的锁的时候还是可以取得的,如果不可锁重入的话,就会造成死锁。示例中的多次获取自己的内部锁就是这个意思。
package extthread;

import myservice.Service;

public class MyThread extends Thread {

    @Override

    public void run() {

        Service service = new Service();

        service.service1();

    }

}
package myservice;

public class Service {

    synchronized public void service1() {

        System.out.println("service1");

        service2();

    }

    synchronized public void service2() {

        System.out.println("service2");

        service3();

    }

    synchronized public void service3() {

        System.out.println("service3");

    }

}
package test;

import extthread.MyThread;

public class Run {

    public static void main(String[] args) {

        MyThread t = new MyThread();

        t.start();

    }

}
service1

service2

service3
示例2:可重入锁也支持在父子类继承的环境中。Sub类是Main类的子类,当存在父子类继承关系时,子类是完全可以通过“可重入锁”调用父类的同步方法。
package extthread;

import myservice.Sub;

public class MyThread extends Thread {

    @Override

    public void run() {

        Sub sub = new Sub();

        sub.operateISubMethod();

    }

}
package myservice;

public class Main {

    public int i = 10;

    synchronized public void operateIMainMethod() {

        try {

                i--;

                System.out.println("main print i=" + i);

                Thread.sleep(100);

            } catch (InterruptedException e) {

        }

    }

}
package myservice;

public class Sub extends Main {

    synchronized public void operateISubMethod() {

        try {

            while (i > 0) {

                i--;

                System.out.println("sub print i=" + i);

                Thread.sleep(100);

                this.operateIMainMethod();

            }

        } catch (InterruptedException e) {

            e.printStackTrace();

        }

    }

}
package test;

import extthread.MyThread;

public class Run {

    public static void main(String[] args) {

        MyThread t = new MyThread();

        t.start();

    }

}
sub  print i=9

main print i=8

sub  print i=7

main print i=6

sub  print i=5

main print i=4

sub  print i=3

main print i=2

sub  print i=1

main print i=0
7.出现异常,锁自动释放
示例:当一个线程执行的代码出现异常时,其所持有的锁会自动释放。线程a出现异常并释放锁,线程b进入方法正常打印,出现异常的锁被自动释放了。
package extthread;

import service.Service;

public class ThreadA extends Thread {

    private Service service;

    public ThreadA(Service service) {

        super();

        this.service = service;

    }

    @Override

    public void run() {

        service.testMethod();

    }

}
package extthread;

import service.Service;

public class ThreadB extends Thread {

    private Service service;

    public ThreadB(Service service) {

        super();

        this.service = service;

    }

    @Override

    public void run() {

        service.testMethod();

    }

}
package service;

public class Service {

    synchronized public void testMethod() {

        if (Thread.currentThread().getName().equals("a")) {

            System.out.println("ThreadName=" + Thread.currentThread().getName()

                             + " run beginTime=" + System.currentTimeMillis());

            int i = 1;

            while (i == 1) {

                if (("" + Math.random()).substring(0, 8).equals("0.123456")) {

                    System.out.println("ThreadName=" + Thread.currentThread().getName() +

                                       " run exceptionTime="+ System.currentTimeMillis());

                    Integer.parseInt("a");

                        }

                    }

            } else {

                System.out.println("Thread B run Time=" + System.currentTimeMillis());

        }

    }

}
package controller;

import service.Service;

import extthread.ThreadA;

import extthread.ThreadB;

public class Test {

    public static void main(String[] args) {

        try {

            Service service = new Service();

            ThreadA a = new ThreadA(service);

            a.setName("a");

            a.start();

            Thread.sleep(500);

            ThreadB b = new ThreadB(service);

            b.setName("b");

            b.start();

        } catch (InterruptedException e) {

            e.printStackTrace();

        }

    }

}
ThreadName=a run beginTime=1525315417775

ThreadName=a run exceptionTime=1525315418077

Exception in thread "a" java.lang.NumberFormatException: For input string: "a"

	at java.lang.NumberFormatException.forInputString(Unknown Source)

	at java.lang.Integer.parseInt(Unknown Source)

	at java.lang.Integer.parseInt(Unknown Source)

	at service.Service.testMethod(Service.java:14)

	at extthread.ThreadA.run(ThreadA.java:16)

Thread B run Time=1525315418276
8.同步不具有继承性
示例1:子类不加synchronized关键字。由前两行可以看出来,子类是非同步调用的。
package extthread;

import service.Sub;

public class MyThreadA extends Thread {

    private Sub sub;

    public MyThreadA(Sub sub) {

        super();

        this.sub = sub;

    }

    @Override

    public void run() {

        sub.serviceMethod();

    }

}
package extthread;

import service.Sub;

public class MyThreadB extends Thread {

    private Sub sub;

    public MyThreadB(Sub sub) {

        super();

        this.sub = sub;

    }

    @Override

    public void run() {

        sub.serviceMethod();

    }

}
package service;

public class Main {

    synchronized public void serviceMethod() {

        try {

            System.out.println("int main 下一步 sleep begin threadName="+ Thread.currentThread().getName()

                             + " time="+ System.currentTimeMillis());

            Thread.sleep(5000);

            System.out.println("int main 下一步 sleep end   threadName="  + Thread.currentThread().getName()

                             + " time="+ System.currentTimeMillis());

        } catch (InterruptedException e) {

            e.printStackTrace();

        }

    }

}
package service;

public class Sub extends Main {

    @Override

    public void serviceMethod() {

        try {

            System.out.println("int sub  下一步 sleep begin threadName="+ Thread.currentThread().getName()

                             + " time=" + System.currentTimeMillis());

            Thread.sleep(5000);

            System.out.println("int sub  下一步 sleep end   threadName="+ Thread.currentThread().getName()

                             + " time="+ System.currentTimeMillis());

            super.serviceMethod();

        } catch (InterruptedException e) {

            e.printStackTrace();

        }

    }

}
package controller;

import service.Sub;

import extthread.MyThreadA;

import extthread.MyThreadB;

public class Test {

    public static void main(String[] args) {

        Sub subRef = new Sub();

        MyThreadA a = new MyThreadA(subRef);

        a.setName("A");

        a.start();

        MyThreadB b = new MyThreadB(subRef);

        b.setName("B");

        b.start();

    }

}
int sub  下一步 sleep begin threadName=A time=1525316376431

int sub  下一步 sleep begin threadName=B time=1525316376431

int sub  下一步 sleep end   threadName=A time=1525316381431

int sub  下一步 sleep end   threadName=B time=1525316381431

int main 下一步 sleep begin threadName=A time=1525316381431

int main 下一步 sleep end   threadName=A time=1525316386432

int main 下一步 sleep begin threadName=B time=1525316386432

int main 下一步 sleep end   threadName=B time=1525316391433
示例2:子类加synchronized关键字。可以看出,同步不能继承, 还需要在子类的方法中添加synchronized关键字才可以。
int sub  下一步 sleep begin threadName=A time=1525316522710

int sub  下一步 sleep end   threadName=A time=1525316527710

int main 下一步 sleep begin threadName=A time=1525316527710

int main 下一步 sleep end   threadName=A time=1525316532710

int sub  下一步 sleep begin threadName=B time=1525316532710

int sub  下一步 sleep end   threadName=B time=1525316537711

int main 下一步 sleep begin threadName=B time=1525316537711

int main 下一步 sleep end   threadName=B time=1525316542711
二、synchronized同步语句块
用关键字synchronized声明方法在某些情况下是有弊端的,比如A线程调用同步方法执行一个长时间的任务,那么B线程则必须等待比较长的时间。在这样的情况下可以使用synchronized语句块来解决。
1.synchronized方法的弊端
示例:测试用synchronized关键字声明方法的弊端。从输出结果可以看出,从开始到结束一共花费了6秒的时间,这个时间很长,所以来说弊端就比较明显了。
package commonutils;

public class CommonUtils {

    public static long beginTime1;

    public static long endTime1;

    public static long beginTime2;

    public static long endTime2;

}
package mytask;

public class Task {

    private String getData1;

    private String getData2;

    public synchronized void doLongTimeTask() {

        try {

            System.out.println("begin task");

            Thread.sleep(3000);

            getData1 = "长时间处理任务后从远程返回的值1 threadName="+ Thread.currentThread().getName();

            getData2 = "长时间处理任务后从远程返回的值2 threadName="+ Thread.currentThread().getName();

            System.out.println(getData1);

            System.out.println(getData2);

            System.out.println("end   task");

        } catch (InterruptedException e) {

            e.printStackTrace();

        }

    }

}
package mythread;

import commonutils.CommonUtils;

import mytask.Task;

public class MyThread1 extends Thread {

    private Task task;

    public MyThread1(Task task) {

        super();

        this.task = task;

    }

    @Override

    public void run() {

        super.run();

        CommonUtils.beginTime1 = System.currentTimeMillis();

        task.doLongTimeTask();

        CommonUtils.endTime1 = System.currentTimeMillis();

    }

}
package mythread;

import commonutils.CommonUtils;

import mytask.Task;

public class MyThread2 extends Thread {

    private Task task;

    public MyThread2(Task task) {

        super();

        this.task = task;

    }

    @Override

    public void run() {

        super.run();

        CommonUtils.beginTime2 = System.currentTimeMillis();

        task.doLongTimeTask();

        CommonUtils.endTime2 = System.currentTimeMillis();

    }

}
package test;

import mytask.Task;

import mythread.MyThread1;

import mythread.MyThread2;

import commonutils.CommonUtils;

public class Run {

    public static void main(String[] args) {

        Task task = new Task();

        MyThread1 thread1 = new MyThread1(task);

        thread1.start();

        MyThread2 thread2 = new MyThread2(task);

        thread2.start();

        try {

            Thread.sleep(10000);

        } catch (InterruptedException e) {

            e.printStackTrace();

        }

        long beginTime = CommonUtils.beginTime1;

        if (CommonUtils.beginTime2 < CommonUtils.beginTime1) {

            beginTime = CommonUtils.beginTime2;

        }

        long endTime = CommonUtils.endTime1;

        if (CommonUtils.endTime2 > CommonUtils.endTime1) {

            endTime = CommonUtils.endTime2;

        }

        System.out.println("耗时:" + ((endTime - beginTime) / 1000));

    }

}
begin task

长时间处理任务后从远程返回的值1 threadName=Thread-0

长时间处理任务后从远程返回的值2 threadName=Thread-0

end   task

begin task

长时间处理任务后从远程返回的值1 threadName=Thread-1

长时间处理任务后从远程返回的值2 threadName=Thread-1

end   task

耗时:6秒
2.synchronized同步代码块的使用
当两个并发线程访问同一个对象object中的synchronized(this)同步代码块时,一段时间内只能有一个线程被执行,另一个线程必须等待当前线程执行完这个代码块以后才能执行该代码块。
示例:serviceMethod方法没有使用synchronized关键字,而是使用了synchronized (this)同步代码块,从输出结果可以看出,虽然解决了同步的问题,但是效率没有提高,一共执行时间还是4秒。
package service;

public class ObjectService {

    public void serviceMethod() {

        try {

            synchronized (this) {

                System.out.println("begin time=" + System.currentTimeMillis());

                Thread.sleep(2000);

                System.out.println("end    end=" + System.currentTimeMillis());

            }

        } catch (InterruptedException e) {

            e.printStackTrace();

        }

    }

}
package extthread;

import service.ObjectService;

public class ThreadA extends Thread {

    private ObjectService service;

    public ThreadA(ObjectService service) {

        super();

        this.service = service;

    }

    @Override

    public void run() {

        super.run();

        service.serviceMethod();

    }

}
package extthread;

import service.ObjectService;

public class ThreadB extends Thread {

    private ObjectService service;

    public ThreadB(ObjectService service) {

        super();

        this.service = service;

    }

    @Override

    public void run() {

        super.run();

        service.serviceMethod();

    }

}
package test.run;

import service.ObjectService;

import extthread.ThreadA;

import extthread.ThreadB;

public class Run {

    public static void main(String[] args) {

        ObjectService service = new ObjectService();

        ThreadA a = new ThreadA(service);

        a.setName("a");

        a.start();

        ThreadB b = new ThreadB(service);

        b.setName("b");

        b.start();

    }

}
begin time=1525317861377

end    end=1525317863378

begin time=1525317863378

end    end=1525317865378
3.用同步代码块解决同步的弊端
示例:修改1中示例的task类。输出有两种结果,可以看出,两个线程总执行时间为3秒,当一个线程访问object的一个synchronized同步代码块时,另一个线程仍然可以访问该object对象中的非synchronized(this)同步代码块。
package mytask;

public class Task {

    private String getData1;

    private String getData2;

    public void doLongTimeTask() {

        try {

            System.out.println("begin task");

            Thread.sleep(3000);

            String privateGetData1 = "长时间处理任务后从远程返回的值1 threadName="+ Thread.currentThread().getName();

            String privateGetData2 = "长时间处理任务后从远程返回的值2 threadName="+ Thread.currentThread().getName();

            synchronized (this) {

                getData1 = privateGetData1;

                getData2 = privateGetData2;

            }

            System.out.println(getData1);

            System.out.println(getData2);

            System.out.println("end task");

        } catch (InterruptedException e) {

            e.printStackTrace();

        }

    }

}
begin task

begin task

长时间处理任务后从远程返回的值1 threadName=Thread-1

长时间处理任务后从远程返回的值2 threadName=Thread-0

end task

长时间处理任务后从远程返回的值1 threadName=Thread-0

长时间处理任务后从远程返回的值2 threadName=Thread-0

end task

耗时:3秒
begin task

begin task

长时间处理任务后从远程返回的值1 threadName=Thread-0

长时间处理任务后从远程返回的值2 threadName=Thread-1

end task

长时间处理任务后从远程返回的值1 threadName=Thread-1

长时间处理任务后从远程返回的值2 threadName=Thread-1

end task

耗时:3秒
4.一半异步,一半同步
示例:测试不再synchronized块中就是异步执行,在synchronized块中就是同步执行。从输出结果可以看出,非同步时交叉打印输出结果,同步时都是排队打印的,线程0和线程1都是按顺序执行完100个输出结果。同一时间只能有一个线程访问synchronized块中的内容。
package mytask;

public class Task {

    public void doLongTimeTask() {

        for (int i = 0; i < 100; i++) {

            System.out.println("nosynchronized threadName="+ Thread.currentThread().getName() + " i=" + (i + 1));

        }

        System.out.println("");

        synchronized (this) {

            for (int i = 0; i < 100; i++) {

                System.out.println("synchronized threadName="+ Thread.currentThread().getName() + " i=" + (i + 1));

            }

        }

    }

}
package mythread;

import mytask.Task;

public class MyThread1 extends Thread {

    private Task task;

    public MyThread1(Task task) {

        super();

        this.task = task;

    }

    @Override

    public void run() {

        super.run();

        task.doLongTimeTask();

    }

}
package mythread;

import mytask.Task;

public class MyThread2 extends Thread {

    private Task task;

    public MyThread2(Task task) {

        super();

        this.task = task;

    }

    @Override

    public void run() {

        super.run();

        task.doLongTimeTask();

    }

}
package test;

import mytask.Task;

import mythread.MyThread1;

import mythread.MyThread2;

public class Run {

    public static void main(String[] args) {

        Task task = new Task();

        MyThread1 thread1 = new MyThread1(task);

        thread1.start();

        MyThread2 thread2 = new MyThread2(task);

        thread2.start();

    }

}
nosynchronized threadName=Thread-0 i=1

nosynchronized threadName=Thread-0 i=2

nosynchronized threadName=Thread-0 i=3

nosynchronized threadName=Thread-0 i=4

nosynchronized threadName=Thread-0 i=5

nosynchronized threadName=Thread-0 i=6

nosynchronized threadName=Thread-0 i=7

nosynchronized threadName=Thread-0 i=8

nosynchronized threadName=Thread-0 i=9

nosynchronized threadName=Thread-0 i=10

nosynchronized threadName=Thread-0 i=11

nosynchronized threadName=Thread-0 i=12

nosynchronized threadName=Thread-0 i=13

nosynchronized threadName=Thread-0 i=14

nosynchronized threadName=Thread-0 i=15

nosynchronized threadName=Thread-0 i=16

nosynchronized threadName=Thread-0 i=17

nosynchronized threadName=Thread-0 i=18

nosynchronized threadName=Thread-0 i=19

nosynchronized threadName=Thread-0 i=20

nosynchronized threadName=Thread-0 i=21

nosynchronized threadName=Thread-0 i=22

nosynchronized threadName=Thread-0 i=23

nosynchronized threadName=Thread-0 i=24

nosynchronized threadName=Thread-0 i=25

nosynchronized threadName=Thread-0 i=26

nosynchronized threadName=Thread-0 i=27

nosynchronized threadName=Thread-0 i=28

nosynchronized threadName=Thread-0 i=29

nosynchronized threadName=Thread-0 i=30

nosynchronized threadName=Thread-0 i=31

nosynchronized threadName=Thread-0 i=32

nosynchronized threadName=Thread-0 i=33

nosynchronized threadName=Thread-0 i=34

nosynchronized threadName=Thread-0 i=35

nosynchronized threadName=Thread-0 i=36

nosynchronized threadName=Thread-0 i=37

nosynchronized threadName=Thread-1 i=1

nosynchronized threadName=Thread-1 i=2

nosynchronized threadName=Thread-0 i=38

nosynchronized threadName=Thread-1 i=3

nosynchronized threadName=Thread-1 i=4

nosynchronized threadName=Thread-1 i=5

nosynchronized threadName=Thread-1 i=6

nosynchronized threadName=Thread-1 i=7

nosynchronized threadName=Thread-1 i=8

nosynchronized threadName=Thread-1 i=9

nosynchronized threadName=Thread-1 i=10

nosynchronized threadName=Thread-1 i=11

nosynchronized threadName=Thread-1 i=12

nosynchronized threadName=Thread-1 i=13

nosynchronized threadName=Thread-1 i=14

nosynchronized threadName=Thread-1 i=15

nosynchronized threadName=Thread-1 i=16

nosynchronized threadName=Thread-1 i=17

nosynchronized threadName=Thread-1 i=18

nosynchronized threadName=Thread-1 i=19

nosynchronized threadName=Thread-1 i=20

nosynchronized threadName=Thread-1 i=21

nosynchronized threadName=Thread-1 i=22

nosynchronized threadName=Thread-1 i=23

nosynchronized threadName=Thread-1 i=24

nosynchronized threadName=Thread-1 i=25

nosynchronized threadName=Thread-1 i=26

nosynchronized threadName=Thread-1 i=27

nosynchronized threadName=Thread-1 i=28

nosynchronized threadName=Thread-1 i=29

nosynchronized threadName=Thread-1 i=30

nosynchronized threadName=Thread-1 i=31

nosynchronized threadName=Thread-1 i=32

nosynchronized threadName=Thread-1 i=33

nosynchronized threadName=Thread-1 i=34

nosynchronized threadName=Thread-1 i=35

nosynchronized threadName=Thread-1 i=36

nosynchronized threadName=Thread-1 i=37

nosynchronized threadName=Thread-1 i=38

nosynchronized threadName=Thread-1 i=39

nosynchronized threadName=Thread-1 i=40

nosynchronized threadName=Thread-1 i=41

nosynchronized threadName=Thread-1 i=42

nosynchronized threadName=Thread-1 i=43

nosynchronized threadName=Thread-1 i=44

nosynchronized threadName=Thread-1 i=45

nosynchronized threadName=Thread-1 i=46

nosynchronized threadName=Thread-1 i=47

nosynchronized threadName=Thread-1 i=48

nosynchronized threadName=Thread-1 i=49

nosynchronized threadName=Thread-1 i=50

nosynchronized threadName=Thread-1 i=51

nosynchronized threadName=Thread-1 i=52

nosynchronized threadName=Thread-1 i=53

nosynchronized threadName=Thread-1 i=54

nosynchronized threadName=Thread-1 i=55

nosynchronized threadName=Thread-1 i=56

nosynchronized threadName=Thread-1 i=57

nosynchronized threadName=Thread-1 i=58

nosynchronized threadName=Thread-1 i=59

nosynchronized threadName=Thread-1 i=60

nosynchronized threadName=Thread-1 i=61

nosynchronized threadName=Thread-1 i=62

nosynchronized threadName=Thread-1 i=63

nosynchronized threadName=Thread-1 i=64

nosynchronized threadName=Thread-1 i=65

nosynchronized threadName=Thread-1 i=66

nosynchronized threadName=Thread-1 i=67

nosynchronized threadName=Thread-1 i=68

nosynchronized threadName=Thread-1 i=69

nosynchronized threadName=Thread-1 i=70

nosynchronized threadName=Thread-1 i=71

nosynchronized threadName=Thread-1 i=72

nosynchronized threadName=Thread-1 i=73

nosynchronized threadName=Thread-1 i=74

nosynchronized threadName=Thread-1 i=75

nosynchronized threadName=Thread-1 i=76

nosynchronized threadName=Thread-1 i=77

nosynchronized threadName=Thread-1 i=78

nosynchronized threadName=Thread-1 i=79

nosynchronized threadName=Thread-1 i=80

nosynchronized threadName=Thread-1 i=81

nosynchronized threadName=Thread-1 i=82

nosynchronized threadName=Thread-1 i=83

nosynchronized threadName=Thread-1 i=84

nosynchronized threadName=Thread-1 i=85

nosynchronized threadName=Thread-1 i=86

nosynchronized threadName=Thread-1 i=87

nosynchronized threadName=Thread-1 i=88

nosynchronized threadName=Thread-1 i=89

nosynchronized threadName=Thread-1 i=90

nosynchronized threadName=Thread-1 i=91

nosynchronized threadName=Thread-1 i=92

nosynchronized threadName=Thread-1 i=93

nosynchronized threadName=Thread-1 i=94

nosynchronized threadName=Thread-1 i=95

nosynchronized threadName=Thread-1 i=96

nosynchronized threadName=Thread-1 i=97

nosynchronized threadName=Thread-1 i=98

nosynchronized threadName=Thread-1 i=99

nosynchronized threadName=Thread-1 i=100

synchronized threadName=Thread-1 i=1

synchronized threadName=Thread-1 i=2

synchronized threadName=Thread-1 i=3

synchronized threadName=Thread-1 i=4

synchronized threadName=Thread-1 i=5

synchronized threadName=Thread-1 i=6

synchronized threadName=Thread-1 i=7

synchronized threadName=Thread-1 i=8

synchronized threadName=Thread-1 i=9

synchronized threadName=Thread-1 i=10

synchronized threadName=Thread-1 i=11

synchronized threadName=Thread-1 i=12

synchronized threadName=Thread-1 i=13

synchronized threadName=Thread-1 i=14

synchronized threadName=Thread-1 i=15

synchronized threadName=Thread-1 i=16

synchronized threadName=Thread-1 i=17

synchronized threadName=Thread-1 i=18

synchronized threadName=Thread-1 i=19

synchronized threadName=Thread-1 i=20

synchronized threadName=Thread-1 i=21

synchronized threadName=Thread-1 i=22

synchronized threadName=Thread-1 i=23

synchronized threadName=Thread-1 i=24

synchronized threadName=Thread-1 i=25

synchronized threadName=Thread-1 i=26

synchronized threadName=Thread-1 i=27

synchronized threadName=Thread-1 i=28

synchronized threadName=Thread-1 i=29

synchronized threadName=Thread-1 i=30

synchronized threadName=Thread-1 i=31

synchronized threadName=Thread-1 i=32

synchronized threadName=Thread-1 i=33

synchronized threadName=Thread-1 i=34

synchronized threadName=Thread-1 i=35

synchronized threadName=Thread-1 i=36

synchronized threadName=Thread-1 i=37

synchronized threadName=Thread-1 i=38

synchronized threadName=Thread-1 i=39

synchronized threadName=Thread-1 i=40

synchronized threadName=Thread-1 i=41

synchronized threadName=Thread-1 i=42

synchronized threadName=Thread-1 i=43

synchronized threadName=Thread-1 i=44

synchronized threadName=Thread-1 i=45

synchronized threadName=Thread-1 i=46

synchronized threadName=Thread-1 i=47

synchronized threadName=Thread-1 i=48

synchronized threadName=Thread-1 i=49

synchronized threadName=Thread-1 i=50

synchronized threadName=Thread-1 i=51

synchronized threadName=Thread-1 i=52

synchronized threadName=Thread-1 i=53

synchronized threadName=Thread-1 i=54

synchronized threadName=Thread-1 i=55

synchronized threadName=Thread-1 i=56

synchronized threadName=Thread-1 i=57

synchronized threadName=Thread-1 i=58

synchronized threadName=Thread-1 i=59

synchronized threadName=Thread-1 i=60

synchronized threadName=Thread-1 i=61

synchronized threadName=Thread-1 i=62

synchronized threadName=Thread-1 i=63

synchronized threadName=Thread-1 i=64

synchronized threadName=Thread-1 i=65

synchronized threadName=Thread-1 i=66

synchronized threadName=Thread-1 i=67

synchronized threadName=Thread-1 i=68

synchronized threadName=Thread-1 i=69

synchronized threadName=Thread-1 i=70

synchronized threadName=Thread-1 i=71

synchronized threadName=Thread-1 i=72

synchronized threadName=Thread-1 i=73

synchronized threadName=Thread-1 i=74

synchronized threadName=Thread-1 i=75

synchronized threadName=Thread-1 i=76

synchronized threadName=Thread-1 i=77

synchronized threadName=Thread-1 i=78

synchronized threadName=Thread-1 i=79

synchronized threadName=Thread-1 i=80

synchronized threadName=Thread-1 i=81

synchronized threadName=Thread-1 i=82

synchronized threadName=Thread-1 i=83

synchronized threadName=Thread-1 i=84

synchronized threadName=Thread-1 i=85

synchronized threadName=Thread-1 i=86

synchronized threadName=Thread-1 i=87

synchronized threadName=Thread-1 i=88

synchronized threadName=Thread-1 i=89

synchronized threadName=Thread-1 i=90

synchronized threadName=Thread-1 i=91

synchronized threadName=Thread-1 i=92

synchronized threadName=Thread-1 i=93

synchronized threadName=Thread-1 i=94

synchronized threadName=Thread-1 i=95

synchronized threadName=Thread-1 i=96

synchronized threadName=Thread-1 i=97

synchronized threadName=Thread-1 i=98

synchronized threadName=Thread-1 i=99

synchronized threadName=Thread-1 i=100

nosynchronized threadName=Thread-0 i=39

nosynchronized threadName=Thread-0 i=40

nosynchronized threadName=Thread-0 i=41

nosynchronized threadName=Thread-0 i=42

nosynchronized threadName=Thread-0 i=43

nosynchronized threadName=Thread-0 i=44

nosynchronized threadName=Thread-0 i=45

nosynchronized threadName=Thread-0 i=46

nosynchronized threadName=Thread-0 i=47

nosynchronized threadName=Thread-0 i=48

nosynchronized threadName=Thread-0 i=49

nosynchronized threadName=Thread-0 i=50

nosynchronized threadName=Thread-0 i=51

nosynchronized threadName=Thread-0 i=52

nosynchronized threadName=Thread-0 i=53

nosynchronized threadName=Thread-0 i=54

nosynchronized threadName=Thread-0 i=55

nosynchronized threadName=Thread-0 i=56

nosynchronized threadName=Thread-0 i=57

nosynchronized threadName=Thread-0 i=58

nosynchronized threadName=Thread-0 i=59

nosynchronized threadName=Thread-0 i=60

nosynchronized threadName=Thread-0 i=61

nosynchronized threadName=Thread-0 i=62

nosynchronized threadName=Thread-0 i=63

nosynchronized threadName=Thread-0 i=64

nosynchronized threadName=Thread-0 i=65

nosynchronized threadName=Thread-0 i=66

nosynchronized threadName=Thread-0 i=67

nosynchronized threadName=Thread-0 i=68

nosynchronized threadName=Thread-0 i=69

nosynchronized threadName=Thread-0 i=70

nosynchronized threadName=Thread-0 i=71

nosynchronized threadName=Thread-0 i=72

nosynchronized threadName=Thread-0 i=73

nosynchronized threadName=Thread-0 i=74

nosynchronized threadName=Thread-0 i=75

nosynchronized threadName=Thread-0 i=76

nosynchronized threadName=Thread-0 i=77

nosynchronized threadName=Thread-0 i=78

nosynchronized threadName=Thread-0 i=79

nosynchronized threadName=Thread-0 i=80

nosynchronized threadName=Thread-0 i=81

nosynchronized threadName=Thread-0 i=82

nosynchronized threadName=Thread-0 i=83

nosynchronized threadName=Thread-0 i=84

nosynchronized threadName=Thread-0 i=85

nosynchronized threadName=Thread-0 i=86

nosynchronized threadName=Thread-0 i=87

nosynchronized threadName=Thread-0 i=88

nosynchronized threadName=Thread-0 i=89

nosynchronized threadName=Thread-0 i=90

nosynchronized threadName=Thread-0 i=91

nosynchronized threadName=Thread-0 i=92

nosynchronized threadName=Thread-0 i=93

nosynchronized threadName=Thread-0 i=94

nosynchronized threadName=Thread-0 i=95

nosynchronized threadName=Thread-0 i=96

nosynchronized threadName=Thread-0 i=97

nosynchronized threadName=Thread-0 i=98

nosynchronized threadName=Thread-0 i=99

nosynchronized threadName=Thread-0 i=100

synchronized threadName=Thread-0 i=1

synchronized threadName=Thread-0 i=2

synchronized threadName=Thread-0 i=3

synchronized threadName=Thread-0 i=4

synchronized threadName=Thread-0 i=5

synchronized threadName=Thread-0 i=6

synchronized threadName=Thread-0 i=7

synchronized threadName=Thread-0 i=8

synchronized threadName=Thread-0 i=9

synchronized threadName=Thread-0 i=10

synchronized threadName=Thread-0 i=11

synchronized threadName=Thread-0 i=12

synchronized threadName=Thread-0 i=13

synchronized threadName=Thread-0 i=14

synchronized threadName=Thread-0 i=15

synchronized threadName=Thread-0 i=16

synchronized threadName=Thread-0 i=17

synchronized threadName=Thread-0 i=18

synchronized threadName=Thread-0 i=19

synchronized threadName=Thread-0 i=20

synchronized threadName=Thread-0 i=21

synchronized threadName=Thread-0 i=22

synchronized threadName=Thread-0 i=23

synchronized threadName=Thread-0 i=24

synchronized threadName=Thread-0 i=25

synchronized threadName=Thread-0 i=26

synchronized threadName=Thread-0 i=27

synchronized threadName=Thread-0 i=28

synchronized threadName=Thread-0 i=29

synchronized threadName=Thread-0 i=30

synchronized threadName=Thread-0 i=31

synchronized threadName=Thread-0 i=32

synchronized threadName=Thread-0 i=33

synchronized threadName=Thread-0 i=34

synchronized threadName=Thread-0 i=35

synchronized threadName=Thread-0 i=36

synchronized threadName=Thread-0 i=37

synchronized threadName=Thread-0 i=38

synchronized threadName=Thread-0 i=39

synchronized threadName=Thread-0 i=40

synchronized threadName=Thread-0 i=41

synchronized threadName=Thread-0 i=42

synchronized threadName=Thread-0 i=43

synchronized threadName=Thread-0 i=44

synchronized threadName=Thread-0 i=45

synchronized threadName=Thread-0 i=46

synchronized threadName=Thread-0 i=47

synchronized threadName=Thread-0 i=48

synchronized threadName=Thread-0 i=49

synchronized threadName=Thread-0 i=50

synchronized threadName=Thread-0 i=51

synchronized threadName=Thread-0 i=52

synchronized threadName=Thread-0 i=53

synchronized threadName=Thread-0 i=54

synchronized threadName=Thread-0 i=55

synchronized threadName=Thread-0 i=56

synchronized threadName=Thread-0 i=57

synchronized threadName=Thread-0 i=58

synchronized threadName=Thread-0 i=59

synchronized threadName=Thread-0 i=60

synchronized threadName=Thread-0 i=61

synchronized threadName=Thread-0 i=62

synchronized threadName=Thread-0 i=63

synchronized threadName=Thread-0 i=64

synchronized threadName=Thread-0 i=65

synchronized threadName=Thread-0 i=66

synchronized threadName=Thread-0 i=67

synchronized threadName=Thread-0 i=68

synchronized threadName=Thread-0 i=69

synchronized threadName=Thread-0 i=70

synchronized threadName=Thread-0 i=71

synchronized threadName=Thread-0 i=72

synchronized threadName=Thread-0 i=73

synchronized threadName=Thread-0 i=74

synchronized threadName=Thread-0 i=75

synchronized threadName=Thread-0 i=76

synchronized threadName=Thread-0 i=77

synchronized threadName=Thread-0 i=78

synchronized threadName=Thread-0 i=79

synchronized threadName=Thread-0 i=80

synchronized threadName=Thread-0 i=81

synchronized threadName=Thread-0 i=82

synchronized threadName=Thread-0 i=83

synchronized threadName=Thread-0 i=84

synchronized threadName=Thread-0 i=85

synchronized threadName=Thread-0 i=86

synchronized threadName=Thread-0 i=87

synchronized threadName=Thread-0 i=88

synchronized threadName=Thread-0 i=89

synchronized threadName=Thread-0 i=90

synchronized threadName=Thread-0 i=91

synchronized threadName=Thread-0 i=92

synchronized threadName=Thread-0 i=93

synchronized threadName=Thread-0 i=94

synchronized threadName=Thread-0 i=95

synchronized threadName=Thread-0 i=96

synchronized threadName=Thread-0 i=97

synchronized threadName=Thread-0 i=98

synchronized threadName=Thread-0 i=99

synchronized threadName=Thread-0 i=100
5.synchronized代码块间的同步性
在使用synchronized(this)代码块时需要注意的是,当一个线程访问object的一个synchronized(this)同步代码块时,其他线程对同一个object中所有其他synchronized(this)同步代码块的访问将被阻塞。
示例:从输出结果可以看出,线程A在访问object的同步代码块时,线程B只能等待线程A访问的代码块访问完成才可以继续访问object的对应的另一个同步代码块。
package service;

public class ObjectService {

    public void serviceMethodA() {

        try {

            synchronized (this) {

                System.out.println("A begin time=" + System.currentTimeMillis());

                Thread.sleep(2000);

                System.out.println("A end    end=" + System.currentTimeMillis());

            }

        } catch (InterruptedException e) {

            e.printStackTrace();

        }

    }

    public void serviceMethodB() {

        synchronized (this) {

            System.out.println("B begin time=" + System.currentTimeMillis());

            System.out.println("B end    end=" + System.currentTimeMillis());

        }

    }

}
package extthread;

import service.ObjectService;

public class ThreadA extends Thread {

    private ObjectService service;

    public ThreadA(ObjectService service) {

        super();

        this.service = service;

    }

    @Override

    public void run() {

        super.run();

        service.serviceMethodA();

    }

}
package test.run;

import service.ObjectService;

import extthread.ThreadA;

import extthread.ThreadB;

public class Run {

    public static void main(String[] args) {

        ObjectService service = new ObjectService();

        ThreadA a = new ThreadA(service);

        a.setName("a");

        a.start();

        ThreadB b = new ThreadB(service);

        b.setName("b");

        b.start();

    }

}
A begin time=1525335613278

A end    end=1525335615279

B begin time=1525335615279

B end    end=1525335615279
6.验证同步synchronized(this)代码块是锁定当前对象的
示例1:otherMethod方法不加关键字,线程1在运行100毫秒后线程2接着执行,即异步打印。
package mytask;

public class Task {

    public void otherMethod() {

        System.out.println("------------------------run--otherMethod");

    }

    public void doLongTimeTask() {

        synchronized (this) {

            for (int i = 0; i < 10000; i++) {

                System.out.println("synchronized threadName="+ Thread.currentThread().getName() + " i=" + (i + 1));

            }

        }

    }

}
package mythread;

import mytask.Task;

public class MyThread1 extends Thread {

    private Task task;

    public MyThread1(Task task) {

        super();

        this.task = task;

    }

    @Override

    public void run() {

        super.run();

        task.doLongTimeTask();

    }

}
package mythread;

import mytask.Task;

public class MyThread2 extends Thread {

    private Task task;

    public MyThread2(Task task) {

        super();

        this.task = task;

    }

    @Override

    public void run() {

        super.run();

        task.otherMethod();

    }

}
package test;

import mytask.Task;

import mythread.MyThread1;

import mythread.MyThread2;

public class Run {

    public static void main(String[] args) throws InterruptedException {

        Task task = new Task();

        MyThread1 thread1 = new MyThread1(task);

        thread1.start();

        Thread.sleep(100);

        MyThread2 thread2 = new MyThread2(task);

        thread2.start();

    }

}
synchronized threadName=Thread-0 i=8216

synchronized threadName=Thread-0 i=8217

synchronized threadName=Thread-0 i=8218

synchronized threadName=Thread-0 i=8219

synchronized threadName=Thread-0 i=8220

synchronized threadName=Thread-0 i=8221

------------------------run--otherMethod

synchronized threadName=Thread-0 i=8222

synchronized threadName=Thread-0 i=8223

synchronized threadName=Thread-0 i=8224

synchronized threadName=Thread-0 i=8225

synchronized threadName=Thread-0 i=8226
示例2:otherMethod方法加关键字,线程2等待线程1执行完成后才执行,即同步打印。
synchronized threadName=Thread-0 i=9992

synchronized threadName=Thread-0 i=9993

synchronized threadName=Thread-0 i=9994

synchronized threadName=Thread-0 i=9995

synchronized threadName=Thread-0 i=9996

synchronized threadName=Thread-0 i=9997

synchronized threadName=Thread-0 i=9998

synchronized threadName=Thread-0 i=9999

synchronized threadName=Thread-0 i=10000

------------------------run--otherMethod
7.将任意对象作为监视器
多个线程调用同一个对象中的不同名称的synchronized同步方法或者synchronized(this)同步代码块时,调用的效果就是按顺序执行,也就是同步的、阻塞的。
这说明synchronized同步方法或者synchronized(this)同步代码块分别有两种作用。
(1)synchronized同步方法
①对其他synchronized同步方法或者synchronized(this)同步代码块调用呈阻塞状态。
②同一时间只有一个线程可以执行synchronized同步方法中的代码。
(2)synchronized(this)同步代码块
①对其他synchronized同步方法或者synchronized(this)同步代码块调用呈阻塞状态。
②同一时间只有一个线程可以执行synchronized(this)同步代码块中的代码。
(3)synchronized(非this对象)同步代码块
①在多个线程持有“对象监视器”为同一个对象的前提下,同一时间只有一个线程可以执行synchronized(非this对象 x)同步代码块中的代码。
②当持有“对象监视器”为同一个对象的前提下,同一时间只有一个线程可以执行synchronized(非this对象 x)同步代码块中的代码。
示例1:Service类中的anyString字段在setUsernamePassword方法外部声明。线程A和线程B在构造函数中都引入了同一个对象anyString。锁定anyString对象具有一定的优点:如果在一个类中有很多个synchronized方法,这是虽然能实现同步,但会受到阻塞,所以影响运行效率;但如果使用同步代码块非锁this对象,则synchronized(非this)代码块中的程序与同步方法是异步的,不予其他锁this同步方法争抢this锁,则可以大大提高运行效率。
package service;

public class Service {

    private String usernameParam;

    private String passwordParam;

    private String anyString = new String();

    public void setUsernamePassword(String username, String password) {

        try {

            //String anyString = new String();

            synchronized (anyString) {

                System.out.println("线程名称为:" + Thread.currentThread().getName()+ "在" + System.currentTimeMillis() + "进入同步块");

                usernameParam = username;

                Thread.sleep(3000);

                passwordParam = password;

                System.out.println("线程名称为:" + Thread.currentThread().getName()+ "在" + System.currentTimeMillis() + "离开同步块");

            }

        } catch (InterruptedException e) {

            e.printStackTrace();

        }

    }

}
package extthread;

import service.Service;

public class ThreadA extends Thread {

    private Service service;

    public ThreadA(Service service) {

        super();

        this.service = service;

    }

    @Override

    public void run() {

        service.setUsernamePassword("a", "aa");

    }

}
package extthread;

import service.Service;

public class ThreadB extends Thread {

    private Service service;

    public ThreadB(Service service) {

        super();

        this.service = service;

    }

    @Override

    public void run() {

        service.setUsernamePassword("b", "bb");

    }

}
package test;

import service.Service;

import extthread.ThreadA;

import extthread.ThreadB;

public class Run {

    public static void main(String[] args) {

        Service service = new Service();

        ThreadA a = new ThreadA(service);

        a.setName("A");

        a.start();

        ThreadB b = new ThreadB(service);

        b.setName("B");

        b.start();

    }

}
线程名称为:A在1525339161012进入同步块

线程名称为:A在1525339164012离开同步块

线程名称为:B在1525339164012进入同步块

线程名称为:B在1525339167013离开同步块
示例2:Service类中的anyString字段在setUsernamePassword方法外部声明。线程A和线程B在调用setUsernamePassword方法时会分别生成两个不同的对象。由输出结果可以看出,使用synchronized(非this对象x)同步代码块格式进行同步操作时,对象监视器必须是同一个对象。如果不是同一个对象监视器,运行的结果就是异步调用了,就会交叉运行。
package service;

public class Service {

    private String usernameParam;

    private String passwordParam;

    //private String anyString = new String();

    public void setUsernamePassword(String username, String password) {

        try {

            String anyString = new String();

            synchronized (anyString) {

                System.out.println("线程名称为:" + Thread.currentThread().getName()+ "在" + System.currentTimeMillis() + "进入同步块");

                usernameParam = username;

                Thread.sleep(3000);

                passwordParam = password;

                System.out.println("线程名称为:" + Thread.currentThread().getName()+ "在" + System.currentTimeMillis() + "离开同步块");

            }

        } catch (InterruptedException e) {

            e.printStackTrace();

        }

    }

}
线程名称为:A在1525339564398进入同步块

线程名称为:B在1525339564398进入同步块

线程名称为:A在1525339567399离开同步块

线程名称为:B在1525339567399离开同步块
示例3:从输出结果可以看出,synchronized(非this对象)与同步synchronized方法时异步调用的。由于对象监视器不同,所以运行结果就是异步的。
package service;

public class Service {

    private String anyString = new String();

    public void a() {

        try {

            synchronized (anyString) {

                System.out.println("a begin");

                Thread.sleep(3000);

                System.out.println("a   end");

            }

        } catch (InterruptedException e) {

            e.printStackTrace();

        }

    }

    synchronized public void b() {

        System.out.println("b begin");

        System.out.println("b   end");

    }

}
package test;

import service.Service;

import extthread.ThreadA;

import extthread.ThreadB;

public class Run {

    public static void main(String[] args) {

        Service service = new Service();

        ThreadA a = new ThreadA(service);

        a.setName("A");

        a.start();

        ThreadB b = new ThreadB(service);

        b.setName("B");

        b.start();

    }

}
a begin

b begin

b   end

a   end
示例4:同步代码块放在非同步synchronized方法中进行声明,并不能保证方法的线程的执行同步/顺序性,也就是线程调用方法的顺序是无序的,虽然在同步块中执行的顺序是同步的,这样极易 出现“脏读”问题。验证多个线程调用同一个方法是随机的。从输出结果也可以看出,同步代码块中的代码是同步打印的,当前线程的“执行”与“退出”是成对出现的。但线程A和线程B的执行确实异步的,这就有可能出现脏读的环境。由于线程执行方法的顺序不确定,所以当A和B两个线程执行带有分支判断的方法时,就会出现逻辑上的错误,有可能出现脏读。
package mylist;

import java.util.ArrayList;

import java.util.List;

public class MyList {

    private List<String> list = new ArrayList<String>();

    synchronized public void add(String username) {

        System.out.println("ThreadName=" + Thread.currentThread().getName()+ "执行了add方法!");

        list.add(username);

        System.out.println("ThreadName=" + Thread.currentThread().getName()+ "退出了add方法!");

    }

    synchronized public int getSize() {

        System.out.println("ThreadName=" + Thread.currentThread().getName()+ "ִ执行了getSize方法!");

        int sizeValue = list.size();

        System.out.println("ThreadName=" + Thread.currentThread().getName()+ "执行了getSize方法!");

        return sizeValue;

    }

}
package extthread;

import mylist.MyList;

public class MyThreadA extends Thread {

    private MyList list;

    public MyThreadA(MyList list) {

        super();

        this.list = list;

    }

    @Override

    public void run() {

        for (int i = 0; i < 100000; i++) {

            list.add("threadA" + (i + 1));

        }

    }

}
package extthread;

import mylist.MyList;

public class MyThreadB extends Thread {

    private MyList list;

    public MyThreadB(MyList list) {

        super();

        this.list = list;

    }

    @Override

    public void run() {

        for (int i = 0; i < 100000; i++) {

            list.add("threadB" + (i + 1));

        }

    }

}
package test;

import mylist.MyList;

import extthread.MyThreadA;

import extthread.MyThreadB;

public class Test {

    public static void main(String[] args) {

        MyList mylist = new MyList();

        MyThreadA a = new MyThreadA(mylist);

        a.setName("A");

        a.start();

        MyThreadB b = new MyThreadB(mylist);

        b.setName("B");

        b.start();

    }

}
ThreadName=A执行了add方法!

ThreadName=A退出了add方法!

ThreadName=B执行了add方法!

ThreadName=B退出了add方法!

ThreadName=A执行了add方法!

ThreadName=A退出了add方法!

ThreadName=B执行了add方法!

ThreadName=B退出了add方法!

ThreadName=B执行了add方法!

ThreadName=B退出了add方法!

ThreadName=A执行了add方法!

ThreadName=A退出了add方法!
...
示例5:业务类Service类的addServiceMethod方法未加synchronized(非this)同步代码块,由于两个线程共同对同一个list对象进行处理,未进行同步时,就会同时对list对象进行处理,两个线程都判断getSize<1,所以两个线程都执行了add方法,结果就是2。
package mylist;

import java.util.ArrayList;

import java.util.List;

public class MyOneList {

    private List<String> list = new ArrayList<String>();

    synchronized public void add(String data) {

        list.add(data);

            };

    synchronized public int getSize() {

        return list.size();

            };

}
package mythread;

import mylist.MyOneList;

import service.MyService;

public class MyThread1 extends Thread {

    private MyOneList list;

    public MyThread1(MyOneList list) {

        super();

        this.list = list;

    }

    @Override

    public void run() {

        MyService msRef = new MyService();

        msRef.addServiceMethod(list, "A");

    }

}
package mythread;

import service.MyService;

import mylist.MyOneList;

public class MyThread2 extends Thread {

    private MyOneList list;

    public MyThread2(MyOneList list) {

        super();

        this.list = list;

    }

    @Override

    public void run() {

        MyService msRef = new MyService();

        msRef.addServiceMethod(list, "B");

    }

}
package service;

import mylist.MyOneList;

public class MyService {

    public MyOneList addServiceMethod(MyOneList list, String data) {

        try {if (list.getSize() < 1) {

                    Thread.sleep(2000);

                    list.add(data);

                }

        } catch (InterruptedException e) {

            e.printStackTrace();

        }

        return list;

    }

}
package test;

import mylist.MyOneList;

import mythread.MyThread1;

import mythread.MyThread2;

public class Run {

    public static void main(String[] args) throws InterruptedException {

        MyOneList list = new MyOneList();

        MyThread1 thread1 = new MyThread1(list);

        thread1.setName("A");

        thread1.start();

        MyThread2 thread2 = new MyThread2(list);

        thread2.setName("B");

        thread2.start();

        Thread.sleep(6000);

        System.out.println("listSize=" + list.getSize());

    }

}
listSize=2
示例6:业务类Service类的addServiceMethod方法加synchronized(list)同步代码块,由于list参数对象在项目中是一份实例,是单例的,而且也正需要对list参数的getSize()方法做同步的调用,所以就对list参数进行了同步处理,这里说明了同步代码块的位置。
package service;

import mylist.MyOneList;

public class MyService {

    public MyOneList addServiceMethod(MyOneList list, String data) {

        try {

            synchronized (list) {

                if (list.getSize() < 1) {

                    Thread.sleep(2000);  //模拟从远程花费2秒取回数据

                    list.add(data);

                }

            }

        } catch (InterruptedException e) {

            e.printStackTrace();

        }

        return list;

    }

}
listSize=1
8.细化验证3个结论
synchronized(非this对象 x)将x对象本身作为“对象监视器”,这样就可以得出以下三个结论:
(1)当多个线程同时执行synchronized(非this对象 x)同步代码块时呈同步效果。
(2)当其他线程执行x对象中的synchronized同步方法时呈同步效果
(3)当其他线程执行x对象方法里面的synchronized(this)同步代码块时也呈同步效果。
但需要注意:如果其他线程调用不加synchronized关键字的方法时,还是异步调用。
示例1:验证当多个线程同时执行synchronized(非this对象 x)同步代码块时呈同步效果。
package test1.extobject;

public class MyObject {

}
package test1.service;

import test1.extobject.MyObject;

public class Service {

    public void testMethod1(MyObject object) {

        synchronized (object) {

            try {

                System.out.println("testMethod1 ____getLock time="+ System.currentTimeMillis()

                                 + " run ThreadName="+ Thread.currentThread().getName());

                Thread.sleep(2000);

                System.out.println("testMethod1 releaseLock time="+ System.currentTimeMillis()

                                 + " run ThreadName="+ Thread.currentThread().getName());

            } catch (InterruptedException e) {

                e.printStackTrace();

            }

        }

    }

}
package test1.extthread;

import test1.extobject.MyObject;

import test1.service.Service;

public class ThreadA extends Thread {

    private Service service;

    private MyObject object;

    public ThreadA(Service service, MyObject object) {

        super();

        this.service = service;

        this.object = object;

    }

    @Override

    public void run() {

        super.run();

        service.testMethod1(object);

    }

}
package test1.extthread;

import test1.extobject.MyObject;

import test1.service.Service;

public class ThreadB extends Thread {

    private Service service;

    private MyObject object;

    public ThreadB(Service service, MyObject object) {

        super();

        this.service = service;

        this.object = object;

    }

    @Override

    public void run() {

        super.run();

        service.testMethod1(object);

    }

}
示例1.1:线程A和线程B共同处理一个object对象,同时执行同步代码块中的对象呈现同步调用。
package test1.run;

import test1.extobject.MyObject;

import test1.extthread.ThreadA;

import test1.extthread.ThreadB;

import test1.service.Service;

public class Run1_1 {

    public static void main(String[] args) {

        Service service = new Service();

        MyObject object = new MyObject();

        ThreadA a = new ThreadA(service, object);

        a.setName("a");

        a.start();

        ThreadB b = new ThreadB(service, object);

        b.setName("b");

        b.start();

    }

}
testMethod1 ____getLock time=1525352109272 run ThreadName=a

testMethod1 releaseLock time=1525352111272 run ThreadName=a

testMethod1 ____getLock time=1525352111272 run ThreadName=b

testMethod1 releaseLock time=1525352113273 run ThreadName=b
示例1.2:线程A和线程B分别使用不同的“对象监视器”,即分别对两个不同的object对象进行操作,就会出现异步的情况。
package test1.run;

import test1.extobject.MyObject;

import test1.extthread.ThreadA;

import test1.extthread.ThreadB;

import test1.service.Service;

public class Run1_2 {

    public static void main(String[] args) {

        Service service = new Service();

        MyObject object1 = new MyObject();

        MyObject object2 = new MyObject();

        ThreadA a = new ThreadA(service, object1);

        a.setName("a");

        a.start();

        ThreadB b = new ThreadB(service, object2);

        b.setName("b");

        b.start();

    }

}
testMethod1 ____getLock time=1525352259718 run ThreadName=b

testMethod1 ____getLock time=1525352259718 run ThreadName=a

testMethod1 releaseLock time=1525352261718 run ThreadName=b

testMethod1 releaseLock time=1525352261718 run ThreadName=a
示例2:验证当其他线程执行x对象中的synchronized同步方法时呈同步效果,线程B执行object对象中的同步方法时呈同步效果。
package test2.extobject;

public class MyObject {

    synchronized public void speedPrintString() {

        System.out.println("speedPrintString ____getLock time="+ System.currentTimeMillis()

                         + " run ThreadName="+ Thread.currentThread().getName());

        System.out.println("-----------------");

        System.out.println("speedPrintString releaseLock time="+ System.currentTimeMillis()

                         + " run ThreadName="+ Thread.currentThread().getName());

    }

}
import test2.extobject.MyObject;

public class Service {

    public void testMethod1(MyObject object) {

        synchronized (object) {

            try {

                System.out.println("testMethod1 ____getLock time="+ System.currentTimeMillis()

                                 + " run ThreadName="+ Thread.currentThread().getName());

                Thread.sleep(5000);

                System.out.println("testMethod1 releaseLock time="+ System.currentTimeMillis()

                                 + " run ThreadName="+ Thread.currentThread().getName());

            } catch (InterruptedException e) {

                e.printStackTrace();

            }

        }

    }

}
package test2.extthread;

import test2.extobject.MyObject;

import test2.service.Service;

public class ThreadA extends Thread {

    private Service service;

    private MyObject object;

    public ThreadA(Service service, MyObject object) {

        super();

        this.service = service;

        this.object = object;

    }

    @Override

    public void run() {

        super.run();

        service.testMethod1(object);

    }

}
package test2.extthread;

import test2.extobject.MyObject;

public class ThreadB extends Thread {

    private MyObject object;

    public ThreadB(MyObject object) {

        super();

        this.object = object;

    }

    @Override

    public void run() {

        super.run();

        object.speedPrintString();

    }

}
package test2.run;

import test2.extobject.MyObject;

import test2.extthread.ThreadA;

import test2.extthread.ThreadB;

import test2.service.Service;

public class Run {

    public static void main(String[] args) throws InterruptedException {

        Service service = new Service();

        MyObject object = new MyObject();

        ThreadA a = new ThreadA(service, object);

        a.setName("a");

        a.start();

        Thread.sleep(100);

        ThreadB b = new ThreadB(object);

        b.setName("b");

        b.start();

    }

}
testMethod1 ____getLock time=1525352713297 run ThreadName=a

testMethod1 releaseLock time=1525352718297 run ThreadName=a

speedPrintString ____getLock time=1525352718297 run ThreadName=b

-----------------

speedPrintString releaseLock time=1525352718297 run ThreadName=b
示例3:验证当其他线程执行x对象方法里面的synchronized(this)同步代码块时也呈同步效果。修改示例2中的MyObject类,其他不变。从输出结果来看,线程B执行object对象方法中的synchronized(this)同步代码块时也呈同步效果。
package test2.extobject;

public class MyObject {

    public void speedPrintString() {

        synchronized(this) {

            System.out.println("speedPrintString ____getLock time="+ System.currentTimeMillis()

                            + " run ThreadName="+ Thread.currentThread().getName());

            System.out.println("-----------------");

            System.out.println("speedPrintString releaseLock time="+ System.currentTimeMillis()

                            + " run ThreadName="+ Thread.currentThread().getName());

        }

    }

}
testMethod1 ____getLock time=1525353460512 run ThreadName=a

testMethod1 releaseLock time=1525353465513 run ThreadName=a

speedPrintString ____getLock time=1525353465513 run ThreadName=b

-----------------

speedPrintString releaseLock time=1525353465513 run ThreadName=b
9.静态同步synchronized与synchronized(this)代码块
关键字synchronized还可以应用在static静态方法上,这样写,是对当前的*.java文件对应的Class类进行持锁。
示例1:从输出结果来看,还是同步的效果。但是,synchronized关键字加到static静态方法上是给Class类上锁,而synchronized关键字加到非static静态方法上是给对象上锁。
package service;

public class Service {

    synchronized public static void printA() {

        try {

            System.out.println("线程名称为" + Thread.currentThread().getName()+ "在" + System.currentTimeMillis() + "进入printA");

            Thread.sleep(3000);

            System.out.println("线程名称为" + Thread.currentThread().getName()+ "在" + System.currentTimeMillis() + "离开printA");

        } catch (InterruptedException e) {

            e.printStackTrace();

        }

    }

    synchronized public static void printB() {

        System.out.println("线程名称为" + Thread.currentThread().getName() + "在"+ System.currentTimeMillis() + "进入printB");

        System.out.println("线程名称为" + Thread.currentThread().getName() + "在"+ System.currentTimeMillis() + "离开printB");

    }

}
package extthread;

import service.Service;

public class ThreadA extends Thread {

    @Override

    public void run() {

        Service.printA();

    }

}
package extthread;

import service.Service;

public class ThreadB extends Thread {

    @Override

    public void run() {

        Service.printB();

    }

}
package test;

import extthread.ThreadA;

import extthread.ThreadB;

public class Run {

    public static void main(String[] args) {

        ThreadA a = new ThreadA();

        a.setName("A");

        a.start();

        ThreadB b = new ThreadB();

        b.setName("B");

        b.start();

    }

}
线程名称为A在1525393711028进入printA

线程名称为A在1525393714029离开printA

线程名称为B在1525393714029进入printB

线程名称为B在1525393714029离开printB
示例2:为了验证不是同一个锁。添加非静态方法printC。从输出结果可以看出,出现了异步的情况,原因是持有不同的锁,一个是对象锁,一个是Class锁,而Class锁可以对类的所有对象实例起作用。
package service;

public class Service {

    synchronized public static void printA() {

        try {

            System.out.println("线程名称为" + Thread.currentThread().getName() + "在"+ System.currentTimeMillis() + "进入printA");

            Thread.sleep(3000);

            System.out.println("线程名称为" + Thread.currentThread().getName() + "在"+ System.currentTimeMillis() + "离开printA");

        } catch (InterruptedException e) {

            e.printStackTrace();

        }

    }

    synchronized public static void printB() {

        System.out.println("线程名称为" + Thread.currentThread().getName() + "在"+ System.currentTimeMillis() + "进入printB");

        System.out.println("线程名称为" + Thread.currentThread().getName() + "在"+ System.currentTimeMillis() + "离开printB");

    }

    synchronized public void printC() {

        System.out.println("线程名称为" + Thread.currentThread().getName() + "在"+ System.currentTimeMillis() + "进入printC");

        System.out.println("线程名称为" + Thread.currentThread().getName() + "在"+ System.currentTimeMillis() + "离开printC");

    }

}
线程名称为C在1525394013882进入printC

线程名称为A在1525394013882进入printA

线程名称为C在1525394013882离开printC

线程名称为A在1525394016882离开printA

线程名称为B在1525394016882进入printB

线程名称为B在1525394016882离开printB
示例3:修改main方法,使两个线程分别执行两个不同的对象,由于Class类的所有对象实例起作用,所以即使是同一个Class产生的不同实例,也都是同步的效果。
package test;

import service.Service;

import extthread.ThreadA;

import extthread.ThreadB;

public class Run {

    public static void main(String[] args) {

        Service service1 = new Service();

        Service service2 = new Service();

        ThreadA a = new ThreadA(service1);

        a.setName("A");

        a.start();

        ThreadB b = new ThreadB(service2);

        b.setName("B");

        b.start();

    }

}
线程名称为A在1525394347966进入printA

线程名称为A在1525394350966离开printA

线程名称为B在1525394350966进入printB

线程名称为B在1525394350966离开printB
示例4:同步synchronized(this)代码块的作用其实是和synchronized static方法的作用一样。
package service;

public class Service {

    synchronized public static void printA() {

        synchronized(Service.class) {

            try {

                System.out.println("线程名称为" + Thread.currentThread().getName() + "在"+ System.currentTimeMillis() + "进入printA");

                Thread.sleep(3000);

                System.out.println("线程名称为" + Thread.currentThread().getName() + "在"+ System.currentTimeMillis() + "离开printA");

            } catch (InterruptedException e) {

                e.printStackTrace();

            }

        }

    }

    synchronized public static void printB() {

        synchronized(Service.class) {

            System.out.println("线程名称为" + Thread.currentThread().getName() + "在"+ System.currentTimeMillis() + "进入printB");

            System.out.println("线程名称为" + Thread.currentThread().getName() + "在"+ System.currentTimeMillis() + "离开printB");

        }

    }

}
package test;

import service.Service;

import extthread.ThreadA;

import extthread.ThreadB;

public class Run {

    public static void main(String[] args) {

        Service service1 = new Service();

        Service service2 = new Service();

        ThreadA a = new ThreadA(service1);

        a.setName("A");

        a.start();

        ThreadB b = new ThreadB(service2);

        b.setName("B");

        b.start();

    }

}
线程名称为A在1525394594986进入printA

线程名称为A在1525394597987离开printA

线程名称为B在1525394597987进入printB

线程名称为B在1525394597987离开printB
10.数据类型String的常量池特性
将synchronized(string)同步块与String联合使用时,要注意由于常量池缓存带来的一些意外情况。
示例1:常量池缓存验证
package test;

public class Test {

    public static void main(String[] args) {

        String a = "a";

        String b = "a";

        System.out.println(a == b);

    }

}
true
示例2:由于两个线程的run方法中传递进去的String值都是AA,由于缓存的存在,并且两个线程持有相同的锁,所以造成线程B不能执行。如果将线程B传递参数换成BB,那么两个线程就可以正常交替执行。
package service;

public class Service {

    public static void print(String stringParam) {

        try {

            synchronized (stringParam) {

                while (true) {

                    System.out.println(Thread.currentThread().getName());

                    Thread.sleep(1000);

                }

            }

        } catch (InterruptedException e) {

            e.printStackTrace();

        }

    }

}
package extthread;

import service.Service;

public class ThreadA extends Thread {

    private Service service;

    public ThreadA(Service service) {

        super();

        this.service = service;

    }

    @Override

    public void run() {

        service.print("AA");

    }

}
package extthread;

import service.Service;

public class ThreadB extends Thread {

    private Service service;

    public ThreadB(Service service) {

        super();

        this.service = service;

    }

    @Override

    public void run() {

        service.print("AA");

    }

}
package test;

import service.Service;

import extthread.ThreadA;

import extthread.ThreadB;

public class Run {

    public static void main(String[] args) {

        Service service = new Service();

        ThreadA a = new ThreadA(service);

        a.setName("A");

        a.start();

        ThreadB b = new ThreadB(service);

        b.setName("B");

        b.start();

    }

}
A

A

A

A

A

A

A

A

A

A

...
示例3:大多数情况下,同步synchronized代码块都不使用String作为锁对象,而改用其他,比如new Object()实例化一个Object对象,但它并不放入缓存中。从输出结果可以看出,A和B交替打印,说明持有的锁不是一个。
package service;

public class Service {

    public static void print(Object object) {

        try {

            synchronized (object) {

                while (true) {

                    System.out.println(Thread.currentThread().getName());

                    Thread.sleep(1000);

                }

            }

        } catch (InterruptedException e) {

            e.printStackTrace();

        }

    }

}
package extthread;

import service.Service;

public class ThreadA extends Thread {

    private Service service;

    public ThreadA(Service service) {

        super();

        this.service = service;

    }

    @Override

    public void run() {

        service.print(new Object());

    }

}
package extthread;

import service.Service;

public class ThreadB extends Thread {

    private Service service;

    public ThreadB(Service service) {

        super();

        this.service = service;

    }

    @Override

    public void run() {

        service.print(new Object());

    }

}
A

B

A

B

A

B

A

B

A

B

...
11.同步synchronized方法无限等待与解决
示例1:线程B永远得不到运行的机会,锁死了,而且线程A永远不会结束。
package service;

public class Service {

    synchronized public void methodA() {

        System.out.println("methodA begin");

        boolean isContinueRun = true;

        while (isContinueRun) {

            }

        System.out.println("methodA end");

    }

    synchronized public void methodB() {

        System.out.println("methodB begin");

        System.out.println("methodB end");

    }

}
package test.run;

import service.Service;

import extthread.ThreadA;

import extthread.ThreadB;

public class Run {

    public static void main(String[] args) {

        Service service = new Service();

        ThreadA athread = new ThreadA(service);

        athread.start();

        ThreadB bthread = new ThreadB(service);

        bthread.start();

    }

}
methodA begin
示例2:解决同步锁死问题。分别对两个不同的object对象实例进行锁定,可以解决同步锁死问题。
package service;

public class Service {

    Object object1 = new Object();

    Object object2 = new Object();

    public void methodA() {

        synchronized (object1) {

            System.out.println("methodA begin");

            boolean isContinueRun = true;

            while (isContinueRun) {

                }

            System.out.println("methodA end");

        }

    }

    public void methodB() {

        synchronized (object2) {

            System.out.println("methodB begin");

            System.out.println("methodB end");

        }

    }

}
methodA begin

methodB begin

methodB end
12.多线程的死锁
Java线程死锁是一个经典的多线程问题,因为不同的线程都在等待根本不可能被释放的锁,从而导致所有的任务都无法继续完成。在多线程技术中心,“死锁”是必须避免的,因为这会造成线程的“假死”。
示例1:从输出结果可以看出,两个线程都执行到前一部分然后被锁住。这是因为双方互相持有对方的锁,这里是通过嵌套的代码结构实现死锁的。
package test;

public class DealThread implements Runnable {

    public String username;

    public Object lock1 = new Object();

    public Object lock2 = new Object();

    public void setFlag(String username) {

        this.username = username;

    }

    @Override

    public void run() {

        if (username.equals("a")) {

            synchronized (lock1) {

                try {

                    System.out.println("username = " + username);

                    Thread.sleep(3000);

                } catch (InterruptedException e) {

                    e.printStackTrace();

                }

                synchronized (lock2) {

                    System.out.println("按lock1->lock2代码顺序执行了");

                }

            }

        }

        if (username.equals("b")) {

            synchronized (lock2) {

                try {

                    System.out.println("username = " + username);

                    Thread.sleep(3000);

                } catch (InterruptedException e) {

                    e.printStackTrace();

                }

                synchronized (lock1) {

                    System.out.println("按lock2->lock1代码顺序执行了");

                }

            }

        }

    }

}
package test;

public class Run {

    public static void main(String[] args) {

        try {

            DealThread t1 = new DealThread();

            t1.setFlag("a");

            Thread thread1 = new Thread(t1);

            thread1.start();

            Thread.sleep(100);

            t1.setFlag("b");

            Thread thread2 = new Thread(t1);

            thread2.start();

        } catch (InterruptedException e) {

            e.printStackTrace();

        }

    }

}
username = a

username = b
示例2:可以使用JDK自带的工具来监测是否有死锁现象。
从CMD进入JDK目录下的bin文件夹下

jps

jstack -l id(of run)
Found one Java-level deadlock:

=============================

"Thread-1":

  waiting to lock monitor 0x00000000048b95a8 (object 0x00000000d5fea6d8, a java.lang.Object),

  which is held by "Thread-0"

"Thread-0":

  waiting to lock monitor 0x00000000048b6d18 (object 0x00000000d5fea6e8, a java.lang.Object),

  which is held by "Thread-1"

Java stack information for the threads listed above:

===================================================

"Thread-1":

        at test.DealThread.run(DealThread.java:37)

        - waiting to lock <0x00000000d5fea6d8> (a java.lang.Object)

        - locked <0x00000000d5fea6e8> (a java.lang.Object)

        at java.lang.Thread.run(Unknown Source)

"Thread-0":

        at test.DealThread.run(DealThread.java:24)

        - waiting to lock <0x00000000d5fea6e8> (a java.lang.Object)

        - locked <0x00000000d5fea6d8> (a java.lang.Object)

        at java.lang.Thread.run(Unknown Source)

Found 1 deadlock.
13.内置类与静态内置类
示例1:内置类,必须通过PrivateClass privateClass = publicClass.new PrivateClass();来进行实例化。
package test;

public class PublicClass {

    private String username;

    private String password;

    class PrivateClass {

        private String age;

        private String address;

        public String getAge() {

            return age;

            }

        public void setAge(String age) {

            this.age = age;

            }

        public String getAddress() {

            return address;

            }

        public void setAddress(String address) {

            this.address = address;

            }

        public void printPublicProperty() {

            System.out.println(username + " " + password);

            }

        }

    public String getUsername() {

        return username;

        }

    public void setUsername(String username) {

        this.username = username;

        }

    public String getPassword() {

        return password;

        }

    public void setPassword(String password) {

        this.password = password;

        }

}
package test;

import test.PublicClass.PrivateClass;

public class Run {

    public static void main(String[] args) {

        PublicClass publicClass = new PublicClass();

        publicClass.setUsername("usernameValue");

        publicClass.setPassword("passwordValue");

        System.out.println(publicClass.getUsername() + " "+ publicClass.getPassword());

        PrivateClass privateClass = publicClass.new PrivateClass();

        privateClass.setAge("ageValue");

        privateClass.setAddress("addressValue");

        System.out.println(privateClass.getAge() + " "+ privateClass.getAddress());

    }

}
usernameValue passwordValue

ageValue addressValue
示例2:静态内置类,只需要PrivateClass privateClass = new PrivateClass();正常实例化就可以了。
package test;

public class PublicClass {

    static private String username;

    static private String password;

    static class PrivateClass {

        private String age;

        private String address;

        public String getAge() {

            return age;

        }

        public void setAge(String age) {

            this.age = age;

        }

        public String getAddress() {

            return address;

        }

        public void setAddress(String address) {

            this.address = address;

        }

        public void printPublicProperty() {

            System.out.println(username + " " + password);

        }

    }

    public String getUsername() {

        return username;

    }

    public void setUsername(String username) {

        this.username = username;

    }

    public String getPassword() {

        return password;

    }

    public void setPassword(String password) {

        this.password = password;

    }

}
package test;

import test.PublicClass.PrivateClass;

public class Run {

    public static void main(String[] args) {

        PublicClass publicClass = new PublicClass();

        publicClass.setUsername("usernameValue");

        publicClass.setPassword("passwordValue");

        System.out.println(publicClass.getUsername() + " "+ publicClass.getPassword());

        PrivateClass privateClass = new PrivateClass();

        privateClass.setAge("ageValue");

        privateClass.setAddress("addressValue");

        System.out.println(privateClass.getAge() + " "+ privateClass.getAddress());

    }

}
usernameValue passwordValue

ageValue addressValue
14.内置类与同步:实验1
示例:内置类中有两个同步方法,但使用的却是不同的锁即持有不同的“对象监视器”,打印的结果也是异步的。
package test;

public class OutClass {

    static class InnerClass {

        public void method1() {

            synchronized ("其他的锁") {

                for (int i = 1; i <= 10; i++) {

                    System.out.println(Thread.currentThread().getName() + " i="

                            + i);

                    try {

                        Thread.sleep(100);

                    } catch (InterruptedException e) {

                    }

                }

            }

        }

        public synchronized void method2() {

            for (int i = 11; i <= 20; i++) {

                System.out

                        .println(Thread.currentThread().getName() + " i=" + i);

                try {

                    Thread.sleep(100);

                } catch (InterruptedException e) {

                }

            }

        }

    }

}
package test;

import test.OutClass.InnerClass;;

public class Run {

    public static void main(String[] args) {

        final InnerClass inner = new InnerClass();

        Thread t1 = new Thread(new Runnable() {

            public void run() {

                inner.method1();

            }

        }, "A");

        Thread t2 = new Thread(new Runnable() {

            public void run() {

                inner.method2();

            }

        }, "B");

        t1.start();

        t2.start();

    }

}
A i=1

B i=11

B i=12

A i=2

A i=3

B i=13

B i=14

A i=4

B i=15

A i=5

A i=6

B i=16

B i=17

A i=7

A i=8

B i=18

A i=9

B i=19

A i=10

B i=20
15.内置类与同步:实验2
示例:InnerClass1内部类有两个方法,InnerClass2内部类有一个方法,由于synchronized (class2)同步代码块对class2上锁,所以其他线程就只能以同步的方式调用class2中的静态同步方法。这里要注意的是i和j是交替异步打印的,但是k是按顺序同步打印的。
package test;

public class OutClass {

    static class InnerClass1 {

        public void method1(InnerClass2 class2) {

            String threadName = Thread.currentThread().getName();

            synchronized (class2) {

                System.out.println(threadName + " 进入InnerClass1类中的method1方法");

                for (int i = 0; i < 10; i++) {

                    System.out.println("i=" + i);

                    try {

                        Thread.sleep(100);

                    } catch (InterruptedException e) {

                    }

                }

                System.out.println(threadName + " 离开InnerClass1类中的method1方法");

            }

        }

        public synchronized void method2() {

            String threadName = Thread.currentThread().getName();

            System.out.println(threadName + " 进入InnerClass1类中的method2方法");

            for (int j = 0; j < 10; j++) {

                System.out.println("j=" + j);

                try {

                    Thread.sleep(100);

                } catch (InterruptedException e) {

                }

            }

            System.out.println(threadName + " 离开InnerClass1类中的method2方法");

        }

    }

    static class InnerClass2 {

        public synchronized void method1() {

            String threadName = Thread.currentThread().getName();

            System.out.println(threadName + " 进入InnerClass2类中的method1方法");

            for (int k = 0; k < 10; k++) {

                System.out.println("k=" + k);

                try {

                    Thread.sleep(100);

                } catch (InterruptedException e) {

                }

            }

            System.out.println(threadName + " 离开InnerClass2类中的method1方法");

        }

    }

}
package test;

import test.OutClass.InnerClass1;

import test.OutClass.InnerClass2;

public class Run {

    public static void main(String[] args) {

        final InnerClass1 in1 = new InnerClass1();

        final InnerClass2 in2 = new InnerClass2();

        // //

        // //

        Thread t1 = new Thread(new Runnable() {

            public void run() {

                in1.method1(in2);

            }

        }, "T1");

        // //

        // //

        Thread t2 = new Thread(new Runnable() {

            public void run() {

                in1.method2();

            }

        }, "T2");

        // //

        // //

        Thread t3 = new Thread(new Runnable() {

            public void run() {

                in2.method1();

            }

        }, "T3");

        // //

        // //

        t1.start();

        t2.start();

        t3.start();

    }

}
T1 进入InnerClass1类中的method1方法

i=0

T2 进入InnerClass1类中的method2方法

j=0

i=1

j=1

i=2

j=2

i=3

j=3

i=4

j=4

i=5

j=5

i=6

j=6

i=7

j=7

i=8

j=8

i=9

j=9

T1 离开InnerClass1类中的method1方法

T3 进入InnerClass2类中的method1方法

k=0

T2 离开InnerClass1类中的method2方法

k=1

k=2

k=3

k=4

k=5

k=6

k=7

k=8

k=9

T3 离开InnerClass2类中的method1方法
16.锁对象的改变
在将任何数据类型作为同步锁时,需要注意的是,是否有多个线程同时持有锁对象,如果同时持有相同的锁对象,则这些线程之间就是同步的;如果分别获得锁对象,这些线程之间就是异步的。
示例:A线程在B线程启动50毫秒后启动,A线程一开始取得的锁是“123”,然后在执行过程中将锁对象修改为“456”,然后B线程取得的锁是“456”,由于锁对象不一样,所以是异步的。
package myservice;

public class MyService {

    private String lock = "123";

    public void testMethod() {

        try {

            synchronized (lock) {

                System.out.println(Thread.currentThread().getName() + " begin "+ System.currentTimeMillis());

                lock = "456";

                Thread.sleep(2000);

                System.out.println(Thread.currentThread().getName() + "   end "+ System.currentTimeMillis());

            }

        } catch (InterruptedException e) {

            e.printStackTrace();

        }

    }

}
package extthread;

import myservice.MyService;

public class ThreadB extends Thread {

    private MyService service;

    public ThreadB(MyService service) {

        super();

        this.service = service;

    }

    @Override

    public void run() {

        service.testMethod();

    }

}
package extthread;

import myservice.MyService;

public class ThreadA extends Thread {

    private MyService service;

    public ThreadA(MyService service) {

        super();

        this.service = service;

    }

    @Override

    public void run() {

        service.testMethod();

    }

}
A begin 1525399414038

B begin 1525399414088

A   end 1525399416039

B   end 1525399416089
示例2:去掉50毫秒后,由于A和B共同争抢的锁是“123”,所以具有相同的锁对象,因此就是同步的。
package test.run;

import myservice.MyService;

import extthread.ThreadA;

import extthread.ThreadB;

public class Run2 {

    public static void main(String[] args) throws InterruptedException {

        MyService service = new MyService();

        ThreadA a = new ThreadA(service);

        a.setName("A");

        ThreadB b = new ThreadB(service);

        b.setName("B");

        a.start();

        b.start();

    }

}
 begin 1525399721246

A   end 1525399723247

B begin 1525399723247

B   end 1525399725247
示例3:从输出结果可以看出,虽然两个线程都共同对同一个userinfo对象进行锁,但是由于userinfo不变,即使在执行的过程中userinfo对象的属性值发生了变化,但对象还是没有发生变化,运行的结果还是同步的。
package entity;

public class Userinfo {

    private String username;

    private String password;

    public Userinfo() {

        super();

    }

    public Userinfo(String username, String password) {

        super();

        this.username = username;

        this.password = password;

    }

    public String getUsername() {

        return username;

    }

    public void setUsername(String username) {

        this.username = username;

    }

    public String getPassword() {

        return password;

    }

    public void setPassword(String password) {

        this.password = password;

    }

}
package service;

import entity.Userinfo;

public class Service {

    public void serviceMethodA(Userinfo userinfo) {

        synchronized (userinfo) {

            try {

                System.out.println(Thread.currentThread().getName());

                userinfo.setUsername("abcabcabc");

                Thread.sleep(3000);

                System.out.println("end! time=" + System.currentTimeMillis());

            } catch (InterruptedException e) {

                e.printStackTrace();

            }

        }

    }

}
package extthread;

import service.Service;

import entity.Userinfo;

public class ThreadA extends Thread {

    private Service service;

    private Userinfo userinfo;

    public ThreadA(Service service,

            Userinfo userinfo) {

        super();

        this.service = service;

        this.userinfo = userinfo;

    }

    @Override

    public void run() {

        service.serviceMethodA(userinfo);

    }

}
package extthread;

import service.Service;

import entity.Userinfo;

public class ThreadB extends Thread {

    private Service service;

    private Userinfo userinfo;

    public ThreadB(Service service,

            Userinfo userinfo) {

        super();

        this.service = service;

        this.userinfo = userinfo;

    }

    @Override

    public void run() {

        service.serviceMethodA(userinfo);

    }

}
package test.run;

import service.Service;

import entity.Userinfo;

import extthread.ThreadA;

import extthread.ThreadB;

public class Run {

    public static void main(String[] args) {

        try {

            Service service = new Service();

            Userinfo userinfo = new Userinfo();

            ThreadA a = new ThreadA(service, userinfo);

            a.setName("a");

            a.start();

            Thread.sleep(50);

            ThreadB b = new ThreadB(service, userinfo);

            b.setName("b");

            b.start();

        } catch (InterruptedException e) {

            e.printStackTrace();

        }

    }

}
a

end! time=1525399951169

b

end! time=1525399954169
三、volatile关键字
volatile关键字的主要作用是使变量在多个线程间可见。
1.关键字volatile与死循环
示例:程序开始运行后出现停不下来的情况,这是因为main线程一直在处理while()循环,无法跳出while循环,然后无法修改参数的值为false,导致程序无法执行后面的代码。
package printstring;

public class PrintString {

    private boolean isContinuePrint = true;

    public boolean isContinuePrint() {

        return isContinuePrint;

    }

    public void setContinuePrint(boolean isContinuePrint) {

        this.isContinuePrint = isContinuePrint;

    }

    public void printStringMethod() {

        try {

            while (isContinuePrint == true) {

                System.out.println("run printStringMethod threadName="+ Thread.currentThread().getName());

                Thread.sleep(1000);

            }

        } catch (InterruptedException e) {

            e.printStackTrace();

        }

    }

}
package test;

import printstring.PrintString;

public class Run {

    public static void main(String[] args) {

        PrintString printStringService = new PrintString();

        printStringService.printStringMethod();

        System.out.println("我要停止它!="+ Thread.currentThread().getName());

        printStringService.setContinuePrint(false);

    }

}
run printStringMethod threadName=main

run printStringMethod threadName=main

run printStringMethod threadName=main

run printStringMethod threadName=main

run printStringMethod threadName=main

run printStringMethod threadName=main

run printStringMethod threadName=main

run printStringMethod threadName=main

...
2.解决同步死循环
示例:通过实现Runnable接口将PrintString类定义为一个线程,然后通过线程修改while循环的判断值为false,可以使while循环跳出。
package printstring;

public class PrintString implements Runnable {

    private boolean isContinuePrint = true;

    public boolean isContinuePrint() {

        return isContinuePrint;

    }

    public void setContinuePrint(boolean isContinuePrint) {

        this.isContinuePrint = isContinuePrint;

    }

    public void printStringMethod() {

        try {

            while (isContinuePrint == true) {

                System.out.println("run printStringMethod threadName="+ Thread.currentThread().getName());

                Thread.sleep(1000);

            }

        } catch (InterruptedException e) {

            e.printStackTrace();

        }

    }

    @Override

    public void run() {

        printStringMethod();

    }

}
package test;

import printstring.PrintString;

public class Run {

    public static void main(String[] args) {

        PrintString printStringService = new PrintString();

        new Thread(printStringService).start();

        System.out.println("我要停止它!stopThread="+ Thread.currentThread().getName());

        printStringService.setContinuePrint(false);

    }

}
我要停止它!stopThread=main

run printStringMethod threadName=Thread-0
3.解决异步死循环
关键字volatile的作用是强制从公共堆栈中取得变量的值,而不是从线程私有数据栈中取得变量的值。
示例1:private boolean isRunning = true;没有volatile关键字的情况。在Win10结合JDK64bit的环境中,使用Eclipse开发环境运行示例程序后没有问题,未出现死循环。
package extthread;

public class RunThread extends Thread {

    private boolean isRunning = true;

    public boolean isRunning() {

        return isRunning;

    }

    public void setRunning(boolean isRunning) {

        this.isRunning = isRunning;

    }

    @Override

    public void run() {

        System.out.println("进入run方法了!");

        while (isRunning == true) {

        }

        System.out.println("线程被停止了!");

    }

}
package test;

import extthread.RunThread;

public class Run {

    public static void main(String[] args) {

        try {

            RunThread thread = new RunThread();

            thread.start();

            Thread.sleep(1000);

            thread.setRunning(false);

            System.out.println("已经赋值为false");

        } catch (InterruptedException e) {

            e.printStackTrace();

        }

    }

}
进入run方法了!

已经赋值为false

线程被停止了!
示例2:private boolean isRunning = true;没有volatile关键字的情况。将示例1的程序运行在JVM设置为Server服务器的环境中,即

点击Run后,出现的输出是:
进入run方法了!

已经赋值为false
示例3:volatile private boolean isRunning = true;有volatile关键字的情况。将示例1的程序运行在JVM设置为Server服务器的环境中,不再出现死循环。
进入run方法了!

已经赋值为false

线程被停止了!
原因分析:
造成服务器环境下出现死循环的原因是,在启动RunThread.java线程时,变量private boolean isRunning = true;存在于公共堆栈及线程的私有堆栈中。为了线程运行的效率,服务器模式下,线程一直在私有堆栈中取得的值时true,而代码setContinuePrint(false);虽然被执行,但是更新的却是共有堆栈中的值,所以就一直是死循环状态。这个问题其实就是私有堆栈中的值和公共堆栈中的值不同步造成的。解决这个问题要使用volatile关键字,它主要的作用就是当线程访问isRunning这个变量时,强制从公共堆栈中进行取值。简单来说就是,强制从主内存而不是从线程的工作内存中进行写入和读取。
使用volatile关键字增加了实例变量在多个线程之间的可见性,但最致命的缺点是不支持原子性。
关键字synchronized和volatile进行比较:
①关键字volatile是线程同步的轻量级实现,所以volatile性能肯定比synchronized要好,并且volatile只能修饰于变量,而synchronized可以修饰方法,以及代码块。
②多线程访问volatile不会发生阻塞,而synchronized会发生阻塞。
③volatile能保证数据的可见性,但不能保证原子性;而synchronized可以保证原子性,也可以间接保证可见性,因为它会将私有内存和公共内存中的数据做同步。
④关键字volatile解决的是变量在多个线程之间的可见性, 而synchronized解决的是多个线程之间访问资源的同步性。
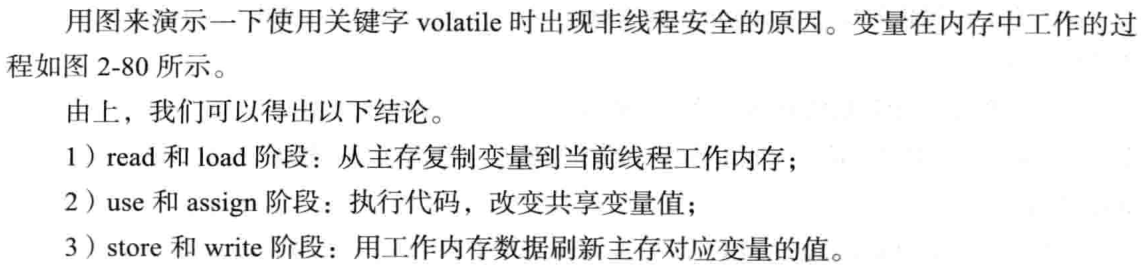
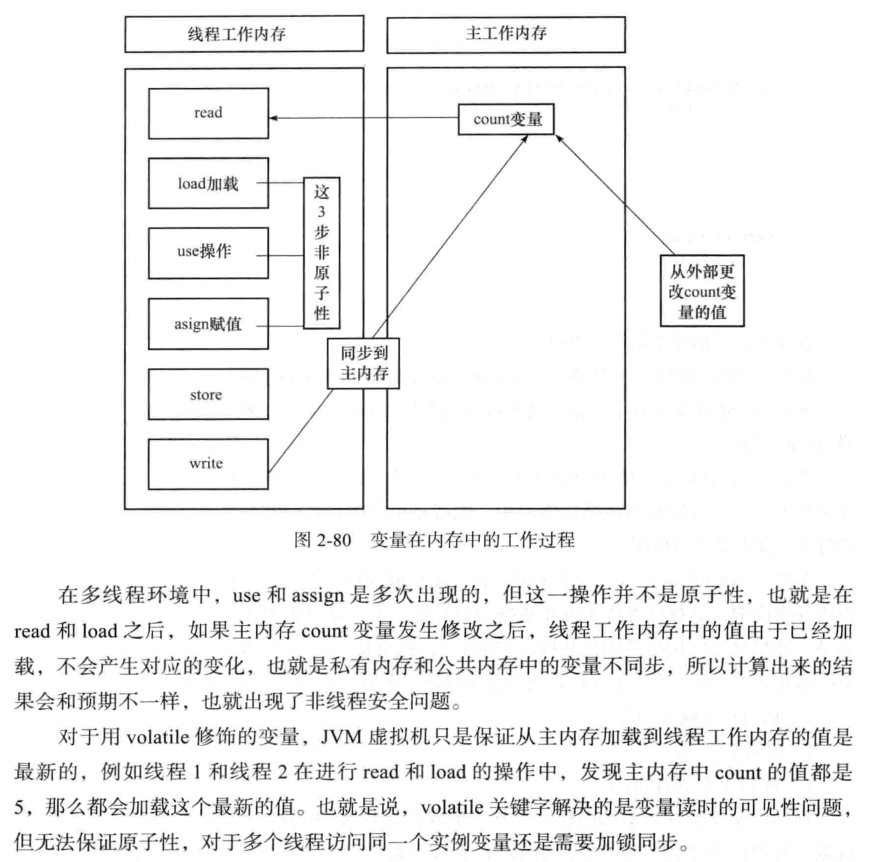
4.volatile非原子的特性
示例1:由于volatile不具备同步性,也就不具备原子性,从输出结果可以看出最后的运行结果值不是10000
package extthread;

public class MyThread extends Thread {

    volatile public static int count;

    private static void addCount() {

        for (int i = 0; i < 100; i++) {

            count++;

        }

        System.out.println("count=" + count);

    }

    @Override

    public void run() {

        addCount();

    }

}
package test.run;

import extthread.MyThread;

public class Run {

    public static void main(String[] args) {

        MyThread[] mythreadArray = new MyThread[100];

        for (int i = 0; i < 100; i++) {

            mythreadArray[i] = new MyThread();

        }

        for (int i = 0; i < 100; i++) {

            mythreadArray[i].start();

        }

    }

}
...
count=8197

count=8097

count=7797

count=7697

count=7497

count=7397

count=7297
示例2:修改MyThread类,在addCount方法上加上synchronized关键字。从输出结果来看,运行结果值是10000
package extthread;

public class MyThread extends Thread {

    volatile public static int count;

    synchronized private static void addCount() {

        for (int i = 0; i < 100; i++) {

            count++;

        }

        System.out.println("count=" + count);

    }

    @Override

    public void run() {

        addCount();

    }

}
...
count=9400

count=9500

count=9600

count=9700

count=9800

count=9900

count=10000
示例3:修改MyThread类,删除count的volatile关键字,输出结果也是正确的。
package extthread;

public class MyThread extends Thread {

    public static int count;

    synchronized private static void addCount() {

        for (int i = 0; i < 100; i++) {

            count++;

        }

        System.out.println("count=" + count);

    }

    @Override

    public void run() {

        addCount();

    }

}
...
count=9400

count=9500

count=9600

count=9700

count=9800

count=9900

count=10000
分析:
volatile关键字主要使用的场合是在多个线程中可以感知实例变量被更改了,并且可以获得最新的值使用,也就是用多线程读取共享变量时可以获得最新值使用。
volatile关键字提示线程每次从共享内存中读取变量,而不是从私有内存中读取,这样就保证了同步数据的可见性。但是,如果修改实例变量中的数据,比如i++也就是i=i+1,则这样的操作其实并不是一个原子操作,也就是非线程安全的。
表达式i++的操作步骤是
从内存中取出i的值;

计算i的值;

将i的值写到内存中;
假如在第二步计算值的时候,另外一个线程也修改了i的值,那么这个时候就会出现脏数据。解决的办法就是使用synchronized关键字,所以说volatile本身并不处理数据的原子性,而是强制对数据的读写即使影响到主内存。
在示例3中也可以发现,如果加了synchronized同步关键字,也就没有必要再使用volatile关键字来声明count变量了。
5.使用原子类进行i++操作
除了在i++操作时使用synchronized关键字实现同步外,还可以使用
原子操作是不能分割的整体,没有其他线程能够中断或检查正在原子操作中的变量。一个原子(atomic)类型就是一个原子操作可用的类型,它可以在没有锁的情况下做到线程安全。
示例:从运行结果来看,可以成功累加到5000。
package extthread;

import java.util.concurrent.atomic.AtomicInteger;

public class AddCountThread extends Thread {

    private AtomicInteger count = new AtomicInteger(0);

    @Override

    public void run() {

        for (int i = 0; i < 10000; i++) {

            System.out.println(count.incrementAndGet());

        }

    }

}
package test;

import extthread.AddCountThread;

public class Run {

    public static void main(String[] args) {

        AddCountThread countService = new AddCountThread();

        Thread t1 = new Thread(countService);

        t1.start();

        Thread t2 = new Thread(countService);

        t2.start();

        Thread t3 = new Thread(countService);

        t3.start();

        Thread t4 = new Thread(countService);

        t4.start();

        Thread t5 = new Thread(countService);

        t5.start();

    }

}
...

49993

49994

49995

49996

49997

49998

49999

50000
6.原子类也并不完全安全
原子类在具有逻辑性的情况下输出结果也具有随机性。
示例1:从输出结果可以看出,打印顺序出错了,应该每加1次100再加1次1,是因为aiRef.addAndGet(100)和aiRef.addAndGet(1)方法是原子的,但是方法和方法之间的调用却不是原子的。
package service;

import java.util.concurrent.atomic.AtomicLong;

public class MyService {

    public static AtomicLong aiRef = new AtomicLong();

    public void addNum() {

        System.out.println(Thread.currentThread().getName() + "加了100之后的值是:"+ aiRef.addAndGet(100));

        aiRef.addAndGet(1);

    }

}
package extthread;

import service.MyService;

public class MyThread extends Thread {

    private MyService mySerivce;

    public MyThread(MyService mySerivce) {

        super();

        this.mySerivce = mySerivce;

    }

    @Override

    public void run() {

        mySerivce.addNum();

    }

}
package test.run;

import service.MyService;

import extthread.MyThread;

public class Run {

    public static void main(String[] args) {

        try {

            MyService service = new MyService();

            MyThread[] array = new MyThread[5];

            for (int i = 0; i < array.length; i++) {

                array[i] = new MyThread(service);

            }

            for (int i = 0; i < array.length; i++) {

                array[i].start();

            }

            Thread.sleep(1000);

            System.out.println(service.aiRef.get());

        } catch (InterruptedException e) {

            e.printStackTrace();

        }

    }

}
Thread-0加了100之后的值是:100

Thread-2加了100之后的值是:300

Thread-1加了100之后的值是:200

Thread-3加了100之后的值是:403

Thread-4加了100之后的值是:504

505
示例2:修改示例1中的MyService类,将addNum方法加上同步关键字。从输出结果来看,结果是正确的,结果是505还保证在过程中累加的顺序也是正确的。
package service;

import java.util.concurrent.atomic.AtomicLong;

public class MyService {

    public static AtomicLong aiRef = new AtomicLong();

    synchronized public void addNum() {

        System.out.println(Thread.currentThread().getName() + "加了100之后的值是:"+ aiRef.addAndGet(100));

        aiRef.addAndGet(1);

    }

}
Thread-0加了100之后的值是:100

Thread-3加了100之后的值是:201

Thread-2加了100之后的值是:302

Thread-1加了100之后的值是:403

Thread-4加了100之后的值是:504

505
7.synchronized代码块有volatile同步的功能
关键字synchronized可以使多个线程访问同一个资源具有同步性,而且它还具有将线程工作内存中的私有变量与公共内存中的变量同步的功能。
示例1:没有添加关键字synchronized并在-server服务器模式运行。结果出现了死循环,得到这个结果是因为各线程间的数据值没有可视性造成的。
package service;

public class Service {

    private boolean isContinueRun = true;

    public void runMethod() {

//        String anyString = new String();

        while (isContinueRun == true) {

//            synchronized (anyString) {

//            }

        }

        System.out.println("ͣ停下来了!");

    }

    public void stopMethod() {

        isContinueRun = false;

    }

}
package extthread;

import service.Service;

public class ThreadA extends Thread {

    private Service service;

    public ThreadA(Service service) {

        super();

        this.service = service;

    }

    @Override

    public void run() {

        service.runMethod();

    }

}
package extthread;

import service.Service;

public class ThreadB extends Thread {

    private Service service;

    public ThreadB(Service service) {

        super();

        this.service = service;

    }

    @Override

    public void run() {

        service.stopMethod();

    }

}
package test;

import service.Service;

import extthread.ThreadA;

import extthread.ThreadB;

public class Run {

    public static void main(String[] args) {

        try {

            Service service = new Service();

            ThreadA a = new ThreadA(service);

            a.start();

            Thread.sleep(1000);

            ThreadB b = new ThreadB(service);

            b.start();

            System.out.println("已经发起停止的命令了!");

        } catch (InterruptedException e) {

            e.printStackTrace();

        }

    }

}
已经发起停止的命令了!
示例2:添加synchronized同步代码块并在-server服务器模式运行。结果未出现死循环,得到这个结果是因为synchronized关键字可以具有可视性。
package service;

public class Service {

    private boolean isContinueRun = true;

    public void runMethod() {

        String anyString = new String();

        while (isContinueRun == true) {

            synchronized (anyString) {

            }

        }

        System.out.println("ͣ停下来了!");

    }

    public void stopMethod() {

        isContinueRun = false;

    }

}
已经发起停止的命令了!
停下来了!
synchronized关键字可以保证在同一时刻,只有一个线程可以执行某一个方法或某一个代码块。它包含两个特征,互斥性和可见性。同步synchronized不仅可以解决一个线程看到对象处于不一致的状态,还可以保证进入同步方法或者同步代码块的每个线程,都看到由同一个锁保护之前所有的修改效果。
Java多线程编程(二)对象及变量的并发访问的更多相关文章
- Java多线程编程核心技术---对象及变量的并发访问(二)
数据类型String的常量池特性 在JVM中具有String常量池缓存的功能. public class Service { public static void print(String str){ ...
- Java多线程编程核心 - 对象及变量的并发访问
1.什么是“线程安全”与“非线程安全”? “非线程安全”会在多个线程对同一对象总的实例变量进行并发访问时发生,产生的后果是“脏读”,也就是取到的数据其实是被更改过的. “线程安全”是以获得的实例变量的 ...
- Java多线程编程核心技术---对象及变量的并发访问(一)
synchronized同步方法 "非线程安全"其实会在多个线程对同一个对象中的实例变量进行并发访问时发生,产生的后果就是"脏读",也就是渠道的数据其实是被更改 ...
- Java多线程编程核心技术(二)对象及变量的并发访问
本文主要介绍Java多线程中的同步,也就是如何在Java语言中写出线程安全的程序,如何在Java语言中解决非线程安全的相关问题.阅读本文应该着重掌握如下技术点: synchronized对象监视器为O ...
- Java多线程编程核心技术-第2章-对象及变量的并发访问-读书笔记
第 2 章 对象及变量的并发访问 本章主要内容 synchronized 对象监视器为 Object 时的使用. synchronized 对象监视器为 Class 时的使用. 非线程安全是如何出现的 ...
- java多线程系列(二)---对象变量并发访问
对象变量的并发访问 前言:本系列将从零开始讲解java多线程相关的技术,内容参考于<java多线程核心技术>与<java并发编程实战>等相关资料,希望站在巨人的肩膀上,再通过我 ...
- Java多线程——对象及变量的并发访问
Java多线系列文章是Java多线程的详解介绍,对多线程还不熟悉的同学可以先去看一下我的这篇博客Java基础系列3:多线程超详细总结,这篇博客从宏观层面介绍了多线程的整体概况,接下来的几篇文章是对多线 ...
- Java——多线程之对象及变量的并发访问
Java多线系列文章是Java多线程的详解介绍,对多线程还不熟悉的同学可以先去看一下我的这篇博客Java基础系列3:多线程超详细总结,这篇博客从宏观层面介绍了多线程的整体概况,接下来的几篇文章是对多线 ...
- 对象及变量的并发访问(同步方法、同步代码块、对class进行加锁、线程死锁)&内部类的基本用法
主要学习多线程的并发访问,也就是使得线程安全. 同步的单词为synchronized,异步的单词为asynchronized 同步主要就是通过锁的方式实现,一种就是隐式锁,另一种是显示锁Lock,本节 ...
- (二)对象以及变量的并发访问--synchronized的使用细节,用法
具体的记录synchronized关键的各种使用方式,注意事项.感觉一步一步跟我来都可以看懂滴 大致是按照以下思路进行书写的.黑体字可以理解为结论, 1.synchronized锁的是什么? 2.sy ...
随机推荐
- Knative 实战:基于 Knative Serverless 技术实现天气服务-上篇
提到天气预报服务,我们第一反应是很简单的一个服务啊,目前网上有大把的天气预报 API 可以直接使用,有必要去使用 Knative 搞一套吗?杀鸡用牛刀?先不要着急,我们先看一下实际的几个场景需求: 场 ...
- Eureka实战-1【Eureka Server在线扩容】
1.准备工作 PS:为了偷懒,每个pom文件都要依赖的公共依赖配置放在下面: <parent> <groupId>org.springframework.boot</gr ...
- shiro使用注解(@RequiresPermissions等)不无效及异常处理
1.注解不生效 在shiro配置类中加上如下代码: /** * Shiro生命周期处理器 */ @Bean(name = "lifecycleBeanPostProcessor") ...
- [Mathematics][MIT 18.03] Proof of a Theory about the Solution to Second-order Linear Homogeneous Differential Equation
At first, I'd like to say thank you to MIT open courses which give me the privilege to enjoy the mos ...
- Hbase入门(四)——表结构设计-RowKey
Hbase的表结构设计与关系型数据库有很多不同,主要是Hbase有Rowkey和列族.timestamp这几个全新的概念,如何设计表结构就非常的重要. 创建 Hbase就是通过 表 Rowkey 列族 ...
- kotlin -- 可见性修饰符
puiblic Kotlin的可见修饰符与Java类似,但是默认可见性不同,Java默认包私有,kotlin默认public ### internal internal 只在模块内部可见.一个模块就是 ...
- [LeetCode] 822. Card Flipping Game
Description On a table are N cards, with a positive integer printed on the front and back of each ca ...
- LitePal的存储操作
传统的存储数据方式 其实最传统的存储数据方式肯定是通过SQL语句拼接字符串来进行存储的,不过这种方式有点过于“传统”了,今天我们在这里就不讨论这种情况.实际上,Android专门提供了一种用于存储 ...
- java中List、Set和Map三个接口及其主要实现类
三个接口都在java.util包下 List与Set具有相似性,它们都是单列元素的集合,所以,它们有一个共同的父接口,叫Collection,Map没有继承Collection接口 1.List接口: ...
- 02-35 scikit-learn库之支持向量机
目录 scikit-learn库之支持向量机 一.SVC 1.1 使用场景 1.2 代码 1.3 参数详解 1.4 属性 1.5 方法 二.LinearSVC 三.NuSVC 四.LinearSVR ...