weblogic搭建总结
目录:
一、安装weblogic软件
二、创建域
三、启动管理节点
四、创建被管理节点
五、部署应用
一、安装weblogic软件
一、关闭selinux和防火墙
service iptables stop //关闭防火墙
setenforce 0 //临时关闭selinux
vi /etc/selinux/config //永久关闭,要重启
将SELINUX=enforcing改为SELINUX=disabled
二、创建普通用户管理weblogic
groupadd app
mkdir /app
useradd -d /app/sinova -g app sinova
echo "sinova" | passwd --stdin sinova
三、安装JDK
1、解压、移动到/app/sinova/
tar fx jdk1.7.0_45.tar
mv jdk1.7.0_45 /app/sinova/
2、配置JDK【声明环境变量】
vi .bash_profile
# .bash_profile
# Get the aliases and functions
if [ -f ~/.bashrc ]; then
. ~/.bashrc
fi
# User specific environment and startup programs
JAVA_HOME=/app/sinova/jdk1.7.0_45
PATH=${JAVA_HOME}/bin:$PATH:$HOME/bin
export PATH JAVA_HOME
3、测试效果
执行:java -version
显示:
java version "1.7.0_45"
Java(TM) SE Runtime Environment (build 1.7.0_45-b18)
Java HotSpot(TM) 64-Bit Server VM (build 24.45-b08, mixed mode)
四、修改 打开文件最大个数、最大进程数【root用户操作】
1、编辑 vi /etc/security/limits.conf
* soft nofile 65535
* hard nofile 65535
sinova soft nproc 65535
sinova hard nproc 65535
2、校验
ulimit -a
五、修改 /etc/hosts 【追加上本机具体IP和127.0.0.1 对应本机主机名】
127.0.0.1 localhost
192.168.101.166 localhost
六、安装weblogic软件 【sinova用户 安装目录 /app/sinova/oracle】
********开始安装*********
java -jar wls1033_generic.jar
Extracting 0%............................100% 【解压缩、提取文件】
Enter [Exit][Next]> 回车【默认就是Next】
Enter new Middleware Home OR [Exit][Previous][Next]> /app/sinova/oracle 【重新定义安装目录】
"Middleware Home" = [/u02/weblogic]
Use above value or select another option:
1 - Enter new Middleware Home
2 - Change to default [/u02/weblogic/Oracle/Middleware]
Enter option number to select OR [Exit][Previous][Next]> 回车 【重新定义安装目录完毕,直接回车】
Warning
/u02/weblogic directory is not empty. Proceed with installation?
Enter [Exit][Previous][Next]> 回车【警告忽略】
Provide your email address for security updates and to initiate configuration manager.
1|Email:[]
2|Support Password:[]
3|Receive Security Update:[Yes]
Enter index number to select OR [Exit][Previous][Next]> 3 【修改第3项,安全更新】
Provide your email address for security updates and to initiate configuration manager.
"Receive Security Update:" = [Enter new value or use default "Yes"]
Enter [Yes][No]? No 【不接受,安全更新】
** Do you wish to bypass initiation of the configuration manager and
** remain uninformed of critical security issues in your configuration?
Enter [Yes][No]? Yes【确认上面的操作】
1|Email:[]
2|Support Password:[]
3|Receive Security Update:[No]
Enter index number to select OR [Exit][Previous][Next]> 回车【上面操作的回显,直接回车】
Select the type of installation you wish to perform.
->1|Typical
| Install the following product(s) and component(s):
| - WebLogic Server
| - Oracle Coherence
| - Oracle Enterprise Pack for Eclipse
2|Custom
| Choose software products and components to install and perform optional
|configuration.
Enter index number to select OR [Exit][Previous][Next]> 直接回车 第1个 典型安装
<-------------------- Oracle Installer - WebLogic 10.3.3.0 ------------------->
JDK Selection (Any * indicates Oracle Supplied VM):
---------------------------------------------------
JDK(s) chosen for use with this product installation will be installed. Supported defaults if not deselected will be used in script string-substitution.
1|Add Local Jdk
2|/app/sinova/jdk1.7.0_45[x]
*Estimated size of installation: 727.6 MB
Enter 1 to add or >= 2 to toggle selection OR [Exit][Previous][Next]>
<-------------------- Oracle Installer - WebLogic 10.3.3.0 ------------------->
Choose Product Installation Directories:
----------------------------------------
Middleware Home Directory: [/app/sinova/Oracle]
Product Installation Directories:
1|WebLogic Server: [/app/sinova/Oracle/wlserver_10.3]
2|Oracle Coherence: [/app/sinova/Oracle/coherence_3.5]
Enter index number to select OR [Exit][Previous][Next]> 直接回车
<-------------------- Oracle Installer - WebLogic 10.3.3.0 ------------------->
The following Products and JDKs will be installed:
--------------------------------------------------
WebLogic Platform 10.3.3.0
|_____WebLogic Server
| |_____Core Application Server
| |_____Administration Console
| |_____Configuration Wizard and Upgrade Framework
| |_____Web 2.0 HTTP Pub-Sub Server
| |_____WebLogic SCA
| |_____WebLogic JDBC Drivers
| |_____Third Party JDBC Drivers
| |_____WebLogic Server Clients
| |_____WebLogic Web Server Plugins
| |_____UDDI and Xquery Support
| |_____Evaluation Database
|_____Oracle Coherence
|_____Coherence Product Files
*Estimated size of installation: 727.7 MB
Enter [Exit][Previous][Next]> 直接回车
Enter [Exit][Previous][Next]>
Feb 14, 2015 3:32:30 AM java.util.prefs.FileSystemPreferences$1 run
INFO: Created user preferences directory.
<-------------------- Oracle Installer - WebLogic 10.3.3.0 ------------------->
Installing files..
0% 25% 50% 75% 100%
[------------|------------|------------|------------]
[***************************************************]
Performing String Substitutions...
<-------------------- Oracle Installer - WebLogic 10.3.3.0 ------------------->
Configuring OCM...
0% 25% 50% 75% 100%
[------------|------------|------------|------------]
[***************************************************]
Creating Domains...
<-------------------- Oracle Installer - WebLogic 10.3.3.0 ------------------->
Installation Complete
Congratulations! Installation is complete.
Press [Enter] to continue or type [Exit]> exit【安装完毕,退出】
<-------------------- Oracle Installer - WebLogic 10.3.3.0 ------------------->
Clean up process in progress ...
二、创建域
[sinova@localhost ~]$ cd /app/sinova/Oracle/wlserver_10.3/common/bin
[sinova@localhost bin]$ ./config.sh
Unable to instantiate GUI, defaulting to console mode.
<------------------- Fusion Middleware Configuration Wizard ------------------>
Welcome:
--------
Choose between creating and extending a domain. Based on your selection,
the Configuration Wizard guides you through the steps to generate a new or
extend an existing domain.
->1|Create a new WebLogic domain
| Create a WebLogic domain in your projects directory.
2|Extend an existing WebLogic domain
| Use this option to add new components to an existing domain and modify |configuration settings.
Enter index number to select OR [Exit][Next]> 1 #第1选择创建一个新的domain,第2选择使用一个已经存在的domian
<------------------- Fusion Middleware Configuration Wizard ------------------>
Select Domain Source:
---------------------
Select the source from which the domain will be created. You can create the
domain by selecting from the required components or by selecting from a
list of existing domain templates.
->1|Choose Weblogic Platform components
| You can choose the Weblogic component(s) that you want supported in
|your domain.
2|Choose custom template
| Choose this option if you want to use an existing template. This
|could be a custom created template using the Template Builder.
Enter index number to select OR [Exit][Previous][Next]> 1 #第1选择weblogic的组件
<------------------- Fusion Middleware Configuration Wizard ------------------>
Application Template Selection:
-------------------------------
Available Templates
|_____Basic WebLogic Server Domain - 10.3.3.0 [wlserver_10.3]x
|_____WebLogic Advanced Web Services for JAX-RPC Extension - 10.3.3.0 [wlserver_10.3] [2]
|_____WebLogic Advanced Web Services for JAX-WS Extension - 10.3.3.0 [wlserver_10.3] [3]
** Invalid input, not selectable
Enter number exactly as it appears in brackets to toggle selection OR [Exit][Previous][Next]> #直接回车
<------------------- Fusion Middleware Configuration Wizard ------------------>
Edit Domain Information:
------------------------
| Name | Value |
_|________|_____________|
1| *Name: | base_domain |
Enter value for "Name" OR [Exit][Previous][Next]> #更改域的名称,这里使用默认,直接回车。
<------------------- Fusion Middleware Configuration Wizard ------------------>
Select the target domain directory for this domain:
---------------------------------------------------
"Target Location" = [Enter new value or use default
"/app/sinova/Oracle/Middleware/user_projects/domains"]
Enter new Target Location OR [Exit][Previous][Next]> /app/sinova/domains #域的安装路径修改为 /app/sinova/domains
<------------------- Fusion Middleware Configuration Wizard ------------------>
Configure Administrator User Name and Password:
-----------------------------------------------
Create a user to be assigned to the Administrator role. This user is the
default administrator used to start development mode servers.
| Name | Value |
_|_________________________|_________________________________________|
1| *Name: | weblogic |
2| *User password: | |
3| *Confirm user password: | |
4| Description: | This user is the default administrator. |
Use above value or select another option:
1 - Modify "Name"
2 - Modify "User password"
3 - Modify "Confirm user password"
4 - Modify "Description"
Enter option number to select OR [Exit][Previous][Next]> 2 #修改第2项,给weblogic用户设置密码。密码设置为weblogic010
Enter option number to select OR [Exit][Previous][Next]> 3 #修改第3项,确认密码。
<------------------- Fusion Middleware Configuration Wizard ------------------>
Configure Administrator User Name and Password:
-----------------------------------------------
Create a user to be assigned to the Administrator role. This user is the
default administrator used to start development mode servers.
"*Confirm user password:" = []
Enter new *Confirm user password: OR [Exit][Reset][Accept]> weblogic010
-----------------------------------------------
Create a user to be assigned to the Administrator role. This user is the
default administrator used to start development mode servers.
| Name | Value |
_|_________________________|_________________________________________|
1| *Name: | weblogic |
2| *User password: | *********** |
3| *Confirm user password: | *********** |
4| Description: | This user is the default administrator. |
Use above value or select another option:
1 - Modify "Name"
2 - Modify "User password"
3 - Modify "Confirm user password"
4 - Modify "Description"
5 - Discard Changes
Enter option number to select OR [Exit][Previous][Next]> #直接回车
<------------------- Fusion Middleware Configuration Wizard ------------------>
Domain Mode Configuration:
--------------------------
Enable Development or Production Mode for this domain.
->1|Development Mode
2|Production Mode
Enter index number to select OR [Exit][Previous][Next]> 2 #1是开发模式,我们选择2,生产模式
<------------------- Fusion Middleware Configuration Wizard ------------------>
Java SDK Selection:
-------------------
->1|Sun SDK 1.6.0_45 @ /app/sinova/jdk1.6.0_45
2|Other Java SDK
Enter index number to select OR [Exit][Previous][Next]> #选择JDK,直接回车
<------------------- Fusion Middleware Configuration Wizard ------------------>
Select Optional Configuration:
------------------------------
1|Administration Server [ ]
2|Managed Servers, Clusters and Machines [ ]
3|RDBMS Security Store [ ]
Enter index number to select OR [Exit][Previous][Next]> 1 #选择1,只配置Admin Server,其它可以以后在控制台配置。
<------------------- Fusion Middleware Configuration Wizard ------------------>
Select Optional Configuration:
------------------------------
1|Administration Server [x]
2|Managed Servers, Clusters and Machines [ ]
3|RDBMS Security Store [ ]
Enter index number to select OR [Exit][Previous][Next]> #回车确认
Configure the Administration Server:
------------------------------------
Enter adminstration server configurations. Each WebLogic Server domain must
have one Administration Server. The Administration Server hosts the
Administration Console which is used to perform administrative tasks.
| Name | Value |
_|__________________|_____________________|
1| *Name: | AdminServer |
2| *Listen address: | All Local Addresses |
3| Listen port: | 7001 |
4| SSL listen port: | N/A |
5| SSL enabled: | false |
Use above value or select another option:
1 - Modify "Name"
2 - Modify "Listen address"
3 - Modify "Listen port"
4 - Modify "SSL enabled"
Enter option number to select OR [Exit][Previous][Next]> #回车确认,使用默认的端口7001
<------------------- Fusion Middleware Configuration Wizard ------------------>
Creating Domain...
0% 25% 50% 75% 100%
[------------|------------|------------|------------]
[***************************************************]
**** Domain Created Successfully! ****
配置完成。
三、启动管理节点
一、管理服务器----认证管理
[sinova@localhost ~]$ cd /app/sinova/domains/base_domain/servers/AdminServer(这个要手动起之后才会有这个目录)
[sinova@localhost AdminServer]$ mkdir security
[sinova@localhost AdminServer]$ cd security/
[sinova@localhost security]$ vi boot.properties
username=weblogic
password=weblogic010
二、创建目录【后面脚本会使用到】
mkdir -p /app/sinova/bin
mkdir -p /app/sinova/logs/www
三、编写 管理服务器启动脚本【管理节点给1G内存】
1、cd /app/sinova/bin
2、vi restart-admin.sh
#!/bin/bash
DATE=`date +%Y%m%d`
USER_MEM_ARGS="-Xms1024m -Xmx1024m -XX:MaxPermSize=256m"
export USER_MEM_ARGS JAVA_OPTIONS
ps -ef | grep java | grep weblogic | grep AdminServer | awk '{print $2}' | xargs kill -9 > /dev/null 2>&1
nohup /app/sinova/domains/base_domain/bin/startWebLogic.sh > /app/sinova/logs/www/admin-${DATE}.log 2>&1 & ##weblogic安装启动文件
3、chmod +x restart-admin.sh
4、执行 ./restart-admin.sh
5、登录控平台 http://192.168.101.166:7001/console 【用户: weblogic 密码: weblogic010】
附上:启动管理节点出错的情况 我们手动起 先改这个配置
启动报错1【修改 vi /app/sinova/Oracle/wlserver_10.3/common/bin/commEnv.sh】
Exception in thread "Timer-1"
Exception: java.lang.OutOfMemoryError thrown from the UncaughtExceptionHandler in thread "Timer-1"
Exception in thread "[STANDBY] ExecuteThread: '3' for queue: 'weblogic.kernel.Default (self-tuning)'"
Exception: java.lang.OutOfMemoryError thrown from the UncaughtExceptionHandler in thread "[STANDBY] ExecuteThread: '3' for queue: 'weblogic.kernel.Default (self-tuning)'"
Exception in thread "DynamicListenThread[Default]"
Exception: java.lang.OutOfMemoryError thrown from the UncaughtExceptionHandler in thread "DynamicListenThread[Default]"
./startWebLogic.sh: line 175: 58635 Killed ${JAVA_HOME}/bin/java ${JAVA_VM} ${MEM_ARGS} -Dweblogic.Name=${SERVER_NAME} -Djava.security.policy=${WL_HOME}/server/lib/weblogic.policy ${JAVA_OPTIONS} ${PROXY_SETTINGS} ${SERVER_CLASS}
修改:【第152行,原 JAVA_VM=-jrockit】
148 # Set up JVM options base on value of JAVA_VENDOR
149 if [ "$PRODUCTION_MODE" = "true" ]; then
150 case $JAVA_VENDOR in
151 Oracle)
152 JAVA_VM=-server
153 MEM_ARGS="-Xms128m -Xmx256m"
启动报错2、【修改 /etc/hosts,增加上本机IP及127.0.0.1】
<Jan 29, 2015 11:57:23 AM CST> <Error> <Security> <BEA-090870> <The realm "myrealm" failed to be loaded: weblogic.security.service.SecurityServiceException: java.lang.ExceptionInInitializerError.
weblogic.security.service.SecurityServiceException: java.lang.ExceptionInInitializerError
at weblogic.security.service.CSSWLSDelegateImpl.initializeServiceEngine(CSSWLSDelegateImpl.java:342)
at weblogic.security.service.CSSWLSDelegateImpl.initialize(CSSWLSDelegateImpl.java:221)
at weblogic.security.service.CommonSecurityServiceManagerDelegateImpl.InitializeServiceEngine(CommonSecurityServiceManagerDelegateImpl.java:1783)
at weblogic.security.service.CommonSecurityServiceManagerDelegateImpl.initializeRealm(CommonSecurityServiceManagerDelegateImpl.java:442)
at weblogic.security.service.CommonSecurityServiceManagerDelegateImpl.loadRealm(CommonSecurityServiceManagerDelegateImpl.java:840)
Truncated. see log file for complete stacktrace
Caused By: java.lang.ExceptionInInitializerError
at com.octetstring.vde.util.guid.GuidGenerator.nextGuidInBytes(GuidGenerator.java:125)
at com.octetstring.vde.util.guid.Guid.<init>(Guid.java:84)
at com.octetstring.vde.backend.standard.BackendStandard.add(BackendStandard.java:379)
at com.octetstring.vde.backend.BackendHandler.add(BackendHandler.java:460)
at com.octetstring.vde.util.LDIF.importLDIF(LDIF.java:279)
Truncated. see log file for complete stacktrace
Caused By: java.lang.NullPointerException
at java.lang.System.arraycopy(Native Method)
at com.octetstring.vde.util.guid.GuidParamGenerator.generateNodeID(GuidParamGenerator.java:47)
at com.octetstring.vde.util.guid.GuidStateManager.initializeGUIDParameters(GuidStateManager.java:59)
at com.octetstring.vde.util.guid.GuidStateManager.<init>(GuidStateManager.java:30)
at com.octetstring.vde.util.guid.GuidStateManager.<clinit>(GuidStateManager.java:23)
Truncated. see log file for complete stacktrace
>
<Jan 29, 2015 11:57:23 AM CST> <Notice> <Security> <BEA-090082> <Security initializing using security realm myrealm.>
<Jan 29, 2015 11:57:23 AM CST> <Critical> <WebLogicServer> <BEA-000362> <Server failed. Reason:
There are 1 nested errors:
weblogic.security.service.SecurityServiceRuntimeException: [Security:090399]Security Services Unavailable
at weblogic.security.service.CommonSecurityServiceManagerDelegateImpl.doBootAuthorization(CommonSecurityServiceManagerDelegateImpl.java:916)
at weblogic.security.service.CommonSecurityServiceManagerDelegateImpl.initialize(CommonSecurityServiceManagerDelegateImpl.java:1050)
at weblogic.security.service.SecurityServiceManager.initialize(SecurityServiceManager.java:875)
at weblogic.security.SecurityService.start(SecurityService.java:141)
at weblogic.t3.srvr.SubsystemRequest.run(SubsystemRequest.java:64)
at weblogic.work.ExecuteThread.execute(ExecuteThread.java:201)
at weblogic.work.ExecuteThread.run(ExecuteThread.java:173)
启动报错3、【内存不够,使用我编写的启动脚本就不会报错了】
<Feb 14, 2015 3:43:56 AM CST> <Error> <JMX> <BEA-149500> <An exception occurred while registering the MBean com.bea:ServerRuntime=AdminServer,Name=AdminServer,Type=SingleSignOnServicesRuntime.
java.lang.OutOfMemoryError: PermGen space
at java.lang.ClassLoader.defineClass1(Native Method)
at java.lang.ClassLoader.defineClass(ClassLoader.java:800)
at java.security.SecureClassLoader.defineClass(SecureClassLoader.java:142)
at java.net.URLClassLoader.defineClass(URLClassLoader.java:449)
at java.net.URLClassLoader.access$100(URLClassLoader.java:71)
Truncated. see log file for complete stacktrace
>
<Feb 14, 2015 3:43:58 AM CST> <Error> <JMX> <BEA-149500> <An exception occurred while registering the MBean com.bea:ServerRuntime=AdminServer,Name=DataRetirementWorkManager,Type=MaxThreadsConstraintRuntime.
java.lang.OutOfMemoryError: PermGen space
at java.lang.Class.getDeclaredConstructors0(Native Method)
at java.lang.Class.privateGetDeclaredConstructors(Class.java:2493)
at java.lang.Class.getConstructor0(Class.java:2803)
at java.lang.Class.getDeclaredConstructor(Class.java:2053)
at weblogic.management.provider.internal.BeanInfoAccessImpl.buildBeanInfo(BeanInfoAccessImpl.java:400)
Truncated. see log file for complete stacktrace
四、创建被管理节点
一、登录控制台
http://192.168.101.166:7001/console
用户: weblogic 密码: weblogic010
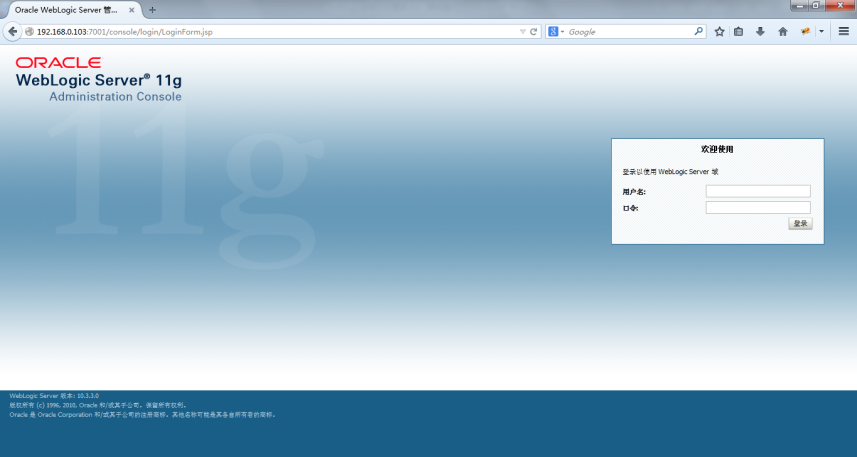

二、创建集群
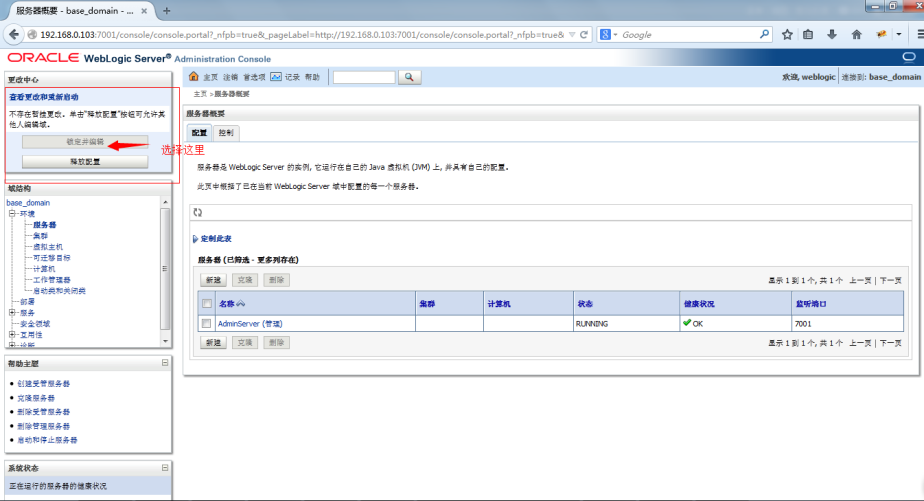
点击“锁定并编辑”,接下来可新建服务器或集群。
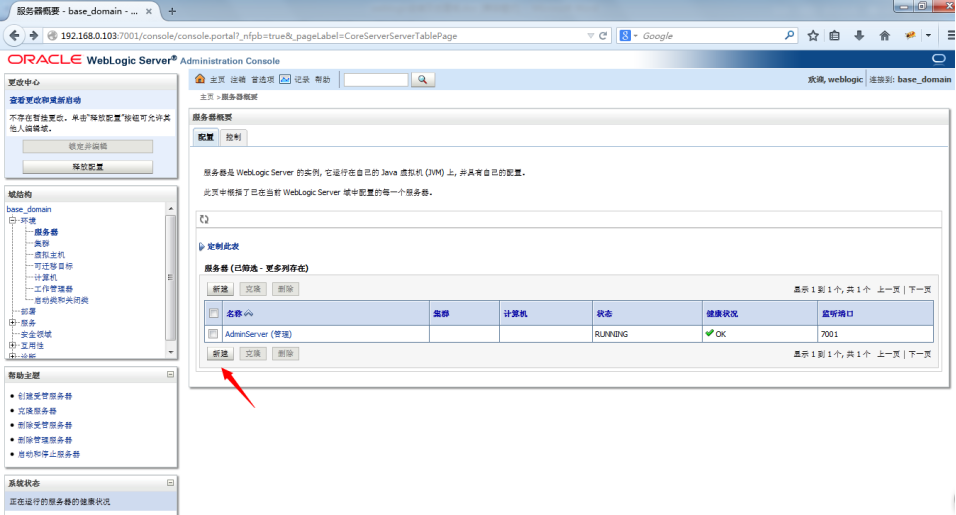
点击“新建”

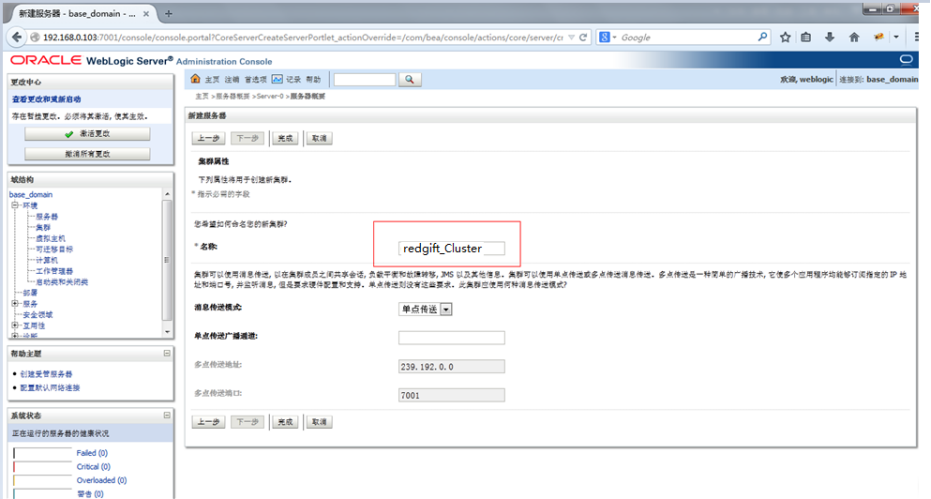
点击“下一步”
节点2创建方法和节点1一样

状态为“unknown”,这是因为还没启动节点。
点击“激活更改”保存配置。
三、被管理服务器----密码认证
cd /app/sinova/domains/base_domain/bin
vi startManagedWebLogic.sh
[查找,并修改,如下]
WLS_USER="weblogic"
export WLS_USER
WLS_PW="weblogic010"
export WLS_PW
四、编写重启被管理节点脚本
cd /app/sinova/bin
1、vi restart_redgift_node1.sh
#!/bin/bash
DATE=`date +%Y%m%d`
WLS_NODE="redgift_node1" 【换成对应的Note名称】
USER_MEM_ARGS="-Xms1024m -Xmx1024m -XX:MaxPermSize=512m"
JAVA_OPTIONS="-DUseSunHttpHandler=true"
ServiceIP=192.168.101.166 【管理服务器IP】
export USER_MEM_ARGS JAVA_OPTIONS WLS_NODE ServiceIP
ps -ef | grep java | grep weblogic | grep -w ${WLS_NODE} | awk '{print $2}' | xargs kill -9 > /dev/null 2>&1
rm -rf /app/sinova/domains/base_domain/servers/${WLS_NODE}/tmp/*
sleep 1
nohup /app/sinova/domains/base_domain/bin/startManagedWebLogic.sh ${WLS_NODE} http://192.168.101.166:7001/ >/app/sinova/logs/www/${WLS_NODE}-${DATE}.log 2>&1 & 【这里的ip是管理服务器的ip和端口】
2、vi restart_redgift_all.sh
#!/bin/bash
/app/sinova/bin/restart_redgift_node1.sh
/app/sinova/bin/restart_redgift_node2.sh
3、授权 chmod +x *.sh
4、执行启动所有节点 ./restart_redgift_all.sh
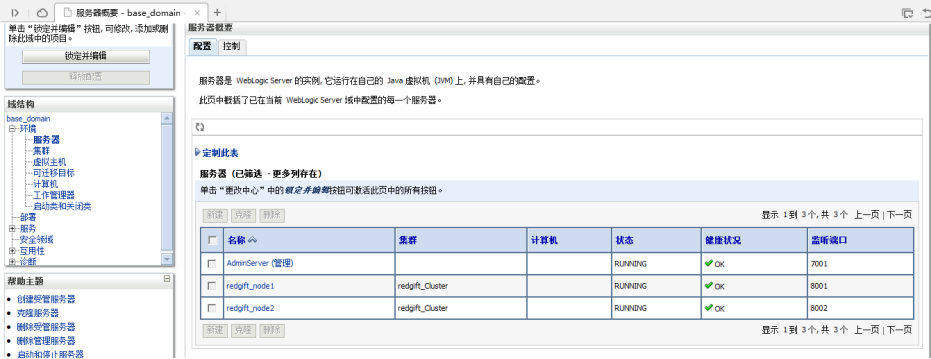
五、控制台查看节点状态
五、部署应用
- 新建应用目录:
[sinova@localhost ~]$ cd /app/sinova/
[sinova@localhost ~]$ mkdir application
- 上传应用至application目录并解压
- 将解压后的应用同步至其它节点
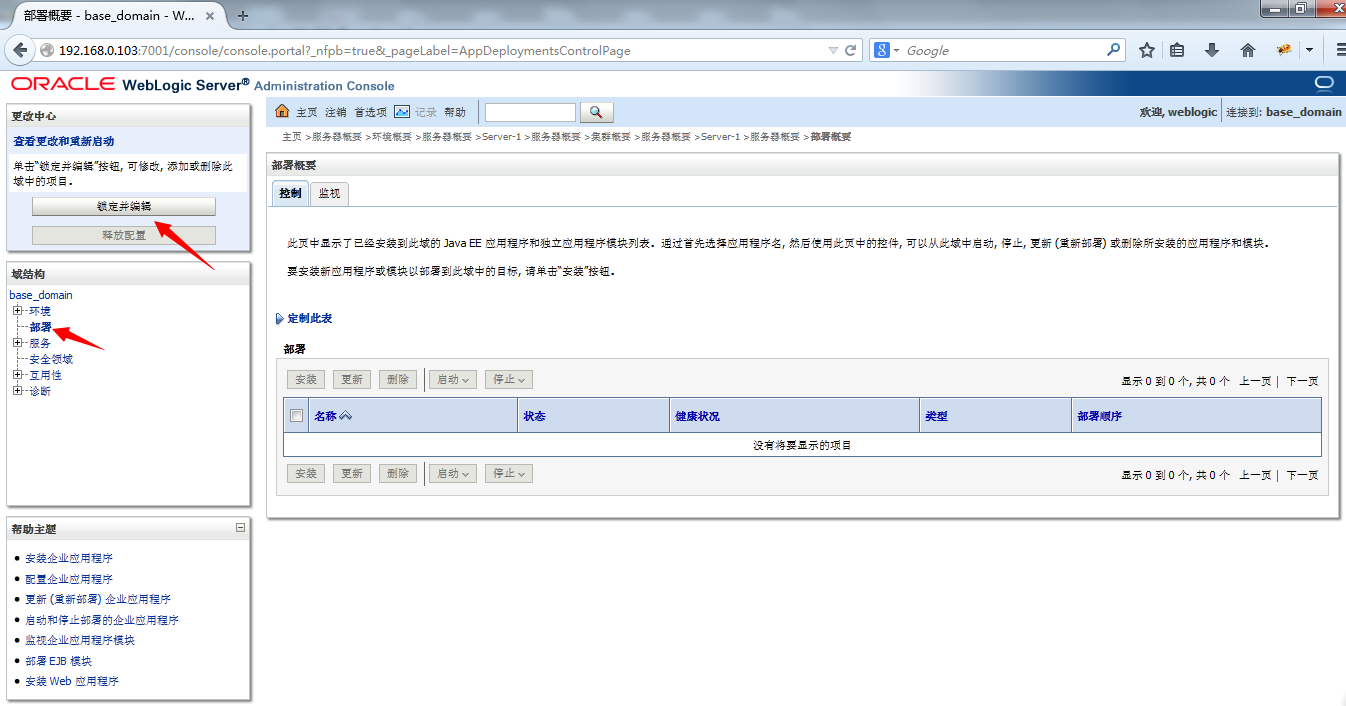
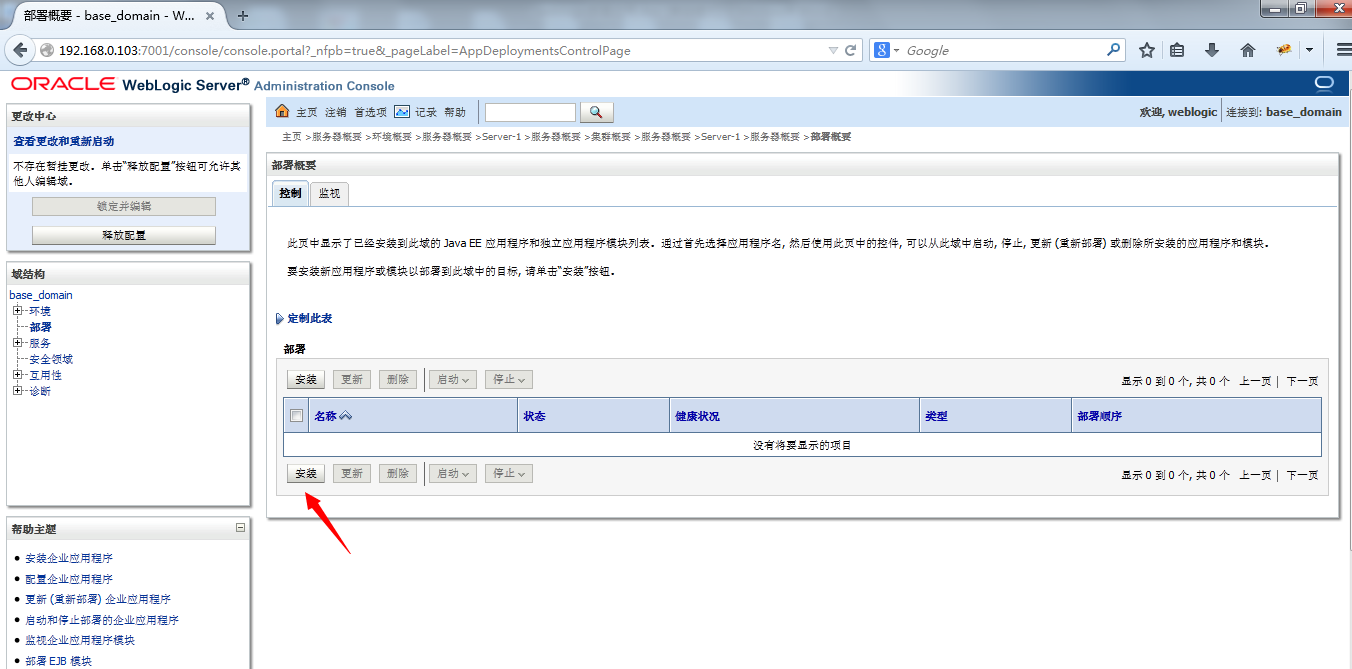
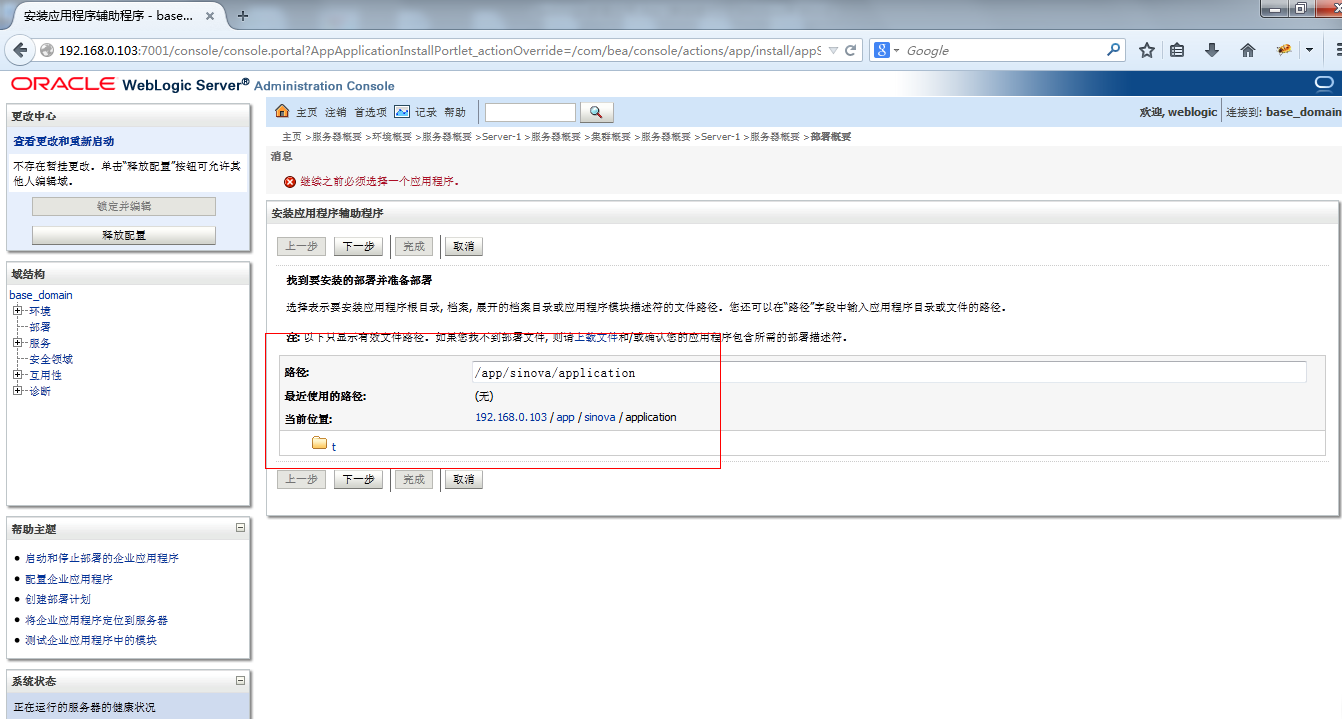
- 控制台上部署应用:
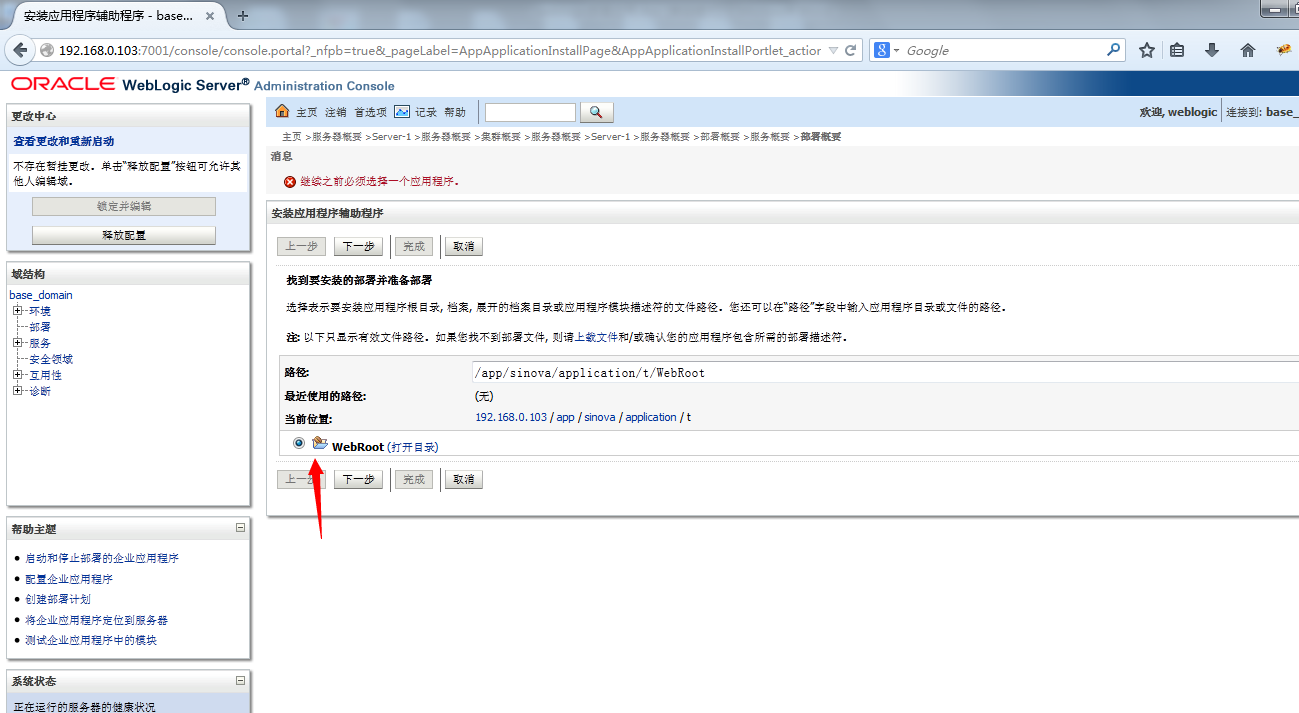
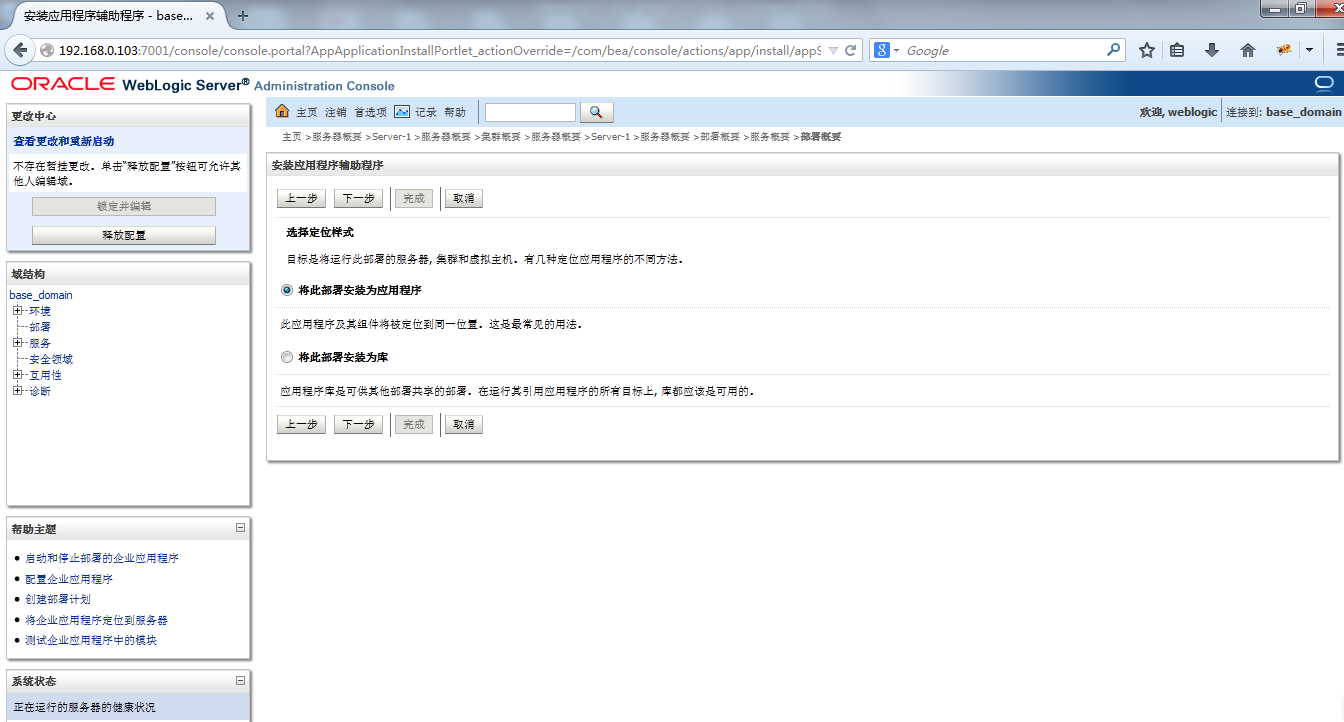
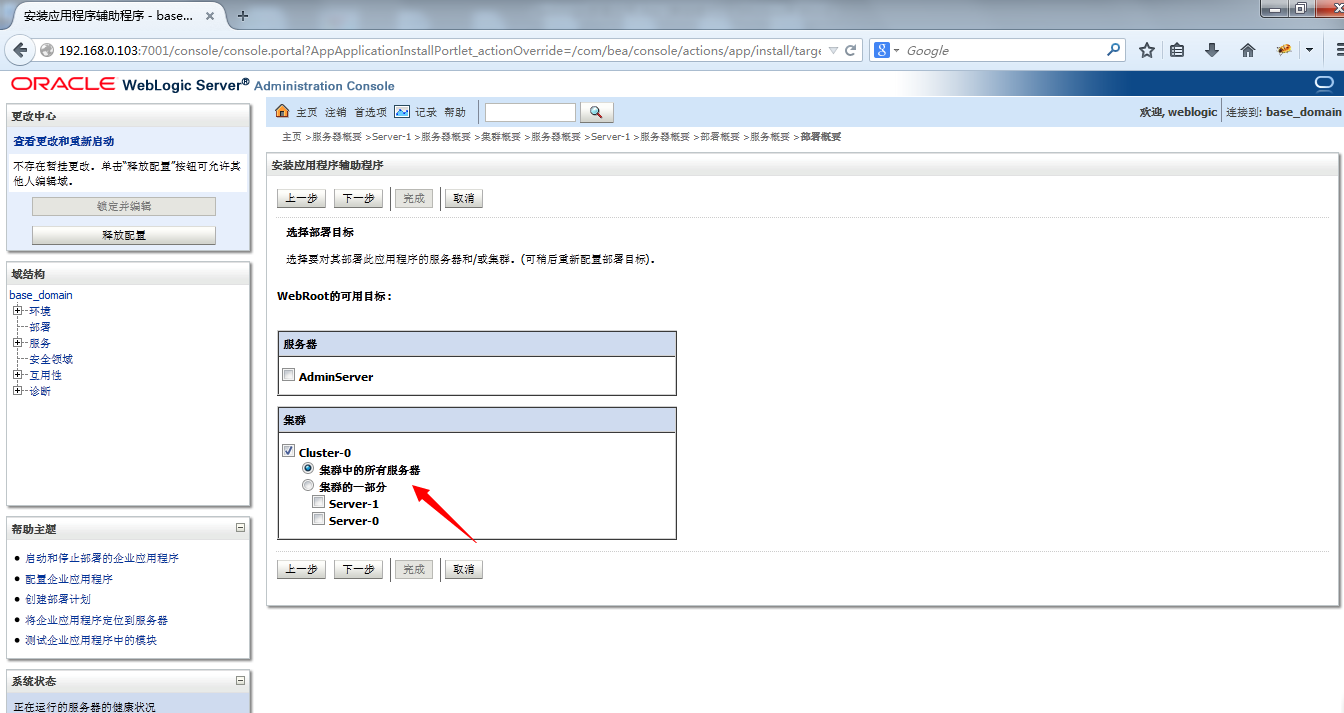
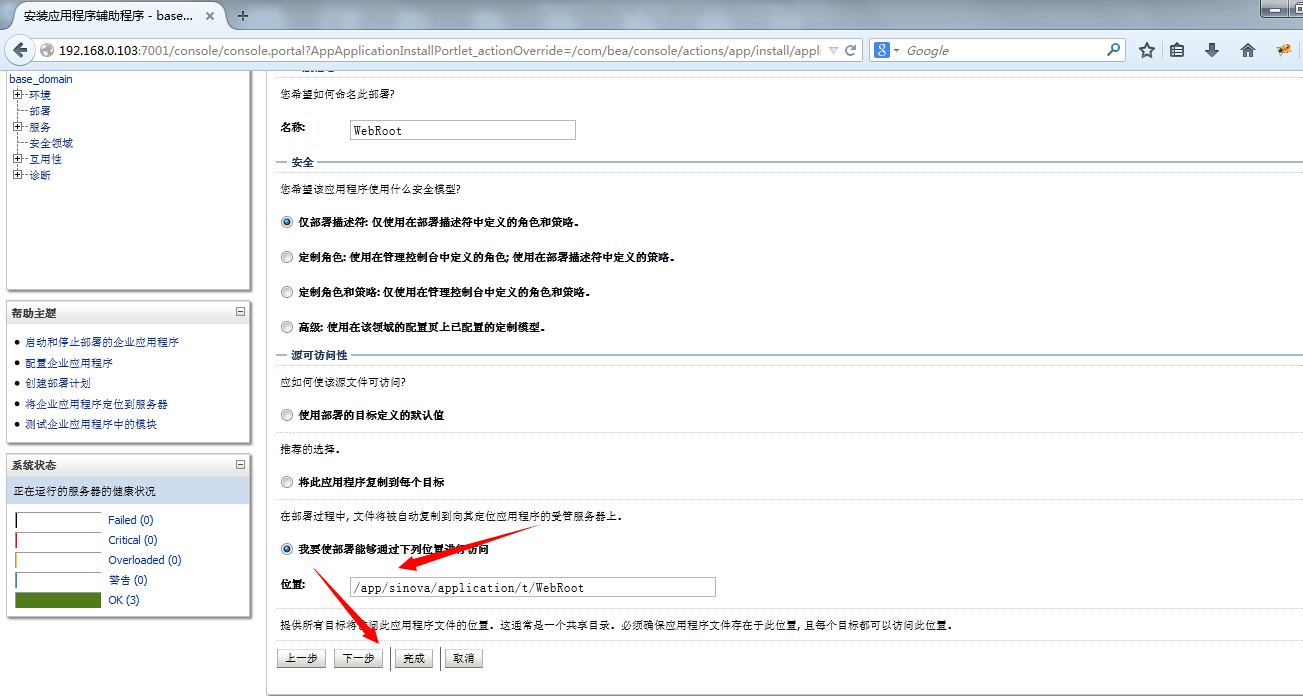
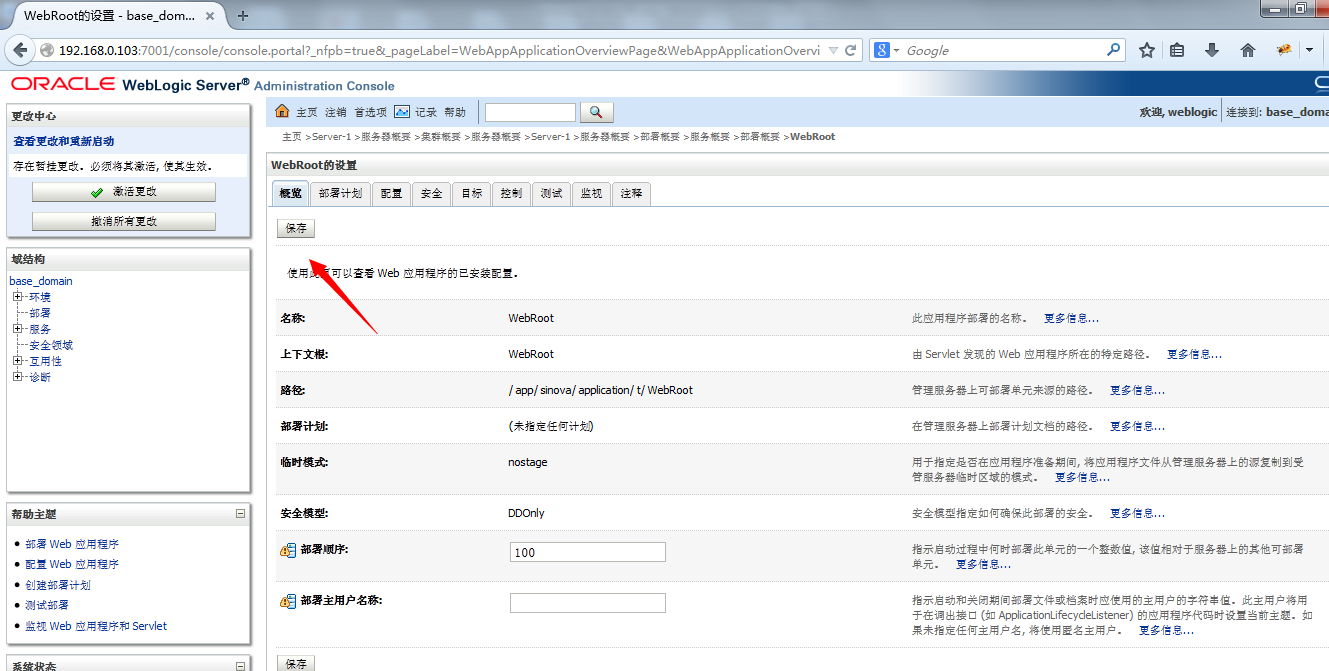
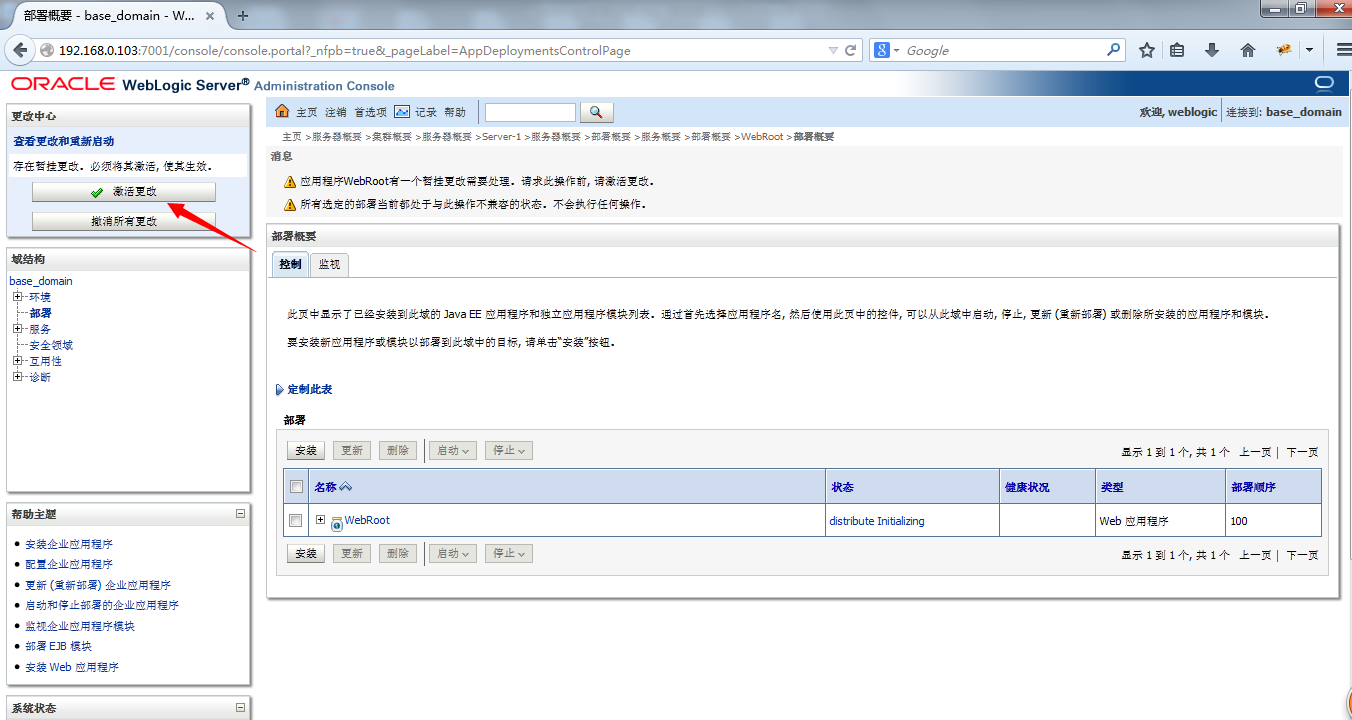
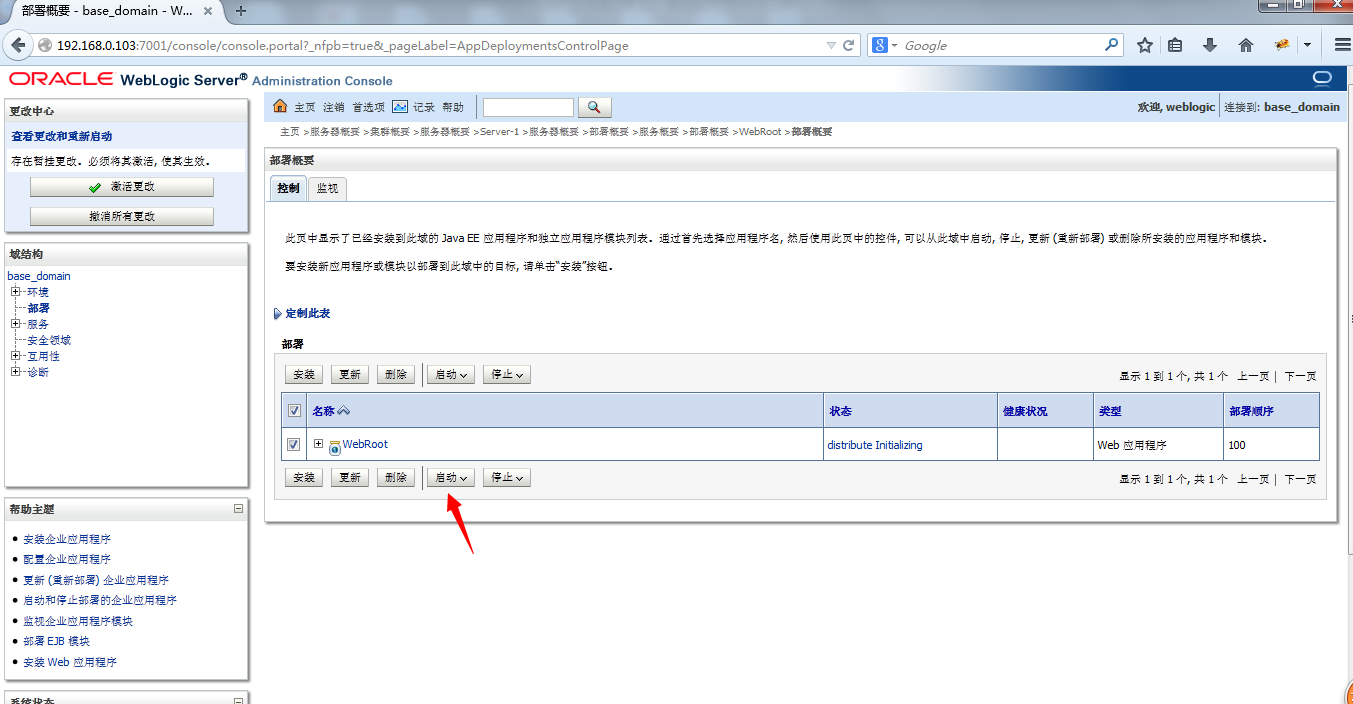
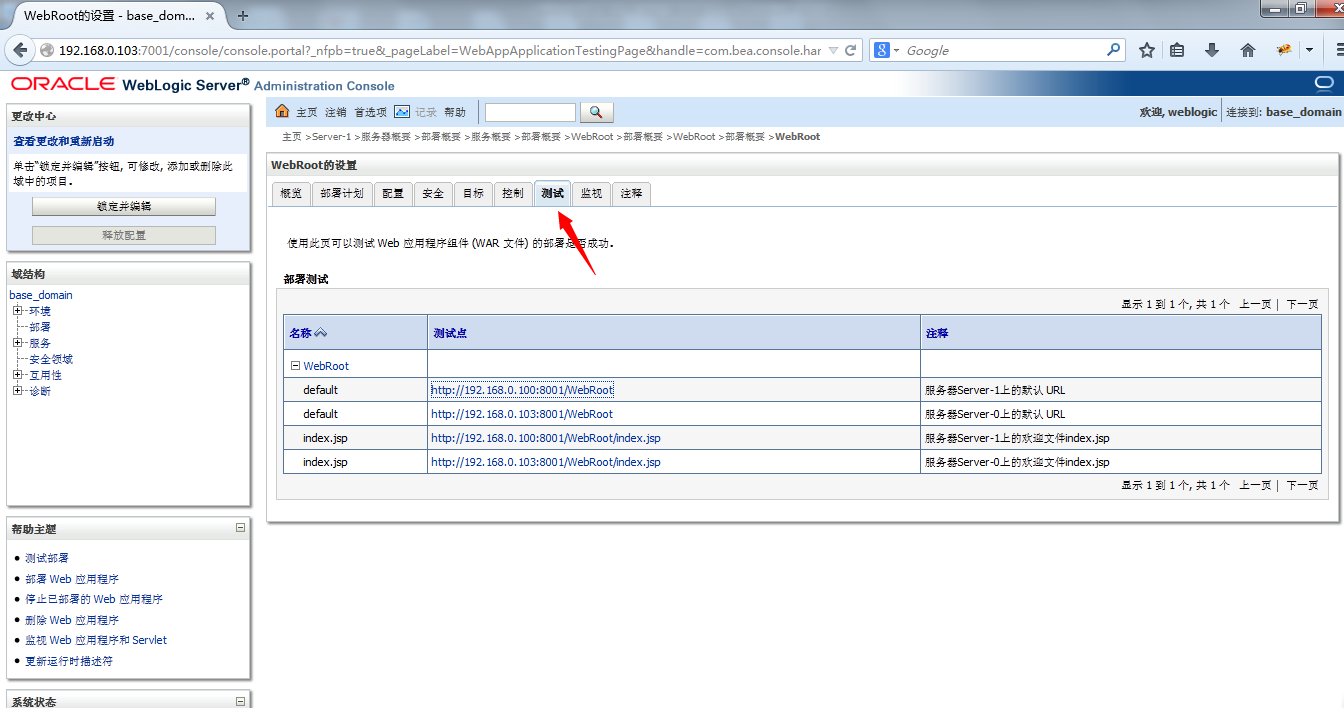

weblogic搭建总结的更多相关文章
- CVE-2020-2555漏洞复现&&流量分析
CVE-2020-2555漏洞复现&&流量分析 一.准备环境 windows7: weblogic 12.2.1.4.0 JDK版本为jdk-8u261 关于weblogic搭建可以看 ...
- 纯手工搭建JSF开发环境(JSF2.2+maven+weblogic 12c/jboss EAP 6.1+)
前言: JSF 2.X因为种种原因(我个人觉得主要是因为推出太晚),再加上EJB2之前的设计过于复杂,引起很多开发人员对官方解决方案的反感,即使EJB3后来做了大量改进,国内也很少有人对EJB3感兴趣 ...
- Haproxy+Keepalived搭建Weblogic高可用负载均衡集群
配置环境说明: KVM虚拟机配置 用途 数量 IP地址 机器名 虚拟IP地址 硬件 内存3G 系统盘20G cpu 4核 Haproxy keepalived 2台 192.168.1.10 192 ...
- weblogic 双机集群搭建
weblogic 双机集群搭建,基本步骤引用百度文库的一篇文章: wenlogic双机集群基本步骤 下面详解一下该文章搭建后会遇到的问题: 1. 主机名验证失败 javax.net.ssl.SSLKe ...
- Weblogic 12c 集群环境搭建
本文是在windows7操作系统下配置的,jdk版本1.7 ,weblogic版本12.1.3.0.0. 搭建集群前的规划 其中AdminServer是总控制端,server1.server2.ser ...
- weblogic——服务器搭建与配置
本次操作的内容:weblogic服务器搭建与配置服务 本次操作是主要围绕如何搭建weblogic服务器及配置服务,总共有两大步骤,可划分为六个小步骤: 选取已有环境,准备weblogic压缩包 安装w ...
- Weblogic 10.3.6.0 集群搭建
Weblogic 集群搭建 Oracle的Weblogic分开发者版本和生产版本,有32位和64位.一般生产版本的weblogic是64位的,安装文件是一个大小为1G多的jar包.去oracle官网上 ...
- SUSE 11 SP3 搭建weblogic服务
环境的搭建和业务需求相关,仅供参考 环境: SUSE 11 SP3 安装步骤 创建一个weblogic组 创建一个用户名为weblogic的用户, 创建相关目录 上传jdk,脚本等 安装 创建用户及其 ...
- WebLogic的服务搭建
一.简介 WebLogic是美国Oracle公司出品的一个application server,确切的说是一个基于JAVAEE架构的中间件,WebLogic是用于开发.集成.部署和管理大型分布式Web ...
随机推荐
- myeclipse不同版本共存破解办法
我自己破解的是myeclipse10+myeclipse2018: 方法是:先破解myeclipse10.7,使用破解工具,到最后一步不关闭破解工具,再进行替换文件那一步,路径不选择10版本的,换成M ...
- mongod 命令常用参数 mongod常用命令参数大全
成功启动MongoDB后,再打开一个命令行窗口输入mongo,就可以进行数据库的一些操作.输入help可以看到基本操作命令,只是MongoDB没有创建数据库的命令,但有类似的命令 mongod.exe ...
- bzoj 2430: [Poi2003]Chocolate 贪心
发现每一次切割都会使另一方向所有切割次数++. 而每一刀的代价就是 cost*切割次数,故贪心按照cost从大到小排序即可. #include <bits/stdc++.h> #defin ...
- 代码编辑器——Visual Studio Code
一.介绍 Visual Studio Code(简称 VS Code / VSC) 是一款免费开源的现代化轻量级代码编辑器,支持几乎所有主流的开发语言的语法高亮.智能代码补全.自定义热键.括号匹配.代 ...
- ROS与树莓派的结合
从零开始学树莓派和ROS 今天写下自己的第一篇博客,记录一下自己的学习历程和学习过程中碰到的各种小问题,供同道者参阅和自己以后回顾用 ,水平不高,我就放开手写吧,反正也不会有人看. 我现在在做毕业设计 ...
- P1966 火柴排队——逆序对(归并,树状数组)
P1966 火柴排队 很好的逆序对板子题: 求的是(x1-x2)*(x1-x2)的最小值: x1*x1+x2*x2-2*x1*x2 让x1*x2最大即可: 可以证明将b,c数组排序后,一一对应的状态是 ...
- Excel表格内容导出到页面
引入org.apache.poi.ss.usermodel public void addExcelBooks() throws Exception { HttpServletRequest re ...
- webpack-merge
配置分离 随着我们业务逻辑的增多,图片.字体.css.ES6以及CSS预处理器和后处理器逐渐的加入到我们的项目中来,进而导致配置文件的增多,使得配置文件书写起来比较繁琐,更严重者(书写特定文件的位置会 ...
- Spring boot + mybatis 只读取到一个jar包中的mapper配置文件
采用spring boot 开发了一个多模块项目,有多个模块中都有mapper配置文件. 采用如下的方式配置,制度去到了一个模块jar包中配置文件: @Bean(name = "sqlSe ...
- idea创建Web项目(基于Maven多模块)
简述:通常我们开发的项目结构是由多个modules项目组合而成,并且由有个parent的maven项目整体管理.废话少说,直接进入创建过程. 创建parent项目 1.打开idea工具,按照下图操作, ...
