Windows VS2017 编译 libssh2 1.7.0(执行命令、文件上传、下载)
下载安装 OpenSSL
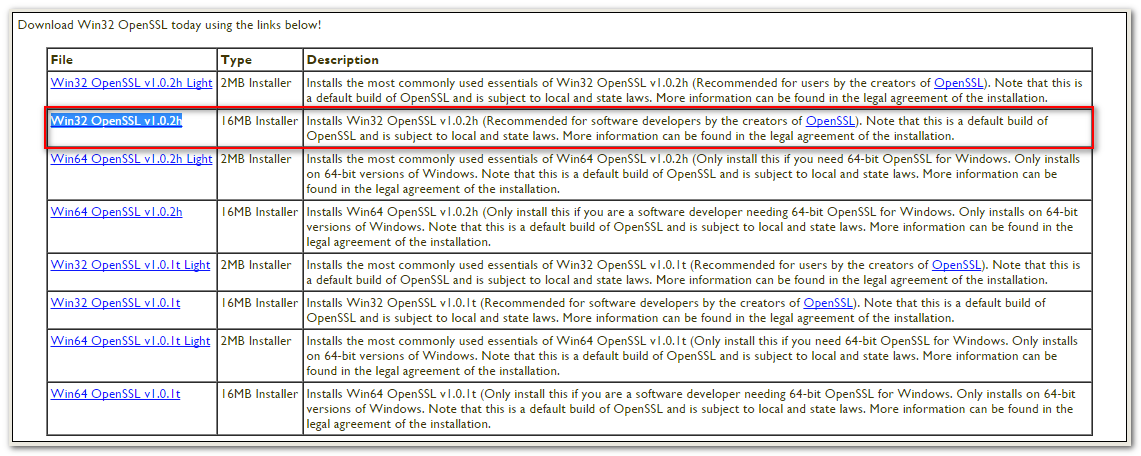
要编译 libssh2,必须先编译好 OpenSSL 的静态库,直接从 http://slproweb.com/products/Win32OpenSSL.html 下载已经编译好的包含 lib 和 include 文件的安装包即可。访问该网站点击下载完整的安装包,注意,不要下载 light 版本,因为 light 版本不带 lib 和 include。如下图:
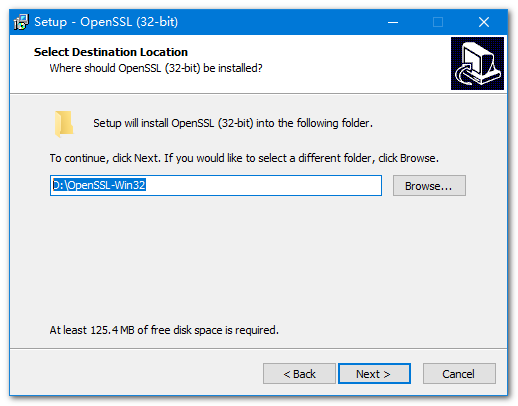
下载完成后直接安装,我这里安装到 D:\OpenSSL-Win32 目录:
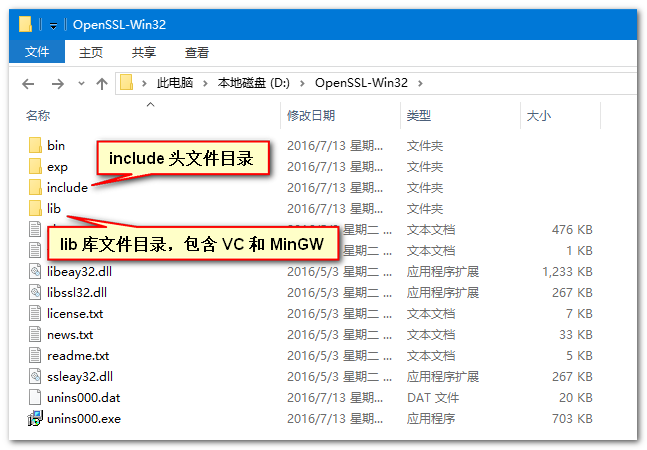
OpenSSL 就这样安装完毕了,如果你按网上自己编译的方法去自己编译,恐怕要耗上你至少半天的时间。我们来看看他的目录结构。
开始编译 libssh2
从 https://www.libssh2.org/snapshots/ 下载最新版本的源码包,解压出来后,用 VS2017 打开libssh2-1.9.0-20190719\win32\libssh2.dsw(其实你可以用任何版本)。
此时会提示升级项目,点击确定升级即可:
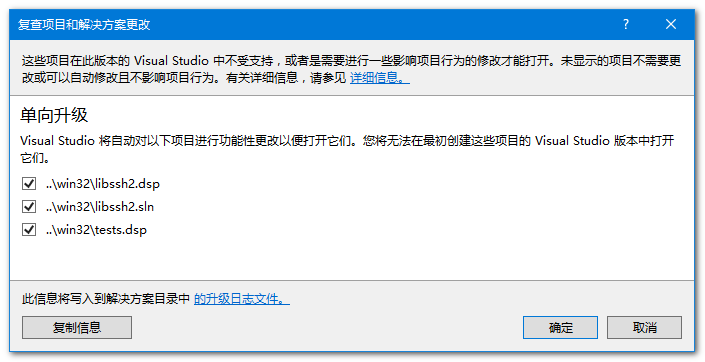
升级完成后,项目成功加载,里面有两个工程,一个是 libssh2,一个是 tests。tests 是一个测试的项目,我们不用管,我们重点关注的就是 libssh2 项目。
打开 libssh2 的属性管理器,可以看到该项目被官方配置好了已经有很多编译方式:
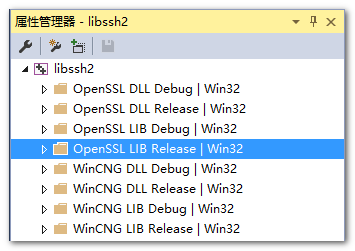
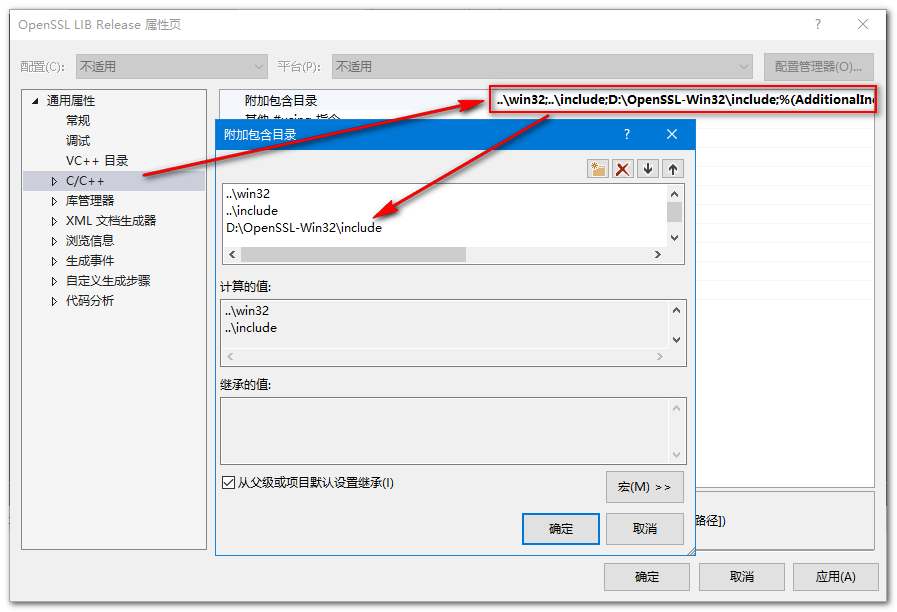
因为我们要用 OpenSSL lib 的方式编译,且要 Release 版本的,所以我只用这个做演示,大家自己需要什么版本自己编译即可。首先双击 OpenSSL LIB Release | Win32,编辑该项目属性,在 C/C++ -> 常规 -> 附加包含目录 中,添加 OpenSSL 的 include 路径 D:\OpenSSL-Win32\include,如下图:
接下来,添加 OpenSSL 的库路径和库文件到项目中。
- 选择项目属性中的 库管理器 -> 常规 -> 附加库目录,添加 OpenSSL 的 Lib 库路径 D:\OpenSSL-Win32\lib\VC
- 选择项目属性中的 库管理器 -> 常规 -> 附加依赖库,添加 OpenSSL 的 Lib 文件 libeay32MT.lib ssleay32MT.lib
这里大家可能注意到了,libeay32.lib 和 ssleay32.lib 分好多个版本,有 MD、MDd、MT、MTd 等,我们到底要选择哪个那?这要取决你编译这个库要使用的 运行库。选择该项目属性中的 C/C++ -> 代码生成 -> 运行库,根据你要调用 libssh2 的项目属性。
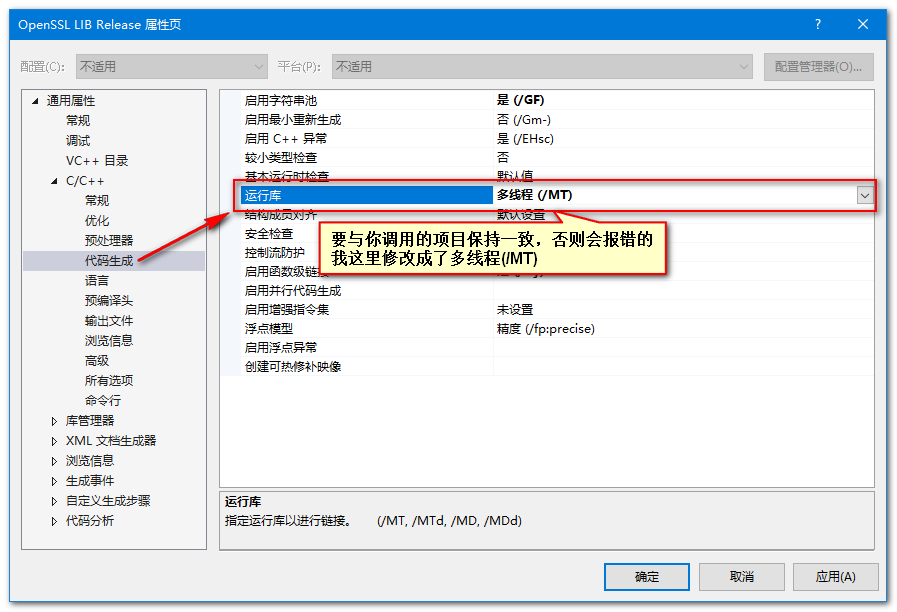
修改这里的属性,因为我要调用 libssh2 的项目使用的是 多线程MT,所以这里我也选择了 多线程MT,同时,你选择 libeay32.lib 和 ssleay32.lib 的时候,就根据这里的属性选择即可。
至此全部配置完毕了,编译一下项目,遇到了一个其他问题,编译器提示 snprintf 宏重定义:

这是因为在 libssh2_config.h 中重复定义了 snprintf 宏,只需要将 libssh2_config.h 中的定义注释即可:
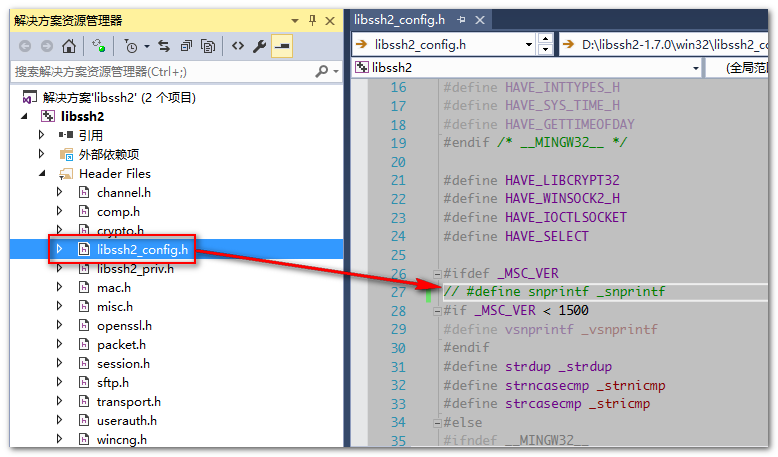
当然,这不是最终解决方案,在 libssh2 的 github 中,有人曾提出了这个问题,并且目前 github 最新的代码已经解决了这个问题,其解决的办法是判断 VC 库的版本决定是否定义 snprintf 宏。参见:https://github.com/libssh2/libssh2/commit/ded55537acbfda9756667e054c22972842633cf4
注释掉冲突的代码后,再次重新编译项目,这次就可以编译通过了,后面有两条警告,无需理会,不影响我们使用。
1>------ 已启动生成: 项目: libssh2, 配置: OpenSSL LIB Release Win32 ------

1>  agent.c

1>  channel.c

1>  comp.c

1>  crypt.c

1>  global.c

1>  hostkey.c

1>  keepalive.c

1>  kex.c

1>  knownhost.c

1>  mac.c

1>  misc.c

1>  openssl.c

1>  packet.c

1>  pem.c

1>  publickey.c

1>  scp.c

1>  session.c

1>  sftp.c

1>  transport.c

1>  userauth.c

1>  正在生成代码...

1>  正在编译...

1>  version.c

1>  wincng.c

1>  正在生成代码...

1>ssleay32MT.lib(SSLEAY32.dll) : warning LNK4006: __NULL_IMPORT_DESCRIPTOR 已在 libeay32MT.lib(LIBEAY32.dll) 中定义;已忽略第二个定义

1>ssleay32MT.lib(SSLEAY32.dll) : warning LNK4221: 此对象文件未定义任何之前未定义的公共符号,因此任何耗用此库的链接操作都不会使用此文件

1>  libssh2.vcxproj -> D:\libssh2-1.7.0\win32\.\Release_lib\libssh2.lib

========== 生成: 成功 1 个,失败 0 个,最新 0 个,跳过 0 个 ==========
以下是我调试通过的 VS2015 的项目目录,用 VS2015 打开可以直接编译通过的,下载后打开 win32 目录,用 VS2015 打开 libssh2.sln 编译即可:
测试 libssh2
接下来我们新建一个 Win32 控制台的空项目,新建一个 cpp 文件。

然后复制我们刚刚编译好的 libssh2 的库文件和所需的头文件。
- 在新建的 Win32 项目目录下新建两个目录,一个叫 include,一个叫 lib。
- 复制我们刚才生成好的 libssh2-1.7.0\win32\Release_lib\libssh2.lib 到新建 Win32 项目的 lib 目录下。
- 复制 libssh2-1.7.0\include 目录下所有文件到新建的 Win32 项目的 include 目录下。
- 复制 libssh2-1.7.0\win32\libssh2_config.h 文件到新建的 Win32 项目的 include 目录下。
复制完成后的目录结构如下:
│  libssh2_example.vcxproj

│  libssh2_example.vcxproj.filters

│  main.cpp

│

├─include

│      libssh2.h

│      libssh2_config.h

│      libssh2_publickey.h

│      libssh2_sftp.h

│

└─lib

        libssh2.lib
将测试项目的解决方案配置改为 Release,将 include 目录添加到项目的“附加包含目录”中。

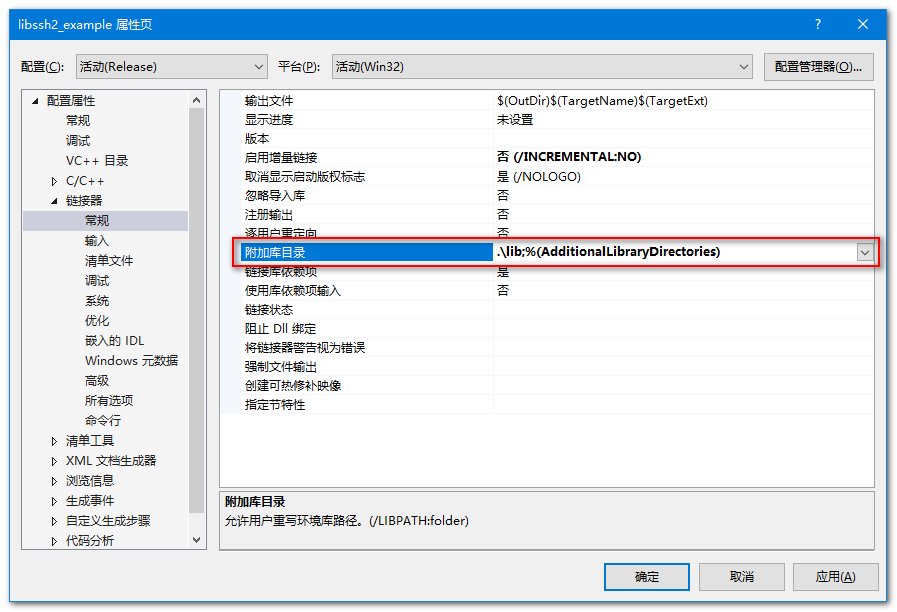
将 lib 目录添加到项目的“附加库目录”中。
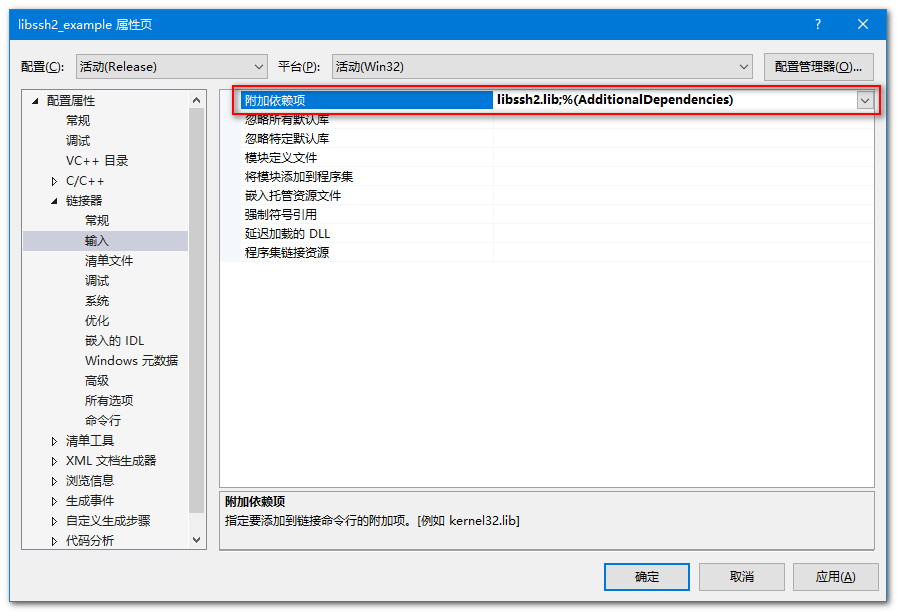
添加 libssh2.lib 到“附加依赖库”中。
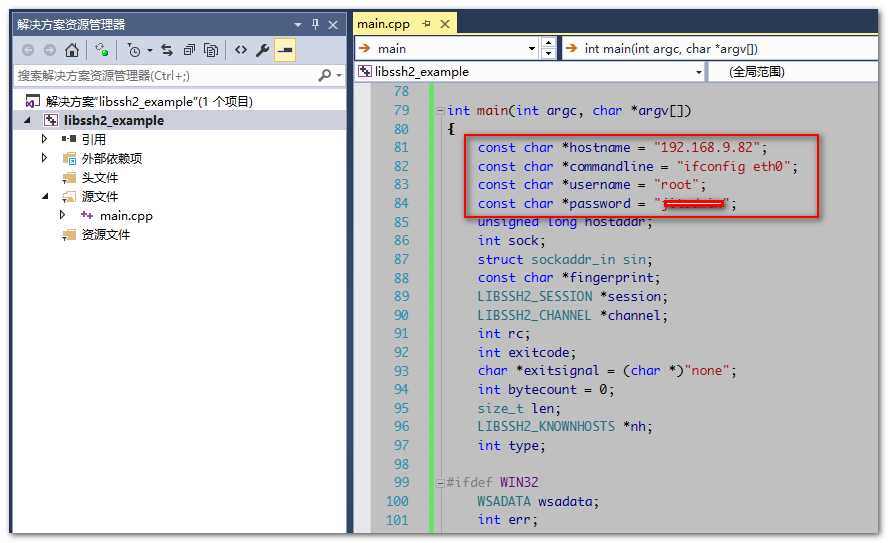
这里项目属性就配置好了,我们到官网找一个测试代码,拷贝到我们的项目里试一下。打开 https://www.libssh2.org/examples,随便找一个例子,我这里找的是 ssh2_exec.c 的列子,选择 ssh2_exec.c 例子,将里面所有的代码复制出来到我们测试项目的 main.cpp 中,然后修改一下例子中连接服务器的 IP 地址、用户名口令等信息。
编译项目,提示了如下错误:

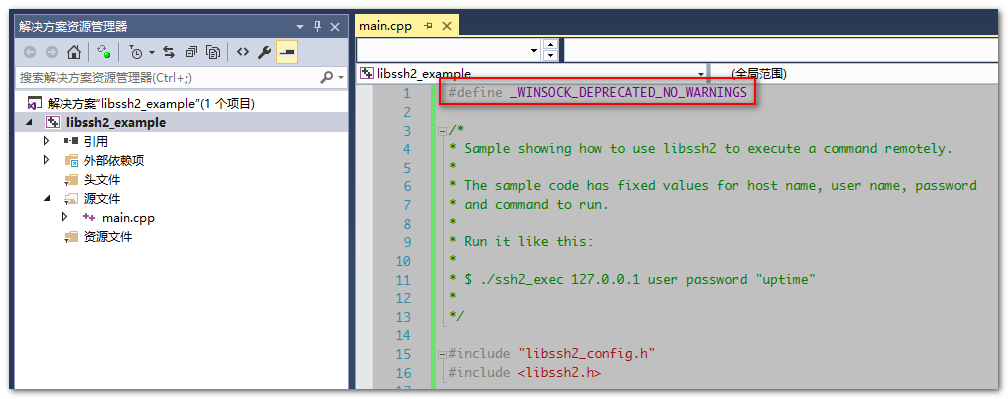
在代码的第一行(注意一定是第一行,所有 include 的前面)加上一句 #define _WINSOCK_DEPRECATED_NO_WARNINGS,禁用这个警告。
再次编译,提示找不到很多符号的错误:
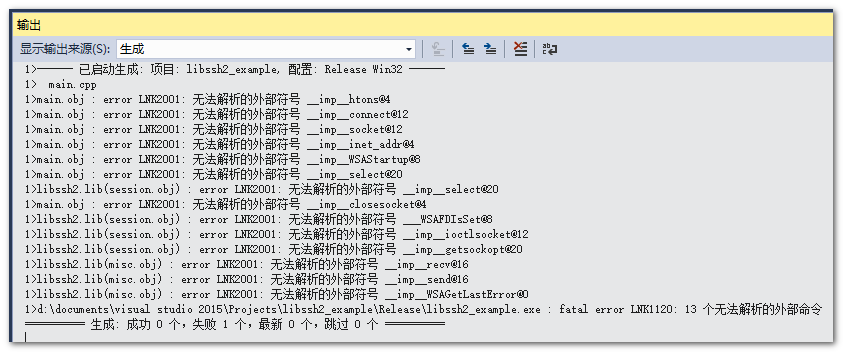
这是因为我们使用了 Windows socket 库里面的函数,要包含一下 ws2_32.lib 库文件,一样在附加依赖库中,增加 ws2_32.lib。
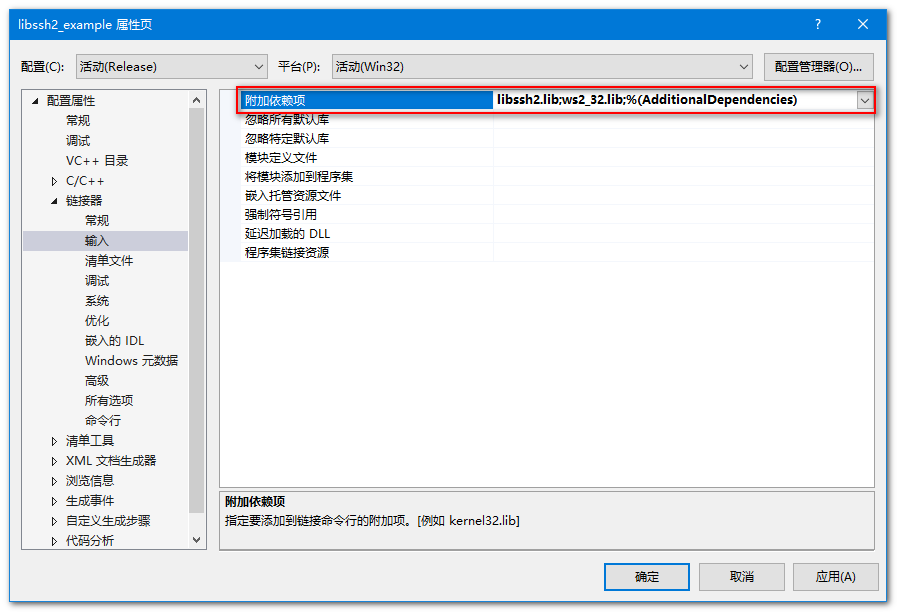
再次编译,这次编译成功了。

CTRL+F5 运行一下测试项目,就可以看到执行命令的结果输出了。
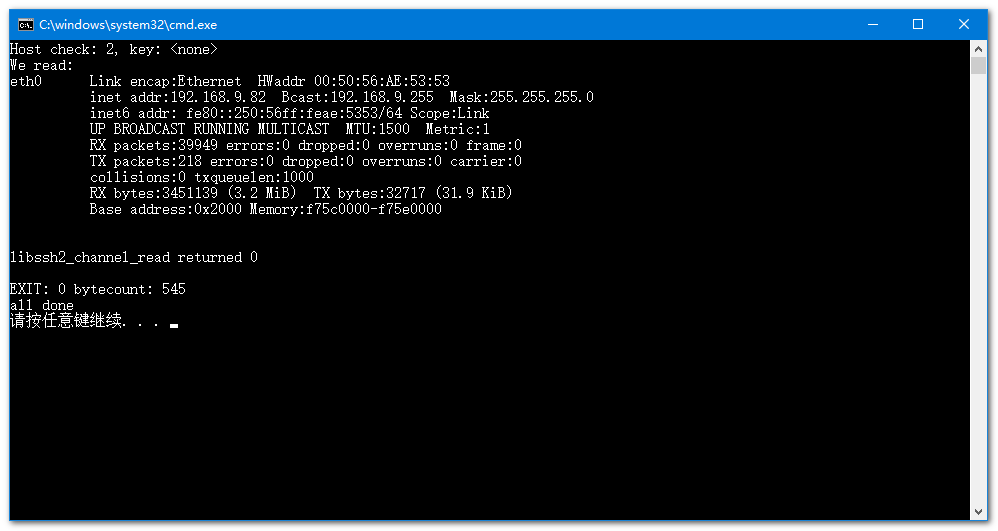
SFTP客户端文件上传、文件下载代码
把libeay32.lib放到自己当前工程目录的lib目录下

SFTP客户端示例代码:
#include "SFTP_Libssh2.h"

#include <iostream>

int main(int argc, char* argv[])

{

	//下面的代码只要在进程初始化的时候执行

	kagula::network::SFTP_Init();

	//测试SFTP链接

	kagula::network::SFTP_Libssh2* client = kagula::network::SFTP_Libssh2::Inst();

	std::string ip = "192.168.19.130";

	uint16_t port = 22;

	std::string usr = "kagula";

	std::string pwd = "123456";

	if (false == client->IsAbilityConn(ip, port, usr, pwd))

	{

		std::cout << client->strLastError << std::endl;

		return -1;

	}

	//测试文件上传,d:\\temp\\a.html

	if (0 != client->upload(ip, 22, usr, pwd, "d:\\temp\\a.html", "/home/kagula/a.html"))

	{

		std::cout << "Error:" << client->strLastError << std::endl;

	} else

	{

		std::cout << client->strLastError << std::endl;

	}

	//测试文件下载

	if (0 != client->download(ip, 22, usr, pwd, "/home/kagula/a.html","d:\\temp\\b.html" ))

	{

		std::cout << "Error:" << client->strLastError << std::endl;

	}

	else

	{

		std::cout << client->strLastError << std::endl;

	}

	//进程准备结束,释放资源的时候,运行下面的代码

	kagula::network::SFTP_Exit();

	return 0;

}
SFTP_Libssh2.h
#pragma once

#include <string>

#include <atomic>

/*

功能:SFTP协议的文件传输功能

最后更新日期:2014-5-17

简介:借助Libssh2库很容易实现sftp,ssh2客户端,这里给出

      如何实现Sftp客户端的代码

测试环境:Windows 8.1 64bit、Visual Studio 2013 Professional SP1

       OpenSSL 1.0.1g、zlib-1.2.8、libssh2  1.4.3

       Win32控制台项目

注意:动态链接需要把“libssh2.dll”文件复制到当前项目路径下

说明:原来的代码支持多线程,从应用程序抽出来的时候简化了,

	 你可以修改代码使它同时支持上传或下载多个文件。

建议:[1]第三方库直接下载源代码自己编译免得库由于编译器版本的

     不同或设置的不同链接的时候一大堆麻烦。

	 [2]读懂代码根据项目需求作相应修改

补充阅读资料:

《使用libssh2库实现支持密码参数的ssh2客户端》

http://blog.chinaunix.net/uid-24382173-id-229823.html

*/

namespace kagula {

	namespace network {

		int SFTP_Init();

		void SFTP_Exit();

		class SFTP_BKCall

		{

		public:

			/* progress返回值范围[0.0,1.0] */

			virtual void OnProgress(float progress) = 0;

		};

		class SFTP_Libssh2

		{

		public:

			static SFTP_Libssh2* Inst()

			{

				static SFTP_Libssh2 inst;

				return &inst;

			}

			/*

			入口参数使用说明

			ip:	  就填一个IP地址就好了,例如“127.0.0.1”。

			port: 端口,SFTP服务器默认端口为22。

			username:

			password:

			sftppath: 远程路径“/”开头 ,例如“/a.jpg”

			localpath: 本地路径,例如“d:\\temp\\test.jpg”

			strLastError: 错误信息

			出口参数

			返回不等于零,代表失败!

			*/

			int upload(std::string ip, unsigned short port, std::string username,

				std::string password, std::string localpath, std::string remotepath);

			int download(std::string ip, unsigned short port, std::string username,

				std::string password, std::string sftppath, std::string localpath);

			//测试SFTP服务器是否可以链接

			bool IsAbilityConn(std::string ip, unsigned short port, std::string username,

				std::string password);

			//设置回掉函数

			void SetBKCall(SFTP_BKCall *bkCall)	{ m_bkCall = bkCall; }

			//存放最近的错误信息

			std::string   strLastError;

			//用于停止当前上传或下载线程

			void stop() { m_isBreak.store(true); }

		private:

			SFTP_Libssh2() :m_bkCall(NULL) { m_isBreak.store(false); };//防止直接初始化

			SFTP_Libssh2(const SFTP_Libssh2&);                 //防止拷贝复制

			SFTP_Libssh2& operator=(const SFTP_Libssh2&);      //防止分配(运算符函数的调用)

			SFTP_BKCall  *m_bkCall;

			std::atomic_bool m_isBreak; //带读写保护的bool值

		};

	}

}
SFTP_Libssh2.cpp
//SFTP_Libssh2.cpp文件清单

#include "SFTP_Libssh2.h"

#include <libssh2.h>

#include <libssh2_sftp.h>

#ifdef HAVE_WINSOCK2_H

#include <winsock2.h>

#endif

#ifdef HAVE_SYS_SOCKET_H

#include <sys/socket.h>

#endif

#ifdef HAVE_NETINET_IN_H

#include <netinet/in.h>

#endif

#ifdef HAVE_UNISTD_H

#include <unistd.h>

#endif

#ifdef HAVE_ARPA_INET_H

#include <arpa/inet.h>

#endif

#ifdef HAVE_SYS_TIME_H

#include <sys/time.h>

#endif

#include <sys/types.h>

#include <fcntl.h>

#include <errno.h>

#include <stdio.h>

#include <ctype.h>

#include <sstream>

#include <iomanip>

#pragma comment(lib, "ws2_32.lib")

#pragma comment(lib, "libeay32.lib")

#pragma comment(lib, "libssh2.lib")

namespace kagula {

	namespace network

	{

		//初始化进程的时候调用

		//如果非0表示初始化失败!

		int SFTP_Init()

		{

			WSADATA wsadata;

			int rc = WSAStartup(MAKEWORD(2, 0), &wsadata);

			if (rc != 0) {

				return rc;

			}

			rc = libssh2_init(0);

			return rc;

		}

		//进程结束的时候调用

		void SFTP_Exit()

		{

			libssh2_exit();

			WSACleanup();

		}

		bool SFTP_Libssh2::IsAbilityConn(std::string ip, unsigned short port, std::string username,

			std::string password)

		{

			unsigned long hostaddr;

			struct sockaddr_in sin;

			const char *fingerprint;

			LIBSSH2_SESSION *session;

			int rc;

			bool bR = false;

			FILE *local;

			LIBSSH2_SFTP *sftp_session;

			LIBSSH2_SFTP_HANDLE *sftp_handle;

			hostaddr = inet_addr(ip.c_str());//hostaddr = htonl(0x7F000001);

			//新建连接

			int sock = socket(AF_INET, SOCK_STREAM, 0);

			sin.sin_family = AF_INET;

			sin.sin_port = htons(port);

			sin.sin_addr.s_addr = hostaddr;

			if (connect(sock, (struct sockaddr*)(&sin),

				sizeof(struct sockaddr_in)) != 0) {

				std::ostringstream ostr;

				ostr << "[" << __FILE__ << "][" << __LINE__ << "]failed to connect" << ip << "!" << std::endl;

				strLastError = ostr.str();

				return bR;

			}

			//新建对话实例

			session = libssh2_session_init();

			if (!session)

			{

				closesocket(sock);

				return bR;

			}

			//设置调用阻塞

			libssh2_session_set_blocking(session, 1);

			//进行握手

			rc = libssh2_session_handshake(session, sock);

			if (rc) {

				std::ostringstream ostr;

				ostr << "[" << __FILE__ << "][" << __LINE__ << "]Failure establishing SSH session: " << rc << std::endl;

				strLastError = ostr.str();

				libssh2_session_free(session); closesocket(sock);

				return bR;

			}

			//检查主机指纹

			std::ostringstream ostr;

			fingerprint = libssh2_hostkey_hash(session, LIBSSH2_HOSTKEY_HASH_SHA1);

			ostr << "Fingerprint: ";

			for (int i = 0; i < 20; i++) {

				unsigned char c = fingerprint[i];

				int nT = c;

				ostr << std::hex << std::setw(2) << std::setfill('0') << nT;

			}

			strLastError = ostr.str();

			//通过密码验证登陆用户身份

			if (libssh2_userauth_password(session, username.c_str(), password.c_str())) {

				std::ostringstream ostr;

				ostr << "[" << __FILE__ << "][" << __LINE__ << "]Authentication by password failed." << std::endl;

				strLastError = ostr.str();

				goto shutdown;

			}

			sftp_session = libssh2_sftp_init(session);

			if (!sftp_session) {

				std::ostringstream ostr;

				ostr << "[" << __FILE__ << "][" << __LINE__ << "]Unable to init SFTP session " << std::endl;

				strLastError = ostr.str();

				goto shutdown;

			}

			bR = true;

			libssh2_sftp_shutdown(sftp_session);

		shutdown:

			libssh2_session_disconnect(session,

				"Normal Shutdown, Thank you for playing");

			libssh2_session_free(session);

			closesocket(sock);

			return bR;

		}

		/*

		源码参考地址

		http://www.libssh2.org/examples/sftp_write.html

		*/

		int SFTP_Libssh2::upload(std::string ip, unsigned short port, std::string username, std::string password,

			std::string localpath, std::string remotepath)

		{

			if (ip.length()<1 || username.length()<1 || password.length()<1 || localpath.length()<1 || remotepath.length()<1)

			{

				return -1;

			}

			int nR = 0;

			unsigned long hostaddr;

			struct sockaddr_in sin;

			const char *fingerprint;

			LIBSSH2_SESSION *session;

			int rc = -1;

			FILE *local = NULL;

			LIBSSH2_SFTP *sftp_session;

			LIBSSH2_SFTP_HANDLE *sftp_handle;

			hostaddr = inet_addr(ip.c_str());//hostaddr = htonl(0x7F000001);

			if (fopen_s(&local, localpath.c_str(), "rb") != 0) {

				std::ostringstream ostr;

				ostr << "[" << __FILE__ << "][" << __LINE__ << "]Can't open local file " << localpath << std::endl;

				strLastError = ostr.str();

				return -2;

			}

			//取待上传文件整个size.

			fseek(local, 0, SEEK_END);

			size_t filesize = ftell(local);//local file大小,在readFromDisk中被引用

			fseek(local, 0, SEEK_SET);//文件指针重置到文件头

			//新建连接

			int sock = socket(AF_INET, SOCK_STREAM, 0);

			sin.sin_family = AF_INET;

			sin.sin_port = htons(port);

			sin.sin_addr.s_addr = hostaddr;

			if (connect(sock, (struct sockaddr*)(&sin),

				sizeof(struct sockaddr_in)) != 0) {

				std::ostringstream ostr;

				ostr << "[" << __FILE__ << "][" << __LINE__ << "] failed to connect " << ip << std::endl;

				strLastError = ostr.str();

				fclose(local);

				return -3;

			}

			//创建会话实例

			session = libssh2_session_init();

			if (!session)

			{

				fclose(local); closesocket(sock);

				return -4;

			}

			//阻塞方式调用libssh2

			libssh2_session_set_blocking(session, 1);

			//进行握手

			rc = libssh2_session_handshake(session, sock);

			if (rc) {

				std::ostringstream ostr;

				ostr << "[" << __FILE__ << "][" << __LINE__ << "] Failure establishing SSH session:" << rc << std::endl;

				strLastError = ostr.str();

				fclose(local); libssh2_session_free(session); closesocket(sock);

				return -5;

			}

			//获取主机指纹

			std::ostringstream ostr;

			fingerprint = libssh2_hostkey_hash(session, LIBSSH2_HOSTKEY_HASH_SHA1);

			ostr << "Fingerprint: ";

			for (int i = 0; i < 20; i++) {

				unsigned char c = fingerprint[i];

				int nT = c;//这样转是为了防止符号位扩展

				ostr << std::hex << std::setw(2) << std::setfill('0') << nT;

			}

			strLastError = ostr.str();

			//通过密码验证

			if (libssh2_userauth_password(session, username.c_str(), password.c_str())) {

				std::ostringstream ostr;

				ostr << "[" << __FILE__ << "][" << __LINE__ << "] Authentication by password failed ["

					<< username << "][" << password << "]" << rc << std::endl;

				strLastError = ostr.str();

				goto shutdown;

			}

			sftp_session = libssh2_sftp_init(session);

			if (!sftp_session) {

				std::ostringstream ostr;

				ostr << "[" << __FILE__ << "][" << __LINE__ << "] Unable to init SFTP session" << std::endl;

				strLastError = ostr.str();

				goto shutdown;

			}

			//向SFTP服务器发出新建文件请求

			sftp_handle =

				libssh2_sftp_open(sftp_session, remotepath.c_str(),

				LIBSSH2_FXF_WRITE | LIBSSH2_FXF_CREAT | LIBSSH2_FXF_TRUNC,

				LIBSSH2_SFTP_S_IRUSR | LIBSSH2_SFTP_S_IWUSR |

				LIBSSH2_SFTP_S_IRGRP | LIBSSH2_SFTP_S_IROTH);

			if (!sftp_handle) {

				std::ostringstream ostr;

				ostr << "[" << __FILE__ << "][" << __LINE__ << "] Unable to open file with SFTP.  ip="

					<< ip <<"] remotepath=[" << remotepath << "]" << std::endl;

				strLastError = ostr.str();

				nR = -1;

				goto shutdown;

			}

			char mem[1024 * 16];

			size_t nread;

			char *ptr;

			size_t count = 0;

			do {

				nread = fread(mem, 1, sizeof(mem), local);

				if (nread <= 0) {

					//到达文件尾部

					break;

				}

				ptr = mem;

				do {

					// 向服务器写数据,直到数据写完毕

					rc = libssh2_sftp_write(sftp_handle, ptr, nread);

					if (rc < 0)

						break;

					ptr += rc; count += nread;

					nread -= rc;

					//如果设置了回调,进行回调

					if (m_bkCall)

					{

						float p = count / (float)filesize;

						m_bkCall->OnProgress(p);

					}

					//callback.end

				} while (nread);

				if ( m_isBreak.load() == true )

				{

					std::ostringstream ostr;

					ostr << "[" << __FILE__ << "][" << __LINE__ << "] 上传文件任务被用户break!" << std::endl;

					strLastError = ostr.str();

					nR = -6;

					break;

				}

			} while (rc > 0);

			libssh2_sftp_close(sftp_handle);

			libssh2_sftp_shutdown(sftp_session);

		shutdown:

			libssh2_session_disconnect(session,

				"Normal Shutdown, Thank you for playing");

			libssh2_session_free(session);

			closesocket(sock);

			fclose(local);

			return nR;//返回“0”表示成功

		}

		/*

		源码参考地址

		http://www.oschina.net/code/snippet_12_10717

		*/

		int SFTP_Libssh2::download(std::string ip, unsigned short port, std::string username, std::string password,

			std::string sftppath, std::string localpath)

		{

			unsigned long hostaddr;

			int sock, i, auth_pw = 0;

			struct sockaddr_in sin;

			const char *fingerprint;

			char *userauthlist;

			LIBSSH2_SESSION *session;

			int rc;

			LIBSSH2_SFTP *sftp_session;

			LIBSSH2_SFTP_HANDLE *sftp_handle;

			hostaddr = inet_addr(ip.c_str()); //hostaddr = htonl(0x7F000001);

			/*

			* The application code is responsible for creating the socket

			* and establishing the connection

			*/

			sock = socket(AF_INET, SOCK_STREAM, 0);

			sin.sin_family = AF_INET;

			sin.sin_port = htons(port);

			sin.sin_addr.s_addr = hostaddr;

			if (connect(sock, (struct sockaddr*)(&sin),

				sizeof(struct sockaddr_in)) != 0) {

				std::ostringstream ostr;

				ostr << "[" << __FILE__ << "][" << __LINE__ << "] 连接失败!" << std::endl;

				strLastError = ostr.str();

				return -1;

			}

			/* Create a session instance

			*/

			session = libssh2_session_init();

			if (!session)

				return -1;

			/* Since we have set non-blocking, tell libssh2 we are blocking */

			libssh2_session_set_blocking(session, 1);

			/* ... start it up. This will trade welcome banners, exchange keys,

			* and setup crypto, compression, and MAC layers

			*/

			rc = libssh2_session_handshake(session, sock);

			if (rc) {

				std::ostringstream ostr;

				ostr << "[" << __FILE__ << "][" << __LINE__ << "] 建立SSH会话失败" << rc << std::endl;

				strLastError = ostr.str();

				return -1;

			}

			/* At this point we havn't yet authenticated.  The first thing to do

			* is check the hostkey's fingerprint against our known hosts Your app

			* may have it hard coded, may go to a file, may present it to the

			* user, that's your call

			*/

			fingerprint = libssh2_hostkey_hash(session, LIBSSH2_HOSTKEY_HASH_SHA1);

			std::ostringstream ostr;

			fingerprint = libssh2_hostkey_hash(session, LIBSSH2_HOSTKEY_HASH_SHA1);

			ostr << "Fingerprint: ";

			for (int i = 0; i < 20; i++) {

				unsigned char c = fingerprint[i];

				int nT = c;

				ostr << std::hex << std::setw(2) << std::setfill('0') << nT;

			}

			strLastError = ostr.str();

			/* check what authentication methods are available */

			userauthlist = libssh2_userauth_list(session, username.c_str(), username.length());

			if (strstr(userauthlist, "password") == NULL)

			{

				std::ostringstream ostr;

				ostr << "[" << __FILE__ << "][" << __LINE__ << "] 服务器不支持输入password方式验证!" << std::endl;

				strLastError = ostr.str();

				goto shutdown;

			}

			/* We could authenticate via password */

			if (libssh2_userauth_password(session, username.c_str(), password.c_str())) {

				std::ostringstream ostr;

				ostr << "[" << __FILE__ << "][" << __LINE__ << "] 密码错误!" << std::endl;

				strLastError = ostr.str();

				goto shutdown;

			}

			sftp_session = libssh2_sftp_init(session);

			if (!sftp_session) {

				std::ostringstream ostr;

				ostr << "[" << __FILE__ << "][" << __LINE__ << "] 初始化FTL对话失败!" << std::endl;

				strLastError = ostr.str();

				goto shutdown;

			}

			/* Request a file via SFTP */

			sftp_handle =

				libssh2_sftp_open(sftp_session, sftppath.c_str(), LIBSSH2_FXF_READ, 0);

			if (!sftp_handle) {

				std::ostringstream ostr;

				ostr << "[" << __FILE__ << "][" << __LINE__ << "] 打开文件失败! " << libssh2_sftp_last_error(sftp_session) << std::endl;

				strLastError = ostr.str();

				goto shutdown;

			}

			FILE *stream;

			if (fopen_s(&stream, localpath.c_str(), "wb") == 0)

			{

				do {

					char mem[1024];

					/* loop until we fail */

					rc = libssh2_sftp_read(sftp_handle, mem, sizeof(mem));

					if (rc > 0) {

						//从内存到磁盘

						fwrite(mem, 1, rc, stream);

					}

					else {

						break;

					}

				} while (1);

				fclose(stream);

			}

			else {

				std::ostringstream ostr;

				ostr << "[" << __FILE__ << "][" << __LINE__ << "] 新建本地文件失败 " << localpath << std::endl;

				strLastError = ostr.str();

			}

			libssh2_sftp_close(sftp_handle);

			libssh2_sftp_shutdown(sftp_session);

		shutdown:

			libssh2_session_disconnect(session, "Normal Shutdown, Thank you for playing");

			libssh2_session_free(session);

			closesocket(sock);//INVALID_SOCKET

			return 0;

		}

	}

}
源码下载
链接:https://pan.baidu.com/s/1OBAw-B5zrITXVDFiIDm_pA
提取码:q25a
参考
Windows VS2015 编译 libssh2 1.7.0
https://www.mycode.net.cn/language/cpp/1681.html
Windows VS2017 编译 libssh2 1.7.0(执行命令、文件上传、下载)的更多相关文章
- 【Python】模块学习之使用paramiko连接Linux,远程执行命令,上传下载、文件
本文主要介绍paramiko远程执行linux命令,及在服务器上进行文件的上传.下载 paramiko是用python语言写的一个模块,遵循SSH2协议,支持以加密和认证的方式,进行远程服务器的连接. ...
- python3 实现堡垒机功能(并发执行命令及上传下载文件)
转载请注明出处,欢迎提出宝贵意见,谢谢! 功能介绍: 1.主机分组 登录后显示分组主机及主机数量 选择主机组后显示该主机组下所有主机信息,主机名及IP显示输入选择:1.执行命令利用线程并发组内所有主机 ...
- linux CentOS 安装rz和sz命令 lrzsz 实现windows和linux之间的文件上传 下载
https://blog.nbhao.org/1902.html https://bbs.csdn.net/topics/391989523 https://www.cnblogs.com/zhoul ...
- python批量操作Linux服务器脚本,ssh密码登录(执行命令、上传、下载)(一)
-*- paramiko.util.log_to_file( ssh = paramiko.SSHClient() ssh.set_missing ...
- python批量操作Linux服务器脚本,key登录(执行命令、上传、下载)(二)
-*- 2 #批量操作linux服务器(执行命令,上传,下载) 3 #!/usr/bin/python 4 import paramiko 5 import datetime ...
- Linux学习笔记(7)CRT实现windows与linux的文件上传下载
Linux学习笔记(7)CRT实现windows与linux的文件上传下载 按下Alt + p 进入SFTP模式,或者右击选项卡进入 命令介绍 help 显示该FTP提供所有的命令 lcd 改变本地上 ...
- xftp实现本地与服务器的文件上传下载(windows)
背景: Jemter环境搭建,需上传下载服务器文件到aws服务器上,由于secureCRT的局限性它只支持pub格式的密钥,不支持pem格式密钥,xshell是支持pem格式的,所以尝试安装xshel ...
- 批量执行(Linux命令,上传/下载文件)
前言: 每个公司的网络环境大都划分 办公网络.线上网络,之所以划分的主要原因是为了保证线上操作安全: 对于外部用户而言也只能访问线上网络的特定开放端口,那么是什么控制了用户访问线上网络的呢? 防火墙过 ...
- Java 开源博客 Solo 1.8.0 发布 - 改进文件上传
本次发布主要是更新了编辑器,使其更好地支持文件上传.(1.8.0 版本变更记录请看这里) 我们的 Markdown 编辑器: 另外,我们对 HTTPS 的支持也更完善了,欢迎大家试用! 简介 Solo ...
随机推荐
- go语言-变量与常量
变量 一.变量注意事项 变量名首字母大写,可以被其他包访问调用(公有),变量名首字母小写,其他包不能访问和调用(私有) 在同一个域里一个变量只能定义一次,不可重复定义 二.变量的声明的种方式 1.先声 ...
- 07_gitee源码参考
Django REST framework Tutorial 教程 码云:https://gitee.com/venicid/tutorial-api
- linux mint 19.1安装搜狗输入法
1.到搜狗拼音输入法官网下载Linux版. 2.使用dpkg命令安装deb软件包: $ sudo dpkg -i sogoupinyin_2.2.0.0108_amd64.deb 3.安装成功;也有可 ...
- AS400 printer setting
(1) CRTOUTQ OUTQ(TESTLIB/PRINTER2) (2) CRTDEVPRT ===> CRTDEVPRT DEVD(PRINTER2) DEVCLS(*LAN) TYPE( ...
- 查找 Linux 发行版名称、版本和内核详细信息
作者: Sk 译者: LCTT geekpi | 2019-08-26 11:40 收藏: 1 本指南介绍了如何查找 Linux 发行版名称.版本和内核详细信息.如果你的 Linux 系统有 GU ...
- qt 读取xml文件中文问题
1.保存文件格式为UTF-8 2.文件流打开时设置 QFile file(fileName); if (!file.open(QIODevice::ReadOnly)) { qDebug() < ...
- 项目 java.lang.NoClassDefFoundError 异常。
项目部署之后调用接口失败:异常信息: NoClassDefFoundError ClassNotFoundException 注意这两种是有区别的. 具体转 https://www.cnblogs.c ...
- python获取当前天气情况
利用 Python 从互联网公开服务中获取天气预报信息.天气信息来源网站:http://www.webxml.com.cn/WebServices/WeatherWebService.asmx实现以下 ...
- 激活 phpstorm2019.1 win10
首先添加以下内容到c:\windows\system32\drivers\etc\hosts 文件 0.0.0.0 account.jetbrains.com 0.0.0.0 www.jetbrain ...
- RethinkDB是什么?—— 面向文档的NOSQL数据库,MVCC+Btree索引,pushes JSON to your apps in realtime采用push思路,优化的ssd存储
RethinkDB是什么? RethinkDB是新一代的面向文档的数据库存储管理系统,原本是MySQL中针对SSD优化的一个存储引擎,后来脱离了MySQL成为了独立的系统. 数据如何存储在磁盘上? 数 ...
