Ansible自动化搭建及工具集和常见模块、命令详情(重点)
一、ansible介绍
1、ansible简介
官方的title是“Ansible is Simple IT Automation”——简单的自动化IT工具。
Ansible跟其他IT自动化技术的区别在于其关注点并非配置管理、应用部署或IT流程工作流,而是提供一个统一的界面来协调所有的IT自动化功能,因此Ansible的系统更加易用,部署更快。
Ansible可以让用户避免编写脚本或代码来管理应用,同时还能搭建工作流实现IT任务的自动化执行。IT自动化可以降低技术门槛及对传统IT的依赖,从而加快项目的交付速度。
2、ansible优缺点
优点:
- 轻量级,他不需要去客户端安装agent,更新时,只需要在操作机上进行一次更新即可
- 批量任务执行可以写成脚本,而且不用分发到远程就可以执行
- 使用python编写的,维护更简单
- 支持sudo
缺点
- 对于几千台、上万台机器的操作,还不清楚性能、效率情况如何,需要进一步了解。
3、ansible架构及工作原理
andible基本架构如下图所示
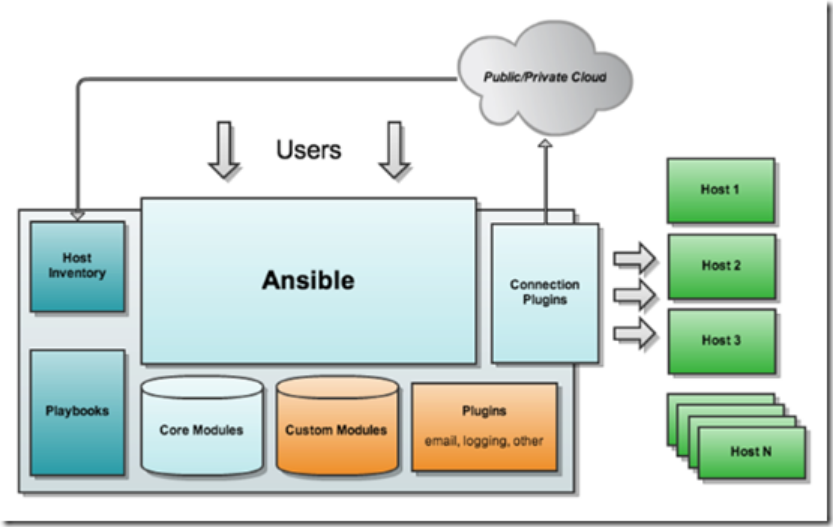
ansible core : ansible 自身核心模块
host inventory: 主机库,定义可管控的主机列表
connection plugins: 连接插件,一般默认基于 ssh 协议连接
modules:core modules ( 自带模块 ) 、 custom modules ( 自定义模块 )
playbooks :剧本,按照所设定编排的顺序执行完成安排任务
Ansible工作原理如下图:

1、管理端支持local 、ssh、zeromq 三种方式连接被管理端,默认使用基于ssh的连接---这部分对应基本架构图中的连接模块;
2、可以按应用类型等方式进行Host Inventory(主机群)分类,管理节点通过各类模块实现相应的操作---单个模块,单条命令的批量执行,我们可以称之为 ad-hoc;
3、管理节点可以通过playbooks 实现多个task的集合实现一类功能,如web服务的安装部署、数据库服务器的批量备份等。playbooks我们可以简单的理解为,系 统通过组合多条ad-hoc操作的配置文件 。
Ansible默认是通过SSH通道来管理的,也就是它所说的免客户端方式管理, 它底层是通过 paramiko 来实现的。
ansible执行过程大体过程如下图,其中暖色调的代表已经模块化。

二、部署安装
操作环境:
| 操作系统 | IP地址 | 角色 | 主机名 | CPU核心 |
| Centos7 | 192.168.200.113 | Ansible | ansible | 1 |
| Centos7 | 192.168.200.114 | Client | client1 | 1 |
| Centos7 | 192.168.200.115 | Client | client2 | 2 |
环境准备:
关闭防火墙:
[root@localhost ~]#systemctl stop firewalld
[root@localhost ~]#iptables -F
[root@localhost ~]#setenfrce 0
Ansible113操作:
[root@localhost ~]#hostname ansible
[root@localhost ~]#bash
[root@ansible]#nslookup www.baidu.com #测试网络连通性
[root@ansible]#vim /etc/hosts #编写主机名和IP的映射
192.168.200.113 ansible

192.168... client1

192.168.200.112 client2
通过scp把hosts文件发送给另外两台主机:
[root@ansible]#scp /etc/hosts 192.168.200.114:/etc
[root@ansible]#scp /etc/hosts 192.168.200.115:/etc
YUM方式安装ansible:(推荐使用YUM安装)
[root@ansible]#cd /etc/yum.repos.d/
[root@ansible yum.repos.d]# mkdir a/
[root@ansible yum.repos.d]# mv C* a/
[root@ansible yum.repos.d]# vim local.repo
[yum]

name=yum

baseurl=file:///media

enabled=

gpgcheck=
[root@ansible yum.repos.d]# mount /dev/sr0 /media/
[root@localhost yum.repos.d]#yum clean all
[root@localhost yum.repos.d]#wget http://mirrors.aliyun.com/repo/Centos-7.repo
安装ansible
[root@localhost yum.repos.d]#yum install ansible -y
[root@localhost yum.repos.d]#ansible --version
ansible 2.4.2.0

  config file = /etc/ansible/ansible.cfg

  configured module search path = [u'/root/.ansible/plugins/modules', u'/usr/share/ansible/plugins/modules']

  ansible python module location = /usr/lib/python2./site-packages/ansible

  executable location = /usr/bin/ansible

  python version = 2.7. (default, Oct  , ::) [GCC 4.8.  (Red Hat 4.8.-)]
PIP3方式安装ansible:
[root@ansible]#yum install lrzsz vim net-tools gcc gcc-c++ ncurses ncurses-devel unzip zlib-devel zlib openssl-devel opdenssl #安装依赖包
[root@ansible]#rz #上传Python-3.5.2源码包
[root@ansible]#tar xf Python3.5.2.tgz -C /usr/src/
[root@ansible]#cd /usr/src/Python-3.5.2/
[root@ansible Python-3.5.2]#./configure --perfix=/usr/local/python/ && make && make install
[root@ansible Python-3.5.2]#ln -s /usr/local/python/bin/python3 /usr/bin/python3
[root@ansible Python-3.5.2]#which python3
/usr/bin/python3
[root@ansible Python-3.5.2]#python3 -V
pip3安装ansibe:
[root@ansible Python-3.5.2]#/usr/local/python/bin/pip3 install ansible
等待ansible安装完后。注意基于pip安装的没有配置文件。需要自己建立
[root@ansible Python-3.5.2]#ln -s /usr/local/python/bin/ansible /usr/local/bin/
[root@ansible Python-3.5.2]#which ansible
[root@ansible Python-3.5.2]#ansible --version
创建SSH免交互登录:

[root@localhost yum.repos.d]#cd
[root@ansible ~]#ssh-keygen -t rsa #生成秘钥对、这种属于交互式的、此处不选择
选择这种非交互式的
[root@ansible ~]# ssh-keygen -t rsa -P "" -f .ssh/id_rsa #属于非交互式的
[root@ansible ~]#ls .ssh/
id_rsa id_rsa.pub known_hosts
client1 114操作环境准备:
关闭防火墙:
[root@localhost ~]#systemctl stop firewalld
[root@localhost ~]#iptables -F
[root@localhost ~]#setenfrce 0
[root@localhost ~]# hostname client1
[root@localhost ~]# bash
client2 115操作环境准备:
关闭防火墙:
[root@localhost ~]#systemctl stop firewalld
[root@localhost ~]#iptables -F
[root@localhost ~]#setenfrce 0
[root@localhost ~]# hostname client2
[root@localhost ~]# bash
Ansible113操作:
发送公钥给两台client:
[root@ansible ~]# ssh-copy-id root@192.168.200.114
[root@ansible ~]# ssh-copy-id root@192.168.200.115
测试免密连接:
[root@ansible ~]# ssh root@192.168.200.114
[root@ansible ~]# ssh root@192.168.200.115
Ansible配置:

[root@ansible ~]# cp /etc/ansible/hosts /etc/ansible/hosts.bak
root@ansible ~]# vim /etc/ansible/hosts
在最末尾添加如下:

[crushlinux]

192.168.200.114

192.168.200.115
[root@ansible ~]# ansible crushlinux -m ping #查询环境
192.168.200.115 | SUCCESS => {

"changed": false,

"ping": "pong"

}

192.168.200.114 | SUCCESS => {

"changed": false,

"ping": "pong"

}

crushlinux需要提前在/etc/ansible/hosts文件中定义组
Ansible一般用三种颜色表示返回执行的结果:红色、绿色、橘黄色。其中红色表示执行过程有异常,橘黄色表示命令在执行过程中有变更
绿色表示执行成功但是没有变更且没有对机器做修改
基于sshpass秘钥分发:
sshpass可以帮助我们免交互的方式发送文件,一旦把公钥删除就无法继续发送文件[root@client1 ~]# rm -rf .ssh/authorized_keys
[root@ansible ~]# yum install sshpass -y #安装sshpass秘钥
[root@ansible ~]# sshpass -p 123123 ssh root@192.168.200.114
[root@client1 ~]# rm -rf .ssh/authorized_keys
[root@client2 ~]# rm -rf .ssh/authorized_keys
[root@ansible ~]# sshpass -p123123 ssh-copy-id root@192.168.200.115
[root@ansible ~]# sshpass -p123123 ssh-copy-id root@192.168.200.114
第一种使用sshpass免密连接
第二种修改SSH配置文件
[root@ansible ~]# vim /etc/ssh/ssh_config
35行修改成如下:

StrictHostKeyChecking no

=====================================================================================================

[root@ansible ~]# vim /etc/ansible/hosts
[crushlinux]

192.168.200.114

192.168.200.115

[clinet]                   #测试主机名

client1

client1

[test01]                   #测试正则

client[:]
[root@ansible ~]# ansible client -m ping && ansible test01 -m ping #查询环境、ping是模块
client1 | SUCCESS => {
"ansible_facts": {
"discovered_interpreter_python": "/usr/bin/python"
},
"changed": false,
"ping": "pong"
}
client2 | SUCCESS => {
"ansible_facts": {
"discovered_interpreter_python": "/usr/bin/python"
},
"changed": false,
"ping": "pong"
}
client2 | SUCCESS => {
"ansible_facts": {
"discovered_interpreter_python": "/usr/bin/python"
},
"changed": false,
"ping": "pong"
}
client1 | SUCCESS => {
"ansible_facts": {
"discovered_interpreter_python": "/usr/bin/python"
},
"changed": false,
"ping": "pong"
}
SUCCESS表示命令执行成 ,=>{}表示返回的结果,changed:flase表示没有对主机做出更改
ping:ping表示Ping命令返回非结果
配置完成后可以针对hosts定义服务组进行远程操作,也可以针对组中的指定的某一个或多个主机操作,下面介绍如何对特定的服务器操作“
1:针对crushlinux组中的192.168.200.114主机操作,通--limit参数限定主机的变更
[root@ansible ~]# ansible crushlinux -m command -a "head -5 /etc/passwd" --limit "192.168.200.114"
192.168.200.114 | SUCCESS | rc=0 >>

root:x:0:0:root:/root:/bin/bash

bin:x:1:1:bin:/bin:/sbin/nologin

daemon:x:2:2:daemon:/sbin:/sbin/nologin

adm:x:3:4:adm:/var/adm:/sbin/nologin

lp:x:4:7:lp:/var/spool/lpd:/sbin/nologin
2:只对192.168.200.114主机操作,通过IP限定主机变更
[root@ansible ~]# ansible 192.168.200.114 -m command -a "head -5 /etc/passwd" #-a表示要执行的操作
192.168.200.114 | SUCCESS | rc=0 >>

root:x:0:0:root:/root:/bin/bash

bin:x:1:1:bin:/bin:/sbin/nologin

daemon:x:2:2:daemon:/sbin:/sbin/nologin

adm:x:3:4:adm:/var/adm:/sbin/nologin

lp:x:4:7:lp:/var/spool/lpd:/sbin/nologin
3:只对192.168.200.0网段所有主机进行操作,通过通配符限定主机变更
[root@ansible ~]# ansible 192.168.200.* -m command -a "head -5 /etc/passwd"
192.168.200.114 | SUCCESS | rc=0 >>

root:x:0:0:root:/root:/bin/bash

bin:x:1:1:bin:/bin:/sbin/nologin

daemon:x:2:2:daemon:/sbin:/sbin/nologin

adm:x:3:4:adm:/var/adm:/sbin/nologin

lp:x:4:7:lp:/var/spool/lpd:/sbin/nologin

192.168.200.115 | SUCCESS | rc=0 >>

root:x:0:0:root:/root:/bin/bash

bin:x:1:1:bin:/bin:/sbin/nologin

daemon:x:2:2:daemon:/sbin:/sbin/nologin

adm:x:3:4:adm:/var/adm:/sbin/nologin

lp:x:4:7:lp:/var/spool/lpd:/sbin/nologin
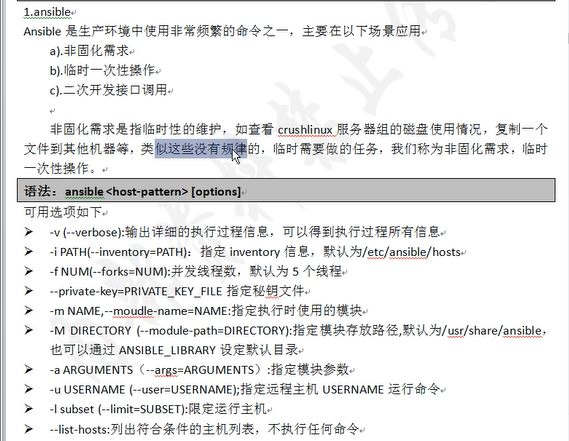
Ansible命令:
Ansible额维护命令大多以ansible开头,在终端输入ansible后连续按两次Tab键,会补全所有以ansible字母揩油的命令,
[root@ansible ~]# ansible #连续按两次Tab键
ansible ansible-connection ansible-doc ansible-galaxy-2 ansible-playbook-2 ansible-pull-2.7
ansible-2 ansible-console ansible-doc-2 ansible-galaxy-2.7 ansible-playbook-2.7 ansible-vault
ansible-2.7 ansible-console-2 ansible-doc-2.7 ansible-inventory ansible-pull ansible-vault-2
ansible-config ansible-console-2.7 ansible-galaxy ansible-playbook ansible-pull-2

实验案例:
1:检查所有主机是否存活
[root@ansible ~]# ansible all -f5 -m ping
192.168.200.102 | SUCCESS => {
"ansible_facts": {
"discovered_interpreter_python": "/usr/bin/python"
},
"changed": false,
"ping": "pong"
}
192.168.200.101 | SUCCESS => {
"ansible_facts": {
"discovered_interpreter_python": "/usr/bin/python"
},
"changed": false,
"ping": "pong"
}
client1 | SUCCESS => {
"ansible_facts": {
"discovered_interpreter_python": "/usr/bin/python"
},
"changed": false,
"ping": "pong"
}
client2 | SUCCESS => {
"ansible_facts": {
"discovered_interpreter_python": "/usr/bin/python"
},
"changed": false,
"ping": "pong"
}
2:列出crushlinux组中所有主机列表:
[root@ansible ~]# ansible crushlinux --list-host

hosts ():

192.168.200.114

192.168.200.115
[root@ansible ~]# cat /etc/ansible/hosts
[crushlinux]
192.168.200.114
192.168.200.115
[client]
client1
client2
[test01]
client[1:2]
3:批量显示crushlinux组中的磁盘使用情况:
[root@ansible ~]# ansible crushlinux -a "df -Th"                       #查询client两台主机磁盘

192.168.200.114 | SUCCESS | rc=0 >>

文件系统 类型 容量 已用 可用 已用% 挂载点

/dev/mapper/centos-root xfs 50G 5.0G 45G 10% /

devtmpfs devtmpfs 475M 0 475M 0% /dev

tmpfs tmpfs 487M 0 487M 0% /dev/shm

tmpfs tmpfs 487M 8.6M 478M 2% /run

tmpfs tmpfs 487M 0 487M 0% /sys/fs/cgroup

/dev/sda1 xfs 1014M 148M 867M 15% /boot

/dev/mapper/centos-home xfs 26G 33M 26G 1% /home

tmpfs tmpfs 98M 36K 98M 1% /run/user/0

/dev/sr0 iso9660 4.3G 4.3G 0 100% /run/media/root/CentOS 7 x86_64

192.168.200.115 | SUCCESS | rc=0 >>

文件系统 类型 容量 已用 可用 已用% 挂载点

/dev/mapper/centos-root xfs 17G 4.2G 13G 25% /

devtmpfs devtmpfs 470M 0 470M 0% /dev

tmpfs tmpfs 487M 0 487M 0% /dev/shm

tmpfs tmpfs 487M 8.6M 478M 2% /run

tmpfs tmpfs 487M 0 487M 0% /sys/fs/cgroup

/dev/sda1 xfs 1014M 166M 849M 17% /boot

tmpfs tmpfs 98M 24K 98M 1% /run/user/0

/dev/sr0 iso9660 4.3G 4.3G 0 100% /run/media/root/CentOS 7 x86_64
2:Ansible-doc
ansibe-doc用来查询模块文档的说明,类似于man命令,针对每个模块都有详细说明应用案例:
[root@ansible ~]#ansible-doc -l #查看总帮助
[root@ansible ~]#ansible-doc -s shell #查看shell模块的帮助
[root@ansible ~]#ansible-doc -s raw
3:ansible-playbook:
Ansible-playbook是日常应用中使用频繁最高的命令,类似于Linux中的sh,用来执行系列任务,其工作机制是,通过读取编写好的pliaybook文件实现集中处理任务,ansible-playbook命令后面跟yml格式的playbook文件,playbook文件存放了要执行的任务代码,命令使用方式如下:
语法:ansible-playbook playbook.yml
ansible-console是ansible为用户提供的一款交互式工具,类似于windows中的cmd以及shell,用户可以在ansible-console虚拟出来的终端上做像shell一样使用ansible-console:
ansible-console命令后显示如下:
[root@ansible ~]# ansible-console

Vault password:                     #密码是ansible

Welcome to the ansible console.

Type help or ? to list commands.

root@all ()[f:]$ cd crushlinux

root@crushlinux ()[f:]$ list

192.168.200.114

192.168.200.115

root@crushlinux ()[f:]$ exit       #exit退出
Ansible模块集群
1:command模块:
command模块在远程主机执行命令,不支持管道,重定向等shell的特性,常用参数如下:
1:chdir:在远程主机上运行命令前需要提前进入目录
2:creates:在命令运行时创建一个文件,如果文件已经存在,则不会创建任务
3:removes:在命令运行时移除一个文件,如果文件不存在,则不会执行任务移除命令
4:executeble:指明运行命令的shell程序
实验案例:
1:在所有主机上运行"ls ./"命令。运行前切换到./home目录下。操作如下:
准备环境,在两台主机上分别创建crushlinux用户否则/home目录下为空查看不带结果:
Client端操作:

[root@client1 ~]# useradd crushlinux

[root@client1 ~]# ls /home/

crushlinux kvm

[root@client2 ~]# useradd crushlinx

[root@client2 ~]# ls /home/

crushlinx room
ansible端操作:
[root@ansible ~]# ansible all -m command -a "chdir=/home ls ./"


client2 | SUCCESS | rc=0 >>

crushlinx

room

192.168.200.115 | SUCCESS | rc=0 >>

crushlinx

room

client1 | SUCCESS | rc=0 >>

crushlinux

kvm

192.168.200.114 | SUCCESS | rc=0 >>

crushlinux

kvm
[root@ansible ~]# ansible crushlinux -a 'uptime'             #uptime表示系统时间

192.168.200.115 | SUCCESS | rc=0 >>

 10:05:21 up  1:28,  4 users,  load average: 0.00, 0.02, 0.05

192.168.200.114 | SUCCESS | rc=0 >>

 10:05:21 up  1:24,  2 users,  load average: 0.00, 0.03, 0.05
Shell模块:
shell模块在远程主机执行命令,相当于调用远程主机的shell进程,然后再该shell下打开子shell运行命令,和command模块的区别在于shell模块支持shell特性,如管道,重定向等:
实验案例:
1:测试重定向:
[root@ansible ~]# ansible crushlinux(此处换成all也可以,也可单独用IP指定) -m shell -a 'echo "111111111" > /tmp/test.txt'

192.168.200.114 | SUCCESS | rc=0 >>

192.168.200.115 | SUCCESS | rc=0 >>

[root@client1 ~]# cat /tmp/test.txt

111111111

[root@client2 ~]# cat /tmp/test.txt

111111111
[root@ansible ~]# ansible all -m command -a 'echo "192.168.200.114" > /tmp/test.txt'
client2 | SUCCESS | rc=0 >>
192.168.200.114 > /tmp/test.txt
192.168.200.115 | SUCCESS | rc=0 >>
192.168.200.114 > /tmp/test.txt
192.168.200.114 | SUCCESS | rc=0 >>
192.168.200.114 > /tmp/test.txt
client1 | SUCCESS | rc=0 >>
192.168.200.114 > /tmp/test.txt
使用command模块虽然运行没有问题但是依旧不会在两台client主机上显示这步更改操作,因为command模块不支持重定向、管道操作
2:测试管道符
[root@ansible ~]# ansible all -m shell -a 'ifconfig ens33 | awk -F "[ :]+" "NR==2 {print $3}"'

192.168.200.115 | SUCCESS | rc=0 >>

        inet 192.168.200.115  netmask 255.255.255.0  broadcast 192.168.200.255

client2 | SUCCESS | rc=0 >>

        inet 192.168.200.115  netmask 255.255.255.0  broadcast 192.168.200.255

client1 | SUCCESS | rc=0 >>

        inet 192.168.200.114  netmask 255.255.255.0  broadcast 192.168.200.255

192.168.200.114 | SUCCESS | rc=0 >>

        inet 192.168.200.114  netmask 255.255.255.0  broadcast 192.168.200.255
raw模块:
最开始的方式运行命令(不依赖python,仅仅通过ssh实现)
注:raw模块和comand、shell 模块不同的是其没有chdir、creates、removes参数,chdir参数的作用就是先切到chdir指定的目录后,再执行后面的命令,这在后面很多模块里都会有该参数 。
实验案例:
1:清除yum缓存:
[root@ansible ~]# ansible all -m raw -a "mount /dev/sr0 /media"
192.168.200.114 | CHANGED | rc=0 >>
mount: /dev/sr0 写保护,将以只读方式挂载
Shared connection to 192.168.200.102 closed.
client1 | CHANGED | rc=0 >>
mount: /dev/sr0 写保护,将以只读方式挂载
Shared connection to client1 closed.
client2 | FAILED | rc=32 >>
mount: /dev/sr0 写保护,将以只读方式挂载
mount: /dev/sr0 已经挂载或 /media 忙
/dev/sr0 已经挂载到 /media 上
Shared connection to client2 closed.
non-zero return code
192.168.200.115 | FAILED | rc=32 >>
mount: /dev/sr0 写保护,将以只读方式挂载
mount: /dev/sr0 已经挂载或 /media 忙
/dev/sr0 已经挂载到 /media 上
Shared connection to 192.168.200.101 closed.
non-zero return code
[root@ansible ~]# ansible all -m raw -a "yum clean all"

client2 | SUCCESS | rc=0 >>

已加载插件:fastestmirror, langpacks

正在清理软件源: epel yum

Shared connection to client2 closed.

192.168.200.115 | SUCCESS | rc=0 >>

已加载插件:fastestmirror, langpacks

正在清理软件源: epel yum

Shared connection to 192.168.200.115 closed.

192.168.200.114 | SUCCESS | rc=0 >>

已加载插件:fastestmirror, langpacks

正在清理软件源: yum

Shared connection to 192.168.200.114 closed.

client1 | SUCCESS | rc=0 >>

已加载插件:fastestmirror, langpacks

正在清理软件源: yum

Shared connection to client1 closed.
2:重建缓存:
[root@ansible ~]# ansible all -m raw -a "yum makecache"

client1 | SUCCESS | rc=0 >>

已加载插件:fastestmirror, langpacks

Determining fastest mirrors

yum                                                      | 3.6 kB     00:00

(1/4): yum/group_gz                                        | 166 kB   00:00

(2/4): yum/primary_db                                      | 3.1 MB   00:00

(3/4): yum/filelists_db                                    | 3.2 MB   00:00

(4/4): yum/other_db                                        | 1.3 MB   00:00

元数据缓存已建立

Shared connection to client1 closed.

192.168.200.114 | SUCCESS | rc=0 >>

已加载插件:fastestmirror, langpacks

/var/run/yum.pid 已被锁定,PID 为 14905 的另一个程序正在运行。

Another app is currently holding the yum lock; waiting for it to exit...

  另一个应用程序是:yum

    内存: 23 M RSS (346 MB VSZ)

    已启动: Mon Oct 28 11:51:00 2019 - 00:02之前

    状态  :睡眠中,进程ID:14905

Another app is currently holding the yum lock; waiting for it to exit...

  另一个应用程序是:yum

    内存: 29 M RSS (350 MB VSZ)

    已启动: Mon Oct 28 11:51:00 2019 - 00:04之前

    状态  :运行中,进程ID:14905

Loading mirror speeds from cached hostfile

yum                                                      | 3.6 kB     00:00

元数据缓存已建立

Shared connection to 192.168.200.114 closed.
copy 模块:

实验案例:
将crushlinux组中主机的/etc/hosts文件拷贝到/tmp、下指定权限为777更改属主为crushlinx属组为root:
[root@ansible ~]# ansible crushlinux -m copy -a "src=/etc/hosts dest=/tmp/ mode=777 owner=crushlinux group=root"

192.168.200.114 | SUCCESS => {

    "changed": true,

    "checksum": "4efbe32544b08f6b76d05599131211a08ba2ea35",

    "dest": "/tmp/hosts",

    "gid": 0,

    "group": "root",

    "md5sum": "461ed2a7440cd3b1a17437c409a54ef3",

    "mode": "0777",

    "owner": "crushlinux",

    "secontext": "unconfined_u:object_r:admin_home_t:s0",

    "size": 230,

    "src": "/root/.ansible/tmp/ansible-tmp-1572236033.85-131139758635890/source",

    "state": "file",

    "uid": 1001

}

192.168.200.115 | FAILED! => {                #两台client机的/tmp/下都有了hosts的文件依旧运行出问题

    "changed": false,

    "checksum": "4efbe32544b08f6b76d05599131211a08ba2ea35",

    "gid": 0,

    "group": "root",

    "mode": "0644",

    "msg": "chown failed: failed to look up user crushlinux",

    "owner": "root",

    "path": "/tmp/hosts",

    "secontext": "unconfined_u:object_r:admin_home_t:s0",

    "size": 230,

    "state": "file",

    "uid": 0

}
yum模块
YUM模块基于yum机制,对远程主机管理程序包,常用参数如下:
1:name:程序包的名称,可以带上版本号,如下指定版本号默认安装为最新版本
2:state=present | latest | absent:指明对程序包执行的操作,present表示安装程序包,latest表示安装最新的安装包,absent表示卸载程序包。
3:disablerepo:在用yum安装时禁用某个仓库的ID
4:enablerepo:在用yum安装时启用某个仓库的ID
5:conf_file:yum 运行时的配置文件而并不是使用默认的配置文件
6:diavle_gpg_check=yes | no:是否启用完整的校验功能
实验案例:
注意:实验前要在client配置yum仓库
管理员只是发送yum命令到被管理端,被管理端要存在可用的yum仓库才可以成功安装。
1:client端yum安装dhcp
[root@ansible ~]# ansible crushlinux -m yum -a "name=dhcp state=present"
192.168.200.114 | SUCCESS => {
"changed": true,
"msg": "",
"rc": 0,
"results": [
"Loaded plugins: fastestmirror, langpacks\nLoading mirror speeds from cached hostfile\nResolving Dependencies\n--> Running transaction check\n---> Package dhcp.x86_64 12:4.2.5-68.el7.centos.1 will be installed\n--> Finished Dependency Resolution\n\nDependencies Resolved\n\n================================================================================\n Package Arch Version Repository Size\n================================================================================\nInstalling:\n dhcp x86_64 12:4.2.5-68.el7.centos.1 yum 513 k\n\nTransaction Summary\n================================================================================\nInstall 1 Package\n\nTotal download size: 513 k\nInstalled size: 1.4 M\nDownloading packages:\nRunning transaction check\nRunning transaction test\nTransaction test succeeded\nRunning transaction\n Installing : 12:dhcp-4.2.5-68.el7.centos.1.x86_64 1/1 \n Verifying : 12:dhcp-4.2.5-68.el7.centos.1.x86_64 1/1 \n\nInstalled:\n dhcp.x86_64 12:4.2.5-68.el7.centos.1 \n\nComplete!\n"
]
}
192.168.200.115 | SUCCESS => {
"changed": true,
"msg": "",
"rc": 0,
"results": [
"Loaded plugins: fastestmirror, langpacks\nLoading mirror speeds from cached hostfile\n * epel: mirrors.yun-idc.com\nResolving Dependencies\n--> Running transaction check\n---> Package dhcp.x86_64 12:4.2.5-68.el7.centos.1 will be installed\n--> Finished Dependency Resolution\n\nDependencies Resolved\n\n================================================================================\n Package Arch Version Repository Size\n================================================================================\nInstalling:\n dhcp x86_64 12:4.2.5-68.el7.centos.1 yum 513 k\n\nTransaction Summary\n================================================================================\nInstall 1 Package\n\nTotal download size: 513 k\nInstalled size: 1.4 M\nDownloading packages:\nRunning transaction check\nRunning transaction test\nTransaction test succeeded\nRunning transaction\n Installing : 12:dhcp-4.2.5-68.el7.centos.1.x86_64 1/1 \n Verifying : 12:dhcp-4.2.5-68.el7.centos.1.x86_64 1/1 \n\nInstalled:\n dhcp.x86_64 12:4.2.5-68.el7.centos.1 \n\nComplete!\n"
]
}
USER模块

实验案例:
1:创建用户:
[root@ansible ~]# ansible crushlinux -m user -a 'name=user1 system=yes uid=502 group=root
groups=sshd shell=/sbin/nologin home=/home/user1 paassword=user1 comment="test user"'

 查看:
[root@ansible ~]# ansible crushlinux -m command -a 'tail -l /etc/passwd'
2:删除用户和家目录:
[root@ansible ~]# ansible crushlinux -m user -a 'name=crushlinux state=absent remove=yes'
[root@ansible ~]# ansible crushlinux -m user -a 'name=crushlinux state=absent remove=yes'
192.168.200.115 | SUCCESS => {
"changed": false,
"name": "crushlinux",
"state": "absent"
}
192.168.200.114 | SUCCESS => {
"changed": true,
"force": false,
"name": "crushlinux",
"remove": true,
"state": "absent"
}
批量部署nginx
基于playbook部署nginx
[root@ansible ansible]# vim /etc/ansible/hosts
[crushlinux]                 #后面用crushlinux中的机器IP来操作全部机器

192.168.200.112

192.168.200.113
[root@ansible ~]# yum -y install tree
1、创建目录结构
[root@ansible ~]# mkdir -pv /etc/ansible/roles/nginx/{files,handlers,tasks,templates,vars}
2、上传需要用的源码包到file文件下
[root@ansible ansible]# tree /etc/ansible/
/etc/ansible/
├── ansible.cfg
├── hosts
├── hosts.bak
├── nginx.yaml
└── roles
└── nginx
├── files #file用于存储用于copy或script模块调用的文件
│ └── nginx-1.16.0.tar.gz
├── handlers #handlers用于定义开启的服务,且此目录最少存放一个mian.yaml文件,是一个触发器
├── tasks #tasks此目录最少存放一个mian.yaml文件,是一个任务文件
├── templates #定义模板
└── vars #定义变量
7 directories, 5 files
[root@ansible ~]# cd /etc/ansible/roles/nginx/files
[root@ansible files]# rz
z waiting to receive.**B0100000023be50
[root@ansible files]# ls
nginx-1.16.0.tar.gz
3、定义一个主调用文件(总入口文件)
[root@ansible files]# vim /etc/ansible/nginx.yaml
---

- hosts: crushlinux                      #执行的主机范围

gather_facts: True                      #开启系统内置变量

remote_user: root

roles:                                         #启用roles原型配置

- nginx                                      #执行nginx原型模组
...
4、handlers定义mian.yaml文件
[root@ansible files]# cd ../../../
[root@ansible ansible]# vim /etc/ansible/roles/nginx/handlers/main.yaml
---

- name: start nginx                         #名字:开启nginx服务

raw: /usr/local/nginx/sbin/nginx            #路径:

...
5、tasks定义mian.yaml文件
[root@ansible ansible]# vim /etc/ansible/roles/nginx/tasks/main.yaml
---

- name: yum install                  #使用yum install安装

  yum: name={{ item }} state=latest   #定义item变量下载更多依赖包,state=latest表示最新

  with_items:

    - openssl-devel

    - pcre-devel

    - zlib-devel

    - gcc

    - gcc-c++

    - make

- name: user nginx

  shell: useradd -M -s /sbin/nologin nginx     #用shell模块定义程序用户

- name: package

  copy: src=nginx-1.16.0.tar.gz dest=/usr/src   #用copy模块将nginx-1.16.0源码包上传到/usr/src下

- name: install nginx

  shell: cd /usr/src ; tar xf nginx-1.16.0.tar.gz -C /usr/src ; cd /usr/src/nginx-1.16.0 ; ./configure --prefix=/usr/local/nginx --user=nginx
--group=nginx --with-http_ssl_module --with-http_flv_module --with-http_stub_status_module --with-http_gzip_static_module --with-pcre
&& make && make install

- name: copy conf file

  template: src=nginx.conf dest=/usr/local/nginx/conf/nginx.conf   #用templete模板将nginx.conf配置文件同步到/usr/local/nginx/cong/nginx.conf

  notify:               #notify通知触发器启动nginx服务

    - start nginx

...
6、templates:存储由templates模块调用的模板文件
[root@ansible ansible]# vim /etc/ansible/roles/nginx/templates/nginx.conf
user  nginx;

worker_processes 1;

#error_log  logs/error.log;

#error_log  logs/error.log  notice;

error_log  logs/error.log  info;

pid        logs/nginx.pid;

events {

    use epoll;

    worker_connections  10240;

}

http {

    include       mime.types;

    default_type  application/octet-stream;

    log_format  main  '$remote_addr - $remote_user [$time_local] "$request" '

                      '$status $body_bytes_sent "$http_referer" '

                      '"$http_user_agent" "$http_x_forwarded_for"';

    access_log  logs/access.log  main;

    sendfile        on;

    #tcp_nopush     on;

    #keepalive_timeout  0;

    keepalive_timeout  65;

    #gzip  on;

    server {

        listen       {{ nginxport}};        #定义变量端口

        server_name  {{ server_name}};       #定义主机名变量

        charset utf-8;

        access_log  logs/host.access.log  main;

        location / {

            root   html;

            index  index.html index.htm;

}

}

}
7、vars定义templates中的端口和主机名变量mian.yaml文件
[root@ansible ansible]# vim /etc/ansible/roles/nginx/vars/main.yaml
---

nginxport: "80"

server_name: "www.crushlinux"

...
8、查看目录结构
[root@ansible ansible]# tree /etc/ansible/
/etc/ansible/

├── ansible.cfg

├── hosts

├── hosts.bak

├── nginx.yaml                    #总入口文件

└── roles

    └── nginx

        ├── files                        #file存放软件包

        │   └── nginx-1.16.0.tar.gz

        ├── handlers                     #触发器

        │   └── main.yaml

        ├── tasks                       #任务

        │   └── main.yaml

        ├── templates                    #模板

        │   └── nginx.conf

        └── vars                        #变量

            └── main.yaml
9、测试部署
[root@ansible ansible]# ansible-playbook -C /etc/ansible/nginx.yaml
PLAY [crushlinux] **************************************************************************************************************************

TASK [Gathering Facts] **********************************************************************************************************************

ok: [192.168.200.112]

ok: [192.168.200.113]

TASK [nginx : yum install] ******************************************************************************************************************

changed: [192.168.200.112] => (item=[u'openssl-devel', u'pcre-devel', u'zlib-devel', u'gcc', u'gcc-c++', u'make'])

changed: [192.168.200.113] => (item=[u'openssl-devel', u'pcre-devel', u'zlib-devel', u'gcc', u'gcc-c++', u'make'])

TASK [nginx : user nginx] ******************************************************************************************************************

skipping: [192.168.200.112]

skipping: [192.168.200.113]

TASK [nginx : package] *********************************************************************************************************************

changed: [192.168.200.113]

changed: [192.168.200.112]

TASK [nginx : install nginx] ***************************************************************************************************************

skipping: [192.168.200.112]

skipping: [192.168.200.113]

TASK [nginx : copy conf file] ************************************************************************************************************

changed: [192.168.200.112]

changed: [192.168.200.113]

RUNNING HANDLER [nginx : start nginx] *****************************************************************************************************

skipping: [192.168.200.112]

skipping: [192.168.200.113]

PLAY RECAP *********************************************************************************************************************************

192.168.200.112            : ok=4    changed=3    unreachable=0    failed=0

192.168.200.113            : ok=4    changed=3    unreachable=0    failed=0
10、正式部署
此处报错因为对方目标主机用于nginx账户
[root@client1 /]# vim /etc/passwd
[root@client1 /]# vim /etc/group
[root@ansible ansible]# ansible-playbook /etc/ansible/nginx.yaml

PLAY [crushlinux] *************************************************************************************************

TASK [Gathering Facts] *****************************************************************************************************

ok: [192.168.200.112]

ok: [192.168.200.113]

TASK [nginx : yum install] ********************************************************************************************

changed: [192.168.200.112] => (item=[u'openssl-devel', u'pcre-devel', u'zlib-devel', u'gcc', u'gcc-c++', u'make'])

changed: [192.168.200.113] => (item=[u'openssl-devel', u'pcre-devel', u'zlib-devel', u'gcc', u'gcc-c++', u'make'])

TASK [nginx : user nginx] *********************************************************************************************

fatal: [192.168.200.112]: FAILED! => {"changed": true, "cmd": "useradd -M -s /sbin/nologin nginx", "delta": "0:00:00.023112",
"end": "2020-03-17 16:18:51.053670", "msg": "non-zero return code", "rc": 9, "start": "2020-03-17 16:18:51.030558", "stderr":
 "useradd:用户“nginx”已存在", "stderr_lines": ["useradd:用户“nginx”已存在"], "stdout": "", "stdout_lines": []}

fatal: [192.168.200.113]: FAILED! => {"changed": true, "cmd": "useradd -M -s /sbin/nologin nginx", "delta": "0:00:00.022611",
"end": "2020-03-17 16:18:51.080721", "msg": "non-zero return code", "rc": 9, "start": "2020-03-17 16:18:51.058110", "stderr":
 "useradd:用户“nginx”已存在", "stderr_lines": ["useradd:用户“nginx”已存在"], "stdout": "", "stdout_lines": []}

	to retry, use: --limit @/etc/ansible/nginx.retry

PLAY RECAP ********************************************************************************************************************************

192.168.200.112            : ok=2    changed=1    unreachable=0    failed=1

192.168.200.113            : ok=2    changed=1    unreachable=0    failed=1
删除cliente1和client2中的nginx账户后执行正常如下:
[root@ansible ansible]# ansible-playbook /etc/ansible/nginx.yaml

PLAY [crushlinux] *************************************************************************************************************

TASK [Gathering Facts] *****************************************************************************************************

ok: [192.168.200.113]

ok: [192.168.200.112]

TASK [nginx : yum install] *********************************************************************************************************

ok: [192.168.200.113] => (item=[u'openssl-devel', u'pcre-devel', u'zlib-devel', u'gcc', u'gcc-c++', u'make'])

ok: [192.168.200.112] => (item=[u'openssl-devel', u'pcre-devel', u'zlib-devel', u'gcc', u'gcc-c++', u'make'])

TASK [nginx : user nginx] *************************************************************************************************************

changed: [192.168.200.113]

changed: [192.168.200.112]

TASK [nginx : package] *********************************************************************************************

changed: [192.168.200.112]

changed: [192.168.200.113]

TASK [nginx : install nginx] *********************************************************************************************************

changed: [192.168.200.113]

changed: [192.168.200.112]

TASK [nginx : copy conf file] **********************************************************************************************************

changed: [192.168.200.112]

changed: [192.168.200.113]

RUNNING HANDLER [nginx : start nginx] ************************************************************************************************

changed: [192.168.200.113]

changed: [192.168.200.112]

PLAY RECAP ************************************************************************************************************************

192.168.200.112            : ok=7    changed=5    unreachable=0    failed=0

192.168.200.113            : ok=7    changed=5    unreachable=0    failed=0
state=latest
Ansible自动化搭建及工具集和常见模块、命令详情(重点)的更多相关文章
- Ansible自动化运维工具及其常用模块
Ansible自动化运维工具及其常用模块 目录 Ansible自动化运维工具及其常用模块 一.Ansible简介 1. Ansible概述 2. Ansible作用 3. Ansible的工作模块 4 ...
- Ansible 自动化运维工具
Ansible 自动化运维工具 Ansible是什么? Ansible是一个"配置管理工具"也是一个"自动化运维工具" Ansible 作用: Ansible是 ...
- Ansible自动化运维工具-上
[Ansible特点] 1)Ansible与saltstack均是基于Python语言开发的 2)安装使用简单,基于不同插件和模块实现各种软件,平台,版本的管理以及支持虚拟容器多层级的部署 3)不需要 ...
- Ansible自动化运维工具的使用
Ansible自动化运维工具的使用 host lnventory 管理主机 ip root账号密码 ssh端口 core mod ...
- [Linux]Ansible自动化运维② - 工具与模块
目录 一.Ansible的工具 1.1 Ansible的工作前提 1.2 Ansible的安装文件 1.3 Ansible的配置文件 1.4 Ansible的相关工具 1.4.1 [帮助工具]Ansi ...
- CentOS7下搭建Ansible自动化运维工具,集中管理服务器
(1).Ansible具有如下特点: 部署简单,只需在主控端部署Ansible环境,被控端无需做任何操作: 默认使用SSH协议对设备进行管理: 主从集中化管理: 配置简单.功能强大.扩展性强: 支持A ...
- Ansible自动化运维工具使用
概述本文描述自动化运维工具 Ansible 的安装及基础使用方法,包含: Centos 下的安装主机配置Ad-Hoc command(命令行执行)Playbook (任务剧本)Ansible 和 Sa ...
- ansible自动化运维工具使用详解
一. ansible 简介 1. ansible ansible是新出现的 自动化 运维工具 , 基于Python研发 . 糅合了众多老牌运维工具的优点实现了批量操作系统配置.批量程序的部署.批量运行 ...
- Ansible自动化运维工具
ansible软件介绍 python语言是运维人员必会的语言! ansible是一个基于Python开发的自动化运维工具!(saltstack) 其功能实现基于SSH远程连接服务! ans ...
随机推荐
- shiro中setUnauthorizedUrl("/403")不起作用
最近学习shiro框架,在用户没有权限的情况下想让其跳转到403页面,结果非自己预想的效果.后来找到一个解决办法如下: 转载来源 SpringBoot中集成Shiro的时候, 配置setUnautho ...
- 第五十篇 入门机器学习——线性回归(Linear Regression)
No.1. 线性回归算法的特点 No.2. 分类问题与回归问题的区别 上图中,左侧为分类问题,右侧为回归问题.左侧图中,横轴和纵轴表示的都是样本的特征,用不同的颜色来作为输出标记,表示不同的种类:左侧 ...
- LCA 倍增算法模板
. #include <cstring> #include <cstdio> #include <cstdlib> #include <algorithm&g ...
- LTE引理——解决数论竞赛题的利器
LTE (Lifting The Exponent Lemma)引理是一个解指数型不定方程的强力工具.它在Olympiad folklore非常知名,虽然它的起源已经无从查找了.它和Hensel’s ...
- 查看ie版本
window10系统还好说,一般都是IE11版本,其他系统或服务器看=查看ie版本就很烦 方法一:按组合键 ALT+H 打开“帮助”,再按 A 选择“关于Internet Explorer” 方法二 ...
- Hdu6586 String 字符串字典序贪心
Hdu6586 字符串字典序贪心 题意 给出一个只包含26个字符的字符串(|S|<=1e5),要求从中取出长度为k的字典序最小的组序列,满足所给的26个字母的限制条件,例如\([l_i,r_i] ...
- HTML学习(8)超链接
<a href="url">链接文本或图片</a> 可以使用id属性来访问标记的地方,例: <a id="tip">被访问的 ...
- MongoDB 在Windows环境的下载、安装、配置
MongoDB4.0在Windows环境的下载.安装.配置 今天本想玩玩MongoDB,可因工作机上未下载Linux虚拟机,下载多耗时.无奈只能先下载Windows版本耍耍.不料,Windows在安装 ...
- 利用数据结构排序的priority_queue
考虑以下几个问题: 将一个序列排序 某神仙: \(\mathtt{sort}\) !!! 每次取出最前面的两个数 某神仙: \(a_i\) 和 \(a_{i+1}\) 啊!! 相加,再加入序列 某神仙 ...
- python调用sqlite
参考资料:https://www.liaoxuefeng.com/wiki/1016959663602400/1017801751919456 https://www.cnblogs.com/lia ...