iOS自定义弹出视图
p.p1 { margin: 0.0px 0.0px 0.0px 0.0px; font: 14.0px Menlo; color: #78492a }
p.p2 { margin: 0.0px 0.0px 0.0px 0.0px; font: 14.0px Menlo; color: #000000; min-height: 16.0px }
p.p3 { margin: 0.0px 0.0px 0.0px 0.0px; font: 14.0px Menlo; color: #d12f1b }
p.p4 { margin: 0.0px 0.0px 0.0px 0.0px; font: 14.0px Menlo; color: #4f8187 }
p.p5 { margin: 0.0px 0.0px 0.0px 0.0px; font: 14.0px Menlo; color: #ba2da2 }
p.p6 { margin: 0.0px 0.0px 0.0px 0.0px; font: 14.0px Menlo; color: #000000 }
p.p7 { margin: 0.0px 0.0px 0.0px 0.0px; font: 14.0px Menlo; color: #703daa }
p.p8 { margin: 0.0px 0.0px 0.0px 0.0px; font: 14.0px Menlo; color: #3e1e81 }
p.p9 { margin: 0.0px 0.0px 0.0px 0.0px; font: 14.0px Menlo; color: #008400 }
p.p10 { margin: 0.0px 0.0px 0.0px 0.0px; font: 14.0px Menlo; color: #272ad8 }
span.s1 { }
span.s2 { color: #272ad8 }
span.s3 { color: #78492a }
span.s4 { color: #ba2da2 }
span.s5 { color: #000000 }
span.s6 { color: #703daa }
span.s7 { color: #3e1e81 }
span.s8 { color: #31595d }
span.s9 { color: #d12f1b }
span.s10 { font: 14.0px "PingFang SC"; color: #d12f1b }
span.s11 { color: #4f8187 }
span.s12 { font: 14.0px "PingFang SC" }
里面的坐标可能有问题 可以自己修改
#define kSelfBackgroundColor [UIColor colorWithRed:0 green:0 blue:0 alpha:0.5f];
#import "HBActionSheet.h"
@interface HBActionSheet ()
@property (nonatomic, strong) UIView *btnBgView;
@property (nonatomic, strong) UIButton *selectedBtn;
@end
@implementation HBActionSheet
- (instancetype)initWithFrame:(CGRect)frame
{
self = [super initWithFrame:frame];
if (self) {
self.frame = [UIScreen mainScreen].bounds;
UIView *view = [[UIView alloc]initWithFrame:CGRectMake(0, 0, [UIScreen mainScreen].bounds.size.width, 368 - 64)];
view.backgroundColor = kSelfBackgroundColor;
[self addSubview:view];
UITapGestureRecognizer *tap = [[UITapGestureRecognizer alloc]initWithTarget:self action:@selector(hiddenActionSheet:)];
[view addGestureRecognizer:tap];
[self loadingUI];
}
return self;
}
- (void) loadingUI{
CGSize size = [[UIScreen mainScreen] bounds].size;
UILabel *titleLabel = [[UILabel alloc]initWithFrame:CGRectMake(0, 0, size.width, 45)];
titleLabel.text = @"支付方式";
titleLabel.textAlignment = NSTextAlignmentCenter;
titleLabel.backgroundColor = [UIColor redColor];
titleLabel.font = [UIFont systemFontOfSize:16];
[self.btnBgView addSubview:titleLabel];
UIButton *cancelBtn = [UIButton buttonWithType:UIButtonTypeCustom];
cancelBtn.frame = CGRectMake(size.width - 25 - 15, 11, 24, 24);
[cancelBtn setImage:[UIImage imageNamed:@"close"] forState:UIControlStateNormal];
[cancelBtn addTarget:self action:@selector(hiddenActionSheet) forControlEvents:UIControlEventTouchUpInside];
[self.btnBgView addSubview:cancelBtn];
UILabel *priceLabel = [[UILabel alloc]initWithFrame:CGRectMake(0, CGRectGetMaxY(titleLabel.frame), size.width, 70)];
priceLabel.backgroundColor = [UIColor whiteColor];
priceLabel.text = @"共¥30.00";
priceLabel.textAlignment = NSTextAlignmentCenter;
priceLabel.font = [UIFont systemFontOfSize:24];
[self.btnBgView addSubview:priceLabel];
NSMutableAttributedString *attributedString = [[NSMutableAttributedString alloc]initWithString:priceLabel.text];
[attributedString addAttribute:NSForegroundColorAttributeName
value:[UIColor grayColor]
range:NSMakeRange(0, 1)];
[attributedString addAttribute:NSFontAttributeName
value:[UIFont systemFontOfSize:16]
range:NSMakeRange(0, 1)];
priceLabel.attributedText = attributedString;
NSArray *titleArray = [[NSArray alloc]initWithObjects:@"余额",@"支付宝支付",@"微信支付",@"App Pay", nil];
for (int j = 0; j < 4; j++) {
UILabel *payStyleLabel = [[UILabel alloc]initWithFrame:CGRectMake(0, CGRectGetMaxY(priceLabel.frame) + j*50 , size.width, 50)];
payStyleLabel.text = [NSString stringWithFormat:@" %@",titleArray[j]];
payStyleLabel.font = [UIFont systemFontOfSize:16];
payStyleLabel.userInteractionEnabled = YES;
[self.btnBgView addSubview:payStyleLabel];
UIImageView *imageView = [[UIImageView alloc]initWithFrame:CGRectMake(15, 15, 20, 20)];
imageView.backgroundColor = [UIColor redColor];
[payStyleLabel addSubview:imageView];
UIButton *payBtn = [UIButton buttonWithType:UIButtonTypeCustom];
payBtn.frame = CGRectMake(size.width - 24 - 15, 13, 24, 24);
payBtn.tag = j + 1;
[payBtn setImage:[UIImage imageNamed:@"selectNo"] forState:UIControlStateNormal];
[payBtn setImage:[UIImage imageNamed:@"selectNo"] forState: UIControlStateHighlighted];
[payBtn setImage:[UIImage imageNamed:@"selectYes"] forState:UIControlStateSelected];
[payBtn setImage:[UIImage imageNamed:@"selectYes"]forState:UIControlStateSelected | UIControlStateHighlighted];
[payBtn addTarget:self action:@selector(selectPayStyle:) forControlEvents:UIControlEventTouchUpInside];
[payStyleLabel addSubview:payBtn];
}
UIButton *confirmPayBtn = [UIButton buttonWithType:UIButtonTypeCustom];
confirmPayBtn.backgroundColor = [UIColor greenColor];
[confirmPayBtn addTarget:self action:@selector(confirmPay) forControlEvents:UIControlEventTouchUpInside];
[confirmPayBtn setTitle:@"确认支付" forState:UIControlStateNormal];
confirmPayBtn.titleLabel.font = [UIFont systemFontOfSize:18];
confirmPayBtn.frame = CGRectMake(0, self.btnBgView.frame.size.height - 49, size.width, 49);
[self.btnBgView addSubview:confirmPayBtn];
// 显示
[UIView animateWithDuration:0.3 animations:^{
CGRect frame = self.btnBgView.frame;
frame.origin.y = size.height - frame.size.height - 64;
self.btnBgView.frame = frame;
}];
}
- (void)confirmPay{
}
- (void)selectPayStyle:(UIButton *)btn{
if (btn != self.selectedBtn) {
self.selectedBtn.selected = NO;
btn.selected = YES;
self.selectedBtn = btn;
}else{
self.selectedBtn.selected = YES;
}
}
- (void)hiddenActionSheet{
[UIView animateWithDuration:0.3 animations:^{
CGRect frame = self.btnBgView.frame;
frame.origin.y = [UIScreen mainScreen].bounds.size.height;
self.btnBgView.frame = frame;
} completion:^(BOOL finished) {
[self removeFromSuperview];
}];
}
- (void)hiddenActionSheet:(UITapGestureRecognizer *)tap{
if ([tap.view isKindOfClass:[UIButton class]] || [tap.view isKindOfClass:[UILabel class]] || [tap.view isKindOfClass:[UIImageView class]]) {
return;
}
[UIView animateWithDuration:0.3 animations:^{
CGRect frame = self.btnBgView.frame;
frame.origin.y = [UIScreen mainScreen].bounds.size.height;
self.btnBgView.frame = frame;
} completion:^(BOOL finished) {
[self removeFromSuperview];
}];
}
- (UIView *)btnBgView{
if (!_btnBgView) {
CGSize size = [[UIScreen mainScreen] bounds].size;
_btnBgView = [[UIView alloc]init];
_btnBgView.backgroundColor = [UIColor colorWithRed:223.0f/255.0f green:226.0f/255.f blue:236.0f/255.0f alpha:1];
_btnBgView.frame = CGRectMake(0, size.height - 368 - 64, size.width ,size.height - 368);
[self addSubview:_btnBgView];
}
return _btnBgView;
}
@end
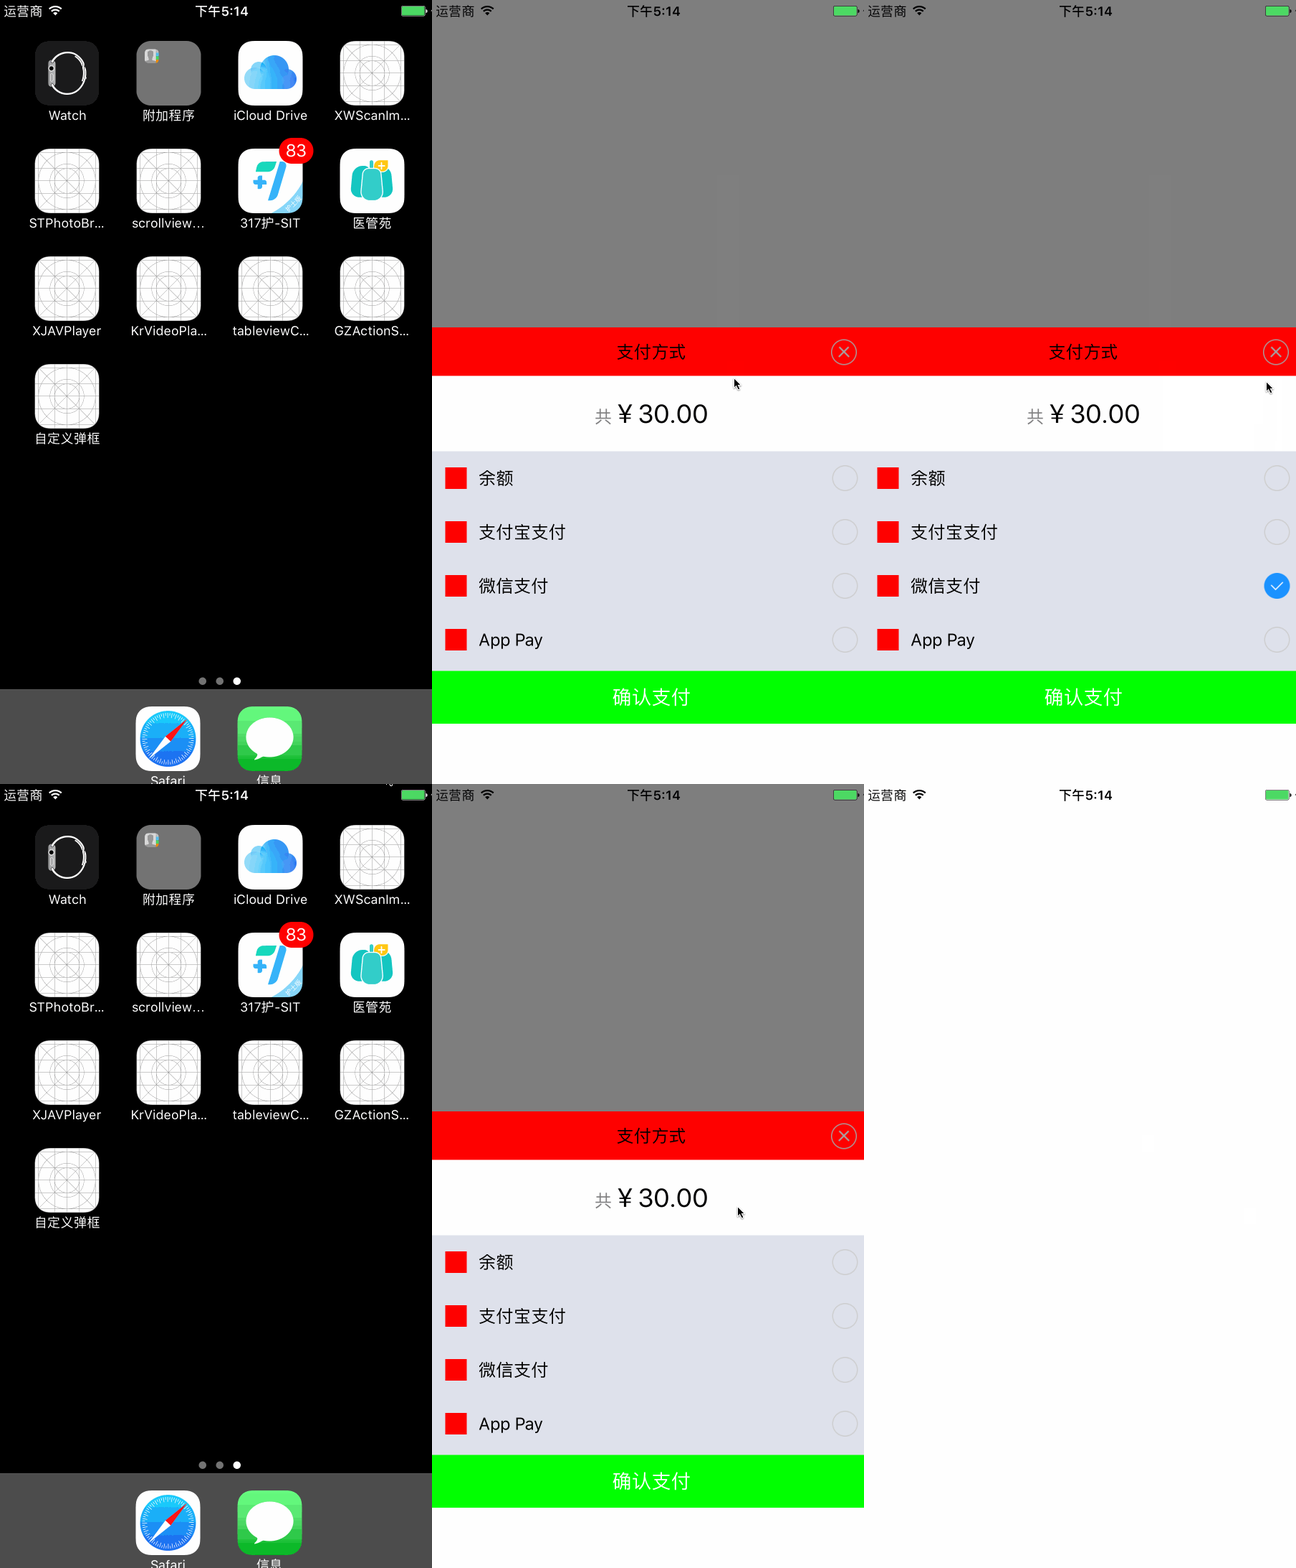
效果图:

iOS自定义弹出视图的更多相关文章
- iOS自定义弹出视图、收音机APP、图片涂鸦、加载刷新、文件缓存等源码
iOS精选源码 一款优秀的 聆听夜空FM 源码 zhPopupController 简单快捷弹出自定义视图 WHStoryMaker搭建美图(贴纸,涂鸦,文字,滤镜) iOS cell高度自适应 有加 ...
- iOS 仿看了吗应用、指南针测网速等常用工具、自定义弹出视图框架、图片裁剪、内容扩展等源码
iOS精选源码 扩展内容的cell - folding-cell 一个近乎完整的可识别中国身份证信息的Demo 可自动快速... JPImageresizerView 仿微信的图片裁剪 带年月和至今以 ...
- iOS实现自定义的弹出视图(popView)
前段时间,在项目中有个需求是支付完成后,弹出红包,实现这么一个发红包的功能.做了最后,实现的效果大致如下: 一.使用方法 整个ViewController的代码大致如下 // // SecondVi ...
- IOS弹出视图 LewPopupViewController
LewPopupViewController是一款IOS弹出视图软件.iOS 下的弹出视图.支持iPhone/iPad. 软件截图 使用方法 弹出视图 1 2 3 4 5 PopupView *vie ...
- iOS模态弹出半透明视图控制器
项目中需要实现点击按钮出现的视图全屏覆盖,呈半透明状态可以看到下面的视图? 解决方案: 绕了很多弯路原来可以使用模态弹出一个视图控制器 在iOS8之后只需要设置一个最新的属性 SecondViewCo ...
- js自定义弹出框
js自定义弹出框: 代码如下 <html> <head><title>自定义弹出对话框</title> <style type ="te ...
- android自定义弹出框样式实现
前言: 做项目时,感觉Android自带的弹出框样式比较丑,很多应用都是自己做的弹出框,这里也试着自己做了一个. 废话不说先上图片: 实现机制 1.先自定义一个弹出框的样式 2.自己实现CustomD ...
- CSS3/jQuery自定义弹出窗口
简单演示一下,精简了演示效果和css样式文件,更利于在项目中的实际应用 引入style.css index.js <!DOCTYPE HTML PUBLIC "-//W3C//DT ...
- react native仿微信性别选择-自定义弹出框
简述 要实现微信性别选择需要使用两部分的技术: 第一.是自定义弹出框: 第二.单选框控件使用: 效果 实现 一.配置弹出框 弹出框用的是:react-native-popup-dialog(Git地址 ...
随机推荐
- mysql 优化方法
1.选取最适用的字段属性 MySQL可以很好的支持大数据量的存取,但是一般说来,数据库中的表越小,在它上面执行的查询也就会越快.因此,在创建表的时候,为了获得更好的性能,我们可以将表中字段的宽度设得尽 ...
- [codevs]1087麦森数
题目 这个题在noiOJ上是分治专题,这个题包括了很多,求位数,高精度乘,快速幂. 那么单独把这个高精度拿出来做一个自定义函数即可 一.求位数 显而易见,既然是2进制的就是log2X,是10进制就是l ...
- 查询表达式和LINQ to Objects
查询表达式实际上是由编译器“预处理”为“普通”的C#代码,接着以完全普通的方式进行编译.这种巧妙的发式将查询集合到了语言中,而无须把语义改得乱七八糟 LINQ的介绍 LINQ中的基础概念 降低两种数据 ...
- java线程(三)
线程代码同步与线程锁 为什么要有同步代码块? 线程同步的出现是为了解决多个线程对统一资源操作而引发的数据混乱问题.这里引用一个经典demo-银行转账操作,场景如下,小明的账户目前有1000人民币,他在 ...
- SSO单点登录的研究
一.单点登录的概述 单点登录(Single Sign On),简称为 SSO,SSO的定义是在多个应用系统中,用户只需要登录一次就可以访问所有相互信任的应用系统. 用以解决同一公司不同子产 ...
- 刑天DDOS攻击器下一版本即将使用NTP放大功能
刑天DDOS攻击器下一版本即将使用NTP放大功能 在一次无语实验中无意发现NTP方法后的攻击流量相当可观,Linux实测G口高达30G,也就是说最大可以放大30倍的攻击流量是何等的威武.而 ...
- 基于Spring的Appium配置应用
本文主要是讲述,使用Spring框架,优化Appium的Driver调用,并将写在代码里的大量配置参数定义到配置文件当中,还可灵活的控制调用AndroidDriver还是IOSDriver. Spri ...
- 【JAVAWEB学习笔记】27_Redis:在Linux上的安装、Jedis和常用命令
一.Redis简介 1.关于关系型数据库和nosql数据库 关系型数据库是基于关系表的数据库,最终会将数据持久化到磁盘上,而nosql数据 库是基于特殊的结构,并将数据存储到内存的数据库.从性 ...
- 关于ubuntu的图标创建以及快捷方式打开
//这里个人要添加的的为微信小程序开发工具 1:终端命令: sudo gedit /usr/share/applications/MyChat.desktop 2:修改启动器配置如下: [Deskto ...
- JSP中include指令和include动作区别
首先 <%@ include file=” ”%>:为指令元素 <jsp:include page=” ” flush=”true”/>:为 动作元素 先说指令元素: incl ...
