在 OpenGL ES 2.0 上实现视差贴图(Parallax Mapping)
在 OpenGL ES 2.0 上实现视差贴图(Parallax Mapping)
视差贴图
最近一直在研究如何在我的 iPad 2(只支持 OpenGL ES 2.0, 不支持 3.0) 上实现 视差贴图(Parallax Mapping) 和 位移贴图(Displacement Mapping).
经过一番研究, 搜索阅读了不少文章, 终于确定, OpenGL ES 2.0 可以支持 视差贴图, 不过暂时还没什么好办法支持 位移贴图.
因为就我目前所了解的位移贴图, 有这么两种方法来实现, 一种是用 Tessellation 来提供多面数网格, 另一种是在顶点着色器中对高度图进行纹理采样来计算对应的顶点偏移量.
第一种方法就不必想了, 因为目前移动设备的 OpenGL ES 2.0/3.0 都不支持(貌似 DX11 和 OpenGL 4.0 才支持), 而 OpenGL ES 3.0 衍生自 OpenGL 3.3.
第二种方法目前看起来只能在 OpenGL ES 3.0 上使用, 请参考这篇文档Jim's GameDev Blog: 置换贴图 Displacement Mapping. 不过没办法在 OpenGL ES 2.0 上使用, 因为它要求在顶点着色器中进行纹理采样, 而这个特性恰恰是 2.0 不支持, 3.0 支持的.
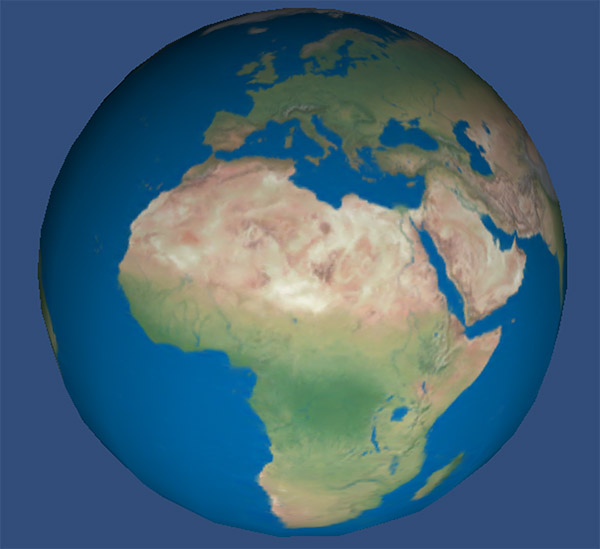
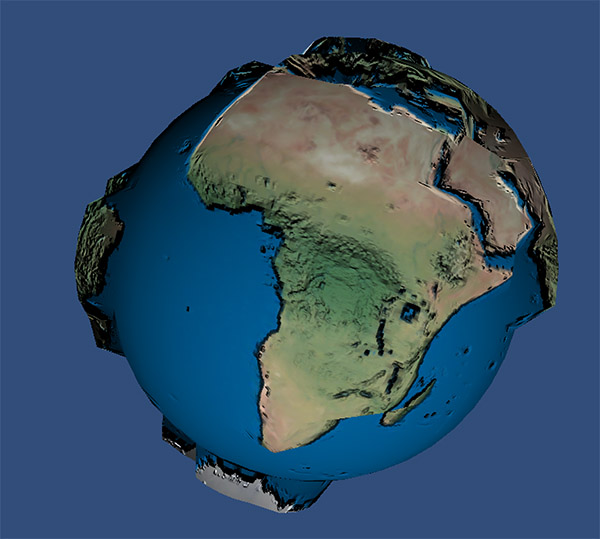
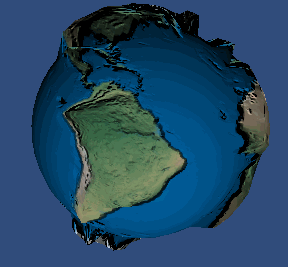
我们可以看看 Jim 在 3.0 设备上实现位移贴图的效果:
原始图:
使用位移贴图后的效果:
好了, 现在在我们的 2.0 设备上实现我们的 视差贴图 吧, 先看看效果:
使用不同参数的效果:
- height_scale = -0.015

- height_scale = -0.055

- height_scale = -0.095

你可以灵活调整这些参数:
- lightPos: 光源位置
- viewPos: 眼睛位置
- height_scale: 高度图取样值缩放比例
看看这个视频 video:
实现细节
关键技术点就这么几个:
手动构造正切空间 TBN 变换矩阵
如果你使用比较大的引擎, 比如 Unity, 它会帮你计算好法线,切线和次法线, 如果自己开发, 没有使用这些引擎, 那么很可能就需要自己手动构造了.
目前我发现有 3 种根据法线手动计算 TBN 的近似算法, 其中一种既能在 OpenGL ES 2.0 的顶点着色器内使用, 也能在片段着色器内使用, 就是我们下面要提到的这种, 主要原理就是已知了法线 Normal, 要据此求出对应的切线 Tangent 和 次法线 Binormal, 因为它们两两垂直, 而且 TB 跟 UV 对齐, 因此很容易求得 T, 再根据 T 和 N 求得 B, 算法代码如下:
	// 根据法线 N 计算 T,B

    vec3 tangent;

    vec3 binormal;

    // 使用顶点属性法线,并归一化

    vec3 Normal = normalize(normal*2.0-1.0);

	// 通过叉积来计算夹角

    vec3 c1 = cross(Normal, vec3(0.0, 0.0, 1.0));

    vec3 c2 = cross(Normal, vec3(0.0, 1.0, 0.0));

	// 方向朝外的是我们要的

    if ( length(c1) > length(c2) ) { tangent = c1;	} else { tangent = c2;}

    // 归一化切线和次法线

    tangent = normalize(tangent);

    binormal = normalize(cross(normal, tangent));

    vec3 T = normalize(mat3(model) * tangent);

    vec3 B = normalize(mat3(model) * binormal);

    vec3 N = normalize(mat3(model) * normal);

    // 构造出 TBN 矩阵

    mat3 TBN = mat3(T, B, N);
得到 TBN 矩阵后, 既可以把其他向量从其他空间变换进正切空间来, 也可以把正切空间的向量变换到其他空间去. 通常意义的做法是:
- TBN 用于正向变换
- TBN 的逆阵用于反向变换
不过在 OpenGL 中, 你把矩阵放在向量左边乘, 就是正向变换, 它会按列矩阵处理; 你把矩阵放在向量右边乘就是反向变换, 它会按行矩阵处理. 这样就不需要再进行矩阵求逆的操作了.
视差映射函数
视差贴图 的本质就是根据高度纹理图的不同高度以及视线向量的坐标, 来实时计算纹理坐标在视线下的偏移, 并以此作为新的纹理坐标来从纹理贴图中进行取样.
代码如下:
// The Parallax Mapping

vec2 ParallaxMapping1(vec2 texCoords, vec3 viewDir)

{

    float height =  texture2D(depthMap, texCoords).r;

    return texCoords - viewDir.xy / viewDir.z * (height * height_scale);

}
在此基础上提出的 视差遮掩 可以提供更好的视觉效果, 具体原理在代码注释中.
光照模型
最后就是一个非常简单的光照模型, 先从原始纹理中取样, 以此为基础, 缩小10倍作为环境光, 根据前面计算得到的切线来计算光线摄入方向, 再结合法线可以计算出漫射光和反射光, 最后把这些光线混合就得到最终的光照颜色值了.
这个光照模型的好处是简单易用, 不需要另外设置过多参数, 坏处就是不太灵活, 实际使用时可以把参数设置为可变, 或者直接换成其他光照模型也可以(具体的参数值就需要自己调整了).
因为代码自己计算构造了 TBN 变换矩阵, 所以这段 shader 代码具有很好的移植性, 可以轻松地把它用在其他地方.
完整代码
代码如下:
function setup()

    displayMode(OVERLAY)

    print("试验 OpenGL ES 2.0 中位移贴图的例子")

    print("Test the Parallax Mapping in OpenGL ES 2.0")

    img1 = readImage("Dropbox:dm")

    img2 = readImage("Dropbox:dnm1")

    img3 = readImage("Dropbox:dm1")

    local w,h = WIDTH,HEIGHT

    local c = color(223, 218, 218, 255)

    m3 = mesh()

    m3i = m3:addRect(w/2,h/2,w/1,h/1)

    m3:setColors(c)

    m3.texture = img1

    m3:setRectTex(m3i,0,0,1,1)

    m3.shader = shader(shaders.vs,shaders.fs)

    m3.shader.diffuseMap = img1

    m3.shader.normalMap = img2

    m3.shader.depthMap =  img3

    -- local tb = m3:buffer("tangent")

    -- tb:resize(6)

    tchx,tchy = 0,0

end

function draw()

    background(40, 40, 50)

    perspective()

    -- camera(e.x, e.y, e.z, p.x, p.y, p.z)

    -- 用于立方体

    -- camera(300,300,600, 0,500,0, 0,0,1)

    -- 用于平面位移贴图

    camera(WIDTH/2,HEIGHT/2,1000, WIDTH/2,HEIGHT/2,-200, 0,1,0)

    -- mySp:Sphere(100,100,100,0,0,0,10)

    light = vec3(tchx, tchy, 100.75)

    view = vec3(tchx, tchy, 300.75)

    -- light = vec3(300, 300, 500)

    -- rotate(ElapsedTime*5,0,1,0)

    -- m3:setRect(m2i,tchx,tchy,WIDTH/100,HEIGHT/100)

    setShaderParam(m3)

    m3:draw()

end

function touched(touch)

    if touch.state == BEGAN or touch.state == MOVING then

        tchx=touch.x+10

        tchy=touch.y+10

    end

end

function setShaderParam(m)

    m.shader.model = modelMatrix()

    m.shader.lightPos = light

    -- m.shader.lightPos = vec3(0.5, 1.0, 900.3)

    m.shader.viewPos = vec3(WIDTH/2,HEIGHT/2,5000)

    m.shader.viewPos = view

    -- m.shader.viewPos = vec3(0.0, 0.0, 90.0)

    m.shader.parallax = true

    m.shader.height_scale = -0.015

end

-- 试验 视差贴图 中的例子

shaders = {

vs = [[

attribute vec4 position;

attribute vec3 normal;

attribute vec2 texCoord;

//attribute vec3 tangent;

//attribute vec3 bitangent;

varying vec3 vFragPos;

varying vec2 vTexCoords;

varying vec3 vTangentLightPos;

varying vec3 vTangentViewPos;

varying vec3 vTangentFragPos;

uniform mat4 projection;

uniform mat4 view;

uniform mat4 model;

uniform mat4 modelViewProjection;

uniform vec3 lightPos;

uniform vec3 viewPos;

void main()

{

    //gl_Position = projection * view * model * position;

    gl_Position = modelViewProjection * position;

    vFragPos = vec3(model * position);

    vTexCoords = texCoord;

    // 根据法线 N 计算 T,B

    vec3 tangent;

    vec3 binormal;

    // 使用顶点属性法线,并归一化

    vec3 Normal = normalize(normal*2.0-1.0);

    vec3 c1 = cross(Normal, vec3(0.0, 0.0, 1.0));

    vec3 c2 = cross(Normal, vec3(0.0, 1.0, 0.0));

    if ( length(c1) > length(c2) ) { tangent = c1;	} else { tangent = c2;}

    // 归一化切线和次法线

    tangent = normalize(tangent);

    binormal = normalize(cross(normal, tangent));

    vec3 T = normalize(mat3(model) * tangent);

    vec3 B = normalize(mat3(model) * binormal);

    vec3 N = normalize(mat3(model) * normal);

    mat3 TBN = mat3(T, B, N);

    vTangentLightPos = lightPos*TBN;

    vTangentViewPos  = viewPos*TBN;

    vTangentFragPos  = vFragPos*TBN;

}

]],

fs = [[

precision highp float;

varying vec3 vFragPos;

varying vec2 vTexCoords;

varying vec3 vTangentLightPos;

varying vec3 vTangentViewPos;

varying vec3 vTangentFragPos;

uniform sampler2D diffuseMap;

uniform sampler2D normalMap;

uniform sampler2D depthMap;

uniform bool parallax;

uniform float height_scale;

vec2 ParallaxMapping(vec2 texCoords, vec3 viewDir);

vec2 ParallaxMapping1(vec2 texCoords, vec3 viewDir);

// The Parallax Mapping

vec2 ParallaxMapping1(vec2 texCoords, vec3 viewDir)

{

    float height =  texture2D(depthMap, texCoords).r;

    return texCoords - viewDir.xy / viewDir.z * (height * height_scale);

}

// Parallax Occlusion Mapping

vec2 ParallaxMapping(vec2 texCoords, vec3 viewDir)

{

    // number of depth layers

    const float minLayers = 10.0;

    const float maxLayers = 50.0;

    float numLayers = mix(maxLayers, minLayers, abs(dot(vec3(0.0, 0.0, 1.0), viewDir)));

    // calculate the size of each layer

    float layerDepth = 1.0 / numLayers;

    // depth of current layer

    float currentLayerDepth = 0.0;

    // the amount to shift the texture coordinates per layer (from vector P)

    vec2 P = viewDir.xy / viewDir.z * height_scale;

    vec2 deltaTexCoords = P / numLayers;

    // get initial values

    vec2  currentTexCoords     = texCoords;

    float currentDepthMapValue = texture2D(depthMap, currentTexCoords).r;

    while(currentLayerDepth < currentDepthMapValue)

    {

        // shift texture coordinates along direction of P

        currentTexCoords -= deltaTexCoords;

        // get depthmap value at current texture coordinates

        currentDepthMapValue = texture2D(depthMap, currentTexCoords).r;

        // get depth of next layer

        currentLayerDepth += layerDepth;

    }

    // -- parallax occlusion mapping interpolation from here on

    // get texture coordinates before collision (reverse operations)

    vec2 prevTexCoords = currentTexCoords + deltaTexCoords;

    // get depth after and before collision for linear interpolation

    float afterDepth  = currentDepthMapValue - currentLayerDepth;

    float beforeDepth = texture2D(depthMap, prevTexCoords).r - currentLayerDepth + layerDepth;

    // interpolation of texture coordinates

    float weight = afterDepth / (afterDepth - beforeDepth);

    vec2 finalTexCoords = prevTexCoords * weight + currentTexCoords * (1.0 - weight);

    return finalTexCoords;

}

void main()

{

    // Offset texture coordinates with Parallax Mapping

    vec3 viewDir = normalize(vTangentViewPos - vTangentFragPos);

    vec2 texCoords = vTexCoords;

    if(parallax)

        texCoords = ParallaxMapping(vTexCoords,  viewDir);

    // discards a fragment when sampling outside default texture region (fixes border artifacts)

    if(texCoords.x > 1.0 || texCoords.y > 1.0 || texCoords.x < 0.0 || texCoords.y < 0.0)

       discard;

    // Obtain normal from normal map

    vec3 normal = texture2D(normalMap, texCoords).rgb;

    normal = normalize(normal * 2.0 - 1.0);

    // Get diffuse color

    vec3 color = texture2D(diffuseMap, texCoords).rgb;

    // Ambient

    vec3 ambient = 0.1 * color;

    // Diffuse

    vec3 lightDir = normalize(vTangentLightPos - vTangentFragPos);

    float diff = max(dot(lightDir, normal), 0.0);

    vec3 diffuse = diff * color;

    // Specular

    vec3 reflectDir = reflect(-lightDir, normal);

    vec3 halfwayDir = normalize(lightDir + viewDir);

    float spec = pow(max(dot(normal, halfwayDir), 0.0), 32.0);

    vec3 specular = vec3(0.2) * spec;

    gl_FragColor = vec4(ambient + diffuse + specular, 1.0);

}

]]

}
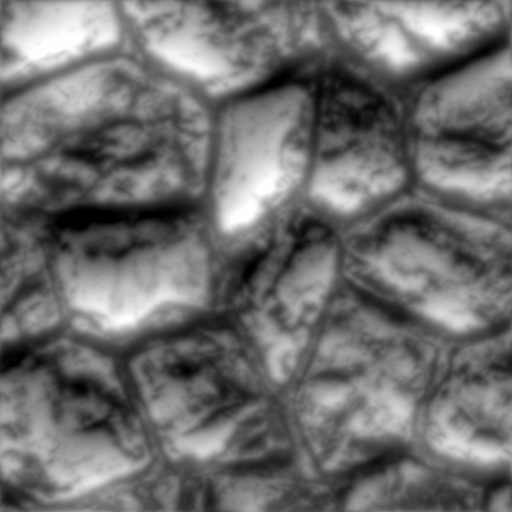
其中法线图(img2),高度图(img3) 都是通过软件 CrazyBump 根据原始纹理(img1)生成的.
你也可以下载它们直接使用:
img1:

img2:

img3:
参考
38 视差贴图
视差贴图(Parallax Mapping)与陡峭视差贴图(Steep Palallax Mapping)
Parallax Occlusion Mapping in GLSL
Jim's GameDev Blog: 置换贴图 Displacement Mapping
在 OpenGL ES 2.0 上实现视差贴图(Parallax Mapping)的更多相关文章
- 【AR实验室】OpenGL ES绘制相机(OpenGL ES 1.0版本)
0x00 - 前言 之前做一些移动端的AR应用以及目前看到的一些AR应用,基本上都是这样一个套路:手机背景显示现实场景,然后在该背景上进行图形学绘制.至于图形学绘制时,相机外参的解算使用的是V-SLA ...
- OpenGL ES 3.0 基础知识
首先要了解OpenGL的图形管线有哪些内容,再分别去了解其中的相关的关系: 管线分别包括了顶点缓冲区/数组对象,定点着色器,纹理,片段着色器,变换反馈,图元装配,光栅化,逐片段操作,帧缓冲区.其中顶点 ...
- 利用JNI技术在Android中调用C++形式的OpenGL ES 2.0函数
1. 打开Eclipse,File-->New-->Project…-->Android-->AndroidApplication Projec ...
- [置顶] 使用Android OpenGL ES 2.0绘图之五:添加运动
传送门 ☞ 系统架构设计 ☞ 转载请注明 ☞ http://blog.csdn.net/leverage_1229 传送门 ☞ GoF23种设计模式 ☞ 转载请注明 ☞ http://blog.csd ...
- OpenGL ES 2.0 渲染管线 学习笔记
图中展示整个OpenGL ES 2.0可编程管线 图中Vertex Shader和Fragment Shader 是可编程管线: Vertex Array/Buffer objects 顶点数据来源, ...
- 【Android 应用开发】OpenGL ES 2.0 -- 制作 3D 彩色旋转三角形 - 顶点着色器 片元着色器 使用详解
最近开始关注OpenGL ES 2.0 这是真正意义上的理解的第一个3D程序 , 从零开始学习 . 案例下载地址 : http://download.csdn.net/detail/han120201 ...
- 一步步实现windows版ijkplayer系列文章之六——SDL2源码分析之OpenGL ES在windows上的渲染过程
一步步实现windows版ijkplayer系列文章之一--Windows10平台编译ffmpeg 4.0.2,生成ffplay 一步步实现windows版ijkplayer系列文章之二--Ijkpl ...
- OpenGL ES 2.0 Shader 调试新思路(二): 做一个可用的原型
OpenGL ES 2.0 Shader 调试新思路(二): 做一个可用的原型 目录 背景介绍 请参考前文OpenGL ES 2.0 Shader 调试新思路(一): 改变提问方式 优化 ledCha ...
- OpenGL ES 2.0 Shader 调试新思路(一): 改变提问方式
OpenGL ES 2.0 Shader 调试新思路(一): 改变提问方式 --是什么(答案是具体值) VS 是不是(答案是布尔值) 目录 背景介绍 问题描述 Codea 是 iPad 上的一款很方便 ...
随机推荐
- Bootstrap系列 -- 18. 表单控件大小
前面看到的表单控件都正常的大小.可以通过设置控件的height,line-height,padding和font-size等属性来实现控件的高度设置.不过Bootstrap框架还提供了两个不同的类名, ...
- Linq之扩展方法
目录 写在前面 系列文章 扩展方法 总结 写在前面 上篇文章介绍了隐式类型,自动属性,初始化器,匿名类的相关概念,及通过反编译的方式查看了编译器帮我们做了那些事.本篇文章将介绍扩展方法的知识点,及如何 ...
- myeclipse自动import
不管包什么的 直接把代码全写出来 再按 ctrl + shift +o 这是自动导包的 前提是你写的代码是正确的
- codevs 1378选课 树形DP
#include<cstdio> #include<cstring> #include<algorithm> using namespace std; ],tr[] ...
- struts2理解
(1) Struts2(一)---struts2的环境搭建及实例 (2) struts2(二)---ModelDriven模型驱动 (3) Struts2属性驱动与模型驱动 (4)
- 10 个免费的 jQuery 可视化编辑器插件
富文本编辑器,也就是所见即所得的 HTML 编辑器,是网站一个非常重要的组件,特别是对于一些内容发布网站来说.本文介绍 10 个基于 jQuery 的可视化文本编辑器. MarkitUp markIt ...
- 【HDU 1757】 A Simple Math Problem
题 Description Lele now is thinking about a simple function f(x). If x < 10 f(x) = x. If x >= 1 ...
- POJ-1273 Drainage Ditches 最大流Dinic
Drainage Ditches Time Limit: 1000MS Memory Limit: 10000K Total Submissions: 65146 Accepted: 25112 De ...
- 宿主机( win 7 系统) ping 虚拟机VMware( cent os 6.6 ) 出现“请求超时”或者“无法访问目标主机”的解决方法
首先虚拟机的网络连接设置为"Host-only": 然后在 cmd 窗口中查看 VMnet1 的 ip 地址,这里是 192.168.254.1 接下来在 Linux 中设置网卡地 ...
- sqlserver字段类型详解
抄了一篇不错的数据库类型,来自:http://www.cnblogs.com/andy_tigger/archive/2011/08/21/2147745.html bit 整型 bit数据类型是整型 ...