Spark 运行架构核心总结
摘要:
1.基本术语
2.运行架构
2.1基本架构
2.2运行流程
2.3相关的UML类图
2.4调度模块:
2.4.1作业调度简介
2.4.2任务调度简介
3.运行模式
3.1 standalone模式
4.RDD实战
总结:
- 基本术语:
- Application:在Spark 上建立的用户程序,一个程序由一个驱动程序(Driver Program)和集群中的执行进程(Executer)构成。
- Driver Program:运行应用程序(Application)的main函数和创建SparkContext的程序。
- Executer:运行在工作节点(Work Node)上的进程。Executer负责运行任务(Task)并将各节点的数据保存在内存或磁盘中。每个应用程序都有自己对应Executer
- Work Node:集群中运行应用程序(Applicatuon)的节点
- Cluster Manager: 在集群上获取资源的外部服务(如Standalone,Mesos,Yarn),称作资源管理器或集群管理器
- Job: 包含多个Task的并行计算,往往由Spark Action(如save,collect)触发生成,一个Application中往往会产生多个Job
- Stage:每个Job被分成了更小的任务集合(TaskSet),各个阶段(Stage)相互依赖
- Task:被发送到某一个Executer的工作单元
- DAGScheduler:基于Stage的逻辑调度模块,负责将每个Job分割成一个DAG图
- TaskScheduler:基于Task的任务调度模块,负责每个Task的跟踪和向DAGScheduler汇报任务执行情况
2.运行架构
2.1基本架构:
图示:
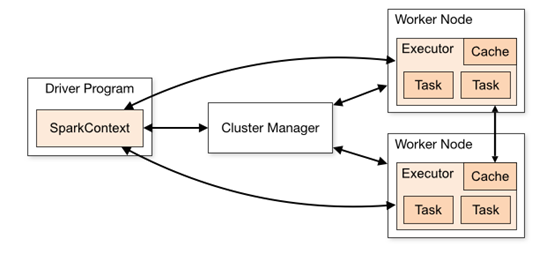
Spark Application在集群中以一组独立的进程运行,通过你的驱动程序(driver program)中的SparkContext 对象进行协作。
具体来说,SparkContext可以连接到多种类型的集群管理器 cluster managers (standalone cluster manager, Mesos ,YARN),这些 cluster managers 负责跨应用程序分配资源。一旦连接,Spark就获得集群中的节点上的executors,接下来,它会将应用程序代码发送到executors。最后,SparkContext发送tasks到executors运行。
注意:该驱动程序会一直监听并接受其executor传入的连接(spark.driver.port在网络配置部分)。这样,driver program必须可以寻找到工作节点的网络地址。数据不能跨应用程序(SparkContext)访问,除非写入外部系统
2.1.1 SparkContext类(代表连接到spark集群,现在一个jvm只能有一个sc,以后会取消):
几个重要的属性(包含DAGScheduler,TaskScheduler调度,获取executor,心跳与监听等):
说明:这里的下划线_代表默认值,比如Int 默认值就是0,String默认值就是None 参考知乎
  /* ------------------------------------------------------------------------------------- *

   | Private variables. These variables keep the internal state of the context, and are    |

   | not accessible by the outside world. They're mutable since we want to initialize all  |

   | of them to some neutral value ahead of time, so that calling "stop()" while the       |

   | constructor is still running is safe.                                                 |

   * ------------------------------------------------------------------------------------- */

  private var _conf: SparkConf = _

  private var _eventLogDir: Option[URI] = None

  private var _eventLogCodec: Option[String] = None

  private var _env: SparkEnv = _

  private var _jobProgressListener: JobProgressListener = _

  private var _statusTracker: SparkStatusTracker = _

  private var _progressBar: Option[ConsoleProgressBar] = None

  private var _ui: Option[SparkUI] = None

  private var _hadoopConfiguration: Configuration = _

  private var _executorMemory: Int = _

  private var _schedulerBackend: SchedulerBackend = _

  private var _taskScheduler: TaskScheduler = _

  private var _heartbeatReceiver: RpcEndpointRef = _

  @volatile private var _dagScheduler: DAGScheduler = _

  private var _applicationId: String = _

  private var _applicationAttemptId: Option[String] = None

  private var _eventLogger: Option[EventLoggingListener] = None

  private var _executorAllocationManager: Option[ExecutorAllocationManager] = None

  private var _cleaner: Option[ContextCleaner] = None

  private var _listenerBusStarted: Boolean = false

  private var _jars: Seq[String] = _

  private var _files: Seq[String] = _

  private var _shutdownHookRef: AnyRef = _
2.1.2 Executor(一个运行任务的线程池,通过RPC与Driver通信):
心跳报告(心跳进程,记录心跳失败次数和接受task的心跳):
这里有两个参数:spark.executor.heartbeat.maxFailures = 60,spark.executor.heartbeatInterval = 10s,意味着最多每隔10min会重新发送一次心跳
  /** Reports heartbeat and metrics for active tasks to the driver. */

  private def reportHeartBeat(): Unit = {

    // list of (task id, accumUpdates) to send back to the driver

    val accumUpdates = new ArrayBuffer[(Long, Seq[AccumulatorV2[_, _]])]()

    val curGCTime = computeTotalGcTime()

    for (taskRunner <- runningTasks.values().asScala) {

      if (taskRunner.task != null) {

        taskRunner.task.metrics.mergeShuffleReadMetrics()

        taskRunner.task.metrics.setJvmGCTime(curGCTime - taskRunner.startGCTime)

        accumUpdates += ((taskRunner.taskId, taskRunner.task.metrics.accumulators()))

      }

    }

    val message = Heartbeat(executorId, accumUpdates.toArray, env.blockManager.blockManagerId)

    try {

      val response = heartbeatReceiverRef.askWithRetry[HeartbeatResponse](

          message, RpcTimeout(conf, "spark.executor.heartbeatInterval", "10s"))

      if (response.reregisterBlockManager) {

        logInfo("Told to re-register on heartbeat")

        env.blockManager.reregister()

      }

      heartbeatFailures = 0

    } catch {

      case NonFatal(e) =>

        logWarning("Issue communicating with driver in heartbeater", e)

        heartbeatFailures += 1

        if (heartbeatFailures >= HEARTBEAT_MAX_FAILURES) {

          logError(s"Exit as unable to send heartbeats to driver " +

            s"more than $HEARTBEAT_MAX_FAILURES times")

          System.exit(ExecutorExitCode.HEARTBEAT_FAILURE)

        }

    }

  }
Task管理(taskRunner类的启动,停止)
  // Maintains the list of running tasks.

  private val runningTasks = new ConcurrentHashMap[Long, TaskRunner]
下面是TaskRunner 的run方法,贴出来,以后研究
    override def run(): Unit = {

      val taskMemoryManager = new TaskMemoryManager(env.memoryManager, taskId)

      val deserializeStartTime = System.currentTimeMillis()

      Thread.currentThread.setContextClassLoader(replClassLoader)

      val ser = env.closureSerializer.newInstance()

      logInfo(s"Running $taskName (TID $taskId)")

      execBackend.statusUpdate(taskId, TaskState.RUNNING, EMPTY_BYTE_BUFFER)

      var taskStart: Long = 0

      startGCTime = computeTotalGcTime()

      try {

        val (taskFiles, taskJars, taskProps, taskBytes) =

          Task.deserializeWithDependencies(serializedTask)

        // Must be set before updateDependencies() is called, in case fetching dependencies

        // requires access to properties contained within (e.g. for access control).

        Executor.taskDeserializationProps.set(taskProps)

        updateDependencies(taskFiles, taskJars)

        task = ser.deserialize[Task[Any]](taskBytes, Thread.currentThread.getContextClassLoader)

        task.localProperties = taskProps

        task.setTaskMemoryManager(taskMemoryManager)

        // If this task has been killed before we deserialized it, let's quit now. Otherwise,

        // continue executing the task.

        if (killed) {

          // Throw an exception rather than returning, because returning within a try{} block

          // causes a NonLocalReturnControl exception to be thrown. The NonLocalReturnControl

          // exception will be caught by the catch block, leading to an incorrect ExceptionFailure

          // for the task.

          throw new TaskKilledException

        }

        logDebug("Task " + taskId + "'s epoch is " + task.epoch)

        env.mapOutputTracker.updateEpoch(task.epoch)

        // Run the actual task and measure its runtime.

        taskStart = System.currentTimeMillis()

        var threwException = true

        val value = try {

          val res = task.run(

            taskAttemptId = taskId,

            attemptNumber = attemptNumber,

            metricsSystem = env.metricsSystem)

          threwException = false

          res

        } finally {

          val releasedLocks = env.blockManager.releaseAllLocksForTask(taskId)

          val freedMemory = taskMemoryManager.cleanUpAllAllocatedMemory()

          if (freedMemory > 0) {

            val errMsg = s"Managed memory leak detected; size = $freedMemory bytes, TID = $taskId"

            if (conf.getBoolean("spark.unsafe.exceptionOnMemoryLeak", false) && !threwException) {

              throw new SparkException(errMsg)

            } else {

              logError(errMsg)

            }

          }

          if (releasedLocks.nonEmpty) {

            val errMsg =

              s"${releasedLocks.size} block locks were not released by TID = $taskId:\n" +

                releasedLocks.mkString("[", ", ", "]")

            if (conf.getBoolean("spark.storage.exceptionOnPinLeak", false) && !threwException) {

              throw new SparkException(errMsg)

            } else {

              logWarning(errMsg)

            }

          }

        }

        val taskFinish = System.currentTimeMillis()

        // If the task has been killed, let's fail it.

        if (task.killed) {

          throw new TaskKilledException

        }

        val resultSer = env.serializer.newInstance()

        val beforeSerialization = System.currentTimeMillis()

        val valueBytes = resultSer.serialize(value)

        val afterSerialization = System.currentTimeMillis()

        // Deserialization happens in two parts: first, we deserialize a Task object, which

        // includes the Partition. Second, Task.run() deserializes the RDD and function to be run.

        task.metrics.setExecutorDeserializeTime(

          (taskStart - deserializeStartTime) + task.executorDeserializeTime)

        // We need to subtract Task.run()'s deserialization time to avoid double-counting

        task.metrics.setExecutorRunTime((taskFinish - taskStart) - task.executorDeserializeTime)

        task.metrics.setJvmGCTime(computeTotalGcTime() - startGCTime)

        task.metrics.setResultSerializationTime(afterSerialization - beforeSerialization)

        // Note: accumulator updates must be collected after TaskMetrics is updated

        val accumUpdates = task.collectAccumulatorUpdates()

        // TODO: do not serialize value twice

        val directResult = new DirectTaskResult(valueBytes, accumUpdates)

        val serializedDirectResult = ser.serialize(directResult)

        val resultSize = serializedDirectResult.limit

        // directSend = sending directly back to the driver

        val serializedResult: ByteBuffer = {

          if (maxResultSize > 0 && resultSize > maxResultSize) {

            logWarning(s"Finished $taskName (TID $taskId). Result is larger than maxResultSize " +

              s"(${Utils.bytesToString(resultSize)} > ${Utils.bytesToString(maxResultSize)}), " +

              s"dropping it.")

            ser.serialize(new IndirectTaskResult[Any](TaskResultBlockId(taskId), resultSize))

          } else if (resultSize > maxDirectResultSize) {

            val blockId = TaskResultBlockId(taskId)

            env.blockManager.putBytes(

              blockId,

              new ChunkedByteBuffer(serializedDirectResult.duplicate()),

              StorageLevel.MEMORY_AND_DISK_SER)

            logInfo(

              s"Finished $taskName (TID $taskId). $resultSize bytes result sent via BlockManager)")

            ser.serialize(new IndirectTaskResult[Any](blockId, resultSize))

          } else {

            logInfo(s"Finished $taskName (TID $taskId). $resultSize bytes result sent to driver")

            serializedDirectResult

          }

        }

        execBackend.statusUpdate(taskId, TaskState.FINISHED, serializedResult)

      } catch {

        case ffe: FetchFailedException =>

          val reason = ffe.toTaskEndReason

          setTaskFinishedAndClearInterruptStatus()

          execBackend.statusUpdate(taskId, TaskState.FAILED, ser.serialize(reason))

        case _: TaskKilledException | _: InterruptedException if task.killed =>

          logInfo(s"Executor killed $taskName (TID $taskId)")

          setTaskFinishedAndClearInterruptStatus()

          execBackend.statusUpdate(taskId, TaskState.KILLED, ser.serialize(TaskKilled))

        case CausedBy(cDE: CommitDeniedException) =>

          val reason = cDE.toTaskEndReason

          setTaskFinishedAndClearInterruptStatus()

          execBackend.statusUpdate(taskId, TaskState.FAILED, ser.serialize(reason))

        case t: Throwable =>

          // Attempt to exit cleanly by informing the driver of our failure.

          // If anything goes wrong (or this was a fatal exception), we will delegate to

          // the default uncaught exception handler, which will terminate the Executor.

          logError(s"Exception in $taskName (TID $taskId)", t)

          // Collect latest accumulator values to report back to the driver

          val accums: Seq[AccumulatorV2[_, _]] =

            if (task != null) {

              task.metrics.setExecutorRunTime(System.currentTimeMillis() - taskStart)

              task.metrics.setJvmGCTime(computeTotalGcTime() - startGCTime)

              task.collectAccumulatorUpdates(taskFailed = true)

            } else {

              Seq.empty

            }

          val accUpdates = accums.map(acc => acc.toInfo(Some(acc.value), None))

          val serializedTaskEndReason = {

            try {

              ser.serialize(new ExceptionFailure(t, accUpdates).withAccums(accums))

            } catch {

              case _: NotSerializableException =>

                // t is not serializable so just send the stacktrace

                ser.serialize(new ExceptionFailure(t, accUpdates, false).withAccums(accums))

            }

          }

          setTaskFinishedAndClearInterruptStatus()

          execBackend.statusUpdate(taskId, TaskState.FAILED, serializedTaskEndReason)

          // Don't forcibly exit unless the exception was inherently fatal, to avoid

          // stopping other tasks unnecessarily.

          if (Utils.isFatalError(t)) {

            SparkUncaughtExceptionHandler.uncaughtException(t)

          }

      } finally {

        runningTasks.remove(taskId)

      }

    }
2.2运行流程:
图示:
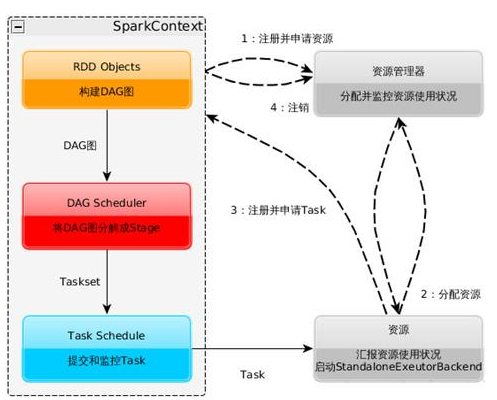
注意这里的StandaloneExecutorBackend是一个概念(我在spark项目中没找到),实际上的spark standalone的资源调度类是 CoarseGrainedExecutorBackend
1.构建Spark Application的运行环境(启动SparkContext),SparkContext向资源管理器(ClusterManager)(可以是Standalone、Mesos或YARN)注册并申请运行Executor资源;
2.资源管理器分配Executor资源并启动StandaloneExecutorBackend,Executor运行情况将随着心跳发送到资源管理器上;
3.SparkContext构建成DAG图,将DAG图分解成Stage,并把Taskset发送给Task Scheduler。
Executor向SparkContext申请Task,Task Scheduler将Task发放给Executor运行同时SparkContext将应用程序代码发放给Executor。
4.Task在Executor上运行,运行完毕释放所有资源。
2.3相关的类:
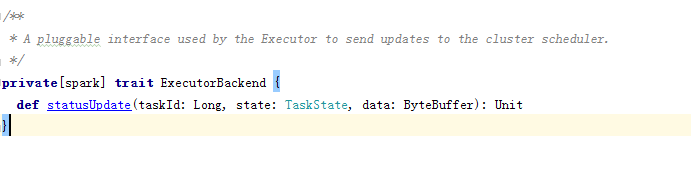
ExecutorBackend:
特质签名(Executor用来向集群调度发送更新的插件)
各种运行模式的类图:
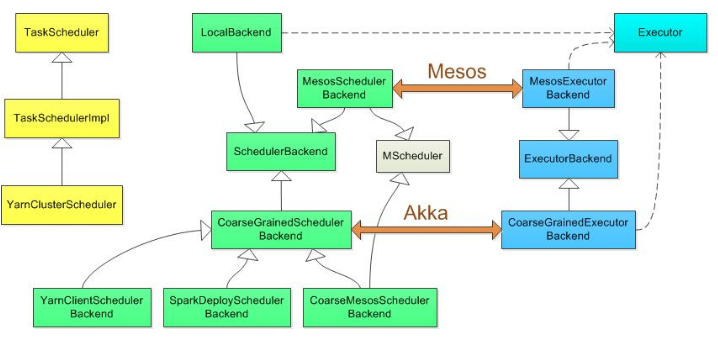
其中standalone是用SparkDeploySchedulerBackend配合TeskSchedulerImpl工作,相关类图应该是:
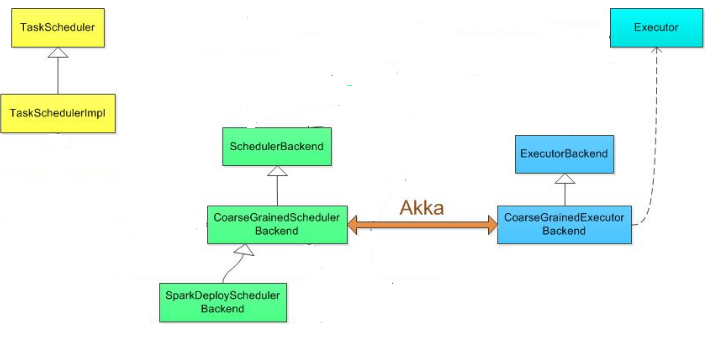
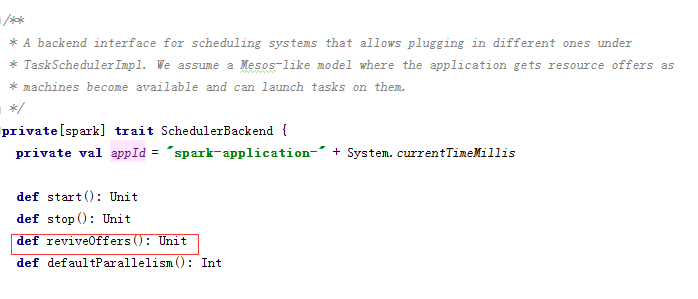
SchedulerBackend特质(核心函数:reviveOffers())
CoarseGrainedExecutorBackend(receive方法里是若干模式匹配,类似于switch case,根据相关模式执行相应操作。主要有注册Executor,运行Task等)
override def receive: PartialFunction[Any, Unit] = {

    case RegisteredExecutor(hostname) =>

      logInfo("Successfully registered with driver")

      executor = new Executor(executorId, hostname, env, userClassPath, isLocal = false)

    case RegisterExecutorFailed(message) =>

      logError("Slave registration failed: " + message)

      exitExecutor(1)

    case LaunchTask(data) =>

      if (executor == null) {

        logError("Received LaunchTask command but executor was null")

        exitExecutor(1)

      } else {

        val taskDesc = ser.deserialize[TaskDescription](data.value)

        logInfo("Got assigned task " + taskDesc.taskId)

        executor.launchTask(this, taskId = taskDesc.taskId, attemptNumber = taskDesc.attemptNumber,

          taskDesc.name, taskDesc.serializedTask)

      }

    case KillTask(taskId, _, interruptThread) =>

      if (executor == null) {

        logError("Received KillTask command but executor was null")

        exitExecutor(1)

      } else {

        executor.killTask(taskId, interruptThread)

      }

    case StopExecutor =>

      stopping.set(true)

      logInfo("Driver commanded a shutdown")

      // Cannot shutdown here because an ack may need to be sent back to the caller. So send

      // a message to self to actually do the shutdown.

      self.send(Shutdown)

    case Shutdown =>

      stopping.set(true)

      new Thread("CoarseGrainedExecutorBackend-stop-executor") {

        override def run(): Unit = {

          // executor.stop() will call `SparkEnv.stop()` which waits until RpcEnv stops totally.

          // However, if `executor.stop()` runs in some thread of RpcEnv, RpcEnv won't be able to

          // stop until `executor.stop()` returns, which becomes a dead-lock (See SPARK-14180).

          // Therefore, we put this line in a new thread.

          executor.stop()

        }

      }.start()

  }
最后一个类SparkDeploySchedulerBackend(start):
  var driverEndpoint: RpcEndpointRef = null

  protected def minRegisteredRatio: Double = _minRegisteredRatio

  override def start() {

    val properties = new ArrayBuffer[(String, String)]

    for ((key, value) <- scheduler.sc.conf.getAll) {

      if (key.startsWith("spark.")) {

        properties += ((key, value))

      }

    }

    // TODO (prashant) send conf instead of properties

    driverEndpoint = createDriverEndpointRef(properties)

  }

  protected def createDriverEndpointRef(

      properties: ArrayBuffer[(String, String)]): RpcEndpointRef = {

    rpcEnv.setupEndpoint(ENDPOINT_NAME, createDriverEndpoint(properties))

  }

  protected def createDriverEndpoint(properties: Seq[(String, String)]): DriverEndpoint = {

    new DriverEndpoint(rpcEnv, properties)

  }
2.4调度模块:
2.4.1作业调度简介
DAGScheduler: 根据Job构建基于Stage的DAG(Directed Acyclic Graph有向无环图),并提交Stage给TASkScheduler。 其划分Stage的依据是RDD之间的依赖的关系找出开销最小的调度方法,如下图

注:从最后一个Stage开始倒推,如果有依赖关系 就先解决父节点,如果没有依赖关系 就直接运行;这里做了一个简单的实验:Spark DAGSheduler生成Stage过程分析实验
2.4.2 任务调度简介:
TaskSchedulter: 将TaskSet提交给worker运行,每个Executor运行什么Task就是在此处分配的. TaskScheduler维护所有TaskSet,当Executor向Driver发生心跳时,TaskScheduler会根据资源剩余情况分配相应的Task。
另外TaskScheduler还维护着所有Task的运行标签,重试失败的Task。下图展示了TaskScheduler的作用

在不同运行模式中任务调度器具体为:
- Spark on Standalone模式为TaskScheduler
- YARN-Client模式为YarnClientClusterScheduler
- YARN-Cluster模式为YarnClusterScheduler
3.运行模式
3.1 standalone模式
- Standalone模式使用Spark自带的资源调度框架
- 采用Master/Slaves的典型架构,选用ZooKeeper来实现Master的HA
- 框架结构图如下:

- 该模式主要的节点有Client节点、Master节点和Worker节点。其中Driver既可以运行在Master节点上中,也可以运行在本地Client端。当用spark-shell交互式工具提交Spark的Job时,Driver在Master节点上运行;当使用spark-submit工具提交Job或者在Eclips、IDEA等开发平台上使用”new SparkConf.setManager(“spark://master:7077”)”方式运行Spark任务时,Driver是运行在本地Client端上的
- 运行过程如下图:(参考至)

- SparkContext连接到Master,向Master注册并申请资源(CPU Core 和Memory)
- Master根据SparkContext的资源申请要求和Worker心跳周期内报告的信息决定在哪个Worker上分配资源,然后在该Worker上获取资源,然后启动StandaloneExecutorBackend;
- StandaloneExecutorBackend向SparkContext注册;
- SparkContext将Applicaiton代码发送给StandaloneExecutorBackend;并且SparkContext解析Applicaiton代码,构建DAG图,并提交给DAG Scheduler分解成Stage(当碰到Action操作时,就会催生Job;每个Job中含有1个或多个Stage,Stage一般在获取外部数据和shuffle之前产生),然后以Stage(或者称为TaskSet)提交给Task Scheduler,Task Scheduler负责将Task分配到相应的Worker,最后提交给StandaloneExecutorBackend执行;
- StandaloneExecutorBackend会建立Executor线程池,开始执行Task,并向SparkContext报告,直至Task完成
- 所有Task完成后,SparkContext向Master注销,释放资源
4 RDD实战
sc.makeRDD(Seq("arachis","tony","lily","tom")).map{

      name => (name.charAt(0),name)

    }.groupByKey().mapValues{

      names => names.toSet.size //unique and count

    }.collect()
提交Job collect

划分Stage

提交Stage , 开始Task 运行调度
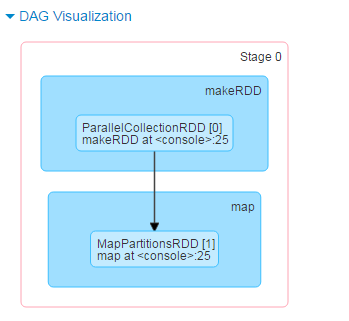
Stage0的DAG图,makeRDD => map ; 相应生成了两个RDD:ParallelCollectionRDD,MapPartitionsRDD
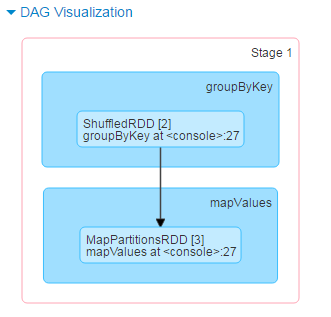
Stage1 的DAG图,groupByKey => mapValues; 相应生成两个RDD:ShuffledRDD, MapPartitionsRDD
- 将这些术语串起来的运行层次图如下:

- Job=多个stage,Stage=多个同种task, Task分为ShuffleMapTask和ResultTask,Dependency分为ShuffleDependency和NarrowDependency
链接:
Spark官网:http://spark.apache.org/docs/latest/cluster-overview.html
http://www.cnblogs.com/tgzhu/p/5818374.html
Spark 运行架构核心总结的更多相关文章
- Spark入门实战系列--4.Spark运行架构
[注]该系列文章以及使用到安装包/测试数据 可以在<倾情大奉送--Spark入门实战系列>获取 1. Spark运行架构 1.1 术语定义 lApplication:Spark Appli ...
- 【转载】Spark运行架构
1. Spark运行架构 1.1 术语定义 lApplication:Spark Application的概念和Hadoop MapReduce中的类似,指的是用户编写的Spark应用程序,包含了一个 ...
- Spark运行架构
http://blog.csdn.net/pipisorry/article/details/52366288 1. Spark运行架构 1.1 术语定义 lApplication:Spark App ...
- spark 运行架构
spark 运行架构基本由三部分组成,包括SparkContext(驱动程序),ClusterManager(集群资源管理器)和Executor(任务执行过程)组成. 其中SparkContext负责 ...
- Spark学习(一)——Spark运行架构
基本概念 在具体讲解Spark运行架构之前,需要先了解几个重要的概念: RDD:是弹性分布式数据集(Resilient Distributed Dataset)的简称,是分布式内存的一个抽象概念,提供 ...
- Spark运行架构详解
原文引自:http://www.cnblogs.com/shishanyuan/p/4721326.html 1. Spark运行架构 1.1 术语定义 lApplication:Spark Appl ...
- 3.2 Spark运行架构
一.基本概念 1.RDD Resillient Distributed Dataset 弹性分布式数据集 2.DAG 反映RDD之间的依赖关系 3.Executor 进程驻守在机器上面,由进程派生出很 ...
- Spark入门:Spark运行架构(Python版)
此文为个人学习笔记如需系统学习请访问http://dblab.xmu.edu.cn/blog/1709-2/ 基本概念 * RDD:是弹性分布式数据集(Resilient Distributed ...
- 【Todo】Spark运行架构
接上一篇:http://www.cnblogs.com/charlesblc/p/6108105.html 上一篇文章中主要参考的是 Link 这个系列下一篇讲的是Idea,没有细看,又看了再下一篇: ...
随机推荐
- SQL Server 数据加密功能解析
SQL Server 数据加密功能解析 转载自: 腾云阁 https://www.qcloud.com/community/article/194 数据加密是数据库被破解.物理介质被盗.备份被窃取的最 ...
- Intellij idea添加单元测试工具
1.idea 版本是14.0.0 ,默认带有Junit,但是不能自动生成单元测试,需要下载JunitGererator2.0插件 2.Settings -Plugins,下载 JunitGenerat ...
- [C#] 走进异步编程的世界 - 开始接触 async/await
走进异步编程的世界 - 开始接触 async/await 序 这是学习异步编程的入门篇. 涉及 C# 5.0 引入的 async/await,但在控制台输出示例时经常会采用 C# 6.0 的 $&qu ...
- 使用 Android Studio 检测内存泄漏与解决内存泄漏问题
本文在腾讯技术推文上 修改 发布. http://wetest.qq.com/lab/view/63.html?from=ads_test2_qqtips&sessionUserType=BF ...
- php注册审核
通过注册审核,判断刚创建的账户是否可以使用. 后台管理员审核通过后,账号可以使用. 通过session 设置只能通过登录入口进入网页. 原理:通过数据库设置账号的一个字段状态,例: isok:1, i ...
- angluarjs2项目生成内容合并到asp.net mvc4项目中一起发布
应用场景 angular2(下文中标注位NG2)项目和.net mvc项目分别开发,前期采用跨域访问进行并行开发,后期只需要将NG2项目的生产版本合并到.net项目. NG2项目概述 ng2项目采用的 ...
- python 数据类型 ----字典
字典由一对key:value 组成的 python中常用且重量级的数据类型 1. key , keys, values 字典由一对key:value 组成的 python中常用且重量级的数据类型 1. ...
- Flex 布局教程:实例篇
该教程整理自 阮一峰Flexible教程 今天介绍常见布局的Flex写法.你会看到,不管是什么布局,Flex往往都可以几行命令搞定. 我的主要参考资料是Landon Schropp的文章和Solved ...
- Linux的locale、LC_ALL和LANG
如果你是一个Linux新手,并且刚刚安装了一个新的英文系统但想要设置成中文系统,肯定会接触到上面几个变量,在网上搜索了一系列解决方法,给一些变量赋一下值,再export一下,或者写到配置文件里面,然后 ...
- 如何给FineReport设置自定义消息提醒工具
FineReport设计器有自动的消息推送功能,可设置报表定时推送和常规的日报周报推送.官方有自己的消息推送的接口,不过有些用户旺旺希望自己开发,符合自己需求的推送界面. 下面这个方案就从逻辑层面简单 ...