Python中logging在多进程环境下打印日志
因为涉及到进程间互斥与通信问题,因此默认情况下Python中的logging无法在多进程环境下打印日志。但是查询了官方文档可以发现,推荐了一种利用logging.SocketHandler的方案来实现多进程日志打印。
其原理很简单,概括一句话就是说:多个进程将各自环境下的日志通过Socket发送给一个专门打印日志的进程,这样就可以防止多进程打印的冲突与混乱情况。
本文主要记录下SocketHandler真实的用法情况:
1 时序图
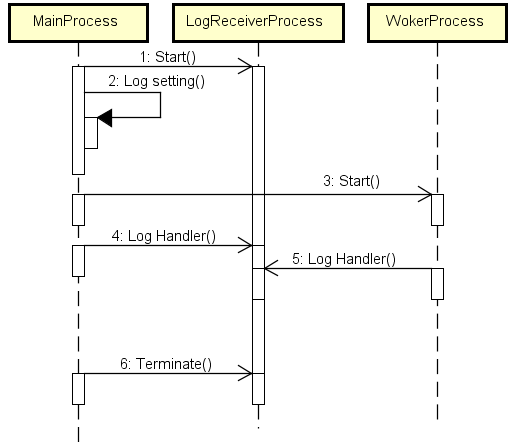
简单说明下逻辑:主进程(MainProcess)启动一个专门打印日志的进程(LogReceiverProcess),并且将自己(主进程)环境下的日志都“重定向”给LogReceiverProcess。同理,在后续逻辑中启动的所有工作子进程(WorkerProcess)都做一样的操作,把自己环境下的日志都“重定向”给日志进程去打印。

2 实现代码
2.1 日志进程
日志进程的代码核心在于要建立一个TCP Server来接收并处理Log record,代码如下:
 import os

 import logging

 import logging.handlers

 import traceback

 import cPickle

 import struct

 import SocketServer

 from multiprocessing import Process

 class LogRecordStreamHandler(SocketServer.StreamRequestHandler):

     def handle(self):

         while True:

             try:

                 chunk = self.connection.recv(4)

                 if len(chunk) < 4:

                     break

                 slen = struct.unpack(">L", chunk)[0]

                 chunk = self.connection.recv(slen)

                 while len(chunk) < slen:

                     chunk = chunk + self.connection.recv(slen - len(chunk))

                 obj = self.unpickle(chunk)

                 record = logging.makeLogRecord(obj)

                 self.handle_log_record(record)

             except:

                 break

     @classmethod

     def unpickle(cls, data):

         return cPickle.loads(data)

     def handle_log_record(self, record):

         if self.server.logname is not None:

             name = self.server.logname

         else:

             name = record.name

         logger = logging.getLogger(name)

         logger.handle(record)

 class LogRecordSocketReceiver(SocketServer.ThreadingTCPServer):

     allow_reuse_address = 1

     def __init__(self, host='localhost', port=logging.handlers.DEFAULT_TCP_LOGGING_PORT, handler=LogRecordStreamHandler):

         SocketServer.ThreadingTCPServer.__init__(self, (host, port), handler)

         self.abort = 0

         self.timeout = 1

         self.logname = None

     def serve_until_stopped(self):

         import select

         abort = 0

         while not abort:

             rd, wr, ex = select.select([self.socket.fileno()], [], [], self.timeout)

             if rd:

                 self.handle_request()

             abort = self.abort

 def _log_listener_process(log_format, log_time_format, log_file):

     log_file = os.path.realpath(log_file)

     logging.basicConfig(level=logging.DEBUG, format=log_format, datefmt=log_time_format, filename=log_file, filemode='a+')

     # Console log

     console = logging.StreamHandler()

     console.setLevel(logging.INFO)

     console.setFormatter(logging.Formatter(fmt=log_format, datefmt=log_time_format))

     logging.getLogger().addHandler(console)

     tcp_server = LogRecordSocketReceiver()

     logging.debug('Log listener process started ...')

     tcp_server.serve_until_stopped()
关键点:
(1)TCPServer的构建逻辑,拆包还原Log记录;
(2)在日志进程中设定好logging记录级别和打印方式,这里除了指定文件存储还添加了Console打印。
2.2 其他进程
除了日志进程之外的进程,设置logging都“重定向”给日志进程,并且要关闭当前进程的日志在Console打印(默认会显示Warning级别及以上的日志到Console),否则Console上日志展示会有重复凌乱的感觉。
 class LogHelper:

     # 默认日志存储路径(相对于当前文件路径)

     default_log_path = os.path.join(os.path.dirname(os.path.realpath(__file__)), '..', 'logs')

     # 记录当前实际的日志所在目录

     current_log_path = ''

     # 记录当前实际的日志完整路径

     current_log_file = ''

     # 日志文件内容格式

     log_format = '[%(asctime)s.%(msecs)03d][%(processName)s][%(levelname)s][%(filename)s:%(lineno)d] %(message)s'

     # 日志中时间格式

     log_time_format = '%Y%m%d %H:%M:%S'

     # 日志进程

     log_process = None

     def __init__(self):

         pass

     @staticmethod

     def print_console_log(level, message):

         print '--------------------------------------------------'

         if level == logging.WARN:

             level_str = '[WARN]'

         elif level == logging.ERROR:

             level_str = '[ERROR]'

         elif level == logging.FATAL:

             level_str = '[FATAL]'

         else:

             level_str = '[INFO]'

         print '\t%s %s' % (level_str, message)

         print '--------------------------------------------------'

     @staticmethod

     def init(clear_logs=True, log_path=''):

         #

         console = logging.StreamHandler()

         console.setLevel(logging.FATAL)

         logging.getLogger().addHandler(console)

         try:

             # 如果外部没有指定日志存储路径则默认在common同级路径存储

             if log_path == '':

                 log_path = LogHelper.default_log_path

                 if not os.path.exists(log_path):

                     os.makedirs(log_path)

             LogHelper.current_log_path = log_path

             # 清理旧的日志并初始化当前日志路径

             if clear_logs:

                 LogHelper.clear_old_log_files()

             LogHelper.current_log_file = LogHelper._get_latest_log_file()

             socket_handler = logging.handlers.SocketHandler('localhost', logging.handlers.DEFAULT_TCP_LOGGING_PORT)

             logging.getLogger().setLevel(logging.DEBUG)

             logging.getLogger().addHandler(socket_handler)

             #

             LogHelper.start()

         except Exception, ex:

             LogHelper.print_console_log(logging.FATAL, 'init() exception: %s' % str(ex))

             traceback.print_exc()

     @staticmethod

     def start():

         if LogHelper.log_process is None:

             LogHelper.log_process = Process(target=_log_listener_process, name='LogRecorder', args=(LogHelper.log_format, LogHelper.log_time_format, LogHelper.current_log_file))

             LogHelper.log_process.start()

         else:

             pass

     @staticmethod

     def stop():

         if LogHelper.log_process is None:

             pass

         else:

             LogHelper.log_process.terminate()

             LogHelper.log_process.join()

     @staticmethod

     def _get_latest_log_file():

         latest_log_file = ''

         try:

             if os.path.exists(LogHelper.current_log_path):

                 for maindir, subdir, file_name_list in os.walk(LogHelper.current_log_path):

                     for file_name in file_name_list:

                         apath = os.path.join(maindir, file_name)

                         if apath > latest_log_file:

                             latest_log_file = apath

             if latest_log_file == '':

                 latest_log_file = LogHelper.current_log_path + os.sep + 'system_'

                 latest_log_file += time.strftime("%Y%m%d_%H%M%S", time.localtime(time.time())) + '.log'

         except Exception, ex:

             logging.error('EXCEPTION: %s' % str(ex))

             traceback.print_exc()

         finally:

             return latest_log_file

     @staticmethod

     def get_log_file():

         return LogHelper.current_log_file

     @staticmethod

     def clear_old_log_files():

         if not os.path.exists(LogHelper.current_log_path):

             logging.warning('clear_old_log_files() Not exist: %s' % LogHelper.current_log_path)

             return

         try:

             for maindir, subdir, file_name_list in os.walk(LogHelper.current_log_path):

                 for file_name in file_name_list:

                     apath = os.path.join(maindir, file_name)

                     if apath != LogHelper.current_log_file:

                         logging.info('DEL -> %s' % str(apath))

                         os.remove(apath)

                     else:

                         with open(LogHelper.current_log_file, 'w') as f:

                             f.write('')

             logging.debug('Clear log done.')

         except Exception, ex:

             logging.error('EXCEPTION: %s' % str(ex))

             traceback.print_exc()
Python中logging在多进程环境下打印日志的更多相关文章
- Python 中 logging 日志模块在多进程环境下的使用
因为我的个人网站 restran.net 已经启用,博客园的内容已经不再更新.请访问我的个人网站获取这篇文章的最新内容,Python 中 logging 日志模块在多进程环境下的使用 使用 Pytho ...
- Python中logging模块的基本用法
在 PyCon 2018 上,Mario Corchero 介绍了在开发过程中如何更方便轻松地记录日志的流程. 整个演讲的内容包括: 为什么日志记录非常重要 日志记录的流程是怎样的 怎样来进行日志记录 ...
- python中logging模块的用法
很多程序都有记录日志的需求,并且日志中包含的信息即有正常的程序访问日志,还可能有错误.警告等信息输出,python的logging模块提供了标准的日志接口,你可以通过它存储各种格式的日志,loggin ...
- 尚学python课程---11、linux环境下安装python注意
尚学python课程---11.linux环境下安装python注意 一.总结 一句话总结: 准备安装依赖包:zlib.openssl:yum install zlib* openssl*:pytho ...
- 重写NSLog,Debug模式下打印日志和当前行数
在pch文件中加入以下命令,NSLog在真机测试中就不会打印了 //重写NSLog,Debug模式下打印日志和当前行数 #if DEBUG #define NSLog(FORMAT, ...) fpr ...
- python中logging模块的一些简单用法
用Python写代码的时候,在想看的地方写个print xx 就能在控制台上显示打印信息,这样子就能知道它是什么了,但是当我需要看大量的地方或者在一个文件中查看的时候,这时候print就不大方便了,所 ...
- python中logging模块使用
1.logging模块使用场景 在写程序的时候,尤其是大型的程序,在程序中加入日志系统是必不可少的,它能记录很多的信息.刚刚接触python的时候肯定都在用print来输出信息,这样是最简单的输出,正 ...
- python中logging的使用
什么是日志: 日志是一种可以追踪某些软件运行时所发生事件的方法 软件开发人员可以向他们的代码中调用日志记录相关的方法来表明发生了某些事情 一个事件可以用一个可包含可选变量数据的消息来描述 此外,事件也 ...
- Python中的输入(input)和输出打印
目录 最简单的打印 打印数字 打印字符 字符串的格式化输出 python中让输出不换行 以下的都是在Python3.X环境下的 使用 input 函数接收用户的输入,返回的是 str 字符串 最简单的 ...
随机推荐
- 三十九.NoSQL概述 部署Redis服务 、 部署LNMP+Redis
1. 搭建Redis服务器 在主机 192.168.4.50 上安装并启用 redis 服务 设置变量test,值为123 查看变量test的值 1.1 搭建redis服务器 1.1.1 安装re ...
- P2543 [AHOI2004]奇怪的字符串
题目描述 输入输出格式 输入格式: 输入文件中包含两个字符串X和Y.当中两字符串非0即1.序列长度均小于9999. 输出格式: X和Y的最长公共子序列长度. 输入输出样例 输入样例#1: 复制 010 ...
- PHP全栈学习笔记20
thinkphp概述,thinkphp项目构建流程,thinkphp项目结构,thinkphp配置,thinkphp控制器,thinkphp模型,thinkphp视图,thinkphp的内置模板引擎. ...
- 数据结构实验之图论七:驴友计划【迪杰斯特拉算法】(SDUT 3363)
分析:可以求简单的任意两点间最短距离的稍微变形,一个板子题. #include <iostream> #include <bits/stdc++.h> using names ...
- 解决Ubuntu重启后,core_pattern失效问题——手动关闭apport
云主机重启后,core_pattern,即/proc/sys/kernel/core_pattern和/etc/sysctl*配置失效,被系统自动修改. 配置后,重启后core_pattern被重写 ...
- ansible 主机正则
ansible <pattern> -m <module_name> -a <arguments> 该功能主要针对Inventory的主机列表,案例如下: 1.AL ...
- PHP 之去除代码中的注释
测试文件代码如下: <?php /** * Created by PhpStorm. * User: Yang * Date: 2019/10/16 * Time: 10:25 */ // 计算 ...
- [PKUSC2018]最大前缀和——状压DP
题目链接: [PKUSC2018]最大前缀和 设$f[S]$表示二进制状态为$S$的序列,任意前缀和都小于等于$0$的方案数. 设$g[S]$表示二进制状态为$S$的序列是整个序列的最大前缀和的方案数 ...
- JAVA基础知识|继承的几个问题
1.子类从父类继承了什么? 子类拥有父类非private的属性,方法. 2.子类可以操作父类的非private属性吗? 子类不能继承父类的私有属性,但是如果父类中的非private方法影响到了私有属性 ...
- QQ 为什么以 UDP 协议为主,以 TCP 协议为辅?
QQ既有UDP也有TCP!不管UDP还是TCP,最终登陆成功之后,QQ都会有一个TCP连接来保持在线状态.这个TCP连接的远程端口一般是80,采用UDP方式登陆的时候,端口是8000. UDP协议是无 ...
