spring cloud oauth2 实现用户认证登录
spring-cloud-oauth2 实现用户认证及单点登录
需求
在微服务架构中,我们有很多业务模块,每个模块都需要有用户认证,权限校验。有时候也会接入来自第三方厂商的应用。要求是只登录一次,即可在各个服务的授权范围内进行操作。看到这个需求,立马就想到了这不就是单点登录吗?于是基于这样的需求,作者使用spring-cloud-oauth2去简单的实现了下用户认证和单点登录。
相关介绍
OAuth2
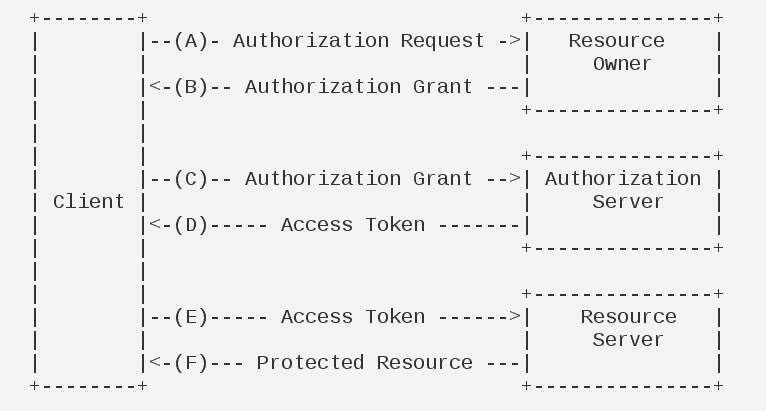
OAuth2是一个关于授权的网络标准,他定制了设计思路和执行流程。OAuth2一共有四种授权模式:授权码模式(authorization code)、简化模式(implicit)、密码模式(resource owner password)和客户端模式(client credentials)。数据的所有者告诉系统同意授权第三方应用进入系统,获取这些数据。于是数据所有者生产了一个短时间内有效的授权码(token)给第三方应用,用来代替密码,供第三方使用。具体流程请看下图,具体的OAuth2介绍,可以参考这篇文章,写的很详细。(http://www.ruanyifeng.com/blog/2019/04/oauth_design.html)
Token
令牌(token)和密码(password)的作用是一样的,都可以进入系统获取资源,但是也有几点不同:
- 令牌是短期的,到期会自动失效,用户无法修改。密码是长期的,用户可以修改,如果不修改,就不会发生变化。
- 令牌可以被数据所有者撤销,令牌会立即失效。密码一般不允许其他人撤销,只能被操作权限更高的人或者本人修改/重制。
- 令牌是有权限范围的,会被数据所有者授予。
实现的功能
本篇介绍的是通过密码模式来实现单点登录的功能。
在微服务架构中,我们的一个应用可能会有很多个服务运行,协调来处理实际的业务。这就需要用到单点登录的技术,来统一认证调取接口的是哪个用户。那总不能请求一次,就认证一次,这么做肯定是不行的。那么就需要在认证完用户之后,给这个用户授权,然后发一个令牌(token),有效期内用户请求资源时,就只需要带上这个标识自己身份的token即可。
架构说明
认证中心:oauth2-oauth-server,OAuth2的服务端,主要完成用户Token的生成、刷新、验证等。
微服务:mzh-etl,微服务之一,接收到请求之后回到认证中心(oauth2-oauth-server)去验证。
代码实现
使用到的框架是java基础的spring boot 和spring-cloud-oauth2
认证中心:
1、引入需要的maven包
<dependency>

    <groupId>org.springframework.boot</groupId>

    <artifactId>spring-boot-starter-web</artifactId>

</dependency>

<dependency>

    <groupId>org.springframework.cloud</groupId>

    <artifactId>spring-cloud-starter-oauth2</artifactId>

</dependency>

<dependency>

    <groupId>org.springframework.boot</groupId>

    <artifactId>spring-boot-starter-data-redis</artifactId>

</dependency>

<dependency>

    <groupId>org.springframework.boot</groupId>

    <artifactId>spring-boot-starter-actuator</artifactId>

</dependency>
因为spring-cloud-starter-oauth2中包含了spring-cloud-starter-security,所以就不用再单独引入了,引入redis包是为了使用redis来存储token。
2、配置application.yml
这里主要用到的是redis的配置,mysql数据库的配置暂时没有用到。
spring:

  application:

    name: oauth-server

  datasource:

    url: jdbc:mysql://localhost:3306/mzh_oauth?useSSL=false&characterEncoding=UTF-8

    username: root

    password: admin123

    driver-class-name: com.mysql.jdbc.Driver

    hikari:

      connection-timeout: 30000

      idle-timeout: 600000

      max-lifetime: 1800000

      maximum-pool-size: 9

  redis:

    database: 0

    host: localhost

    port: 6379

    jedis:

      pool:

        max-active: 8

        max-idle: 8

        min-idle: 0

    timeout: 10000

server:

  port: 8888

  use-forward-headers: true

management:

  endpoint:

    health:

      enabled: true
3、spring security 权限配置
需要继承WebSecurityConfigurerAdapter
/**

 * @Author mzh

 * @Date 2020/10/24

 */

@Configuration

@EnableWebSecurity

@EnableGlobalMethodSecurity(prePostEnabled = true)

public class WebSecurityConfig extends WebSecurityConfigurerAdapter {

    @Autowired

    private CustomUserDetailsService customUserDetailsService;

    /**

     * 修改密码的加密方式

     * @return

     */

    @Bean

    public PasswordEncoder passwordEncoder(){

        return new BCryptPasswordEncoder();

    }

    @Bean

    @Override

    public AuthenticationManager authenticationManagerBean() throws Exception{

        return super.authenticationManagerBean();

    }

    @Override

    protected void configure(AuthenticationManagerBuilder auth) throws Exception{

       // 如果使用BCryptPasswordEncoder,这里就必须指定密码的加密类

       auth.userDetailsService(customUserDetailsService).passwordEncoder(passwordEncoder());

    }

    @Override

    protected void configure(HttpSecurity http) throws Exception {

        http.authorizeRequests()

                .antMatchers("/oauth/**").permitAll();

    }

}
BCryptPasswordEncoder是一个不可逆的密码加密类,AuthenticationManager是OAuth2的password必须指定的授权管理Bean。
CustomUserDetailsService这个类是被注入进来的,熟悉spring security的同学应该知道,spring security有一个自己的UserdetailsService用于权限校验时获取用户信息,但是很多时候不符合我们的业务场景,就需要重现实现这个类。
4、实现CustomUserDetailsService
UserDetailsService这个类的核心方法就是loadUserByUsername()方法,他接收一个用户名,返回一个UserDetails对象。
/**

 * @Author mzh

 * @Date 2020/10/24

 */

@Component(value = "customUserDetailsService")

public class CustomUserDetailsService implements UserDetailsService {

    @Autowired

    private PasswordEncoder passwordEncoder;

    @Override

    public UserDetails loadUserByUsername(String username) throws UsernameNotFoundException {

        // 1. 根据username 去数据库查询 user

        // 2.获取用户的角色和权限

        // 下面是写死,暂时不和数据库交互

        if(!(("admin").equals(username))){

            throw new UsernameNotFoundException("the user is not found");

        }else{

            String role = "ADMIN_ROLE";

            List<SimpleGrantedAuthority> authorities = new ArrayList<>();

            authorities.add(new SimpleGrantedAuthority(role));

            String password = passwordEncoder.encode("123456");

            return new User(username,password,authorities);

        }

    }

}
这里是在程序中写死了用户和权限。账号:admin,密码:123456,权限:ADMIN_ROLE(注意是权限,不是角色),实际中应该从数据库获取用户和相关的权限,然后进行认证。
5、OAuth2 配置
OAuth2配置需要继承AuthorizationServerConfigurerAdapter类
/**

 * @Author mzh

 * @Date 2020/10/24

 */

@Configuration

@EnableAuthorizationServer

public class Oauth2Config extends AuthorizationServerConfigurerAdapter {

    @Autowired

    private PasswordEncoder passwordEncoder;

    @Autowired

    private UserDetailsService customUserDetailsService;

    @Autowired

    private AuthenticationManager authenticationManager;

    @Autowired

    private TokenStore redisTokenStore;

    /**

     * 对AuthorizationServerEndpointsConfigurer参数的重写

     * 重写授权管理Bean参数

     * 重写用户校验

     * 重写token缓存方式

     * @param endpointsConfigurer

     * @throws Exception

     */

    @Override

    public void configure(final AuthorizationServerEndpointsConfigurer endpointsConfigurer) throws Exception{

        endpointsConfigurer.authenticationManager(authenticationManager)

                .userDetailsService(customUserDetailsService)

                .tokenStore(redisTokenStore);

    }

    /**

     * 客户端的参数的重写

     * 这里是将数据直接写入内存,实际应该从数据库表获取

     * clientId:客户端Id

     * secret:客户端的密钥

     * authorizedGrantTypes:授权方式

     *     authorization_code: 授权码类型,

     *     implicit: 隐式授权,

     *     password: 密码授权,

     *     client_credentials: 客户端授权,

     *     refresh_token: 通过上面4中方式获取的刷新令牌获取的新令牌,

     *                      注意是获取token和refresh_token之后,通过refresh_toke刷新之后的令牌

     * accessTokenValiditySeconds: token有效期

     * scopes 用来限制客户端访问的权限,只有在scopes定义的范围内,才可以正常的换取token

     * @param clients

     * @throws Exception

     */

    @Override

    public void configure(ClientDetailsServiceConfigurer clients) throws Exception{

        clients.inMemory()

                .and()

                .withClient("mzh-etl")

                .secret(passwordEncoder.encode("mzh-etl-8888"))

                .authorizedGrantTypes("refresh_token","authorization_code","password")

                .accessTokenValiditySeconds(3600)

                .scopes("all");

    }

    @Override

    public void configure(AuthorizationServerSecurityConfigurer serverSecurityConfigurer) throws Exception{

        serverSecurityConfigurer.allowFormAuthenticationForClients();

        serverSecurityConfigurer.checkTokenAccess("permitAll()");

        serverSecurityConfigurer.tokenKeyAccess("permitAll()");

        serverSecurityConfigurer.passwordEncoder(passwordEncoder);

    }

}
6、启动服务
上述步骤完成之后启动服务,然后观察IDEA下方的Endpoints中的Mappings,就可以找到相关的认证端口。主要的有以下几个:
POST /oauth/authorize  授权码模式认证授权接口

GET/POST /oauth/token  获取 token 的接口

POST  /oauth/check_token  检查 token 合法性接口
到此,认证中心就算是创建完成了。我们通过idea的REST Client 来请求一个token进行测试。
请求内容如下:
POST http://localhost:8888/oauth/token?grant_type=password&username=admin&password=123456&scope=all

Accept: */*

Cache-Control: no-cache

Authorization: Basic dXNlci1jbGllbnQ6dXNlci1zZWNyZXQtODg4OA==
第一行POST http://localhost:8888/oauth/token?grant_type=password&username=admin&password=123456&scope=all 表示发起一个POST请求,请求路径是/oauth/token,请求参数是grant_type=password表示认证类型是password,username=admin&password=123456表示用户名是admin,密码是123456,scope=all是权限相关的,之前在Oauth2Config 中配置了scope是all。
第四行表示在请求头中加入一个字段Authorization,值为Basic空格base64(clientId:clientSecret),我们之前配置的clientId是“meh-etl”,clientSecret是"meh-etl-8888",所以这个值的base64是:bXpoLWV0bDptemgtZXRsLTg4ODg=。
运行请求之后,如果参数都正确的话,获取到返回的内容如下:
{

  // token值,后面请求接口时都需要带上的token

	"access_token": "b4cb804c-93d2-4635-913c-265ff4f37309",

  // token的形式

  "token_type": "bearer",

  // 快过期时可以用这个换取新的token

  "refresh_token": "5cac05f4-158f-4561-ab16-b06c4bfe899f",

  // token的过期时间

	"expires_in": 3599,

  // 权限范围

	"scope": "all"

}
token值过期之后,可以通过refresh_token来换取新的access_token
POST http://localhost:8888/oauth/token?grant_type=refresh_token&refresh_token=706dac10-d48e-4795-8379-efe8307a2282

Accept: */*

Cache-Control: no-cache

Authorization: Basic dXNlci1jbGllbnQ6dXNlci1zZWNyZXQtODg4OA==
这次grant_type的值为“refresh_token”,refresh_token的值是要过期的token的refresh_token值,也就是之前请求获取Token的refresh_token值,请求之后会返回一个和获取token时一样格式的数据。
微服务
1、引入需要的maven包
<dependency>

    <groupId>org.springframework.boot</groupId>

    <artifactId>spring-boot-starter-web</artifactId>

</dependency>

<dependency>

    <groupId>org.springframework.cloud</groupId>

    <artifactId>spring-cloud-starter-oauth2</artifactId>

</dependency>

<dependency>

    <groupId>org.springframework.boot</groupId>

    <artifactId>spring-boot-starter-data-redis</artifactId>

</dependency>
2、配置application.yml
spring:

  application:

    name: mzh-etl

  redis:

    database: 1

    host: localhost

    port: 6379

    jedis:

      pool:

        max-active: 8

        max-idle: 8

        min-idle: 0

    timeout: 10000

server:

  port: 8889

security:

  oauth2:

    client:

      # 需要和之前认证中心配置中的一样

      client-id: mzh-etl

      client-secret: mzh-etl-8888

      # 获取token的地址

      access-token-uri: http://localhost:8888/oauth/token

    resource:

      id: mzh-etl

      user-info-uri: user-info

    authorization:

      # 检查token的地址

      check-token-access: http://localhost:8888/oauth/check_token
这里的配置一定要仔细,必须和之前认证中心中配置的一样。
3、资源配置
在OAuth2中接口也称为资源,资源的权限也就是接口的权限。spring-cloud-oauth2提供了关于资源的注解@EnableResourceServer
/**

 * @Author mzh

 * @Date 2020/10/24

 */

@Configuration

@EnableResourceServer

@EnableGlobalMethodSecurity(prePostEnabled = true)

public class ResourceServerConfig extends ResourceServerConfigurerAdapter {

    @Value("${security.oauth2.client.client-id}")

    private String clientId;

    @Value("${security.oauth2.client.client-secret}")

    private String clientSecret;

    @Value("${security.oauth2.authorization.check-token-access}")

    private String checkTokenEndpointUrl;

    @Autowired

    private RedisConnectionFactory redisConnectionFactory;

    @Bean("redisTokenStore")

    public TokenStore redisTokenStore(){

        return new RedisTokenStore(redisConnectionFactory);

    }

    @Bean

    public RemoteTokenServices tokenService() {

        RemoteTokenServices tokenService = new RemoteTokenServices();

        tokenService.setClientId(clientId);

        tokenService.setClientSecret(clientSecret);

        tokenService.setCheckTokenEndpointUrl(checkTokenEndpointUrl);

        return tokenService;

    }

    @Override

    public void configure(ResourceServerSecurityConfigurer resources) throws Exception {

        resources.tokenServices(tokenService());

    }

    @Override

    public void configure(HttpSecurity http) throws Exception {

        http.authorizeRequests().antMatchers("/get/**").authenticated();

    }

}
4、创建一个接口
@RestController

public class UserController {

    @GetMapping("get")

    @PreAuthorize("hasAuthority('ADMIN_ROLE')")

    public Object get(Authentication authentication){

        authentication.getAuthorities();

        OAuth2AuthenticationDetails details = (OAuth2AuthenticationDetails) authentication.getDetails();

        String token = details.getTokenValue();

        return token;

    }

}
这个接口就是会返回一个请求他时携带的token值,@PreAuthorize会在请求接口时检查是否用权限“ADMIN_ROLE”(之前认证中心配置的权限)
5、启动服务
启动服务,只有当用户有“ADMIN_ROLE“的时候,才能正确返回,否则返回401未授权
同样适用REST Client来发起一个请求:
GET http://localhost:8889/get

Accept: */*

Cache-Control: no-cache

Authorization: bearer b4cb804c-93d2-4635-913c-265ff4f37309
请求路径是http://localhost:8889/get 然后在请求头部带上我们上一步骤获取到的token,放入到Authorization中,格式是bearer空格token值,如果请求成功,就会把token原样返回。
本文由博客群发一文多发等运营工具平台 OpenWrite 发布
spring cloud oauth2 实现用户认证登录的更多相关文章
- Spring Cloud OAuth2 实现用户认证及单点登录
文章较长,建议推荐,建议转发,建议收藏,建议关注公众号哈. OAuth 2 有四种授权模式,分别是授权码模式(authorization code).简化模式(implicit).密码模式(resou ...
- vue+uni-app商城实战 | 第一篇:【有来小店】微信小程序快速开发接入Spring Cloud OAuth2认证中心完成授权登录
一. 前言 本篇通过实战来讲述如何使用uni-app快速进行商城微信小程序的开发以及小程序如何接入后台Spring Cloud微服务. 有来商城 youlai-mall 项目是一套全栈商城系统,技术栈 ...
- 微信授权就是这个原理,Spring Cloud OAuth2 授权码模式
上一篇文章Spring Cloud OAuth2 实现单点登录介绍了使用 password 模式进行身份认证和单点登录.本篇介绍 Spring Cloud OAuth2 的另外一种授权模式-授权码模式 ...
- Spring Cloud OAuth2.0 微服务中配置 Jwt Token 签名/验证
关于 Jwt Token 的签名与安全性前面已经做了几篇介绍,在 IdentityServer4 中定义了 Jwt Token 与 Reference Token 两种验证方式(https://www ...
- 项目一:第十一天 2、运单waybill快速录入 3、权限demo演示-了解 5、权限模块数据模型 6、基于shiro实现用户认证-登录(重点)
1. easyui DataGrid行编辑功能 2. 运单waybill快速录入 3. 权限demo演示-了解 4. Apache shiro安全框架概述 5. 权限模块数据模型 6. 基于shiro ...
- Spring Cloud Security&Eureka安全认证(Greenwich版本)
Spring Cloud Security&Eureka安全认证(Greenwich版本) 一·安全 Spring Cloud支持多种安全认证方式,比如OAuth等.而默认是可以直接添加spr ...
- thymeltesys-基于Spring Boot Oauth2的扫码登录框架
thymeltesys thymelte是一个基于Spring Boot Oauth2的扫码登录框架,使用PostgreSQL存储数据,之后会慢慢支持其他关系型数据库.即使你不使用整个框架,只使用其中 ...
- 整合spring cloud云架构 - SSO单点登录之OAuth2.0登录认证(1)
之前写了很多关于spring cloud的文章,今天我们对OAuth2.0的整合方式做一下笔记,首先我从网上找了一些关于OAuth2.0的一些基础知识点,帮助大家回顾一下知识点: 一.oauth中的角 ...
- Spring Cloud云架构 - SSO单点登录之OAuth2.0登录认证(1)
今天我们对OAuth2.0的整合方式做一下笔记,首先我从网上找了一些关于OAuth2.0的一些基础知识点,帮助大家回顾一下知识点: 一.oauth中的角色 client:调用资源服务器API的应用 O ...
随机推荐
- Jmeter引用外部jar包的几种方法
总结记录下jmeter引用外部jar包的3种方法及其优缺点: 一.测试计划中添加目录或jar包到Classpath 操作:测试计划->添加目录或jar包到Classpath-->浏览导入j ...
- xss利用——BeEF#stage2(初始并持续化控制)
全文概览 浏览器攻击方法流程 攻击浏览器一般分为几个阶段,如下图 整个过程分为三个步骤,第一步是初始化控制,第二步是持续控制,第三步是攻击.在第三步中的七个攻击方法是可以交叉的,比如可以同时攻击用户和 ...
- java实现点击查询数据生成excel文件并下载
须先导入关键maven包 <dependency> <groupId>org.apache.poi</groupId> <artifactId>poi& ...
- 什么是 Opcache,如何使用 Opcache
Opcode 是啥? 我们先看一下 PHP 的执行过程: PHP 初始化执行环节,启动 Zend 引擎,加载注册的扩展模块. 初始化后读取 PHP 脚本文件,Zend 引擎对 PHP 文件进行词法分析 ...
- is_mobile()判断手机移动设备
is_mobile()判断手机移动设备.md is_mobile()判断手机移动设备 制作响应式主题时会根据不同的设备推送不同的内容,是基于移动设备网络带宽压力,避免全局接收pc端内容. functi ...
- 05 C语言的数据类型
C语言的数据类型 在C 中,数据类型是用来声明不同类型的变量或函数的一个广泛的概念.变量的数据类型决定了变量存储占用的空间大小,以及如何去解释存储的位模式. C 中的数据类型可分为以下几大类: 序号 ...
- C++枚举变量与switch
转载:https://www.cnblogs.com/banmei-brandy/p/11263927.html 枚举类型和变量如何定义,下篇博客讲得十分详细: https://blog.csdn.n ...
- C++中cstring.h和string.h的区别
转载:https://blog.csdn.net/qian_chun_qiang/article/details/80648691 1.string与cstring有什么区别 <string&g ...
- 《C++primerplus》第12章练习题
做一下倒数两题,都是在队列模拟的程序基础上做点修改测试. 5.找出平均等候时间为1分钟时,每小时到达的客户数为多少(试验时间不少于100小时). 指定队伍最大长度10人,模拟100小时.粗略估计答案在 ...
- 编程体系结构(06):Java面向对象
本文源码:GitHub·点这里 || GitEE·点这里 一.基础概念 1.面向对象概念 面向对象编程的主要思想是把构成问题的各个事务分解成各个对象,建立对象的目的不是为了完成一个步骤,而是为了描叙一 ...