vue全家桶+Koa2开发笔记(1)--vuex
1. 安装webpack的问题: webpack坑系列--安装webpack-cli
3. 在命令行中使用 touch 执行新建文件;
5. vuex 最简单的介绍
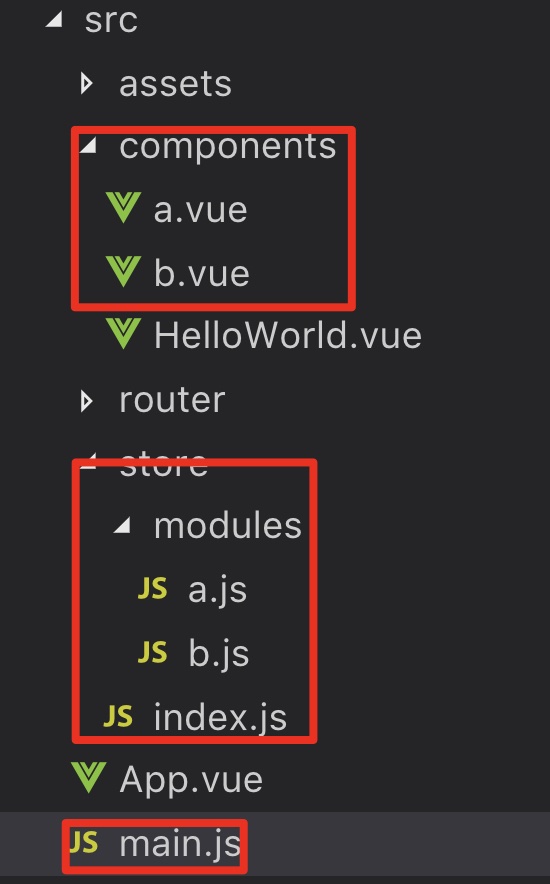
 目录如左侧所示,主要是标红的三个文件。
5.1 store文件,编写vuex的各个功能,包括:
- import Vue from 'vue'
- import Vuex from 'vuex'
- Vue.use(Vuex)
- const state = { // 定义状态数据
- count: 2
- }
- const mutations = { // 定义方法,操作数据
- increment (state) {
- state.count++
- },
- decrement (state) {
- state.count--
- }
- }
- const actions = {
- add: ({commit}) => { // 触发上述的方法,对外提供的方法接口,可以在这里提供异步操作
- commit('increment')
- },
- reduce: ({commit}) => {
- commit('decrement')
- }
- }
- export default new Vuex.Store({state, mutations, actions})
5.2 然后在main文件中,引入store 注意这里是小写的store
- import Vue from 'vue'
- import App from './App'
- import router from './router'
- import store from './store'
- Vue.config.productionTip = false
- /* eslint-disable no-new */
- new Vue({
- el: '#app',
- router,
- store,
- components: { App },
- template: '<App/>'
- })
5.3 最后在vue文件中调用:
- <template>
- <div>
- <h1>{{ $store.state.count }}</h1>
- <button type="button" @click="add">增加</button>
- <button type="button" @click="reduce">删减</button>
- </div>
- </template>
- <script>
- import { mapActions } from 'vuex'
- export default {
- methods: mapActions([
- 'add',
- 'reduce'
- ])
- }
- </script>
注意:在5.2中挂在元素时,加入的store,才能在接下来的文件中,引用到 $store
6. mapState 的使用方法 (文章标题: state,mapState,...mapState对象展开符详解 )
注意的是: 用data接收的 $store 不能及时响应更新,用computed就可以.
7. 多个组件使用不同的vuex:

主要涉及上面三个地方,其中
1、 main.js 主要用来引入注册 store,
2、 store文件夹下定义不同页面或组件对应的 vuex数据,并且有index来进行统一的对外输入,
3、 componments文件夹喜爱定义的a和b等组件是html范畴,调用vuex
具体如下所示:
(1)main文件引入 store的index文件如下所示:
- import Vue from 'vue'
- import App from './App'
- import router from './router'
- import store from './store/index.js'//注意这里引入的是store文件夹下的index文件
- Vue.config.productionTip = false
- new Vue({
- el: '#app',
- router,
- store,
- components: { App },
- template: '<App/>'
- })
(2) index文件 引入a和b文件
- import Vue from 'vue';
- import Vuex from 'vuex';
- import moneys from './modules/a'
- import counts from './modules/b'
- Vue.use(Vuex)//安装注册vuex
- export default new Vuex.Store({//实例话vuex,并引入两个vuex定义的函数
- modules:{
- moneys,
- counts
- }
- })
(3)store文件夹下的a.js
- const state = {//定义state
- money: 10
- }
- const mutations = {//定义操作数据方法
- add(state,parmas) {//接受传参的方法
- state.money+=parmas;
- },
- reduce(state) {
- state.money--
- }
- }
- const actions = {//定义外部接口,包括异步处理
- add: ({commit},parmas) => {//注意这里的传参方式
- commit('add',parmas)
- },
- reduce: ({commit}) => {
- commit('reduce')
- }
- }
- export default {//抛出定义的函数和开启命名空间
- namespaced:true,
//用于在全局引用此文里的方法时标识这一个的文件名
- state, mutations, actions }
对应的b与其类似。对外的index文件如下:
- import Vue from 'vue';
- import Vuex from 'vuex';
- import moneys from './modules/a'
- import counts from './modules/b'
- Vue.use(Vuex)//安装注册vuex
- export default new Vuex.Store({//实例话vuex,并引入两个vuex定义的函数
- modules:{
- moneys,
- counts
- }
- })
(4)对应的vue调用vuex
- <template>
- <div class="box">
- <div>{{$store.state.moneys.money}}</div><!-- 注意这里调用到的state值,需要带上命名空间moneys-->
- <button @click="add(2)">增加</button>
- <button @click="reduce">减少</button>
- </div>
- </template>
- <script>
- import {mapActions} from 'vuex'
- export default {
- methods: mapActions('moneys',['add','reduce'])//注意这里的命名空间 moneys
//this.$store.dispatch('delTask', {task, index});传递多个参数的时候 写成一个对象- }
- </script>
以下两个方式一样:
- changeTab(index){
- this.$store.dispatch('leftNav/changeTab',index) //left是命名空间,index是传递的参数
- },
- //...mapActions('leftNav',['changeTab'])
分发事件和常规事件混合方法:
- methods: {
- ...mapActions('a',['changeData']), //注意这里要写上...符号
- triger:()=>{
- alert(1);
- }
- }
附: 超简单入门Vuex小示例
vue全家桶+Koa2开发笔记(1)--vuex的更多相关文章
- vue全家桶+Koa2开发笔记(5)--nuxt
1. nuxt项目初始化报错 下面是使用 koa 模板方法初始化一个项目,使用该方法需要将 nuxt 的版本降至1.4.2: 官方 https://zh.nuxtjs.org/guide/instal ...
- vue全家桶+Koa2开发笔记(7)--登陆注册功能
1 文件结构:pages中放置页面代码:server 分为 dbs 和interface两个文件夹: dbs设置有关数据库的代码:interface设置接口信息: 2.2 先看dbs的,在dbs的配置 ...
- vue全家桶+Koa2开发笔记(6)--app开发
1.环境配置 详见文章<Nuxt 开发 - 项目初始化> 1.1 使用nuxt脚手架 https://zh.nuxtjs.org/guide/installation 1.2 在nod ...
- vue全家桶+Koa2开发笔记(2)--koa2
1. 安装koa脚手架的时候 执行命令 koa2 -e koa-learn 注意要使用-e的方式,才会生成ejs的模板 2. async await的使用方法:存在的意义:提高promise的可读性 ...
- vue全家桶+Koa2开发笔记(8)--开发网页
1.使用 mongoose 动态倒入数据 mongoimport -d student -c areas areas.dat -d 后面是数据库名称: -c后面是表名称 最后是数据源 2.使用vue的 ...
- vue全家桶+Koa2开发笔记(4)--redis
redis用来在服务器端存放session 1 安装redis brew install redis 启动redis redis-server 2 安装两个中间件 npm i koa-ge ...
- vue全家桶+Koa2开发笔记(3)--mongodb
1. 安装 momgodb brew install mongodb安装成功后执行 which mongod启动:mongod 2. 下载可视化操作数据库的软件 https://robomongo.o ...
- Vue 全家桶 + Electron 开发的一个跨三端的应用
代码地址如下:http://www.demodashi.com/demo/11738.html GitHub Repo:vue-objccn Follow: halfrost · GitHub 利用 ...
- [在线+源码]vue全家桶+Typescript开发一款习惯养成APP
# vue-ts-daily 基于Vue.js的2.5.13版本和TypeScript编写的模仿原生应用的WebApp. [源码地址](https://github.com/xiaomuzhu/vue ...
随机推荐
- javascript进阶笔记(1)
学习js已经有一段时间了,大大小小还是能够做出一些东西来.不过觉得可惜的是,还是对js本身这门语言不是很熟悉,总有一点雾里看花的感觉,看得见,但是看不清楚.最近发现有一本关于js的叫做<忍者秘籍 ...
- 7.1 C++模板基本概念及语法 《C++模板与标准模板库》
参考:http://www.weixueyuan.net/view/6398.html 总结: 模板是另一种代码重用机制. 需要设计的几个类,其功能都是一样的,仅仅只是需要操作的数据类型不同. 有更好 ...
- 2.18 C++类与static关键字
参考:http://www.weixueyuan.net/view/6349.html 总结: 类中的成员变量或成员函数一旦与static关键字相结合,则该成员变量或成员函数就是属于类的,而不是再是属 ...
- 2019.2.13 SW
- centos6.6安装hadoop-2.5.0(四、hadoop HA安装)
操作系统:centos6.6 环境:selinux disabled:iptables off:java 1.8.0_131 安装包:hadoop-2.5.0.tar.gz HA模式下的HADOOP完 ...
- centos6.6安装hadoop-2.5.0(二、伪分布式部署)
操作系统:centos6.6(一台服务器) 环境:selinux disabled:iptables off:java 1.8.0_131 安装包:hadoop-2.5.0.tar.gz 伪分布式环境 ...
- Arduino+Avr libc制作Badusb原理及示例讲解
一. 前言 2014年美国黑帽大会上研究人员JakobLell和Karsten Nohl展示了badusb的攻击方法后,国内与badusb相关的文章虽然有了一些,但是大部分人把相关文章都阅读后还是会有 ...
- dynamic programming:find max subarray
public static mark dynway( ) //put or pop the books into the basket,mark the highest recorder { int ...
- 阿里云配置ssh
1.申请证书,从我的域名列表 右侧的操作栏中点击- ssl 2.配置 nginx config -> /etc/nginx/sites-enabled/default 底部添加:(我的是dj ...
- 如何使用Android Studio把自己的Android library分享到jCenter和Maven Central
参考链接: http://www.jcodecraeer.com/a/anzhuokaifa/androidkaifa/2015/0623/3097.html
