SRS+flv.js打造兼容性较高的直播、点播平台
*************************************************************************************************************************************************
注意:强烈建议使用srs3.0,srs2.0存在的问题(回调,跨域)等问题不需要修改源码,而且可以修改生成mp4视频。
回调:
# SRS推流开始,结束

def live_publish(request):

    # 添加磁盘检测

    if not mounted():

        return HttpResponse(1)

    params = str(request.body, encoding="utf-8")

    object = json.loads(params)

    l_uuid = object.get('stream')

    live = Live.objects.get(uuid=l_uuid)

    live.status = 'living'

    live.save()

    return HttpResponse(0)
跨域:
没测,一直用nginx代理
MP4:
后期打算直接生成mp4,替换之前的flv
*************************************************************************************************************************************************
1、公司之前用的是:
直播:rtmp+jwplayer
点播:h5(mp4文件)
弊端:兼容性差,貌似跟系统版本,浏览器,浏览器版本都有关。还有就是rtmp推流生成的文件是flv格式,需要转码成mp4才能点播。
2、SRS+flv.js的优点:
当然是兼容性大大提高了,在pc端谷歌,火狐都可以播放,手机端火狐可以,谷歌不行,其他没测。
3、上图,看看效果:
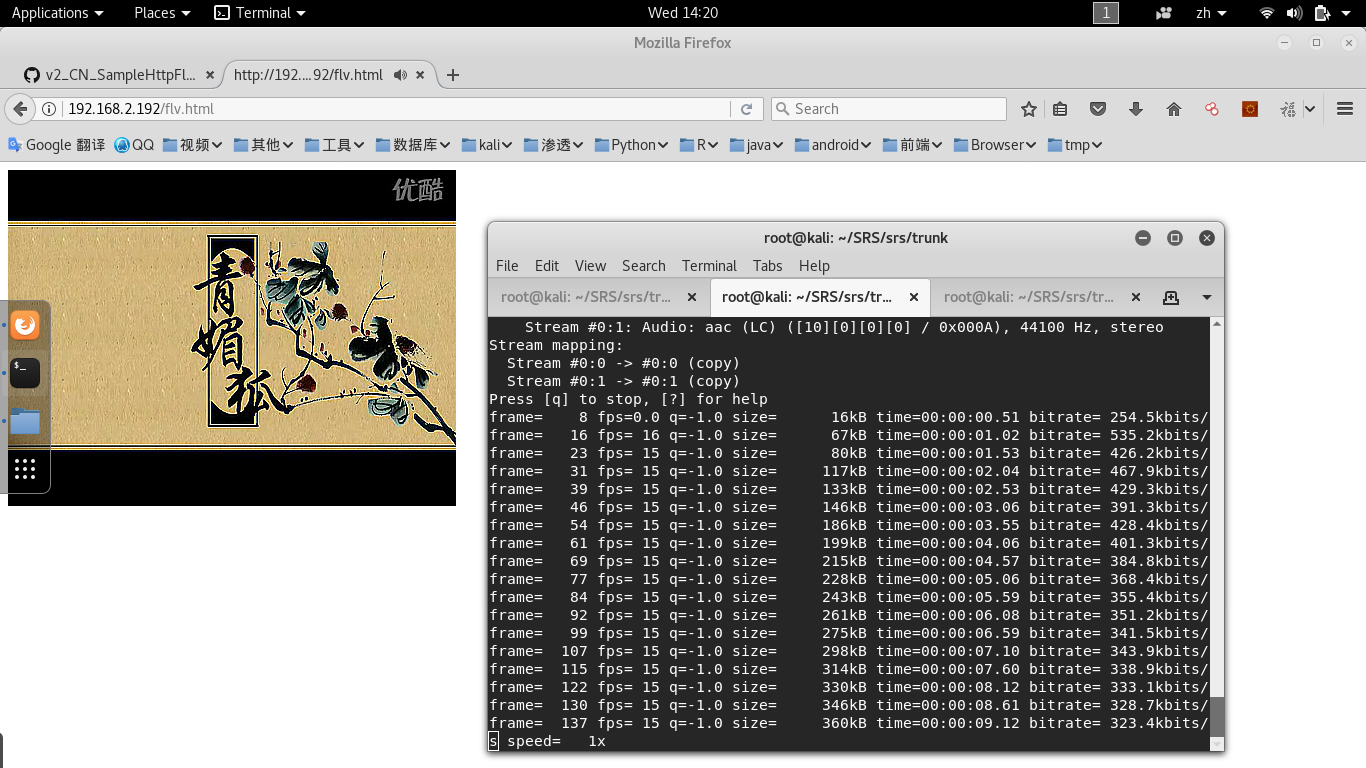

样式什么的没添加,官方的demon 直接copy过来。
4、flv.js下载,构建:
Github:https://github.com/Bilibili/flv.js
解压后进入mater:
构建:
npm install

npm install -g gulp

gulp release
在dist下生成了我们需要的js
flv.html:
<!DOCTYPE html>

<html>

<head>

    <meta content="text/html; charset=utf-8" http-equiv="Content-Type">

</head>

<body>

<script src="flv.min.js"></script>

<video id="videoElement"></video>

<script>

    if (flvjs.isSupported()) {

        var videoElement = document.getElementById('videoElement');

        var flvPlayer = flvjs.createPlayer({

            type: 'flv',

            url: 'http://192.168.2.192/live/video.flv'

        });

        flvPlayer.attachMediaElement(videoElement);

        flvPlayer.load();

        flvPlayer.play();

    }

</script>

</body>

</html>
type可以是mp4,flv。url的类型要对应,可以是服务器的文件,也可以是rtmp推流的临时文件。
在这一步可以测试下点播是否正常,文件应该放在http服务器下以http协议访问,不能是文件形式访问。http服务器可以是nginx,python,tomcat等都可以
5、如果上一步成功,接下来就是搭建SRS服务器了
Github : https://github.com/ossrs/srs/wiki/v2_CN_SampleHttpFlv
这篇文章介绍的比较详细,下面是简单记录步骤:
假定你已经下载并编译好了SRS,可以参考:SRS服务器搭建,ffmpeg 本地推流
首先复制conf中的http.flv.live.conf为my.http.flv.live.conf,内容:
# the config for srs to remux rtmp to flv live stream.

# @see https://github.com/ossrs/srs/wiki/v2_CN_DeliveryHttpStream

# @see full.conf for detail config.

listen              1935;

max_connections     1000;

daemon              off;

srs_log_tank        console;

http_server {

    enabled         on;

    listen          80;

    dir             ./objs/nginx/html;

}

vhost __defaultVhost__ {

    http_remux {

        enabled     on;

        mount       [vhost]/[app]/[stream].flv;

        hstrs       on;

    }

dvr {

        # https://github.com/ossrs/srs/wiki/v2_CN_DVR

        enabled         on;

        dvr_path        ./objs/nginx/html/[app]/[stream].flv;

        dvr_plan        session;

        dvr_duration    30;

        dvr_wait_keyframe       on;

        time_jitter             full;

   }

}
这里该了http的服务端口为80,添加了保存rtmp流文件的配置,指定存储路径./objs/nginx/html/[app]/[stream].flv。
启动SRS:
./objs/srs -c conf/my.http.flv.live.conf
接下来就是推流了。
假定你安装了ffmpeg。
ffmpeg -re -i /root/Videos/video.flv -c copy -f flv rtmp://192.168.2.192/live/video
如果推流成功那就可以在VLC中播放rtmp://192.168.2.192/live/video了,这样之前的html中的url就是:http://192.168.2.192/live/video.flv,
把之前的html/js copy到SRS的/objs/nginx/html/ 下,访问 http://ip/flv.html(这时的http服务由SRS提供,和之前的不一样) ,注意ip要和html中的ip一致,否则会报跨域的错。
至此整个直播点播服务的雏形就搭建成功!
6、添加回调
希望在开始推流的时候srs请求python服务,修改资源的状态为正在直播,推流结束是再次回调,请求python服务,修改状态为停止直播
srs的配置:
# the config for srs to remux rtmp to flv live stream.

# @see https://github.com/ossrs/srs/wiki/v2_CN_DeliveryHttpStream

# @see full.conf for detail config.

listen              1935;

max_connections     1000;

daemon              off;

srs_log_tank        console;

http_server {

    enabled         on;

    listen          8080;

    dir             ./objs/nginx/html;

}

vhost __defaultVhost__ {

    http_remux {

        enabled     on;

        mount       [vhost]/[app]/[stream].flv;

        hstrs       on;

    }

dvr {

        # https://github.com/ossrs/srs/wiki/v2_CN_DVR

        enabled         on;

        dvr_path        ./objs/nginx/html/[app]/[stream].flv;

        dvr_plan        session;

        dvr_duration    30;

        dvr_wait_keyframe       on;

        time_jitter             full;

   }

    http_hooks {

        enabled         on;

        on_publish      http://localhost:8000/on_publish/;

        on_unpublish    http://localhost:8000/on_unpublish/;

    }

}
注意: on_publish的ip需要根据netstat -pantu 判断,看看监听在哪个地址,比如127.0.0.1:8000,那么就应该保持一致,
按理说写localhost也应该可以,在终端用crul localhos:8000 也是可以访问,但是回调时报错:
[2017-11-30 03:08:22.478][error][20398][220][11] dns resolve server error, ip empty. ret=1029(Resource temporarily unavailable)

[2017-11-30 03:08:22.478][warn][20398][220][11] http client failed, server=localhost, port=8000, timeout=30000000, ret=1029

[2017-11-30 03:08:22.478][warn][20398][220][11] http connect server failed. ret=1029

[2017-11-30 03:08:22.478][error][20398][220][11] http post on_publish uri failed. client_id=220, url=http://localhost:8000/on_publish/, request={"action":"on_publish","client_id":220,"ip":"192.168.2.151","vhost":"__defaultVhost__","app":"live","tcUrl":"rtmp://192.168.2.134:1935/live","stream":"f345f5b0d34a11e78008365426bed70e"}, response=, code=-147690992, ret=1029(Resource temporarily unavailable)

[2017-11-30 03:08:22.478][error][20398][220][11] hook client on_publish failed. url=http://localhost:8000/on_publish/, ret=1029(Resource temporarily unavailable)

[2017-11-30 03:08:22.478][error][20398][220][11] http hook on_publish failed. ret=1029(Resource temporarily unavailable)

[2017-11-30 03:08:22.478][error][20398][220][11] stream service cycle failed. ret=1029(Resource temporarily unavailable)
所以还是保持一致的好。
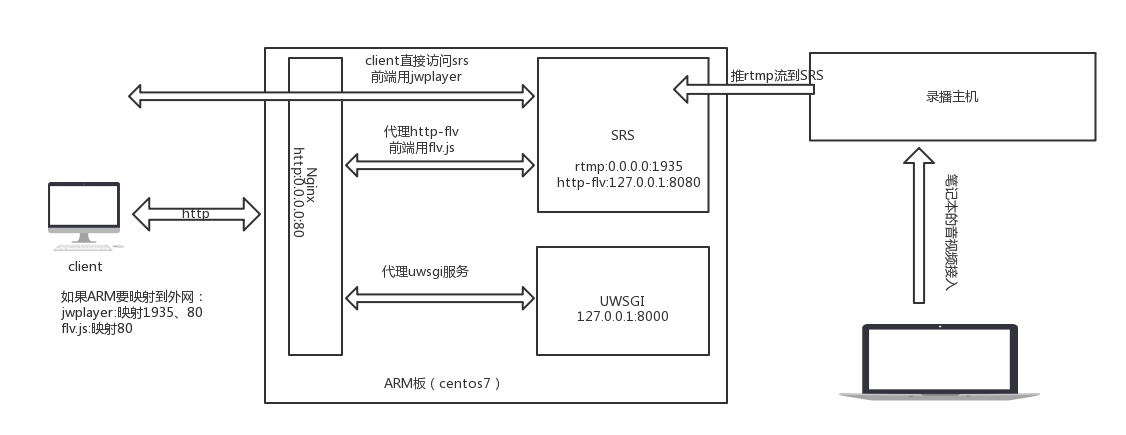
另外:uwsgi并不对外提供访问服务,只由nginx转发,所以服务不要监听在0.0.0.0:8000,更不要写内网ip如192.168.2.111这样的,应为不确定下次启动ip不变。
所以uwsgi最好还是监听在127.0.0.1:8000。
python:
# SRS推流开始,结束

def live_publish(request):

    params = str(request.body, encoding="utf-8")

    object = json.loads(params)

    l_uuid = object.get('stream')

    live = Live.objects.get(uuid=l_uuid)

    live.status = 'living'

    live.save()

    return HttpResponse(0)

def live_unpublish(request):

    params = str(request.body, encoding="utf-8")

    object = json.loads(params)

    l_uuid = object.get('stream')

    live = Live.objects.get(uuid=l_uuid)

    live.status = 'stop'

    live.save()

    return HttpResponse(0)
官方文档的说明:
https://github.com/ossrs/srs/wiki/v2_CN_HTTPCallback
根据:an int value specifies the error code(0 corresponding to success)
大概是说要返回一个0,不过我尝试各种返回值0,“0“,{”code”:0}...都没用
一返回srs就报错:empty response
不知道为毛srs接收不到。
没办法,改源码:
在srs/trunk/src/app/srs_app_http_hooks.cpp
找到报错的位置:
    // should never be empty.

    res = SRS_HTTP_RESPONSE_OK;

    if (res.empty()) {

        ret = ERROR_HTTP_DATA_INVALID;

        srs_error("invalid empty response. ret=%d", ret);

        return ret;

    }
在进入判断前先赋值:res = SRS_HTTP_RESPONSE_OK;
然后重新编译安装。
还可以打包传服务器上用。
./scripts/package.sh --x86-x64
当然这只是权宜之计,因为我不需要判断用户的权限来滤用户,所以不用控制response返回值,希望日后搞明白说明原因导致。
如果有读者知道原因,还请告知,谢谢。
7、视频编辑
剪切:
ffmpeg -ss 0:1:30 -t 0:0:20 -i input.avi -vcodec copy -acodec copy output.avi
-ss 开始时间,-t 持续时间
提取图片:
ffmpeg –i test.avi –r 1 –f image2 image-%3d.jpeg
封装:
ffmpeg –i video_file –i audio_file –vcodec copy –acodec copy output_file
flv快速添加关键帧(为了拖动播放):
yamdi -i tmp.flv -o 51e714ded33a11e7889a365426bed70e.flv
8、压力测试
~/Downloads/flazr-0.7-RC2# ./client.sh rtmp://192.168.2.134:1935/live/a54b2dceda5911e7a5b1365426bed70e -load 200
查看srs服务器的网卡信息:
ethtool eth0
查看 srs服务器的流量:
iftop
9、转了一圈回到原点
前段时间用以上方案搭建的直播点播系统测试结果还是比较满意的
笔记本(百兆网卡)网线直连开发板(千兆网卡):
子码流(100-150并发)主码流(10-20)
笔记本(千兆网卡)网线直连开发板(千兆网卡):
子码流(没测,不过不会超过1000,srs中有最大连接数设置)主码流(100-200)(目标就是支持100人在线观看)
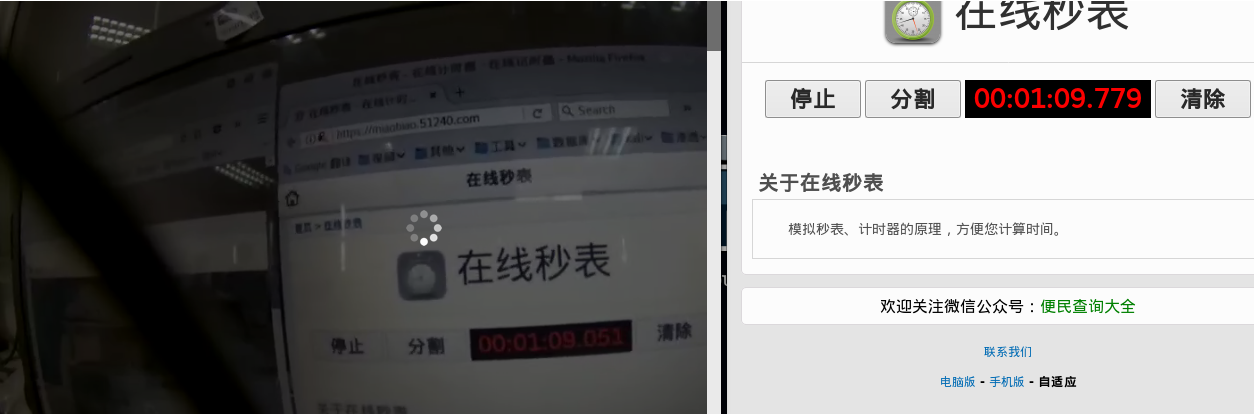
但是前两天用录播主机推流到开发板,出现视频流畅,声音卡顿的现象。
之前怀疑过网络不畅通,视频源有问题,录播主机有问题,flv.js。
后来发现是flv.js在处理某些视频流,或视频文件(直播http-flv,点播xx.flv)会发生以上现象。
但是直接用VLC客户端播放没有声音卡顿的现象。
没办法,只好改回JWPlayer(播放rtmp),Video(播放mp4)
这就需要将推流的临时文件xxx.flv重新封装成xxx.mp4。
希望flv.js的后续版本可以解决这样的问题。
10、转机
测试几天发现只有录播设备播放文件通道的时候声音会卡顿,直接将其他电脑的音视频接入没有卡顿,但是随着播放时间加长,会出现声音延迟的现象。
11、环境和部署脚本:
├── CentOS-Base.repo

├── ffmpeg-3.4

├── install.sh

├── my.http.flv.live.conf

├── nginx-1.12.2

├── nohup.out

├── Python-3.5.0

├── run.sh

├── SRS-Ubuntu12-armv7cpu-2.0.243

├── stop.sh

├── touch

├── touch.conf

├── touch.ini

└── yamdi-1.9
install.sh:
#!/bin/bash

install_list='system python srs nginx deploy env ffmpeg yamdi'

#install_list='ffmpeg yamdi'

if [[ ${install_list} =~ system ]]

then

#替换yum源,更新系统

yum_path='/etc/yum.repos.d/'

for file in ${yum_path}*

do

  end_str=${file:0-3}

  if [ "${end_str}" != 'bak' ]

  then

    mv $file ${file}.bak

  fi

done

cp CentOS-Base.repo ${yum_path}

yum update

#安装基本工具

yum install net-tools

yum install nc

else

  echo '>>>pass system'

fi

if [[ ${install_list} =~ "python" ]]

then

#Python3.5安装

cd Python-3.5.0/

./configure

make

make install

pip3 install uwsgi

cd ..

else

  echo '>>>pass python'

fi

if [[ ${install_list} =~ "nginx" ]]

then

#nginx 安装

yum -y install zlib zlib-devel openssl openssl--devel pcre pcre-devel

cd nginx-1.12.2/

./configure

make

make install

cd ..

else

  echo '>>>pass nginx'

fi

if [[ ${install_list} =~ "srs" ]]

then

#srs 安装

yum install redhat-lsb -y

cd SRS-Ubuntu12-armv7cpu-2.0.243/

./INSTALL

cd ..

else

  echo '>>>pass srs'

fi

if [[ ${install_list} =~ "ffmpeg" ]]

then

#ffmpeg 安装

cd ffmpeg-3.4/

#./configure

make

make install

cd ..

else

  echo '>>>pass ffmpeg'

fi

if [[ ${install_list} =~ "yamdi" ]]

then

#yamdi 安装

cd yamdi-1.9/

make

make install

cd ..

else

  echo '>>>pass yamdi'

fi

if [[ ${install_list} =~ "deploy" ]]

then

#部署项目

mkdir /opt/script/

cp my.http.flv.live.conf /usr/local/srs/conf/

cp touch.conf /usr/local/nginx/conf/

cp touch.ini /opt/script/

cp touch /opt/

mkdir /usr/local/nginx/html/images/

cp touch/tmp/* /usr/local/nginx/html/images/

else

  echo '>>>pass deploy'

fi

if [[ ${install_list} =~ "env" ]]

then

#安装项目依赖

pip3 install django==1.9.8

pip3 install xadmin

pip3 install future

pip3 install django_crispy_forms

pip3 install django-formtools

pip3 install httplib2

pip3 install six

pip3 install django_import_export

pip3 install django-cors-headers

pip3 install django-pure-pagination

yum install python-devel zlib-devel libjpeg-turbo-devel -y

pip3 install Pillow

else

  echo '>>>pass env'

fi
run.sh:
#!/bin/bash

#启动项目

#touch

pkill -9 uwsgi

cd /opt/

uwsgi --ini script/touch.ini &

chmod 766 /opt/script/touchrnb.sock

#nginx

pkill -9 nginx

cd /usr/local/nginx/

./sbin/nginx -c conf/touch.conf &

#srs

pkill -9 srs

cd /usr/local/srs/

./objs/srs -c conf/my.http.flv.live.conf > /dev/null &
stop.sh:
#!/bin/bash

#停止项目

#nginx

pkill -9 nginx

#srs

pkill -9 srs

#touch

pkill -9 uwsgi
开机启动:
编辑/etc/rc.d/rc.local,添加run.sh脚步路径
12、文件瘦身
strip objs/srs
(arm版本:arm-hisiv300-linux-strip)
可以从7-8兆减到2-3兆
13、srs跨域
之前是nginx代理服务器和srs在同一台机器上,但是公司考虑到嵌入式板的性能问题,需要提供更换直播服务器的功能,为了避免修改nginx配置的问题,所以
直播服务器地址由后台配置,存到数据库,而不使用nginx代理。但是这样就有跨域的问题了,我使用的srs版本为2.0,目前解决跨域的方法是修改源码。
参考:https://github.com/ossrs/srs/issues/1002
修改 src/app/srs_app_http_stream.cpp
在486行添加 w->header()->set("Access-Control-Allow-Origin", "*");
重新编译安装即可
14、集群和负载均衡
集群很简单参考:https://github.com/ossrs/srs/wiki/v3_CN_SampleHttpFlvCluster
负载均衡:
如果集群较大推荐CDN,如果小集群可以用nginx
值得一提的是srs在接收nginx的转发请求时不是用的相对路径
nginx配置文件:
worker_processes  4;

events {

    worker_connections  1024;

}

http {

    include       mime.types;

    default_type  application/octet-stream;

    sendfile        on;

    keepalive_timeout  65;

    gzip  on;

    client_max_body_size 4096m;

    upstream localhost{

	ip_hash;

	server 127.0.0.1:8080;

	server 192.168.2.127:8080;

    }

    server {

        listen 80;

        server_name 192.168.2.192 ;

        charset utf-8;

        location / {

	    add_header 'Access-Control-Allow-Origin' '*';

	    proxy_pass http://127.0.0.1:8000/;

        }

        # 指定静态文件路径

        location /static/ {

            alias /root/GitClient/touch/static_all/;

            index index.html index.htm;

        }

        location /uwsgi_http/ {

            proxy_pass http://localhost/;

        }

    }

}
如果upstream localhost 改为upstream aaa,浏览器访问: http://127.0.0.1/uwsgi_http/live/123.flv
srs接收到的是:http://aaa/live/123.flv
所以srs服务器要配置hosts文件,使aaa指向127.0.0.1
这里我直接命名为localhost,这样就可以偷懒啦。
还有负载均衡策略指定ip_hash,因为源站和边缘之间的视频可能不同步,这样可以提高用户体验。
但是如果srs集群的性能差异较大,还是用weight策略好一点。
15、flv.js优化--低延时(为了导播,直播不需要)
    <script>

        if (flvjs.isSupported()) {

            var videoElement = document.getElementById("myplayer");

            var flvPlayer = flvjs.createPlayer({

                    type: 'flv',

                    isLive: true,

                    url: '{{ LIVE_URL }}{{ current_live.uuid }}.flv',

                },

                {

                    enableWorker: false,

                    enableStashBuffer: false,

                    stashInitialSize: 1,

                    lazyLoad: false,

                    lazyLoadMaxDuration: 1,

                    lazyLoadRecoverDuration: 1,

                    deferLoadAfterSourceOpen: false,

                    autoCleanupMaxBackwardDuration: 1,

                    autoCleanupMinBackwardDuration: 1,

                    statisticsInfoReportInterval: 1,

                    fixAudioTimestampGap: false,

                });

            flvPlayer.attachMediaElement(videoElement);

            flvPlayer.load();

            flvPlayer.play();

        }

    </script>
srs低延时配置:
vhost __defaultVhost__ {

    gop_cache       off;

    queue_length    10;

    min_latency     on;

    mr {

        enabled     off;

    }

    mw_latency      100;

    tcp_nodelay     on;

}
video低延时:
videoElement.addEventListener('progress', function() {

    var range = 0;

    var bf = this.buffered;

    var time = this.currentTime;

    while(!(bf.start(range) <= time && time <= bf.end(range))) {

        range += 1;

    }

    this.currentTime = this.buffered.end(range) - 0.01;

});
设置video低延时会触发waiting事件,出现一个圆圈和降低屏幕亮度,有待处理...
这样大概可以把延时从2~3降到1秒左右。(环境不同可能有差别,在网线接交换机的情况下会比连WiFi要好)
延时和流畅不可兼得,需求不同要设置不同参数。
16、音频不同步和卡顿的解决
参考:https://github.com/Bilibili/flv.js/issues/136
解决方法是 fixAudioTimestampGap: false,注意这个配置要在config的位置
17、添加HLS流
官方文档:https://github.com/ossrs/srs/wiki/v3_CN_SampleHLS
vhost __defaultVhost__ {

...

    hls {

        enabled         on;

        hls_fragment    10;

        hls_window      60;

        hls_path        ./objs/nginx/html;

        hls_m3u8_file   [app]/[stream].m3u8;

        hls_ts_file     [app]/[stream]-[seq].ts;

        hls_dispose     10;

    }

}
存在的问题:同一地址第一次正常,后面推的都不能看,第一次生成ts切片正常,后面的ts切片会重复丢弃和生成。
参考: 转hls输出时出现的问题 #894:https://github.com/ossrs/srs/issues/894
在SrsHls::on_unpublish的时候设置SrsHls::aac_samples=0后正常。
SRS+flv.js打造兼容性较高的直播、点播平台的更多相关文章
- js 利用canvas + flv.js实现视频流 截屏 、本地下载功能实现,兼容火狐,谷歌;canvas截屏跨域问题,无音频视频流加载不显示问题
项目:物联网监控项目----后台视频流管理(前端实现视频截屏功能) 本文就不同视频源分情况展示: 1 本地视频(项目同目录视频)截屏(canvas.getContext("2d).drawI ...
- JS打造的跟随鼠标移动的酷炫拓扑图案
<!DOCTYPE html PUBLIC "-//W3C//DTD XHTML 1.0 Transitional//EN" "http://www.w3.org/ ...
- Flv.js
Flv.js 是 HTML5 Flash 视频(FLV)播放器,纯原生 JavaScript 开发,没有用到 Flash.由 bilibili 网站开源. 该项目依托于 Media Source Ex ...
- CSS+JS实现兼容性很好的无限级下拉菜单
<!DOCTYPE html PUBLIC "-//W3C//DTD XHTML 1.1//EN" "http://www.w3.org/TR/xhtml11/DT ...
- js实现未知宽高的元素在指定元素中垂直水平居中
js实现未知宽高的元素在指定元素中垂直水平居中:本章节介绍一下如何实现未知宽高的元素在指定元素下实现垂直水平居中效果,下面就以span元素为例子,介绍一下如何实现span元素在div中实现水平垂直居中 ...
- flv.js怎么用?全面解读flv.js代码
flv.js项目的代码有一定规模,如果要研究的话,我建议从demux入手,理解了demux就掌握了媒体数据处理的关键步骤,前面的媒体数据下载和后面的媒体数据播放就变得容易理解了. 先普及点背景知识,为 ...
- livego+obs+flv.js 搭建视频直播
一.流程 主播通过 obs软件通过直播 ->推流到->直播服务器 客户通过浏览器 访问站点->flv.js拉取直播服务器视频流并播放 二.环境 centos7 直播服务器 https ...
- 【FastDFS】如何打造一款高可用的分布式文件系统?这次我明白了!!
写在前面 前面我们学习了如何基于两台服务器搭建FastDFS环境,而往往在生产环境中,需要FastDFS做到高可用,那如何基于FastDFS打造一款高可用的分布式文件系统呢?别急,今天,我们就一起来基 ...
- Flv.js文档使用随记
关键字:Flv.js | Flv js | Flv-js | HTML5 FLV Player | 0x001: 前言以下涉及到 flv.js 所有内容均是V1.5.0版本内的,如方法.属性.常量.监 ...
随机推荐
- day12 max min zip 用法
max min ,查看最大值,最小值 基础玩法 l = [1,2,3,4,5] print(max(l)) print(min(l)) 高端玩法 默认字典的取值是key的比较 age_dic={'al ...
- MT【242】图像几何意义
设函数$f(x)=x^2+ax+b$,已知函数$f(x)$在$[-1,1]$上存在零点,若$0\le b-2a\le 1$,求$b$的范围 (2015浙江文科高考20(2)) 分析:理解成$g(x)= ...
- 20 Zabbix 利用Scripts栏目对Hosts远程执行命令
点击返回:自学Zabbix之路 点击返回:自学Zabbix4.0之路 点击返回:自学zabbix集锦 20 Zabbix 利用Scripts栏目对Hosts远程执行命令 在Monitoring板块中, ...
- 自学Linux Shell12.2-test命令
点击返回 自学Linux命令行与Shell脚本之路 12.2-test命令 if-then语句不能测试命令退出状态码之外的条件,test命令提供了在if-then语句中测试不同条件的途径. 如果tes ...
- 【Luogu5108】仰望半月的夜空(后缀数组)
[Luogu5108]仰望半月的夜空(后缀数组) 题面 洛谷 题解 实名举报这题在比赛之前还不是这个样子的,还被我用SAM给水过去了 很明显求出\(SA\)之后就是按照\(SA\)的顺序从前往后考虑每 ...
- 【BZOJ3202】项链(莫比乌斯反演,Burnside引理)
[BZOJ3202]项链(莫比乌斯反演,Burnside引理) 题面 BZOJ 洛谷 题解 首先读完题目,很明显的感觉就是,分成了两个部分计算. 首先计算本质不同的珠子个数,再计算本质不同的项链个数. ...
- 洛谷 P2515 [HAOI2010]软件安装 解题报告
P2515 [HAOI2010]软件安装 题目描述 现在我们的手头有\(N\)个软件,对于一个软件\(i\),它要占用\(W_i\)的磁盘空间,它的价值为\(V_i\).我们希望从中选择一些软件安装到 ...
- 洛谷 P2317 [HNOI2005]星际贸易 解题报告
P2317 [HNOI2005]星际贸易 题目描述 输入输出格式 输入格式: 输出格式: 如果可以找到这样的方案,那么输出文件output.txt中包含两个整数X和Y.X表示贸易额,Y表示净利润并且两 ...
- oracle调用DLL
具体步骤:1.创建Oracle Library Create Library AAA as 'C:\UserData\xuxia\TestProc\Debug\TestProc.dll' 可以通 ...
- android关闭日志
我们在开发时,经常会输出各种日志来debug代码.但是等到应用发布的apk运行时不希望它输出日志. 关闭输出日志Log.v(),Log.i(),Log.w(),Log.v(),Log.e()等 原理: ...