Spring Framework------>version4.3.5.RELAESE----->Reference Documentation学习心得----->Spring Framework中的spring web MVC模块
spring framework中的spring web MVC模块
1.概述
- spring web mvc是spring框架中的一个模块
- spring web mvc实现了web的MVC架构模式,可以被用于开发web网站
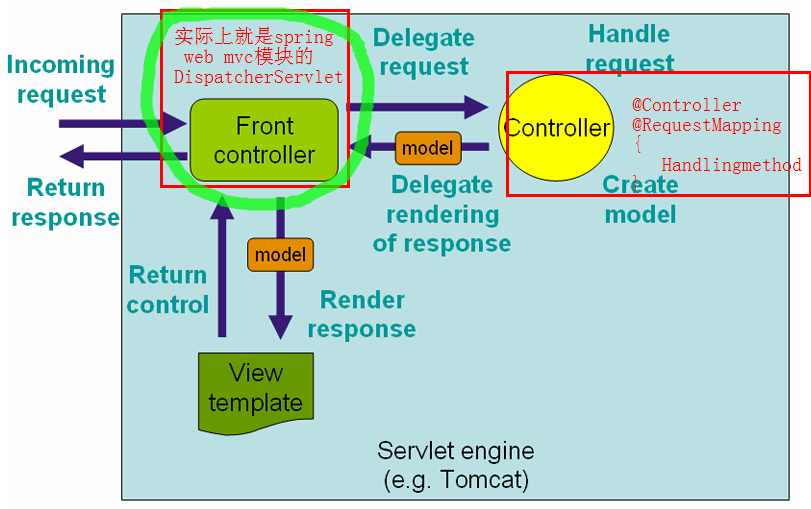
- spring web mvc 实现web网站的原理,如下图:
2.使用spring web mvc开发web应用的步骤
step1:在自己的工程中引入spring web mvc模块
step2:配置spring web mvc模块 中的DispatcherServlet,告诉他要拦截哪些请求
step3:编写controller类
3.spring web mvc中相关知识点
3.1关于spring web mvc 中的DispatcherServlet
DispatcherServlet是spring web mvc 模块的核心部分,DispatcherServlet有如下功能
接收用户请求,并将其分发给controller中的handling method
The
DispatcherServletis an actualServlet(it inherits from theHttpServletbase class),- 一个web application中可以有多个DispatcherServlet 实例,
- 每个DispatcherServlet实例都有他自己的
WebApplicationContext实例,TheWebApplicationContextis an extension of the plainApplicationContextthat has some extra features necessary for web applications.- WebApplicationContext有如下功能:
- it is capable of resolving themes (see Section 22.9, “Using themes”)
- WebApplicationContext有如下功能:
所有的WebApplicationContext实例都继承自rootWebApplicationContext实例,- The root
WebApplicationContext应该包含 all the infrastructure【基础】 beans that should be shared between your other contexts and Servlet instances. These inherited beans can be overridden in the servlet-specific scope, and you can define new scope-specific beans local to a given Servlet instance. 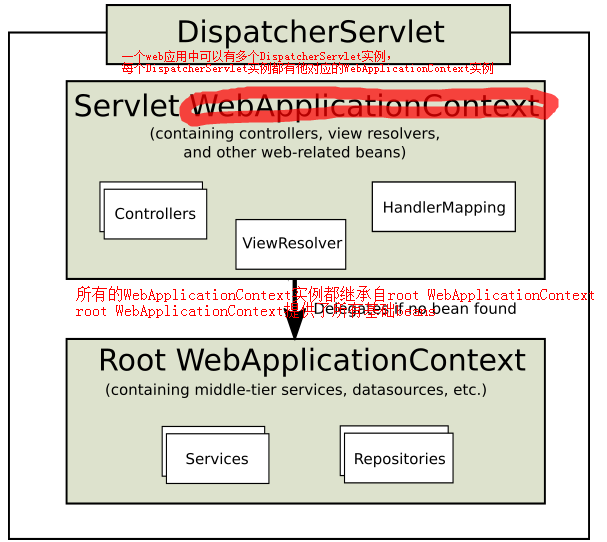
Figure 22.2. Typical context hierarchy in Spring Web MVC
- It is also possible to have just one root context for single DispatcherServlet scenarios.
Figure 22.3. Single root context in Spring Web MVC

Table 22.1. Special bean types in the WebApplicationContext
Bean type Explanation Maps incoming requests to handlers and a list of pre- and post-processors (handler interceptors) based on some criteria the details of which vary by
HandlerMappingimplementation. The most popular implementation supports annotated controllers but other implementations exists as well.HandlerAdapter
Helps the
DispatcherServletto invoke a handler mapped to a request regardless of the handler is actually invoked. For example, invoking an annotated controller requires resolving various annotations. Thus the main purpose of aHandlerAdapteris to shield theDispatcherServletfrom such details.Maps exceptions to views also allowing for more complex exception handling code.
Resolves logical String-based view names to actual
Viewtypes.Resolves the locale a client is using and possibly their time zone, in order to be able to offer internationalized views
Resolves themes your web application can use, for example, to offer personalized layouts
Parses multi-part requests for example to support processing file uploads from HTML forms.
Stores and retrieves the "input" and the "output"
FlashMapthat can be used to pass attributes from one request to another, usually across a redirect.要想
DispatcherServlet能够拦截到用户的请求,还需要做一些相应的配置,如使用URL mapping的方式将用户请求映射到DispatcherServlet。可以有多种方法来使得用户请求被映射到DispatcherServlet上,方法一,直接继承spring MVC 模块的WebApplicationInitializer接口,来配置spring MVC模块的DispatcherServlet,使其可以接收到用户请求将用户请求以URL方式映射到spring web mvc模块的 DispatcherServlet 上,从而使得用户请求能够通过DispatcherServlet被转交给controller来进行处理,并得到处理结果作为响应反馈给用户
- 下面的例子中all requests starting with
/examplewill be handled by theDispatcherServletinstance namedexample. /*
1)WebApplicationInitializeris an interface provided by Spring MVC that ensures your code-based configuration is detected and automatically used to initialize any Servlet 3 container.
2)
*/
public class MyWebApplicationInitializer implements WebApplicationInitializer { @Override
public void onStartup(ServletContext container) {
ServletRegistration.Dynamic registration = container.addServlet("example", new DispatcherServlet());
registration.setLoadOnStartup(1);
registration.addMapping("/example/*");
} }使用上述方法(即Java代码的方法)配置URL映射,将用户请求交给DispatcherServlet来分发给对应的Controller,这与传统情况下使用web.xml文件配置相应映射的效果是一样的,如本例中上述代码的效果和下面的web.xml的配置代码是等价的(传统模式下使用web.xml配置用户请求URL,使得用户请求能够被Servlet拦截(如被spring web mvc的DispatcherServlet拦截))
- 方法二:传统模式下使用web.xml将用户请求URL映射待DispatcherServlet上
- 传统模式下在web.xml中配置请求URL和servlet的映射关系,如下所示:
<!--上面的Java代码和传统模式下web.xml文件下这一段代码是等效的 都是将用户请求/example/*交给web应用的servlet(例子中指的是spring web mvc中的DispatcherServlet)去处理 让servlet把接收到的用户请求交给controller层相应的handling method去处理--> <web-app>
<servlet>
<servlet-name>example</servlet-name>
<servlet-class>org.springframework.web.servlet.DispatcherServlet</servlet-class>
<load-on-startup>1</load-on-startup>
</servlet> <servlet-mapping>
<servlet-name>example</servlet-name>
<url-pattern>/example/*</url-pattern>
</servlet-mapping> </web-app>- You can customize individual
DispatcherServletinstances by adding Servlet initialization parameters (init-paramelements) to the Servlet declaration in theweb.xmlfile. See the following table for the list of supported parameters.
Parameter Explanation contextClassClass that implements
WebApplicationContext, which instantiates the context used by this Servlet. By default, theXmlWebApplicationContextis used.contextConfigLocationString that is passed to the context instance (specified by
contextClass) to indicate where context(s) can be found. The string consists potentially of multiple strings (using a comma as a delimiter) to support multiple contexts. In case of multiple context locations with beans that are defined twice, the latest location takes precedence.namespaceNamespace of the
WebApplicationContext. Defaults to[servlet-name]-servlet.
方法三,实现WebApplicationInitializer接口
import org.springframework.web.WebApplicationInitializer;

public class MyWebApplicationInitializer implements WebApplicationInitializer {

    @Override

    public void onStartup(ServletContext container) {

        XmlWebApplicationContext appContext = new XmlWebApplicationContext();

        appContext.setConfigLocation("/WEB-INF/spring/dispatcher-config.xml");

        ServletRegistration.Dynamic registration = container.addServlet("dispatcher", new DispatcherServlet(appContext));

        registration.setLoadOnStartup(1);

        registration.addMapping("/");

    }

}
(推荐使用本方法)方法四,继承AbstractAnnotationConfigDispatcherServletInitializer类(方法三中所提及的WebApplicationInitializer接口的实现类)
example1,使用Java-based Spring configuration:
public class MyWebAppInitializer extends AbstractAnnotationConfigDispatcherServletInitializer {

    @Override

    protected Class<?>[] getRootConfigClasses() {

        return null;

    }

    @Override

    protected Class<?>[] getServletConfigClasses() {

        return new Class[] { MyWebConfig.class };

    }

    @Override

    protected String[] getServletMappings() {

        return new String[] { "/" };

    }

}
example2,If using XML-based Spring configuration, you should extend directly from
AbstractDispatcherServletInitializer:public class MyWebAppInitializer extends AbstractDispatcherServletInitializer { @Override
protected WebApplicationContext createRootApplicationContext() {
return null;
} @Override
protected WebApplicationContext createServletApplicationContext() {
XmlWebApplicationContext cxt = new XmlWebApplicationContext();
cxt.setConfigLocation("/WEB-INF/spring/dispatcher-config.xml");
return cxt;
} @Override
protected String[] getServletMappings() {
return new String[] { "/" };
} }AbstractDispatcherServletInitializeralso provides a convenient way to addFilterinstances and have them automatically mapped to theDispatcherServlet:public class MyWebAppInitializer extends AbstractDispatcherServletInitializer { // ... @Override
protected Filter[] getServletFilters() {
return new Filter[] { new HiddenHttpMethodFilter(), new CharacterEncodingFilter() };
} }
3.2 Implementing Controllers
方法一:annotion-based Controller
概述:使用 @RequestMapping, @RequestParam,@ModelAttribute,等注解可以定义一个类为controller类,使得该类可以处理用户的请求。
编程思路:
- step1,要想spring能够识别上述注解,必须要先在配置文件中开启上述注解的识别方式
<?xml version="1.0" encoding="UTF-8"?>

<beans xmlns="http://www.springframework.org/schema/beans"

    xmlns:xsi="http://www.w3.org/2001/XMLSchema-instance"

    xmlns:p="http://www.springframework.org/schema/p"

    xmlns:context="http://www.springframework.org/schema/context"

    xsi:schemaLocation="

        http://www.springframework.org/schema/beans

        http://www.springframework.org/schema/beans/spring-beans.xsd

        http://www.springframework.org/schema/context

        http://www.springframework.org/schema/context/spring-context.xsd">

    <context:component-scan base-package="org.springframework.samples.petclinic.web"/>

    <!-- ... -->

</beans>
- step2,The
@Controllerannotation indicates that a particular class serves the role of a controller.- The ServletDispatcher scans such annotated classes for mapped methods and detects @RequestMapping annotations (see the next section).
- step3,
@GetMapping
@PostMapping
@PutMapping
@DeleteMapping
@PatchMapping - 例如,
@Controller

public class HelloWorldController {

    @RequestMapping("/helloWorld")

    public String helloWorld(Model model) {

        model.addAttribute("message", "Hello World!");

        return "helloWorld";

    }

}
@Controller
@RequestMapping("/appointments")
public class AppointmentsController { private final AppointmentBook appointmentBook; @Autowired
public AppointmentsController(AppointmentBook appointmentBook) {
this.appointmentBook = appointmentBook;
} @RequestMapping(method = RequestMethod.GET)
public Map<String, Appointment> get() {
return appointmentBook.getAppointmentsForToday();
} @RequestMapping(path = "/{day}", method = RequestMethod.GET)
public Map<String, Appointment> getForDay(@PathVariable @DateTimeFormat(iso=ISO.DATE) Date day, Model model) {
return appointmentBook.getAppointmentsForDay(day);
} @RequestMapping(path = "/new", method = RequestMethod.GET)
public AppointmentForm getNewForm() {
return new AppointmentForm();
} @RequestMapping(method = RequestMethod.POST)
public String add(@Valid AppointmentForm appointment, BindingResult result) {
if (result.hasErrors()) {
return "appointments/new";
}
appointmentBook.addAppointment(appointment);
return "redirect:/appointments";
}
}上面的例子和下面的例子等价:
@Controller

@RequestMapping("/appointments")

public class AppointmentsController {

    private final AppointmentBook appointmentBook;

    @Autowired

    public AppointmentsController(AppointmentBook appointmentBook) {

        this.appointmentBook = appointmentBook;

    }

    @GetMapping

    public Map<String, Appointment> get() {

        return appointmentBook.getAppointmentsForToday();

    }

    @GetMapping("/{day}")

    public Map<String, Appointment> getForDay(@PathVariable @DateTimeFormat(iso=ISO.DATE) Date day, Model model) {

        return appointmentBook.getAppointmentsForDay(day);

    }

    @GetMapping("/new")

    public AppointmentForm getNewForm() {

        return new AppointmentForm();

    }

    @PostMapping

    public String add(@Valid AppointmentForm appointment, BindingResult result) {

        if (result.hasErrors()) {

            return "appointments/new";

        }

        appointmentBook.addAppointment(appointment);

        return "redirect:/appointments";

    }

}
In the above example,
@RequestMappingis used in a number of places. The first usage is on the type (class) level, which indicates that all handler methods in this controller are relative to the/appointmentspath. Theget()method has a further@RequestMappingrefinement: it only acceptsGETrequests, meaning that an HTTPGETfor/appointmentsinvokes this method. Theadd()has a similar refinement, and thegetNewForm()combines the definition of HTTP method and path into one, so thatGETrequests forappointments/neware handled by that method.The
getForDay()method shows another usage of@RequestMapping: URI templates. (See the section called “URI Template Patterns”).A
@RequestMappingon the class level is not required. Without it, all paths are simply absolute, and not relative. The following example from the PetClinic sample application shows a multi-action controller using@RequestMapping:@Controller
public class ClinicController { private final Clinic clinic; @Autowired
public ClinicController(Clinic clinic) {
this.clinic = clinic;
} @RequestMapping("/")
public void welcomeHandler() {
} @RequestMapping("/vets")
public ModelMap vetsHandler() {
return new ModelMap(this.clinic.getVets());
} }
- step1,要想spring能够识别上述注解,必须要先在配置文件中开启上述注解的识别方式
实际使用实例:
- spring-projects Org on Github,网站上有一些使用注解方式开发的controllers实例,包括MvcShowcase, MvcAjax, MvcBasic, PetClinic, PetCare, and others.
Spring Framework------>version4.3.5.RELAESE----->Reference Documentation学习心得----->Spring Framework中的spring web MVC模块的更多相关文章
- Spring Framework------>version4.3.5.RELAESE----->Reference Documentation学习心得----->使用Spring Framework开发自己的应用程序
1.直接基于spring framework开发自己的应用程序: 1.1参考资料: Spring官网spring-framework.4.3.5.RELAESE的Reference Documenta ...
- Spring Framework------>version4.3.5.RELAESE----->Reference Documentation学习心得----->关于spring framework中的beans
Spring framework中的beans 1.概述 bean其实就是各个类实例化后的对象,即objects spring framework的IOC容器所管理的基本单元就是bean spring ...
- Spring Framework------>version4.3.5.RELAESE----->Reference Documentation学习心得----->使用spring framework的IoC容器功能----->方法一:使用XML文件定义beans之间的依赖注入关系
XML-based configuration metadata(使用XML文件定义beans之间的依赖注入关系) 第一部分 编程思路概述 step1,在XML文件中定义各个bean之间的依赖关系. ...
- Spring Framework------>version4.3.5.RELAESE----->Reference Documentation学习心得----->Spring Framework中web相关的知识(概述)
Spring Framework中web相关的知识 1.概述: 参考资料:官网documentation中第22小节内容 关于spring web mvc: spring framework中拥有自 ...
- Spring Framework------>version4.3.5.RELAESE----->Reference Documentation学习心得----->Spring Framework的依赖注入和控制反转
Dependency Injection and Inversion of Control 1.概述: 1.1相关概念 bean:由IoC容器所管理的对象,也即各个类实例化所得对象都叫做bean 控制 ...
- Spring Framework------>version4.3.5.RELAESE----->Reference Documentation学习心得----->Spring Framework概述
Spring Framework是什么? it is a potential one-stop-shop for building your enterprise-ready applications ...
- Spring Framework------>version4.3.5----->Reference学习心得----->总结
1.Spring Framework概述: 有很多可用版本,网址http://projects.spring.io/spring-framework/ 2.Spring Framework ...
- Spring官方文档翻译——15.1 介绍Spring Web MVC框架
Part V. The Web 文档的这一部分介绍了Spring框架对展现层的支持(尤其是基于web的展现层) Spring拥有自己的web框架--Spring Web MVC.在前两章中会有介绍. ...
- Spring boot学习1 构建微服务:Spring boot 入门篇
Spring boot学习1 构建微服务:Spring boot 入门篇 Spring Boot是由Pivotal团队提供的全新框架,其设计目的是用来简化新Spring应用的初始搭建以及开发过程.该框 ...
随机推荐
- 【摘】linux中fstab解说
https://wiki.archlinux.org/index.php/Fstab_(%E7%AE%80%E4%BD%93%E4%B8%AD%E6%96%87) 一个简单的 /etc/fstab,使 ...
- C#预编译
在C#开发中经常会遇到在Debug和Release模式下需要执行不同代码的情况,这个时候使用C#条件编译可以很好地解决这个问题,如 #if DEBUG // TO Do Debug Mode Code ...
- 删除数组中重复的元素(JSON)
先上一个基础的: var a = [1,2,3,3,4]; var b = []; for (var i = 0; i < a.length; ++i) { if (b.indexOf(a[i] ...
- 装tomcat和nginx心得
开机启动tomcat 1:在/etc/rc.d/init.d目录下生成一个文件tomcat8080 2:在文件里添加如下内 #!/bin/bash #2345 linux运行级别 #10开机启动优先级 ...
- Mariadb 在centos 7下的安装配置
安装Mariadb数据库: sudo yum install mariadb-server 启动数据库: sudo systemctl start mariadb 设置自动启动: sudo syste ...
- encodeURI来解决URL传递时的中文问题
在AJAX浏览器来进行发送数据时,一般它所默认的都是UTF-8的编码. 使用JQUERY中所提供的方法来做操作 encodeURI function verify() { //解决中文乱麻问题的 ...
- EasyUI TextBox的onkeypress事件
关于EasyUI TextBox的事件好像不多,像keypress,keydown在textbox的事件里都没有,所以要用这些事件要采取一些特殊的方法,今天用到了这些就记录一下,有两种方法 方法1: ...
- 拒绝访问 temp 目录。用来运行 XmlSerializer 的标识“IIS APPPOOL\UGAS”没有访问 temp 目录的足够权限
在部署IIS时候会出现下图错误,拒绝访问 temp 目录.用来运行 XmlSerializer 的标识“IIS APPPOOL\UGAS”没有访问 temp 目录的足够权限 解决方法: 在IIS信息管 ...
- 关于char的定义语句,正确的有()
A.char c = "a"; 不对,char只能是单引号 B.char c = '\''; 对,\'是转义字符,为'单引号 C.chae c='cafe' ...
- formValidator表单验证示例
<script type="text/javascript">$(document).ready(function(){ $.formValidator.initCon ...