Sequence Model-week3编程题2-Trigger Word Detection
1. Trigger Word Detection
我们的触发词将是 "Activate."。每当它听到你说 "Activate.",它就会发出 "chiming" 的声音。
在此作业结束时,您将能够记录您自己谈话的片段,并让算法在检测到您说"Activate."时触发一个钟声;
构成一个语音识别项目
合成和处理音频记录以创建train/dev数据集
训练触发词检测模型 并 进行预测
import numpy as np

from pydub import AudioSegment

import random

import sys

import io

import os

import glob

import IPython

from td_utils import *

%matplotlib inline
2. 数据合成(Data synthesis: Creating a speech dataset)
让我们首先为你的触发词检测算法构建一个数据集。
理想情况下,语音数据集应该尽可能接近要运行它的应用程序。
在这种情况下,您希望在工作环境(图书馆、家庭、办公室、开放空间)中检测到 "activate" 一词。
因此,您需要在不同的背景声音上创建带有积极单词 ("activate") 和 消极单词(“activate”以外的随机单词)混合的录音。
2.1 Listening to the data
你的一个朋友正在帮助你完成这个项目,他们去了整个地区的图书馆、咖啡馆、餐馆、家庭和办公室,记录背景噪音,以及人们说积极/消极的话的音频片段。
这个数据集包括以各种口音说话的人。
在raw_data目录中,您可以找到正词、负词和背景噪声的原始音频文件的子集。 您将使用这些音频文件合成数据集来训练模型。
The "activate" directory 包含了人们说 "activate" 这个词的正面例子。
The "negatives" directory 包含了一些负面的例子,说明人们说 "activate" 以外的随机单词;
每次录音有一个单词。
The "backgrounds" directory 包含10秒不同环境下背景噪声的剪辑。
IPython.display.Audio("./raw_data/activates/1.wav") # activate
IPython.display.Audio("./raw_data/negatives/4.wav") # negative
IPython.display.Audio("./raw_data/backgrounds/1.wav") # backgrounds
2.2 从录音到光谱图(From audio recordings to spectrograms)
什么是真正的录音?
麦克风随着时间的推移记录的空气压力变化很小,正是这些空气压力的变化,你的耳朵也被认为是声音。
你可以想到一个音频记录是一个长长的数字列表,测量麦克风检测到的小气压变化。
我们将使用在44100赫兹(或44100 Hertz)采样的音频
这意味着麦克风每秒给我们44,100个数字。
因此,10秒音频剪辑由 441,000个数字表示(= 10 × 44,100)。
光谱图(Spectrogram)
很难从这个 “raw” 的音频,表示中找出“acitvate”这个词是否被说出来。
为了帮助您的序列模型,更容易地学习检测触发词,我们将计算音频的谱图
光谱图告诉我们,在任何时刻,音频剪辑中有多少不同的频率。
如果你曾经上过信号处理或傅里叶变换的高级课程:
- 通过在原始音频信号上滑动一个窗口来计算光谱图,并使用傅里叶变换计算每个窗口中最活跃的频率。
IPython.display.Audio("audio_examples/example_train.wav")
x = graph_spectrogram("audio_examples/example_train.wav")

上面的图表示每个频率在多个时间步骤(x轴)上的活动程度(y轴)。

**Figure 1**: Spectrogram of an audio recording
光谱图中的颜色显示了不同频率,在不同时间点在音频中存在的程度(响亮)。
绿色意味着一定的频率更活跃或更多地存在于音频剪辑(更大声)
蓝色方格表示较少的活动频率。
输出谱图的尺寸,取决于谱图软件的超参数和输入的长度。
我们将使用10秒的音频剪辑作为我们的训练示例的 “标准长度”
光谱图的时间步长为5511
你将看到谱图将是 输入\(x\) 到网络中,因此 \(T_x=5511\)。
_, data = wavfile.read("audio_examples/example_train.wav")

print("Time steps in audio recording before spectrogram", data[:,0].shape)

print("Time steps in input after spectrogram", x.shape)
Time steps in audio recording before spectrogram (441000,)

Time steps in input after spectrogram (101, 5511)
Tx = 5511 # The number of time steps input to the model from the spectrogram

n_freq = 101     # 在光谱图的每个时间步 输入到 模型的 频率数
划分为时间间隔
注意,我们可以用不同的单位(steps) 划分10秒的时间间隔。
原始音频,将10秒分成441,000个单元。
光谱图,将10秒分成5,511个单位。
- \(T_x = 5511\)
将使用Python模块
pydub来合成音频,它将10秒分成10,000个单元。模型的输出 将把10秒分成 1,375个单位。
\(T_y = 1375\)
对于1375 time steps 的每步,该模型 预测是否有人最近完成了 “activate” 这个触发词;
- 所有这些都是超参数,并且可以更改(除了441000,这是麦克风的一个功能)。
Ty = 1375 # The number of time steps in the output of our model
2.3 生成单个训练示例(Generating a single training example)
综合数据的好处(Benefits of synthesizing data)
由于语音数据很难获取和标记,您将使用activates, negatives, backgrounds的音频剪辑合成您的训练数据。
它很慢的 记录许多10秒的带有随机 "activates" 的音频剪辑。
相反,更容易记录大量的积极和消极的词,并单独记录背景噪声。
合成音频剪辑的过程
要合成一个训练示例,您将:
随机选取10秒背景音频剪辑
随机插入0-4音频剪辑的 "activate" 到这个10秒剪辑。
随机插入0-2音频剪辑的 负面单词 到这个10秒剪辑
因为你已经把 “activate” 这个词合成到了背景剪辑中,所以你确切地知道 “activate” 在10秒剪辑中的出现时间.
- 这使得生成标签更加容易 \(y^{\langle t \rangle}\) .
Pydub
将使用
pydub包操作音频。Pydub将原始音频文件转换为Pydub数据结构列表。Pydub使用 1ms 作为离散区间 (1ms is 1 millisecond = 1/1000 seconds).- 这就是为什么10秒剪辑总是用 10,000个步骤来表示。
# Load audio segments using pydub

activates, negatives, backgrounds = load_raw_audio()

print("background len should be 10,000, since it is a 10 sec clip\n" + str(len(backgrounds[0])),"\n")

print("activate[0] len may be around 1000, since an `activate` audio clip is usually around 1 second (but varies a lot) \n" + str(len(activates[0])),"\n")

print("activate[1] len: different `activate` clips can have different lengths\n" + str(len(activates[1])),"\n")
background len should be 10,000, since it is a 10 sec clip

10000

activate[0] len may be around 1000, since an `activate` audio clip is usually around 1 second (but varies a lot)

916

activate[1] len: different `activate` clips can have different lengths

1579
2.31 将正/负“单词”音频剪辑叠加在背景音频之上(Overlaying positive/negative 'word' audio clips on top of the background audio)
给定10秒背景剪辑和短音频剪辑(正例或负例单词),您需要能够将单词的短音频剪辑“添加”或“插入”到背景上。
您将在背景上插入多个正例/负例字的剪辑,并且您不希望在某个与您之前添加的另一个剪辑重叠的地方插入 “activate” 或随机词。
- 要确保插入到背景中的音频片段不重叠,您将跟踪先前插入的音频片段的时间。
要清楚的是,当你在10秒的咖啡噪音剪辑中插入1秒 "activate" 时,你不会以11秒的剪辑结束
- 产生的音频剪辑仍然是10秒长。
标记正/负词
回想一下,标签 \(y^{\langle t \rangle}\) 表示是否有人结束说了“activate”
\(y^{\langle t \rangle} = 1\):当那个剪辑完成后说 "activate" 时
给定一个背景剪辑,我们可以初始化 \(y^{\langle t \rangle}=0\) 为所有 \(t\), 因为剪辑不包含任何 "activates."
当您插入或覆盖"activate"剪辑时,您还将更新 \(y^{\langle t \rangle}\) 的标签。
而不是更新单个时间步骤的标签,我们将更新输出的50步,使其具有目标标签1。
更新几个连续的时间步骤,可以使训练数据更加平衡。
您将训练一个GRU(门控递归单元),以检测某人何时完成了 "activate".
Example
假设合成的 "activate" 剪辑结束于10秒音频中的5秒标记-正好进入剪辑的一半。
Recall that \(T_y = 1375\), so timestep \(687 =\)
int(1375*0.5)对应于进入音频剪辑5秒的时刻。Set \(y^{\langle 688 \rangle} = 1\).
我们将允许GRU在短时间内检测“activate”任何地方,在这一时刻之后, 因此,我们实际上将标签 \(y^{\langle t \rangle}\) 的50个连续值设置为1
- Specifically, we have \(y^{\langle 688 \rangle} = y^{\langle 689 \rangle} = \cdots = y^{\langle 737 \rangle} = 1\).
合成的数据更容易标记
这是合成训练数据的另一个原因:生成这些标签相对简单 \(y^{\langle t \rangle}\) 如上所述。
相反,如果你有10秒的音频记录在麦克风上,一个人听它,并在 "activate" 完成时手动标记是相当耗时的。
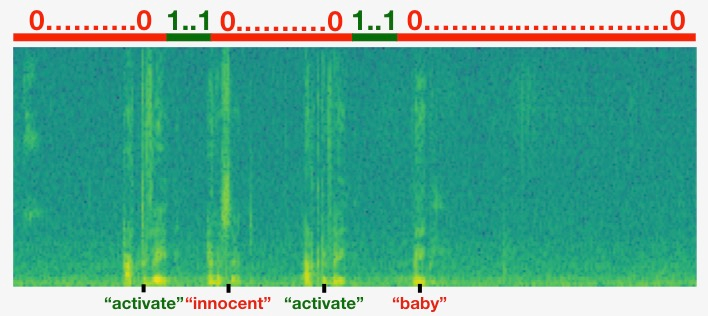
可视化标签
- 这是一个图形,说明标签 \(y^{\langle t \rangle}\) 在一个剪辑。
- 我们已插入 "activate", "innocent", activate", "baby."
- 请注意,正面标签 “1” 只与正面单词相关联。
Helper functions
要实现训练集合成过程,您将使用以下函数
所有这些函数都将使用1ms离散化间隔
音频的10秒总是 离散为10,000步。
get_random_time_segment(segment_ms)- 从背景音频中检索随机时间段。
is_overlapping(segment_time, existing_segments)- 检查时间段是否与现有段重叠
insert_audio_clip(background, audio_clip, existing_times)- 在背景音频中随机插入一个音频段
- 使用功能
get_random_time_segment和is_overlapping
insert_ones(y, segment_end_ms)- 在 "activate" 字后面插入 额外的 1's 到标签向量y中。
得到一个随机的时间段
函数 get_random_time_segment(segment_ms) 返回一个随机的时间段,我们可以在其中插入一个持续时间segment_ms的音频剪辑。
def get_random_time_segment(segment_ms):

    """

    Gets a random time segment of duration segment_ms in a 10,000 ms audio clip.

    Arguments:

    segment_ms -- the duration of the audio clip in ms ("ms" stands for "milliseconds")

    Returns:

    segment_time -- a tuple of (segment_start, segment_end) in ms

    """

    segment_start = np.random.randint(low=0, high=10000-segment_ms)   # Make sure segment doesn't run past the 10sec background

    segment_end = segment_start + segment_ms - 1

    return (segment_start, segment_end)
检查音频剪辑是否重叠
假设您在段(1000, 1800)和(3400,4500)插入了音频剪辑
第一段从步骤1000开始,到步骤1800结束。
第二标段起点3400,终点4500。
如果我们正在考虑是否在(3000,3600)插入一个新的音频剪辑,这是否与先前插入的片段之一重叠?
在这种情况下,(3000,3600)和(3400,4500)重叠,所以我们应该决定不在这里插入剪辑。
为了履行这一职能,将(100,200) 和 (200,250) 定义为重叠,因为它们在时间步骤200重叠。
(100,199)和(200,250) 不重叠。
Exercise:
- 实现
is_overlapping(segment_time, existing_segments)检查新的时间段是否与前一段中的任何一段重叠. - 两个步骤:
- 创建一个“False”标志,如果您发现有重叠,稍后将设置为“True”。
- 循环previous_segments的开始和结束时间。将这些时间 与 段的开始和结束时间进行比较。如果有重叠,则将(1)中定义的标志设置为True。
You can use:
for ....:

        if ... <= ... and ... >= ...:

            ...
Hint: 如果有重叠:
- 新段在前一段 结束之前 开始
- 新段在前一段 开始后 结束。
# GRADED FUNCTION: is_overlapping

def is_overlapping(segment_time, previous_segments):

    """

    Checks if the time of a segment overlaps with the times of existing segments.

    Arguments:

    segment_time -- a tuple of (segment_start, segment_end) for the new segment

    previous_segments -- a list of tuples of (segment_start, segment_end) for the existing segments

    Returns:

    True if the time segment overlaps with any of the existing segments, False otherwise

    """

    segment_start, segment_end = segment_time

    ### START CODE HERE ### (≈ 4 lines)

    # Step 1: Initialize overlap as a "False" flag. (≈ 1 line)

    overlap = False

    # Step 2: loop over the previous_segments start and end times.

    # Compare start/end times and set the flag to True if there is an overlap (≈ 3 lines)

    for previous_start, previous_end in previous_segments:

        if segment_start <= previous_end and segment_end >= previous_start:

            overlap = True

    ### END CODE HERE ###

    return overlap
overlap1 = is_overlapping((950, 1430), [(2000, 2550), (260, 949)])

overlap2 = is_overlapping((2305, 2950), [(824, 1532), (1900, 2305), (3424, 3656)])

print("Overlap 1 = ", overlap1)

print("Overlap 2 = ", overlap2)
Overlap 1 =  False

Overlap 2 =  True
插入音频片段(Insert audio clip)
- 让我们使用前面的助手函数在10秒的背景上随机插入一个新的音频剪辑。
- 我们将确保任何新插入的段 不与先前插入的段重叠。
Exercise:
- 实现
insert_audio_clip()将音频剪辑覆盖到 背景10秒剪辑。 - 需要4个步骤:
获取 要插入的音频剪辑 的长度。
- 获取一个随机时间段,其持续时间 等于 要插入的音频剪辑的持续时间。
确保时间段 不与 以前的任何时间段重叠。
- 如果它是重叠的,那么回到步骤1,并选择一个新的时间段。
将新的时间段 追加到 现有时间段列表中
- 这可以 跟踪 您插入的所有段.
使用
pydub将音频剪辑 覆盖在背景上,已经实现。
# GRADED FUNCTION: insert_audio_clip

def insert_audio_clip(background, audio_clip, previous_segments):

    """

    Insert a new audio segment over the background noise at a random time step, ensuring that the

    audio segment does not overlap with existing segments.

    Arguments:

    background -- a 10 second background audio recording.

    audio_clip -- the audio clip to be inserted/overlaid.

    previous_segments -- times where audio segments have already been placed

    Returns:

    new_background -- the updated background audio

    """

    # Get the duration of the audio clip in ms

    segment_ms = len(audio_clip)

    ### START CODE HERE ###

    # Step 1: Use one of the helper functions to pick a random time segment onto which to insert

    # the new audio clip. (≈ 1 line)

    segment_time = get_random_time_segment(segment_ms)

    # Step 2: Check if the new segment_time overlaps with one of the previous_segments. If so, keep

    # picking new segment_time at random until it doesn't overlap. (≈ 2 lines)

    while is_overlapping(segment_time, previous_segments):    # 如果重叠,就重新选择

        segment_time = get_random_time_segment(segment_ms)

    # Step 3: Append the new segment_time to the list of previous_segments (≈ 1 line)

    previous_segments.append(segment_time)

    ### END CODE HERE ###

    # Step 4: Superpose audio segment and background

    new_background = background.overlay(audio_clip, position = segment_time[0])

    return new_background, segment_time
np.random.seed(5)

audio_clip, segment_time = insert_audio_clip(backgrounds[0], activates[0], [(3790, 4400)])

audio_clip.export("insert_test.wav", format="wav")

print("Segment Time: ", segment_time)

IPython.display.Audio("insert_test.wav")
Segment Time: (2254, 3169)
# Expected audio

IPython.display.Audio("audio_examples/insert_reference.wav")
为正目标的标签插入一个
实现代码来更新标签 \(y^{\langle t \rangle}\),假设您刚刚插入了一个"activate"音频剪辑。
在下面代码中,
y是(1,1375)维向量, 因为 \(T_y = 1375\).如果"activate"音频剪辑在时间步骤 \(t\) 结束,则设置 \(y^{\langle t+1 \rangle}=1\) 并将下49个额外连续值设置为1。
注意,如果目标字出现在整个音频剪辑的末尾,则可能没有50个额外的时间步骤设置为1。
确保不会在数组的末尾运行并尝试更新
y[0][1375], 由于有效指数是y[0][0]到y[0][1374]因为 \(T_y = 1375\).因此,如果"activate"在步骤1370结束,您将只得到设置
y[0][1371] = y[0][1372] = y[0][1373] = y[0][1374] = 1
Exercise:
实现 insert_ones().
- 使用一个for循环
如果要使用Python的数组切片操作,也可以这样做。
如果一段以
segment_end_ms结束(使用10000步离散化),- 要将其转换为 \(y\)输出的索引(使用 \(1375\)步 离散化),我们将使用此公式:
segment_end_y = int(segment_end_ms * Ty / 10000.0)
# GRADED FUNCTION: insert_ones

def insert_ones(y, segment_end_ms):

    """

    Update the label vector y. The labels of the 50 output steps strictly after the end of the segment

    should be set to 1. By strictly we mean that the label of segment_end_y should be 0 while, the

    50 following labels should be ones.

    Arguments:

    y -- numpy array of shape (1, Ty), the labels of the training example

    segment_end_ms -- the end time of the segment in ms

    Returns:

    y -- updated labels

    """

    # duration of the background (in terms of spectrogram time-steps)

    segment_end_y = int(segment_end_ms * Ty / 10000.0)

    # Add 1 to the correct index in the background label (y)

    ### START CODE HERE ### (≈ 3 lines)

    for i in range(segment_end_y+1, segment_end_y+51):

        if i < Ty:

            y[0, i] = 1

    ### END CODE HERE ###

    return y
arr1 = insert_ones(np.zeros((1, Ty)), 9700)

plt.plot(insert_ones(arr1, 4251)[0,:])

print("sanity checks:", arr1[0][1333], arr1[0][634], arr1[0][635])
sanity checks: 0.0 1.0 0.0

创建一个训练样本(Creating a training example)
最后,可以使用insert_audio_clip 和 insert_ones 创建一个新的训练示例。
Exercise: 实现 create_training_example(),使用下面步骤:
初始化标签向量 \(y\) 为 维度 \((1,T_y)\)的 zero numpy数组。.
将现有 片段集合 初始化为空列表
随机选择 0到4 "activate" 音频剪辑,并将它们插入到10秒剪辑中,在标签向量 \(y\) 中的正确位置插入标签。
随机选择0到2个"Negative"音频剪辑,并插入到10秒剪辑中。
# GRADED FUNCTION: create_training_example

def create_training_example(background, activates, negatives):

    """

    Creates a training example with a given background, activates, and negatives.

    Arguments:

    background -- a 10 second background audio recording

    activates -- a list of audio segments of the word "activate"

    negatives -- a list of audio segments of random words that are not "activate"

    Returns:

    x -- the spectrogram of the training example

    y -- the label at each time step of the spectrogram

    """

    # Set the random seed

    np.random.seed(18)

    # Make background quieter

    background = background - 20

    ### START CODE HERE ###

    # Step 1: Initialize y (label vector) of zeros (≈ 1 line)

    y = np.zeros((1, Ty))

    # Step 2: Initialize segment times as an empty list (≈ 1 line)

    previous_segments = []

    ### END CODE HERE ###

    # Select 0-4 random "activate" audio clips from the entire list of "activates" recordings

    number_of_activates = np.random.randint(0, 5)

    random_indices = np.random.randint(len(activates), size=number_of_activates)

    random_activates = [activates[i] for i in random_indices]

    ### START CODE HERE ### (≈ 3 lines)

    # Step 3: Loop over randomly selected "activate" clips and insert in background

    for random_activate in random_activates:

        # Insert the audio clip on the background

        background, segment_time = insert_audio_clip(background, random_activate, previous_segments)

        # Retrieve segment_start and segment_end from segment_time

        segment_start, segment_end = segment_time

        # Insert labels in "y"

        y = insert_ones(y, segment_end)

    ### END CODE HERE ###

    # Select 0-2 random negatives audio recordings from the entire list of "negatives" recordings

    number_of_negatives = np.random.randint(0, 3)

    random_indices = np.random.randint(len(negatives), size=number_of_negatives)

    random_negatives = [negatives[i] for i in random_indices]

    ### START CODE HERE ### (≈ 2 lines)

    # Step 4: Loop over randomly selected negative clips and insert in background

    for random_negative in random_negatives:

        # Insert the audio clip on the background

        background, _ = insert_audio_clip(background, random_negative, previous_segments)

    ### END CODE HERE ###

    # Standardize the volume of the audio clip

    background = match_target_amplitude(background, -20.0)

    # Export new training example

    file_handle = background.export("train" + ".wav", format="wav")

    print("File (train.wav) was saved in your directory.")

    # Get and plot spectrogram of the new recording (background with superposition of positive and negatives)

    x = graph_spectrogram("train.wav")

    return x, y
x, y = create_training_example(backgrounds[0], activates, negatives)
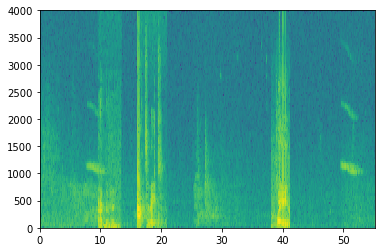
IPython.display.Audio("train.wav")
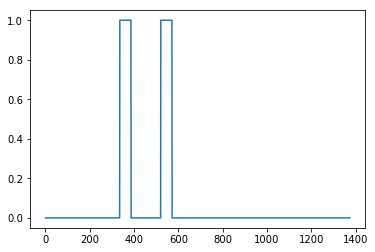
plt.plot(y[0])
2.4 Full training set
您现在已经实现了生成单个培训示例所需的代码。
我们使用这个过程生成一个大的训练集。
为了节省时间,我们已经生成了一组训练示例。
# Load preprocessed training examples

X = np.load("./XY_train/X.npy")

Y = np.load("./XY_train/Y.npy")
2.5 Development set
为了测试我们的模型,我们记录了25个示例的开发集。
当我们的训练数据被合成时,我们希望 使用与实际输入相同的分布 来创建一个开发集。
因此,我们记录了25个10秒的音频片段,人们说“activates” 和 其他随机单词,并用手标记它们。
这遵循课程3“构建机器学习项目”中描述的原则,即我们应该 创建与测试集分布尽可能相似的开发集
- 这就是为什么我们的dev集使用真实音频而不是合成音频。
# Load preprocessed dev set examples

X_dev = np.load("./XY_dev/X_dev.npy")

Y_dev = np.load("./XY_dev/Y_dev.npy")
3. Model
既然你已经建立了一个数据集,编写和训练一个触发词检测模型!
该模型将使用 1-D convolutional layers, GRU layers, and dense layers.
在Keras中使用这些层的包。
from keras.callbacks import ModelCheckpoint

from keras.models import Model, load_model, Sequential

from keras.layers import Dense, Activation, Dropout, Input, Masking, TimeDistributed, LSTM, Conv1D

from keras.layers import GRU, Bidirectional, BatchNormalization, Reshape

from keras.optimizers import Adam
3.1 Build the model
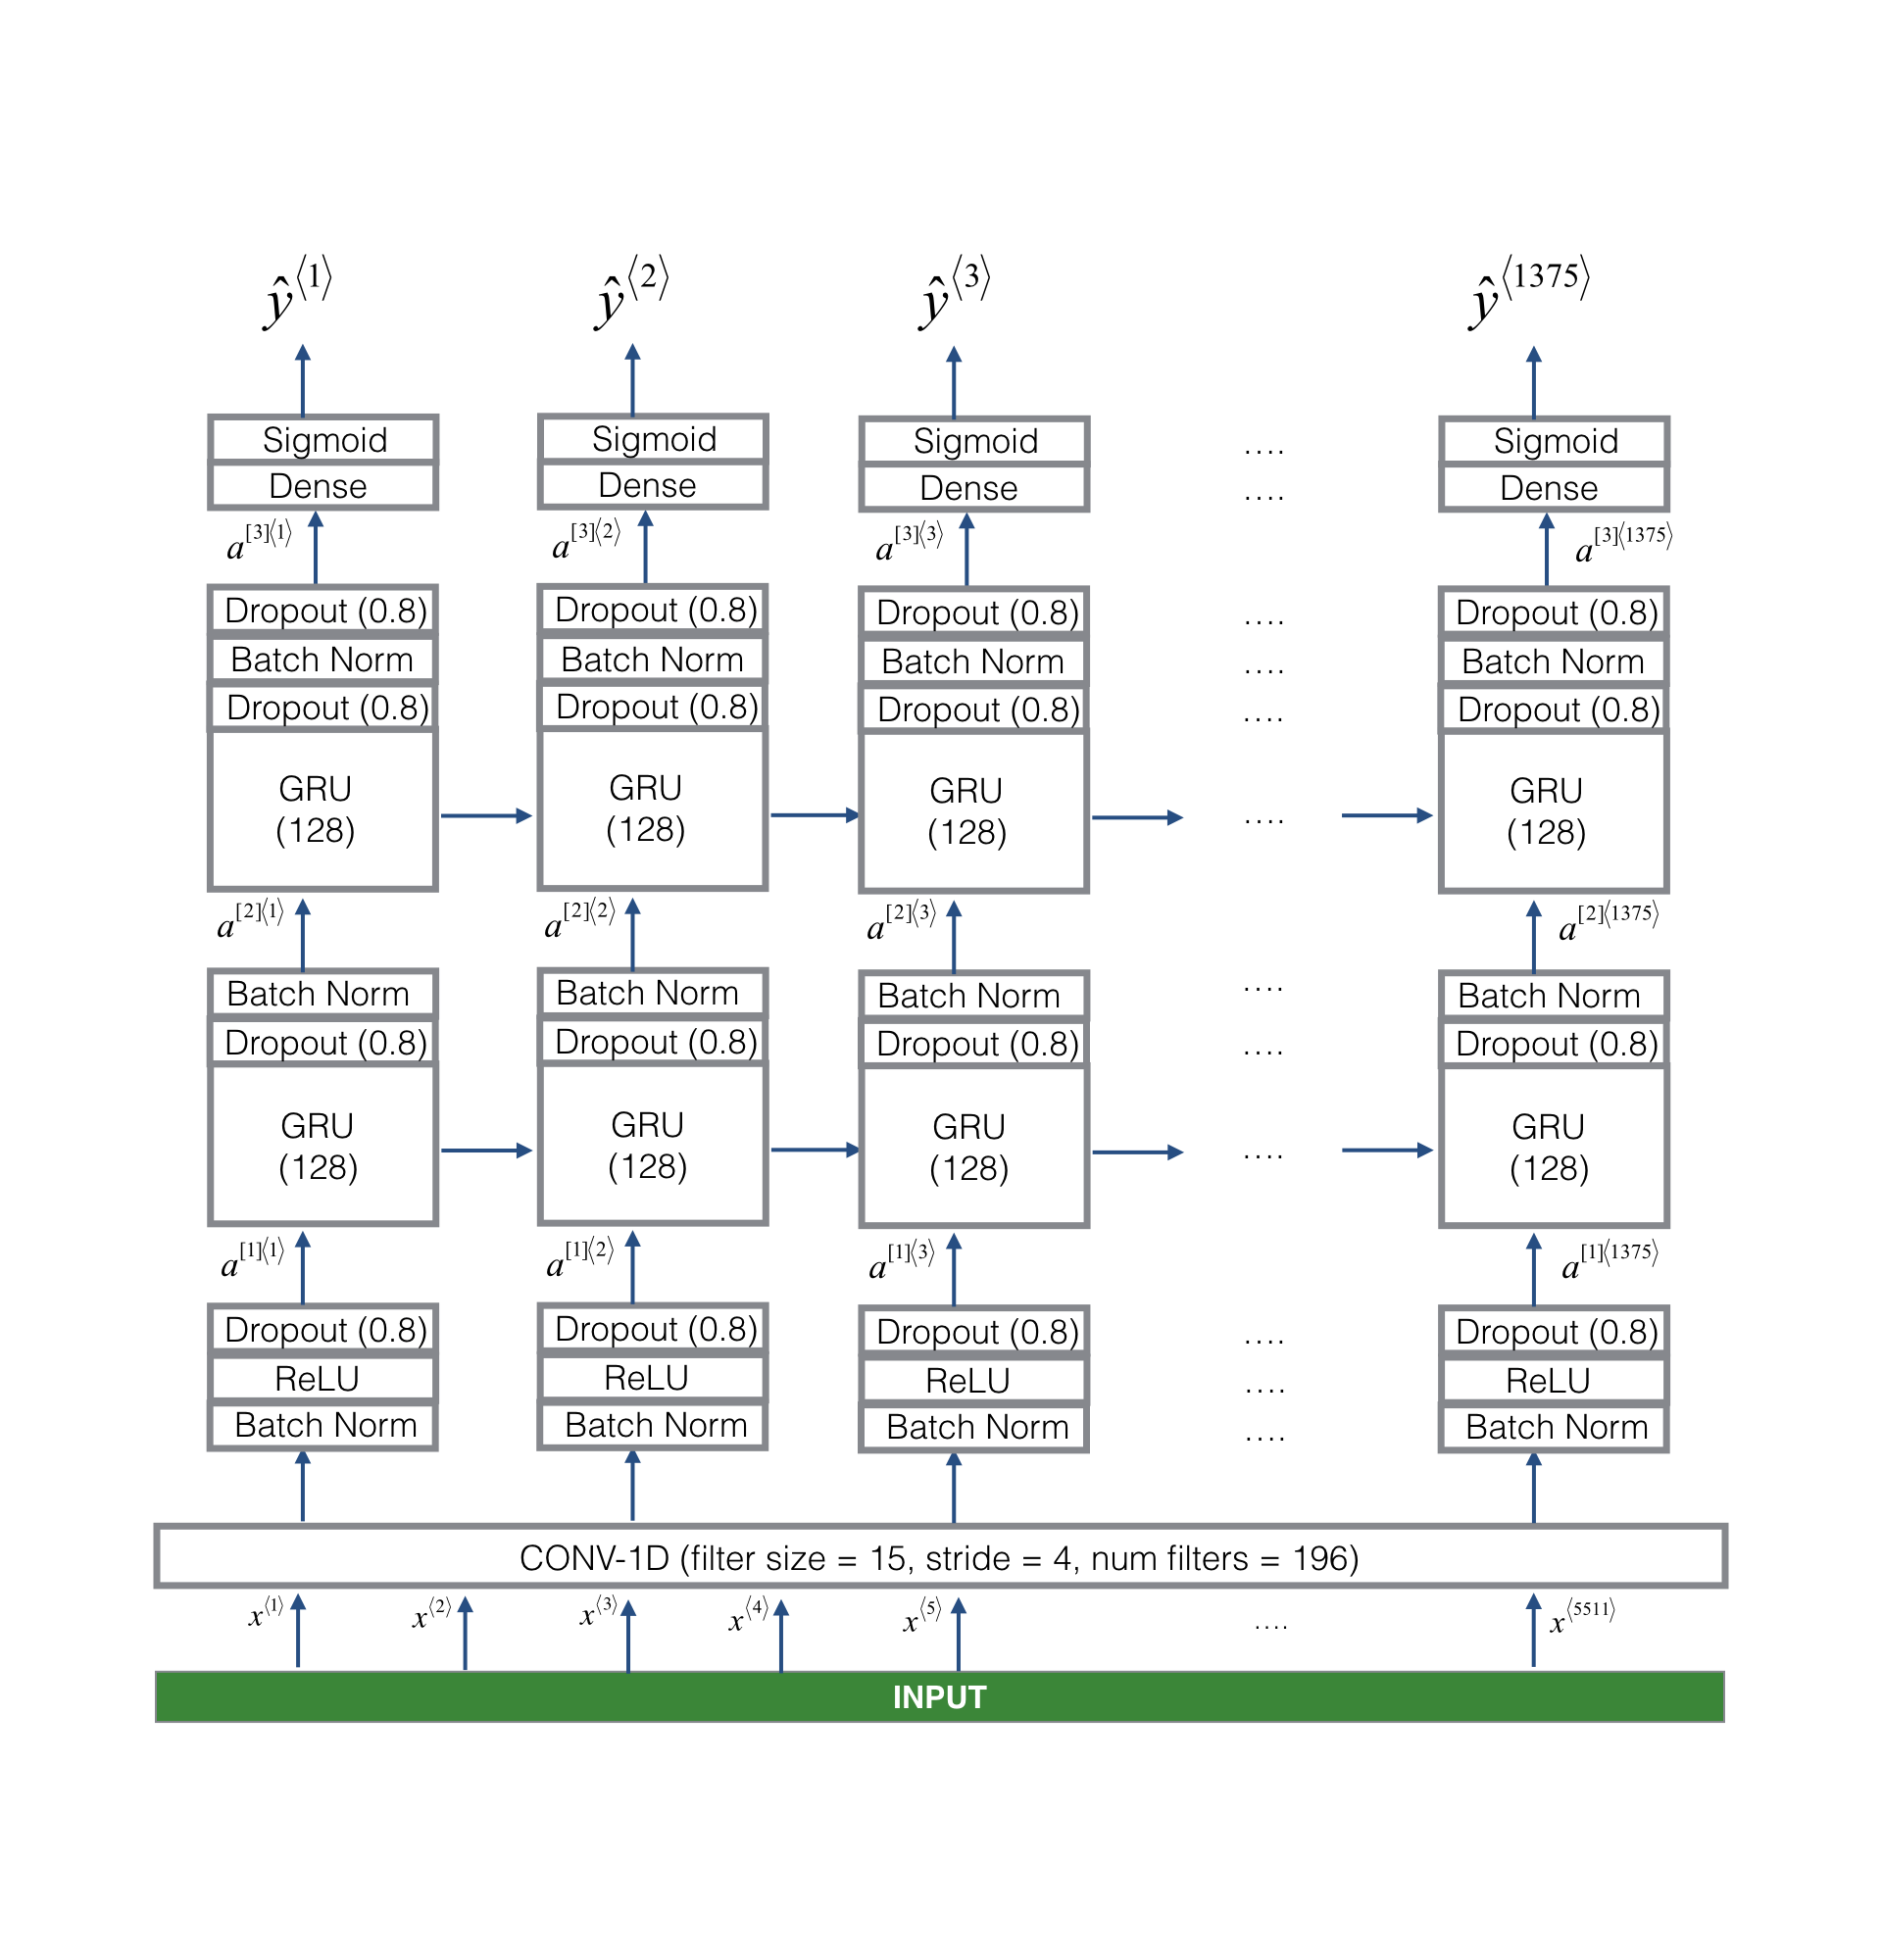
我们的目标是建立一个网络,当它检测到触发词时,它将获取一个光谱图并输出一个信号。本网络将使用4层:
A convolutional layer
Two GRU layers
A dense layer.
使用结构为:
1D convolutional layer
该模型的一个关键层是1D卷积步骤(在图3底部附近)
它输入5511步光谱图,每一步都是101个单位的向量。
有1375步(Ty=1375)输出
此输出 由多层进一步处理,得到最终的 \(Ty=1375\) 步输出。
这个一维卷积层的作用 类似于 二维卷积,它提取低级特征,然后可能产生一个较小维数的输出。
计算上,一维conv层也有助于加快模型的速度,因为现在GRU只能处理1375个时间步长,而不是5511个时间步长。
GRU, dense and sigmoid
两个GRU层从左到右读取输入序列。
A dense + sigmoid layer 做出预测 \(y^{\langle t \rangle}\).
因为 \(y\) 是二进制值(0或1),我们在最后一层使用 Sigmoid输出 来估计输出为1 的机会,对应于刚才说“activate”的用户;
Unidirectional RNN
使用 unidirectional RNN(单向RNN) 而不是 bidirectional RNN(双向RNN).
这对于触发词的检测是非常重要的,因为我们希望能够 在触发词被说出来几乎 立即检测到触发词。
如果我们使用双向RNN,我们将不得不等待整个10秒的音频被记录,然后我们才能知道“activate”是否是在第一秒的音频剪辑。
实现模型(Implement the model)
实现模型需要4个步骤:
Step 1: CONV layer. 使用 Conv1D() ,使用 196个 滤波器(filters)
- a filter size of 15 (
kernel_size=15), and stride of 4. conv1d
output_x = Conv1D(filters=...,kernel_size=...,strides=...)(input_x)
- 使用 Relu activation
output_x = Activation("...")(input_x)
- 使用 dropout, using a keep rate of 0.8
output_x = Dropout(rate=...)(input_x)
Step 2: First GRU layer. 生成 GRU layer,使用 128 units.
output_x = GRU(units=..., return_sequences = ...)(input_x)
返回序列(return_sequence=True),而不仅仅是最后一次步骤的预测,以确保所有GRU的隐藏状态都被输入到下一层。
使用 dropout, using a keep rate of 0.8.
使用 batch normalization. No parameters need to be set.
output_x = BatchNormalization()(input_x)
Step 3: Second GRU layer. 这与第一个GRU层 具有相同的规格。
- 使用 dropout, batch normalization, and then another dropout.
Step 4: 创建一个 time-distributed dense layer 如下:
X = TimeDistributed(Dense(1, activation = "sigmoid"))(X)
这将创建一个dense layer + sigmod,因此用于Dense layer的参数,对于每个time step都是相同的。
Documentation:
- Keras documentation on wrappers.
- To learn more, you can read this blog post How to Use the TimeDistributed Layer in Keras.
Exercise: 实现 model().
# GRADED FUNCTION: model

def model(input_shape):

    """

    Function creating the model's graph in Keras.

    Argument:

    input_shape -- shape of the model's input data (using Keras conventions)

    Returns:

    model -- Keras model instance

    """

    X_input = Input(shape = input_shape)

    ### START CODE HERE ###

    # Step 1: CONV layer (≈4 lines)

    X = Conv1D(filters=15, kernel_size=196, strides=4)(X_input)   # CONV1D

    X = BatchNormalization()(X)                                   # Batch normalization

    X = Activation('relu')(X)                                     # ReLu activation

    X = Dropout(rate=0.8)(X)                                      # dropout (use 0.8)

    # Step 2: First GRU Layer (≈4 lines)

    X = GRU(units=128, return_sequences=True)(X)                 # GRU (use 128 units and return the sequences)

    X = Dropout(rate=0.8)(X)                                     # dropout (use 0.8)

    X = BatchNormalization()(X)                                  # Batch normalization

    # Step 3: Second GRU Layer (≈4 lines)

    X = GRU(units=128, return_sequences=True)(X)                # GRU (use 128 units and return the sequences)

    X = Dropout(rate=0.8)(X)                                    # dropout (use 0.8)

    X = BatchNormalization()(X)                                 # Batch normalization

    X = Dropout(rate=0.8)(X)                                    # dropout (use 0.8)

    # Step 4: Time-distributed dense layer (see given code in instructions) (≈1 line)

    X = TimeDistributed(Dense(1, activation = 'sigmoid'))(X)     # time distributed  (sigmoid)

    ### END CODE HERE ###

    model = Model(inputs = X_input, outputs = X)

    return model
model = model(input_shape = (Tx, n_freq))
model.summary()
_________________________________________________________________

Layer (type)                 Output Shape              Param #

=================================================================

input_2 (InputLayer)         (None, 5511, 101)         0

_________________________________________________________________

conv1d_2 (Conv1D)            (None, 1329, 15)          296955

_________________________________________________________________

batch_normalization_4 (Batch (None, 1329, 15)          60

_________________________________________________________________

activation_2 (Activation)    (None, 1329, 15)          0

_________________________________________________________________

dropout_5 (Dropout)          (None, 1329, 15)          0

_________________________________________________________________

gru_3 (GRU)                  (None, 1329, 128)         55296

_________________________________________________________________

dropout_6 (Dropout)          (None, 1329, 128)         0

_________________________________________________________________

batch_normalization_5 (Batch (None, 1329, 128)         512

_________________________________________________________________

gru_4 (GRU)                  (None, 1329, 128)         98688

_________________________________________________________________

dropout_7 (Dropout)          (None, 1329, 128)         0

_________________________________________________________________

batch_normalization_6 (Batch (None, 1329, 128)         512

_________________________________________________________________

dropout_8 (Dropout)          (None, 1329, 128)         0

_________________________________________________________________

time_distributed_1 (TimeDist (None, 1329, 1)           129

=================================================================

Total params: 452,152

Trainable params: 451,610

Non-trainable params: 542

_________________________________________________________________
网络的输出的维度(无,1375,1),而输入是(无,5511,101), Conv1D将步骤数从5511减少到1375。
3.2 Fit the model
触发词检测需要很长时间的训练。
为了节省时间,我们已经使用上面构建的体系结构在GPU上训练了大约3小时的模型,以及大约4000个示例的大型训练集。
让我们加载模型。
model = load_model('./models/tr_model.h5')
编译模型
opt = Adam(lr=0.0001, beta_1=0.9, beta_2=0.999, decay=0.01)

model.compile(loss='binary_crossentropy', optimizer=opt, metrics=["accuracy"])
拟合模型
model.fit(X, Y, batch_size = 5, epochs=1)
Epoch 1/1
26/26 [==============================] - 38s - loss: 0.0872 - acc: 0.9715
3.3 Test the model
loss, acc = model.evaluate(X_dev, Y_dev)

print("Dev set accuracy = ", acc)
25/25 [==============================] - 5s
Dev set accuracy = 0.948072731495
4. Making Predictions
def detect_triggerword(filename):

    plt.subplot(2, 1, 1)

    x = graph_spectrogram(filename)

    # the spectrogram outputs (freqs, Tx) and we want (Tx, freqs) to input into the model

    x  = x.swapaxes(0,1)

    x = np.expand_dims(x, axis=0)

    predictions = model.predict(x)

    plt.subplot(2, 1, 2)

    plt.plot(predictions[0,:,0])

    plt.ylabel('probability')

    plt.show()

    return predictions
插入一个钟声来确认“激活”触发器(Insert a chime to acknowledge the "activate" trigger)
一旦你估计了在每个输出步骤中检测到 “activate” 这个词的概率,你就可以在概率超过某一阈值时触发一个“鸣叫”声音来播放。
\(y^{\langle t \rangle}\) 在“activate”之后 连续的许多值可能接近1,但我们只想敲一次。
因此,我们将插入一个钟声,每75个输出步骤最多一次
这将有助于防止 我们插入两个钟声为一个实例的“activate";
chime_file = "audio_examples/chime.wav"

def chime_on_activate(filename, predictions, threshold):

    audio_clip = AudioSegment.from_wav(filename)

    chime = AudioSegment.from_wav(chime_file)

    Ty = predictions.shape[1]

    # Step 1: Initialize the number of consecutive output steps to 0

    consecutive_timesteps = 0

    # Step 2: Loop over the output steps in the y

    for i in range(Ty):

        # Step 3: Increment consecutive output steps

        consecutive_timesteps += 1

        # Step 4: If prediction is higher than the threshold and more than 75 consecutive output steps have passed

        if predictions[0,i,0] > threshold and consecutive_timesteps > 75:

            # Step 5: Superpose audio and background using pydub

            audio_clip = audio_clip.overlay(chime, position = ((i / Ty) * audio_clip.duration_seconds)*1000)

            # Step 6: Reset consecutive output steps to 0

            consecutive_timesteps = 0

    audio_clip.export("chime_output.wav", format='wav')
4.1 Test on dev examples
IPython.display.Audio("./raw_data/dev/1.wav")
IPython.display.Audio("./raw_data/dev/2.wav")
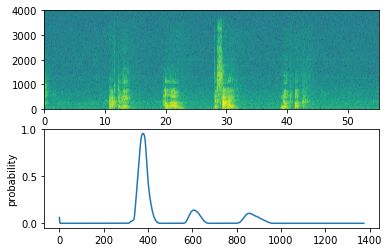
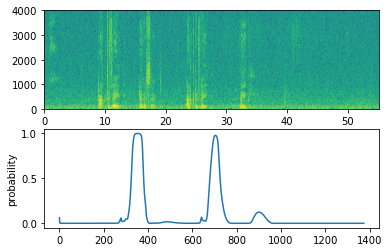
现在让我们在这些音频剪辑上运行模型,看看它是否在“activate”后添加了一个钟声;
filename = "./raw_data/dev/1.wav"

prediction = detect_triggerword(filename)

chime_on_activate(filename, prediction, 0.5)

IPython.display.Audio("./chime_output.wav")
filename  = "./raw_data/dev/2.wav"

prediction = detect_triggerword(filename)

chime_on_activate(filename, prediction, 0.5)

IPython.display.Audio("./chime_output.wav")
5. Try your own example!
尝试您的模型在您自己的音频剪辑!
记录一个10秒的音频剪辑,你说的单词“activate”和其他随机单词.
如果你的音频以不同的格式(如mp3)录制,您可以在网上找到免费软件将其转换为WAV。
如果你的录音不是10秒,下面的代码将修剪或垫它需要使它10秒。
# Preprocess the audio to the correct format

def preprocess_audio(filename):

    # Trim or pad audio segment to 10000ms

    padding = AudioSegment.silent(duration=10000)

    segment = AudioSegment.from_wav(filename)[:10000]

    segment = padding.overlay(segment)

    # Set frame rate to 44100

    segment = segment.set_frame_rate(44100)

    # Export as wav

    segment.export(filename, format='wav')
your_filename = "audio_examples/my_audio.wav"
preprocess_audio(your_filename)

IPython.display.Audio(your_filename) # listen to the audio you uploaded
最后,使用模型预测当你说"activate"在10秒的音频剪辑,并触发一个钟声。如果没有适当地添加蜂鸣声,请尝试调整chime_threshold。
chime_threshold = 0.5

prediction = detect_triggerword(your_filename)

chime_on_activate(your_filename, prediction, chime_threshold)

IPython.display.Audio("./chime_output.wav")

Sequence Model-week3编程题2-Trigger Word Detection的更多相关文章
- 课程五(Sequence Models),第三周(Sequence models & Attention mechanism) —— 2.Programming assignments:Trigger word detection
Expected OutputTrigger Word Detection Welcome to the final programming assignment of this specializa ...
- Sequence Models Week 3 Trigger word detection
Trigger Word Detection Welcome to the final programming assignment of this specialization! In this w ...
- 改善深层神经网络-week3编程题(Tensorflow 实现手势识别 )
TensorFlow Tutorial Initialize variables Start your own session Train algorithms Implement a Neural ...
- Sequence Model-week3编程题1-Neural Machine Translation with Attention
1. Neural Machine Translation 下面将构建一个神经机器翻译(NMT)模型,将人类可读日期 ("25th of June, 2009") 转换为机器可读日 ...
- 程序设计入门—Java语言 第六周编程题 1 单词长度(4分)
第六周编程题 依照学术诚信条款,我保证此作业是本人独立完成的. 1 单词长度(4分) 题目内容: 你的程序要读入一行文本,其中以空格分隔为若干个单词,以'.'结束.你要输出这行文本中每个单词的长度.这 ...
- DeepLearning - Overview of Sequence model
I have had a hard time trying to understand recurrent model. Compared to Ng's deep learning course, ...
- 剑指offer编程题66道题 1-25
1.二维数组中的查找 题目描述 在一个二维数组中,每一行都按照从左到右递增的顺序排序,每一列都按照从上到下递增的顺序排序.请完成一个函数,输入这样的一个二维数组和一个整数,判断数组中是否含有该整数. ...
- 算法是什么我记不住,But i do it my way. 解一道滴滴出行秋招编程题。
只因在今日头条刷到一篇文章,我就这样伤害我自己,手贱. 刷头条看到一篇文章写的滴滴出行2017秋招编程题,后来发现原文在这里http://www.cnblogs.com/SHERO-Vae/p/588 ...
- C算法编程题系列
我的编程开始(C) C算法编程题(一)扑克牌发牌 C算法编程题(二)正螺旋 C算法编程题(三)画表格 C算法编程题(四)上三角 C算法编程题(五)“E”的变换 C算法编程题(六)串的处理 C算法编程题 ...
随机推荐
- 面试官:Redis的事务满足原子性吗?
原创:码农参上(微信公众号ID:CODER_SANJYOU),欢迎分享,转载请保留出处. 谈起数据库的事务来,估计很多同学的第一反应都是ACID,而排在ACID中首位的A原子性,要求一个事务中的所有操 ...
- 灵魂画手:漫画图解 SSH
OpenSSL 本身是一个软件库,这个软件被广泛的应用在系统服务器当中,他的主要功能是在网络通信的过程中,保证数据的一致性以及数据传输过程中的安全性.软件本身是由C语言编写,这使得他具备了跨平台的特性 ...
- 史上最全git命令集
配置化命令 git config --global user.name "Your Name" git config --global user.email "email ...
- java代码覆盖实战
Jacoco原理 代码插桩 On-the-fly插桩: JVM中通过-javaagent参数指定特定的jar文件启动Instrumentation的代理程序,代理程序在通过Class Loader装载 ...
- mac、ip、udp头解析
一.MAC帧头定义 /*数据帧定义,头14个字节,尾4个字节*/ typedef struct _MAC_FRAME_HEADER { char m_cDstMacAddress[6]; // ...
- Vue CSS模拟菜单点击变色
<!DOCTYPE html> <html lang="zh"> <head> <meta charset="UTF-8&quo ...
- 富文本编辑器-SpringBoot
目录 简介 Editor.md 基础工程搭建 数据库设计 基础项目搭建 文章编辑整合(重点) 图片上传问题 表情包问题 文章展示 简介 项目地址:https://gitee.com/zwtgit/ri ...
- 导出excel、word、csv文件方法汇总
http://www.woaic.com/2012/06/64 excel文件主要是输出html代码.以xls的文本格式保存文件. 生成excel格式的代码: /// <summary> ...
- SpringCloud 学习总结
SpringCloud 学习总结 学习回顾 1.Maven依赖管理 在微服务项目中,我们一般是先创建一个父项目模块对整个项目的依赖进行版本限定和依赖控制,子模块继承父模块后,不需要再考虑版本和依赖 ...
- TP5指定讲师页面文章上下篇
控制器代码 // 查询上下篇 $courseIds = model('course') ->where([ 'isdel' => 0, 'teacherid' => $teacher ...
