Idea简单SpringMVC框架配置
前边已经介绍过了Struts在Idea上的配置,相对于Struts来说,我觉得SpringMVC有更多的优势,首先Struts是需要对action进行配置,页面发送不同的请求,就需要配置不同的action,并在每个action中指定对应的结果集,然后进行页面跳转,当然这也是符合逻辑的,但是当要开发一个大的项目,会有很多请求,如果每个请求都要对应一个action,这样会比较繁琐,但对于SpringMVC来说,不用配置多个action,而且SpringMVC框架与Spring有很好的对接,这两个框架可以实现无缝对接,下边就给大家详细介绍一下SpringMVC配置。
对于Struts框架,大家可以参考:http://www.cnblogs.com/wyyDemoTest/p/8676782.html
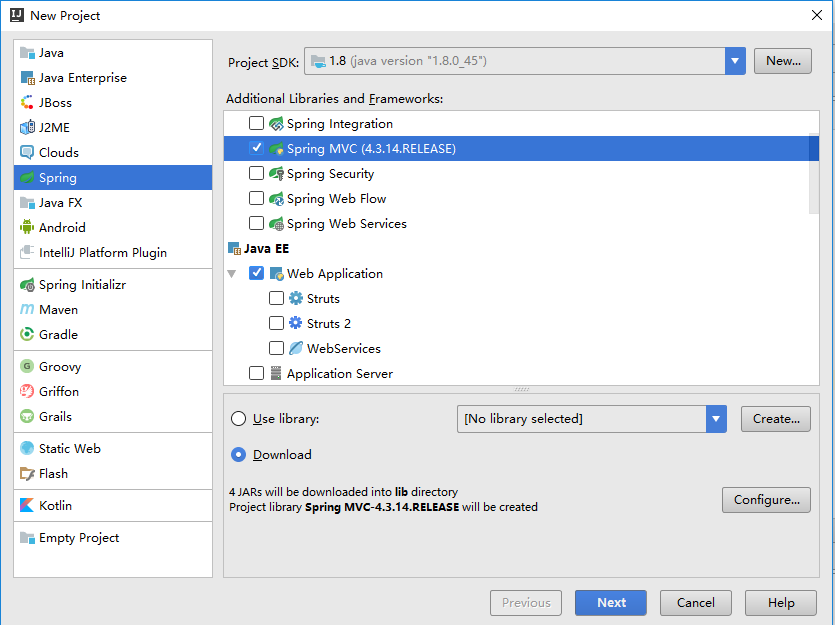
一、环境搭建(File-->New-->Project-->Spring,选中SpringMVC,其他默认,点击Next)
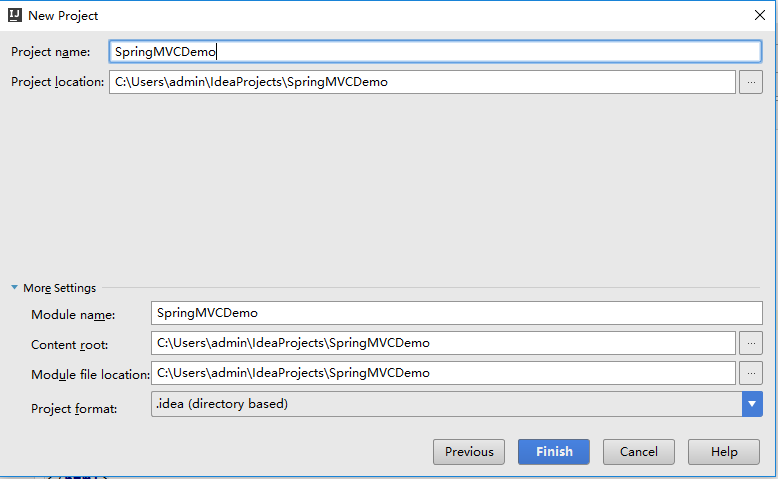
二、填写项目名字,创建项目完成,整个项目环境大部分已经完成
三、项目配置
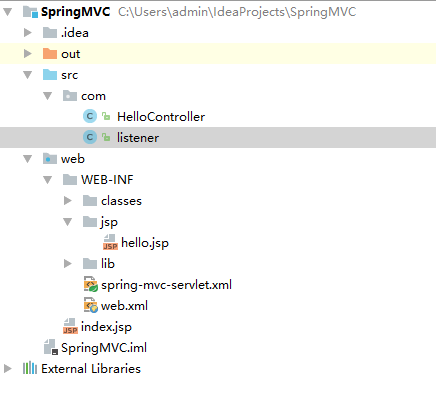
大家先看一下整个的项目目录
其实,SpringMVC的配置很简单的,下边分步骤给大家接收一下,怎样配置,在做下边的配置之前,大家还需要配置服务器,详细的介绍大家可以参考Struts框架怎样配置服务器:
http://www.cnblogs.com/wyyDemoTest/p/8676782.html
1 首先先要配置index.jsp页面,代码如下,主要是页面发送请求,到达服务器,进行后续逻辑判断:
<%@ page contentType="text/html;charset=UTF-8" language="java" %>

<html>

  <head>

    <title>登录页面</title>

  </head>

  <body>

  <form action="${pageContext.request.contextPath}/test/demo"  method="post" >

    username:<input type="text"  required="required" name="username"/><br>

    password:<input type="password"  required="required" name="password"/><br>

    <input type="submit" value="提交"><br>

  </form>

  </body>

</html>
2 配置web.xml文件,一般如果是运用Idea开发工具进行SpringMVC框架开发的话,系统会自动配置该配置文件,但是也需要进行相应的修改,尤其是url:
<?xml version="1.0" encoding="UTF-8"?>

<web-app xmlns="http://xmlns.jcp.org/xml/ns/javaee"

         xmlns:xsi="http://www.w3.org/2001/XMLSchema-instance"

         xsi:schemaLocation="http://xmlns.jcp.org/xml/ns/javaee http://xmlns.jcp.org/xml/ns/javaee/web-app_3_1.xsd"

         version="3.1">

    <!--<listener>

        <listener-class>com.listener</listener-class>

    </listener>-->

    <!--配置Spring-->

    <!--配置SpringMVC-->

    <servlet>

        <servlet-name>spring-mvc</servlet-name>

        <servlet-class>

            org.springframework.web.servlet.DispatcherServlet

        </servlet-class>

    </servlet>

    <servlet-mapping>

        <servlet-name>spring-mvc</servlet-name>

        <url-pattern>/</url-pattern>

    </servlet-mapping>

</web-app>
3 配置spring-mvc-servlet.xml,需要注意的是,有两种方法对该文件进行配置,主要是该文件的文件名“spring-mvc-servlet.xml”
方法① 如果是按照步骤2中的代码进行配置,则该配置文件的名字必须是spring-mvc-servlet.xml,其中“spring-mvc”是web.xml文件中的servlet name,这两个名字必须一一对应:xxx-servlet.xml,这样做的原因是框架会自动去寻找该配置文件,一般我采用第二种方法
方法② 其实该方法也很简单,就是在配置文件中添加初始化参数
<?xml version="1.0" encoding="UTF-8"?>

<web-app xmlns="http://xmlns.jcp.org/xml/ns/javaee"

         xmlns:xsi="http://www.w3.org/2001/XMLSchema-instance"

         xsi:schemaLocation="http://xmlns.jcp.org/xml/ns/javaee http://xmlns.jcp.org/xml/ns/javaee/web-app_3_1.xsd"

         version="3.1">

    <!--<listener>

        <listener-class>com.listener</listener-class>

    </listener>-->

    <!--配置Spring-->

    <!--配置SpringMVC-->

    <servlet>

        <servlet-name>demo</servlet-name>

        <servlet-class>

            org.springframework.web.servlet.DispatcherServlet

        </servlet-class>

        <init-param>

            <param-name>contextConfigLocation</param-name>

            <param-value>/WEB-INF/spring-mvc-servlet.xml</param-value>

        </init-param>

    </servlet>

    <servlet-mapping>

        <servlet-name>demo</servlet-name>

        <url-pattern>/</url-pattern>

    </servlet-mapping>

</web-app>
该方法不用指定servlet的name与配置文件的名字一致,只需要指定相应的文件即可。
下边是该配置文件的内容,我用的是注解的方法
<?xml version="1.0" encoding="UTF-8"?>

<beans xmlns="http://www.springframework.org/schema/beans"

       xmlns:xsi="http://www.w3.org/2001/XMLSchema-instance"

       xmlns:context="http://www.springframework.org/schema/context"

       xmlns:mvc="http://www.springframework.org/schema/mvc"

       xsi:schemaLocation="

       http://www.springframework.org/schema/beans

       http://www.springframework.org/schema/beans/spring-beans.xsd

       http://www.springframework.org/schema/context

       http://www.springframework.org/schema/context/spring-context.xsd

       http://www.springframework.org/schema/mvc http://www.springframework.org/schema/mvc/spring-mvc.xsd">

    <!--自动扫描-->

    <context:component-scan base-package="com"/>

    <!-- 静态资源(js、image等)的访问 -->

    <mvc:default-servlet-handler/>

    <!-- 开启注解 -->

    <mvc:annotation-driven/>

    <bean id="jspViewResolver" class="org.springframework.web.servlet.view.InternalResourceViewResolver">

        <property name="viewClass" value="org.springframework.web.servlet.view.JstlView"/>

        <property name="prefix" value="/WEB-INF/jsp/"/>

        <property name="suffix" value=".jsp"/>

    </bean>

</beans>
4 配置控制器
package com;

import org.springframework.stereotype.Controller;

import org.springframework.ui.Model;

import org.springframework.ui.ModelMap;

import org.springframework.web.bind.annotation.RequestMapping;

import org.springframework.web.bind.annotation.RequestMethod;

import org.springframework.web.bind.annotation.RequestParam;

/**

 * Created by admin on 2018/3/26.

 */

@Controller

@RequestMapping("/test")

public class HelloController {

    @RequestMapping(value = "/demo",method= RequestMethod.POST)

    public String test(@RequestParam("username") String username,

                       @RequestParam("password") String password,

                       Model model){

        model.addAttribute("name",username);

        model.addAttribute("password",password);

        model.addAttribute("test","123456");

        return "hello";

    }

}
需要注意的是该配置器指定的@RequestMapping,必须和index.jsp的请求一致,这样才会到达该控制器,然后对数据进行逻辑判断,当然大家可以看一下控制器是如何获取前台页面数据,当拿到前台页面数据以后,可以对数据进行处理,增删改查逻辑判断,满足条件以后怎样处理,页面跳转携带数据,把数据保存在Model对象中,前台页面通过el获取数据。
5 hello.jsp,主要是显示数据,在步骤4 中返回的字符串对应指定的字符串.jsp页面,这样整个流程都完成了
<%@ page contentType="text/html;charset=UTF-8" language="java" %>

<html>

<head>

    <title>测试</title>

</head>

<body>

${name},${password}

</body>

</html>
Idea简单SpringMVC框架配置的更多相关文章
- springMVC框架配置定时器
在springmvc.xml添加如下内容在xmlns中添加 xmlns:task="http://www.springframework.org/schema/task"1在xsi ...
- 基于java代码的Spring-mvc框架配置
Spring 版本 4.3.2 maven项目 1.首先上项目目录图,主要用到的配置文件,略去css和js的文件 引包: 2.主要代码: (1)NetpageWebAppInitializer类 ...
- 学习springMVC框架配置遇到的问题-数据写入不进数据库时的处理办法
配置完了,运行,数据写入不到数据库中,就应该想UserAction 中的handleRequest()方法有没有进去,然后就设置断点.如果发现程序没有进去,就再想办法进去.
- 使用IntelliJ IDEA开发SpringMVC网站(二)框架配置
原文:使用IntelliJ IDEA开发SpringMVC网站(二)框架配置 摘要 讲解如何配置SpringMVC框架xml,以及如何在Tomcat中运行 目录[-] 文章已针对IDEA 15做了一定 ...
- SpringMVC框架应用
SSMSpringMVC框架 1. MVC设计模式:模型.视图.控制器: 视图:负责格式化数据并把他们呈现给用户,包括数据展示.用户交互.数据验证.界面设计等功能.对应组件:JSP或者HTML ...
- springmvc框架(Spring SpringMVC, Hibernate整合)
直接干货 model 考虑给用户展示什么.关注支撑业务的信息构成.构建成模型. control 调用业务逻辑产生合适的数据以及传递数据给视图用于呈献: view怎样对数据进行布局,以一种优美的方式展示 ...
- 搭建最简单的SpringMVC框架(使用maven)
本文说明:本文介绍使用maven搭建SpringMVC最简单的框架程序过程,适合初学者上手. 下载链接 点此进入下载链接 1.创建一个maven webapp工程. 2.修改WEB-INF目录下的we ...
- 简单实现springmvc框架(servlet+自定义注解)
个人水平比较菜,没有这么高的实力简单实现springmvc框架,我是看了一个老哥的博客,这老哥才是大神! 原文链接:https://www.cnblogs.com/xdp-gacl/p/4101727 ...
- 项目搭建系列之二:SpringMVC框架下配置MyBatis
1.什么是MyBatis? MyBatis是一个支持普通SQL查询,存储过程和高级映射的优秀持久层框架.MyBatis消除了几乎所有的JDBC代码和参数的手工设置以及对结果集的检索封装.MyBatis ...
随机推荐
- Educational Codeforces Round37 E - Connected Components?
#include <algorithm> #include <cstdio> #include <iostream> #include <queue> ...
- 第十一篇:Map/Reduce 工作机制分析 - 错误处理机制
前言 对于Hadoop集群来说,节点损坏是非常常见的现象. 而Hadoop一个很大的特点就是某个节点的损坏,不会影响到整个分布式任务的运行. 下面就来分析Hadoop平台是如何做到的. 硬件故障 硬件 ...
- 【BZOJ1501】【NOI2005】智慧珠游戏(搜索)
[BZOJ1501][NOI2005]智慧珠游戏(搜索) 题面 我要一改我懒惰的作风 这道题目必须放题面 Description Input 文件中包含初始的盘件描述,一共有10行,第i行有i个字符. ...
- 【Luogu3444】ORK-Ploughing(贪心)
[Luogu3444]ORK-Ploughing(贪心) 题面 Luogu 题解 我们知道,如果我们选定了以横向为主,或者纵向为主, 那么就有尽可能减少另一个方向上耕地的次数 所以分开贪心,但是本质相 ...
- 【HDU1754】I hate it!
题面 很多学校流行一种比较的习惯.老师们很喜欢询问,从某某到某某当中,分数最高的是多少. 这让很多学生很反感. 不管你喜不喜欢,现在需要你做的是,就是按照老师的要求,写一个程序,模拟老师的询问.当然, ...
- [Luogu3041][USACO12JAN]视频游戏的连击Video Game Combos
题面 sol 设\(f_{i,j}\)表示填了前\(i\)个字母,在\(AC\)自动机上跑到了节点\(j\)的最大得分.因为匹配需要暴跳\(fail\)所以预先把\(fail\)指针上面的匹配数传下来 ...
- Windows Developer Day - Adaptive Cards
概述 Windows Developer Day 在 Modern Application Experience 环节展示了一种可以让开发者以更通用和统一的方式来对卡片对展示和交互的方式,那就是:Ad ...
- Oracle数据库中in()参数超过一千报错代码报错
转载请注明出处:http://www.cnblogs.com/xunzhaorendaxia/p/8570604.html 解决方案将select * from tablename where fie ...
- web前端UI框架
分类:WEB前端 时间:2016年1月13日 目前,众多互联网公司APP都嵌入了大量的HTML5,移动端的开发越来越重视,HTML5的运用场景也越来越多了.在移动WEB开发的过程中,使用合适的移动WE ...
- SQL Server将自己的查询结果作为待查询数据子列之二
嵌套子查询是SQL语句中比较常用的一种查询方法,开发过程中遇到查询需要将自己的某列作为待查询的数据,在参考别人的SQL语句的写法终于实现了自己需要的功能. 不太和谐查询语句如下: SELECT DIS ...