redis实现mysql的数据缓存
环境设定
base2 172.25.78.12 nginx+php
base3 172.25.78.13 redis端
base4 172.25.78.14 mysql端
# 1.在base2(nginx+php)上
配置nginx和php(这里的nginx只是提供了负载均衡,所以版本要求不高)
[root@base2 ~]# killall redis-server
[root@base2 ~]# ls
gearmand-1.1.12-18.el7.x86_64.rpm
php-fpm-5.4.16-46.el7.x86_64.rpm
libevent-devel-2.0.21-4.el7.x86_64.rpm
php-mysql-5.4.16-46.el7.x86_64.rpm
libgearman-1.1.12-18.el7.x86_64.rpm
php-pdo-5.4.16-46.el7.x86_64.rpm
libgearman-devel-1.1.12-18.el7.x86_64.rpm
php-pecl-gearman-1.1.2-1.el7.x86_64.rpm
libzip-0.10.1-8.el7.x86_64.rpm
php-pecl-igbinary-1.2.1-1.el7.x86_64.rpm
openssl-1.0.2k-16.el7.x86_64.rpm
php-pecl-redis-2.2.8-1.el7.x86_64.rpm
openssl-libs-1.0.2k-16.el7.x86_64.rpm
php-process-5.4.16-46.el7.x86_64.rpm
php-cli-5.4.16-46.el7.x86_64.rpm
php-xml-5.4.16-46.el7.x86_64.rpm
php-common-5.4.16-46.el7.x86_64.rpm
[root@base2 ~]# yum install -y *.rpm # 安装php
注:当服务器上有openssl-devel开发包时,会有冲突,所以要先删除
[root@base2 ~]# tar zxf nginx-1.14.2.tar.gz
[root@base2 ~]# cd nginx-1.14.2
[root@base2 nginx-1.14.2]# vim auto/cc/gcc
171 # debug
172 #CFLAGS="$CFLAGS -g"
[root@base2 nginx-1.14.2]# vim src/core/nginx.h
14 #define NGINX_VER "nginx/"
[root@base2 nginx-1.14.2]# ./configure --prefix=/usr/local/nginx
[root@base2 nginx-1.14.2]# make && make install
[root@base2 ~]# cd /usr/local/nginx/conf/
[root@base2 conf]# vim nginx.conf
location / {
root html;
index index.php index.html index.htm;
}
location ~ \.php$ {
root html;
fastcgi_pass 127.0.0.1:9000;
fastcgi_index index.php;
#fastcgi_param SCRIPT_FILENAME /scripts$fastcgi_script_name;
include fastcgi.conf;
}

[root@base2 conf]# ln -s /usr/local/nginx/sbin/nginx /sbin
[root@base2 conf]# nginx -t
[root@base2 conf]# nginx # 开启nginx服务
[root@base2 conf]# vim /etc/php.ini
878 date.timezone =Asia/Shanghai
[root@base2 conf]# vim /etc/php-fpm.d/www.conf
39 user = nginx
41 group = nginx
[root@base2 conf]# systemctl start php-fpm
[root@base2 conf]# systemctl status php-fpm # 开启php服务
[root@base2 conf]# netstat -antlp # 查看php的端口
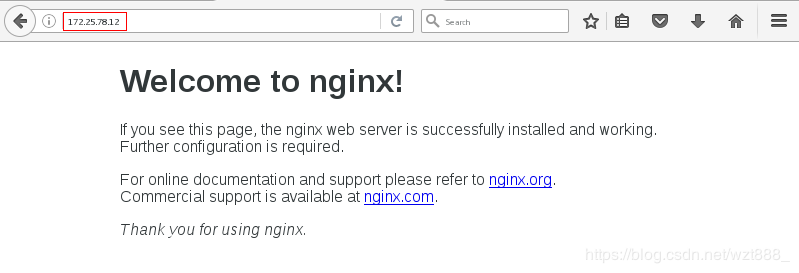
# nginx服务搭建成功
[root@base2 conf]# cd /usr/local/nginx/html/
[root@base2 html]# vim index.php # 编写php网页,测试php
<?php
phpinfo()
?> 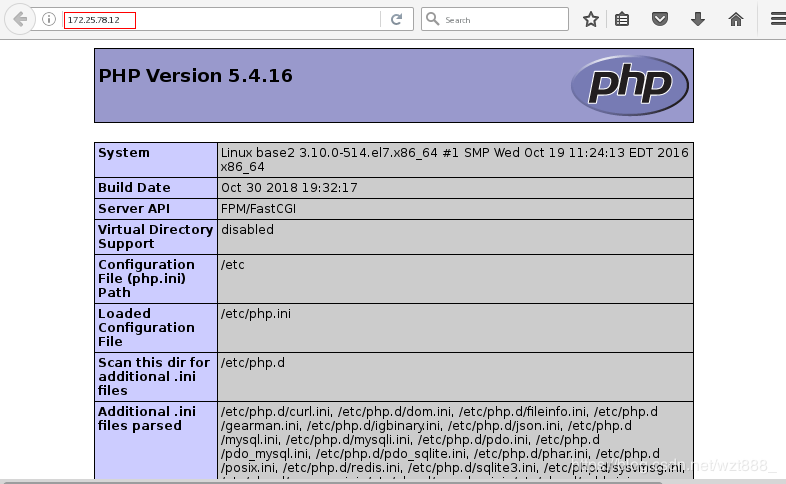
# php配置成功
[root@server1 html]# vim index.php # 重新编写php页面,把redis服务器和mysql服务器建立练习
<?php
$redis = new Redis();
$redis->connect('172.25.78.13',6379) or die ("could net connect redis server"); # 这是redis服务器
# $query = "select * from test limit 9";
$query = "select * from test";
for ($key = 1; $key < 10; $key++)
{
if (!$redis->get($key))
{
$connect = mysql_connect('172.25.78.14','redis','redhat'); # 这是数据库服务器,用户以及密码
mysql_select_db(test);
$result = mysql_query($query);
//如果没有找到$key,就将该查询sql的结果缓存到redis
while ($row = mysql_fetch_assoc($result))
{
$redis->set($row['id'],$row['name']);
}
$myserver = 'mysql';
break;
}
else
{
$myserver = "redis";
$data[$key] = $redis->get($key);
}
}
echo $myserver;
echo "<br>";
for ($key = 1; $key < 10; $key++)
{
echo "number is <b><font color=#FF0000>$key</font></b>";
echo "<br>";
echo "name is <b><font color=#FF0000>$data[$key]</font></b>";
echo "<br>";
}
# 2.redis服务端
[root@base3 ~]# tar zxf redis-5.0.3.tar.gz
[root@base3 ~]# cd redis-5.0.3
[root@base3 redis-5.0.3]# yum install gcc -y
[root@base3 redis-5.0.3]# make && make install
[root@base3 redis-5.0.3]# cd utils/
[root@base3 utils]# ./install_server.sh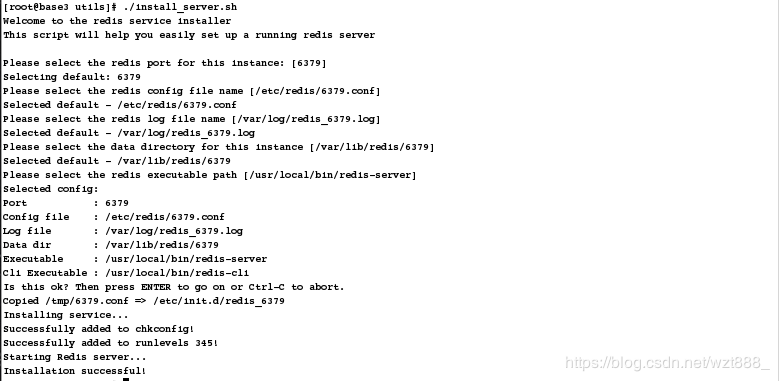
[root@base3 utils]# vim /etc/redis/6379.conf
70 bind 0.0.0.0
[root@base3 ~]# systemctl restart redis_6379
[root@base3 ~]# redis-cli
127.0.0.1:6379> info replication
[root@base3 ~]# netstat -antlp 
# 3.mysql服务端
[root@base4 ~]# yum install -y mariadb-server
[root@base4 ~]# systemctl start mariadb
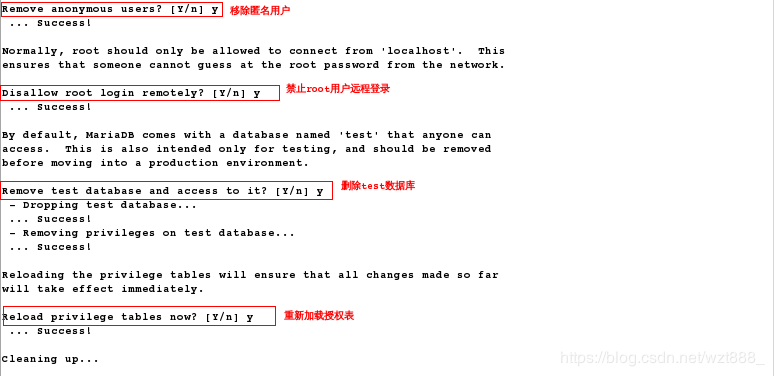
[root@base4 ~]# mysql_secure_installation 
[root@base4 ~]# mysql -p
Enter password:
MariaDB [(none)]> show databases;
MariaDB [(none)]> create database test;
MariaDB [(none)]> grant all on test.* to redis@'%' identified by 'redhat';
MariaDB [(none)]> flush privileges;
MariaDB [(none)]> quit
Bye
[root@base4 ~]# vim test.sql
use test;
CREATE TABLE `test` (`id` int(7) NOT NULL AUTO_INCREMENT, `name` char(8) DEFAULT NULL, PRIMARY KEY (`id`)) ENGINE=InnoDB DEFAULT CHARSET=utf8; # 在test数据库里创建表
INSERT INTO `test` VALUES (1,'test1'),(2,'test2'),(3,'test3'),(4,'test4'),(5,'test5'),(6,'test6'),(7,'test7'),(8,'test8'),(9,'test9'); # 给表里添加内容
[root@base4 ~]# mysql -predhat < test.sql
[root@base4 ~]# mysql -p
Enter password:
MariaDB [(none)]> select * from test.test;
# 测试:
这是mysql服务器通过php页面利用redis缓存来显示数据库中的内容
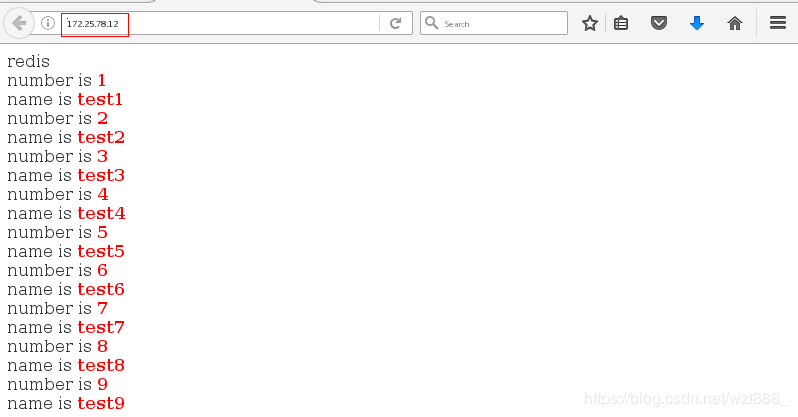
# 但是有一个问题,mysql更新后,redis无法同步
MariaDB [(none)]> use test;
MariaDB [test]> update test set name='lala' where id=1;
MariaDB [test]> select * from test.test;
[root@base3 ~]# redis-cli # 发现redis服务器并没有同步mysql上的数据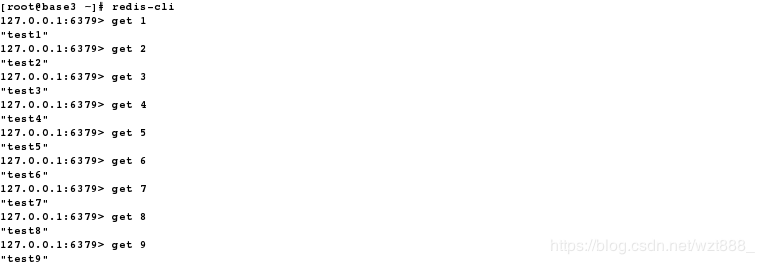
2.gearman 实现redis和mysql的数据同步
Gearman 是一个支持分布式的任务分发框架:
Gearman Job Server: Gearman 核心程序,需要编译安装并以守护进程形式运行在后台。
Gearman Client:可以理解为任务的请求者。
Gearman Worker:任务的真正执行者,一般需要自己编写具体逻辑并通过守护进程方式
运行,Gearman Worker 接收到 Gearman Client 传递的任务内容后,会按顺序处理。
大致流程:下面要编写的 mysql 触发器,就相当于 Gearman 的客户端。修改表,插入表就相当于直接
下发任务。然后通过 lib_mysqludf_json UDF 库函数将关系数据映射为 JSON 格式,然后
在通过 gearman-mysql-udf 插件将任务加入到 Gearman 的任务队列中,最后通过
[root@base2 ~]# systemctl start gearmand
[root@base2 ~]# netstat -antlp
安装 php 的 gearman 扩展,安装 lib_mysqludf_json,lib_mysqludf_json UDF 库函数将关系数据映射为 JSON 格式。通常,数据库中的数据映射为 JSON 格式,是通过程序来转换的。
[root@base4 ~]# ls
lib_mysqlud_json-master.zip
[root@base4 ~]# yum install -y unzip
[root@base4 ~]# unzip lib_mysqludf_json-master.zip
[root@base4 ~]# cd lib_mysqludf_json-master
[root@base4 lib_mysqludf_json-master]# yum install -y gcc
[root@base4 lib_mysqludf_json-master]# yum list mariadb-devel
[root@base4 lib_mysqludf_json-master]# yum install -y mariadb-devel.x86_64
[root@base4 lib_mysqludf_json-master]# gcc $(mysql_config --cflags) -shared -fPIC -o lib_mysqludf_json.so lib_mysqludf_json.c
[root@base4 ~]# cp lib_mysqludf_json-master/lib_mysqludf_json.so /usr/lib64/mysql/plugin/
[root@base4 lib_mysqludf_json-master]# cd /usr/lib64/mysql/
[root@base4 ~]# cd /usr/lib64/mysql/plugin/
[root@base4 plugin]# mysql -p
Enter password:
MariaDB [(none)]> show global variables like 'plugin_dir'; # 查看 mysql 的模块目录:
MariaDB [(none)]> CREATE FUNCTION json_object RETURNS STRING SONAME 'lib_mysqludf_json.so'; # 注册 UDF 函数
MariaDB [(none)]> select * from mysql.func;
MariaDB [(none)]> quit
Bye
# 安装 gearman-mysql-udf,这个插件是用来管理调用 Gearman 的分布式的队列。
[root@base4 ~]# ls
gearman-mysql-udf-0.6.tar.gz
[root@base4 ~]# cd gearman-mysql-udf-0.6
[root@base4 gearman-mysql-udf-0.6]# ./configure --with-mysql=/usr/bin/mysql_config --libdir=/usr/lib64/mysql/plugin/ # 有报错,依赖性没解决完
[root@base4 gearman-mysql-udf-0.6]# cd
[root@base4 ~]# yum install -y libgearman-devel-1.1.12-18.el7.x86_64.rpm libevent-devel-2.0.21-4.el7.x86_64.rpm libgearman-1.1.12-18.el7.x86_64.rpm # 解决依赖性
[root@base4 ~]# cd gearman-mysql-udf-0.6
[root@base4 gearman-mysql-udf-0.6]# ./configure --with-mysql=/usr/bin/mysql_config --libdir=/usr/lib64/mysql/plugin/
[root@base4 gearman-mysql-udf-0.6]# make && make install
[root@base4 gearman-mysql-udf-0.6]# mysql -p
Enter password:
# 注册 UDF 函数
MariaDB [(none)]> CREATE FUNCTION gman_do_background RETURNS STRING SONAME 'libgearman_mysql_udf.so';
MariaDB [(none)]> CREATE FUNCTION gman_servers_set RETURNS STRING SONAME 'libgearman_mysql_udf.so';
MariaDB [(none)]> select * from mysql.func; # 查看函数
MariaDB [(none)]> SELECT gman_servers_set('172.25.78.12:4730'); # 指定 gearman 的服务信息
mysql> Bye
# 编写 mysql 触发器(根据实际情况编写)
[root@base4 gearman-mysql-udf-0.6]# cd
[root@base4 ~]# vim test.sql
use test;
DELIMITER $$
CREATE TRIGGER datatoredis AFTER UPDATE ON test FOR EACH ROW BEGIN
SET @RECV=gman_do_background('syncToRedis', json_object(NEW.id as `id`, NEW.name as `name`));
END$$
DELIMITER ;
[root@base4 ~]# mysql -predhat < test.sql
[root@base4 ~]# mysql -p
Enter password:
MariaDB [(none)]> SHOW TRIGGERS FROM test\G; # 查看触发器
# 在base2上,编写 gearman 的 worker 端
[root@base2 ~]# cd /usr/local/
[root@base2 local]# vim worker.php
<?php
$worker = new GearmanWorker();
$worker->addServer();
$worker->addFunction('syncToRedis', 'syncToRedis');
$redis = new Redis();
$redis->connect('172.25.78.13', 6379);
while($worker->work());
function syncToRedis($job)
{
global $redis;
$workString = $job->workload();
$work = json_decode($workString);
if(!isset($work->id)){
return false;
}
$redis->set($work->id, $work->name);
# 这条语句就是将 id 作 KEY 和name 作 VALUE 分开存储,需要和前面写的 php 测试代码的存取一致。
}
?>
[root@base2 ~]# nohup php /usr/local/worker.php &> /dev/null &
3.测试:
# 在mysql端(base4)更新 mysql 中的数据
MariaDB [test]> update test set name='lala' where id=1;
MariaDB [test]> update test set name='lala' where id=2;
MariaDB [test]> update test set name='lala' where id=3;
MariaDB [test]> select * from test;
# 在redis端(base3)查看是否同步成功
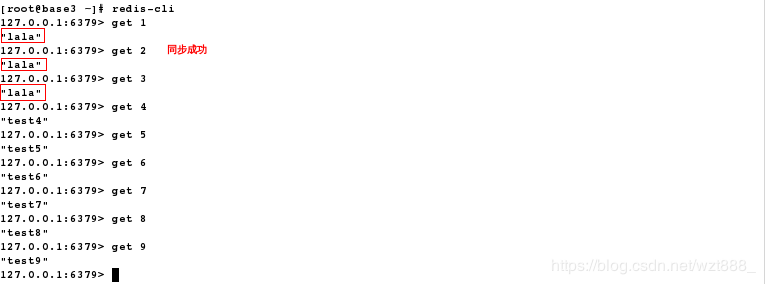
# 刷新测试页面数据同步

redis实现mysql的数据缓存的更多相关文章
- 用Redis作为Mysql数据库的缓存【转】
用Redis作Mysql数据库缓存,必须解决2个问题.首先,应该确定用何种数据结构存储来自Mysql的数据:在确定数据结构之后,还要考虑用什么标识作为该数据结构的键. 直观上看,Mysql中的数据都是 ...
- redis和mySql的数据同步的解析
1.同步MySQL数据到Redis (1) 在redis数据库设置缓存时间,当该条数据缓存时间过期之后自动释放,去数据库进行重新查询,但这样的话,我们放在缓存中的数据对数据的一致性要求不是很高才能放入 ...
- springboot(12)Redis作为SpringBoot项目数据缓存
简介: 在项目中设计数据访问的时候往往都是采用直接访问数据库,采用数据库连接池来实现,但是如果我们的项目访问量过大或者访问过于频繁,将会对我们的数据库带来很大的压力.为了解决这个问题从而redis数据 ...
- redis(三)--用Redis作为Mysql数据库的缓存
把MySQL结果集缓存到Redis的字符串或哈希结构中以后,我们面临一个新的问题,即如何为这些字符串或哈希命名,也就是如何确定它们的键.因为这些数据结构所对应的行都属于某个结果集,假如可以找到一种唯一 ...
- 使用Redis进行简单的数据缓存
引入spring-data-redis包.jedis.connection-pool包 applicationContext.xml的配置 <!-- redis Connection --> ...
- Azure技术系列之Redis篇---第一章数据缓存
嘈杂和忙碌的生活占据占据了生活的每一天,好久没有静下心来对自己喜欢的技术进行归纳总结了.痛定思痛,今天开始开荒,把之前研究的技术进行归纳总结,先从Azure的Redis的开发技术开始. Azure 的 ...
- 用Redis作为Mysql数据库的缓存
看到一篇不错的博文,记录下: http://blog.csdn.net/qtyl1988/article/details/39553339 http://blog.csdn.net/qtyl1988/ ...
- redis作为mysql的缓存服务器(读写分离,通过mysql触发器实现数据同步)
一.redis简介Redis是一个key-value存储系统.和Memcached类似,为了保证效率,数据都是缓存在内存中.区别的是redis会周期性的把更新的数据写入磁盘或者把修改操作写入追加的记录 ...
- 在这个应用中,我使用了 MQ 来处理异步流程、Redis 缓存热点数据、MySQL 持久化数据,还有就是在系统中调用另外一个业务系统的接口,对我的应用来说这些都是属于 RPC 调用,而 MQ、MySQL 持久化的数据也会存在于一个分布式文件系统中,他们之间的调用也是需要用 RPC 来完成数据交互的。
在这个应用中,我使用了 MQ 来处理异步流程.Redis 缓存热点数据.MySQL 持久化数据,还有就是在系统中调用另外一个业务系统的接口,对我的应用来说这些都是属于 RPC 调用,而 MQ.MySQ ...
随机推荐
- [Err] 1055 - Expression #1 of ORDER BY clause is not in GROUP BY clause and contains nonaggregated column 'information_schema.PROFILING.SEQ'
在Navicat Premium中执行Mysql的一条删除语句,虽然执行成功了,却提示已下错误: 受影响的行: 时间: .005s of ORDER BY clause is not in GROUP ...
- 14、VUE服务器渲染
1.HTML的渲染方式 1.1. 浏览器本地渲染 这种方式不会被搜索引擎获取内容,所以不利于网站的推广. 因为浏览器本地渲染是页面js通过发送ajax请求获取后台的json数据,然后生成页面内容. 爬 ...
- Web API 2 的操作结果
这是msdn原文文档!明天用,留存. Web API 控制器操作可以返回以下任何内容: void HttpResponseMessage IHttpActionResult 其他类型 根据返回的这种情 ...
- ListView 根据 文件路径 或 扩展名 显示系统文件图标
private void 获取文件button1_Click(object sender, EventArgs e) { folderBrowserDialog1 ...
- 【翻译】Tusdotnet中文文档(3)自定义功能和相关技术
自定义功能和相关技术 本篇按照如下结构翻译 自定义功能 自定义数据仓库 相关技术 架构和总体概念 自定义数据仓库 tusdotnet附带一个存储库TusDiskStore,它将文件保存在磁盘上的一个目 ...
- Go函数篇
1 定义格式 函数构成代码执行的逻辑结构.在Go语言中,函数的基本组成为:关键字func.函数名.参数列表.返回值.函数体和返回语句. Go 语言函数定义格式如下: func FuncName(/*参 ...
- istio流量管理
目录 1 准备工作 1.1 在k8s部署istio 1.2 istio自动注入 1.3 应用部署要求 2 负载均衡 3 流量迁移:金丝雀发布 3.1 发布应用 3.2 创建目标规则:Destinati ...
- spark源码解析--Shuffle输出追踪者--MapOutputTracker
Shuffle输出追踪者--MapOutputTracker 这个组件作为shuffle的一个辅助组件,在整个shuffle模块中具有很重要的作用.我们在前面一系列的分析中,或多或少都会提到这个组件, ...
- 浅谈Vue.js2.0核心思想
Vue.js是一个提供MVVM数据双向绑定的库,专注于UI层面,核心思想是:数据驱动.组件系统. 数据驱动: Vue.js数据观测原理在技术实现上,利用的是ES5Object.defineProper ...
- FileReader生成图片dataurl的分析
目录 相关代码及html(来源:百度百科) File API及FileReader简介 结合补充知识进行代码分析 修改尝试: 拖曳图片到网页完成转换 相关代码及html(来源:百度百科) <!D ...
