Linux的桌面虚拟化技术KVM(一)——新建KVM虚拟机
(1).虚拟化产品对比介绍
虚拟化技术有以下三种:仿真虚拟化,这是一种对系统硬件没有要求,但性能最低的虚拟化技术;半虚拟化,这是一种直接使用物理硬件,性能高,但需要修改内核的虚拟化技术;全虚拟化,这是一种直接使用物理硬件,性能高的虚拟化技术。
VMware支持仿真虚拟化,xen支持半虚拟化,KVM支持全虚拟化。其中VMware安装在Windows上,支持虚拟机系统与物理机系统不同;xen在REHL5中自带,安装时需要安装内核kernel-xen,只支持与物理机一样的操作系统;KVM在REHL6中自带,支持虚拟机系统与物理机系统不同。
KVM全称Kernel-based Virtual Machine,中文名基于内核的虚拟机,是一个开源的系统虚拟化模块,自Linux 2.6.20之后集成在 之后集成在Linux的各个主要发行版本中,是第一个整合到Linux内核的虚拟化技术。它使用 Linux自身的调度器进行管理,所以相对于Xen,其核心源码很少。KVM目前已成为学术界的主流 VMM(虚拟机监控器 )之一。KVM的虚拟化需要硬件支持(如Intel VT技术或者AMD V技术 )。是基于硬件的完全虚拟化。而Xen早期则是基于软件模拟的Para-Virtualization。在KVM模型中,每一个虚拟机都是一个由Linux调度程序管理的标准进程,你可以在用户空间启动客户机操作系统。另外,一个普通的 Linux 进程有两种运行模式:内核和用户。KVM增加了第三种模式:客户模式(有自己的内核和用户模式)。
扩展:QEMU
QEMU和vmware一样都是支持仿真虚拟化,但效率比较低。它是一套由Fabrice Bellard所编写的以GPL许可证分发源码的模拟处理器,在GNU/Linux平台上使用广泛。QEMU具有高速度和跨平台的特性,QEMU能模拟至接近真实电脑的速度。
(2).安装KVM前的准备
由于我是在VMware里的CentOS7中安装KVM,首先需要确保系统是64位的。
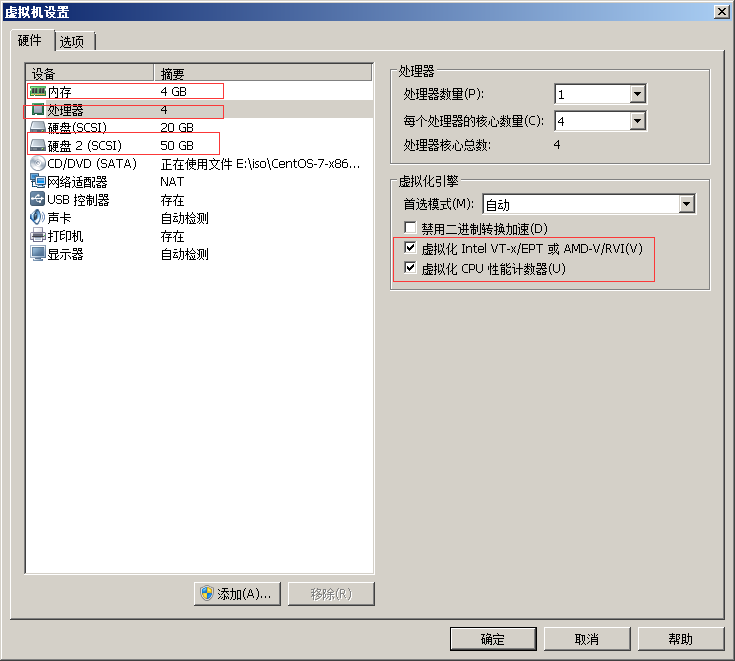
其次虚拟机设置,内存需要调大一点(我这里给的是4G),处理器核心数也多一点(我这里给到了物理核心数),处理器中还要开启虚拟化Intel VT-x/EPT或AMD-V/RVI,以及虚拟化CPU性能计数器(官方说明:如果您打算使用性能监控应用程序(如 VTune 或 OProfile)优化或调试虚拟机中运行的软件,可以打开此功能),最后加一块硬盘(我给的是50G)
VMware官方文档:https://docs.vmware.com/cn/VMware-Workstation-Pro/index.html
以上做完后登录系统,如果是Intel的CPU可以使用cat /proc/cpuinfo | grep --color vmx命令查看CPU是否支持全虚拟化,如果是AMD的CPU可以使用cat /proc/cpuinfo | grep --color svm命令查看CPU是否支持全虚拟化。如果是物理机也可以通过上网查找CPU型号来查看是否支持全虚拟化。
[root@youxi1 ~]# cat /proc/cpuinfo | grep --color vmx

flags           : fpu vme de pse tsc msr pae mce cx8 apic sep mtrr pge mca cmov pat pse36 clflush dts mmx fxsr sse sse2 ss ht syscall nx rdtscp lm constant_tsc arch_perfmon pebs bts nopl xtopology tsc_reliable nonstop_tsc aperfmperf pni pclmulqdq vmx ssse3 cx16 pcid sse4_1 sse4_2 x2apic popcnt tsc_deadline_timer aes xsave avx f16c rdrand hypervisor lahf_lm epb tpr_shadow vnmi ept vpid fsgsbase tsc_adjust smep dtherm ida arat pln pts

flags           : fpu vme de pse tsc msr pae mce cx8 apic sep mtrr pge mca cmov pat pse36 clflush dts mmx fxsr sse sse2 ss ht syscall nx rdtscp lm constant_tsc arch_perfmon pebs bts nopl xtopology tsc_reliable nonstop_tsc aperfmperf pni pclmulqdq vmx ssse3 cx16 pcid sse4_1 sse4_2 x2apic popcnt tsc_deadline_timer aes xsave avx f16c rdrand hypervisor lahf_lm epb tpr_shadow vnmi ept vpid fsgsbase tsc_adjust smep dtherm ida arat pln pts

flags           : fpu vme de pse tsc msr pae mce cx8 apic sep mtrr pge mca cmov pat pse36 clflush dts mmx fxsr sse sse2 ss ht syscall nx rdtscp lm constant_tsc arch_perfmon pebs bts nopl xtopology tsc_reliable nonstop_tsc aperfmperf pni pclmulqdq vmx ssse3 cx16 pcid sse4_1 sse4_2 x2apic popcnt tsc_deadline_timer aes xsave avx f16c rdrand hypervisor lahf_lm epb tpr_shadow vnmi ept vpid fsgsbase tsc_adjust smep dtherm ida arat pln pts

flags           : fpu vme de pse tsc msr pae mce cx8 apic sep mtrr pge mca cmov pat pse36 clflush dts mmx fxsr sse sse2 ss ht syscall nx rdtscp lm constant_tsc arch_perfmon pebs bts nopl xtopology tsc_reliable nonstop_tsc aperfmperf pni pclmulqdq vmx ssse3 cx16 pcid sse4_1 sse4_2 x2apic popcnt tsc_deadline_timer aes xsave avx f16c rdrand hypervisor lahf_lm epb tpr_shadow vnmi ept vpid fsgsbase tsc_adjust smep dtherm ida arat pln pts

[root@youxi1 ~]# cat /proc/cpuinfo | grep --color svm
在确认CPU支持虚拟化之后,进入BIOS界面开启虚拟化支持,一般在设置或高级设置里面,找找有没有虚拟技术(Virtual Technology)。
(3).安装KVM
配置本地系统镜像yum源(详见:配置本地yum源)和阿里云yum源,本地系统镜像yum源只需要临时挂载即可
wget -O /etc/yum.repos.d/CentOS-Base.repo http://mirrors.aliyun.com/repo/Centos-7.repo  //基础源

wget -O /etc/yum.repos.d/epel.repo http://mirrors.aliyun.com/repo/epel-7.repo  //epel源

yum clean all  //清空yum缓存

yum list  //根据新的yum源重新缓存
安装KVM模块、管理工具和虚拟化服务,并启动
[root@youxi1 ~]# yum -y install qemu-kvm virt-install virt-manager libvirt libguestfs-tools libvirt-python

[root@youxi1 ~]# systemctl start libvirtd

[root@youxi1 ~]# systemctl is-enabled libvirtd  //安装完成后,默认开机自启,如果显示disable请手动设置

enabled

[root@youxi1 ~]# ip a sh

1: lo: <LOOPBACK,UP,LOWER_UP> mtu 65536 qdisc noqueue state UNKNOWN group default qlen 1000

    link/loopback 00:00:00:00:00:00 brd 00:00:00:00:00:00

    inet 127.0.0.1/8 scope host lo

       valid_lft forever preferred_lft forever

    inet6 ::1/128 scope host

       valid_lft forever preferred_lft forever

2: ens33: <BROADCAST,MULTICAST,UP,LOWER_UP> mtu 1500 qdisc pfifo_fast state UP group default qlen 1000

    link/ether 00:0c:29:e6:d6:27 brd ff:ff:ff:ff:ff:ff

    inet 192.168.5.101/24 brd 192.168.5.255 scope global noprefixroute ens33

       valid_lft forever preferred_lft forever

    inet6 fe80::201:7257:85b:7dc8/64 scope link noprefixroute

       valid_lft forever preferred_lft forever

3: virbr0: <NO-CARRIER,BROADCAST,MULTICAST,UP> mtu 1500 qdisc noqueue state DOWN group default qlen 1000

    link/ether 52:54:00:4b:93:10 brd ff:ff:ff:ff:ff:ff

    inet 192.168.122.1/24 brd 192.168.122.255 scope global virbr0

       valid_lft forever preferred_lft forever

4: virbr0-nic: <BROADCAST,MULTICAST> mtu 1500 qdisc pfifo_fast master virbr0 state DOWN group default qlen 1000

    link/ether 52:54:00:4b:93:10 brd ff:ff:ff:ff:ff:ff
说明:qemu-kvm,KVM主程序,KVM虚拟化模块;virt-install,安装虚拟机的工具;virt-manager,KVM图形化管理工具;libvirt,虚拟化服务;libguestfs-tools,虚拟机的系统管理工具;libvirt-python,python调用libvirt虚拟化服务的api接口库文件。
启动libvirtd后,会出现一块virbr0网卡,IP地址默认192.168.122.1/24。
(4).配置KVM网络桥接功能
我们经常所说的Bridge设备其实就是网桥设备,也就相当于现在的二层交换机,用于连接同一网段内的所有机器,所以我们的目的就是将网络设备ens33添加到br0,此时br0就成为了所谓的交换机设备,我们物理机的ens33也是连接在上面的。
安装网桥设备工具,并进行配置
[root@youxi1 ~]# yum -y install bridge-utils

[root@youxi1 ~]# cp /etc/sysconfig/network-scripts/ifcfg-ens33 .  //备份

[root@youxi1 ~]# ls

anaconda-ks.cfg  ifcfg-ens33

[root@youxi1 ~]# vim /etc/sysconfig/network-scripts/ifcfg-ens33

#IPADDR="192.168.5.101"

#PREFIX="24"

#GATEWAY="192.168.5.2"

#DNS1="192.168.5.2"

BRIDGE="br0"  //添加

[root@youxi1 ~]# vim /etc/sysconfig/network-scripts/ifcfg-br0  //新建网桥配置文件

DEVICE="br0"

NM_CONTROLLED="yes"

ONBOOT="yes"

TYPE="Bridge"  //Bridge开头的B必须大写

BOOTPROTO=none

IPADDR=192.168.5.101  //需要与ens33注释的信息一致

NETMASK=255.255.255.0

GATEWAY=192.168.5.2

DNS1=192.168.5.2
重启网络,并进行查看
[root@youxi1 ~]# systemctl restart network

[root@youxi1 ~]# ip a sh

1: lo: <LOOPBACK,UP,LOWER_UP> mtu 65536 qdisc noqueue state UNKNOWN group default qlen 1000

    link/loopback 00:00:00:00:00:00 brd 00:00:00:00:00:00

    inet 127.0.0.1/8 scope host lo

       valid_lft forever preferred_lft forever

    inet6 ::1/128 scope host

       valid_lft forever preferred_lft forever

2: ens33: <BROADCAST,MULTICAST,UP,LOWER_UP> mtu 1500 qdisc pfifo_fast master br0 state UP group default qlen 1000

    link/ether 00:0c:29:e6:d6:27 brd ff:ff:ff:ff:ff:ff

3: virbr0: <NO-CARRIER,BROADCAST,MULTICAST,UP> mtu 1500 qdisc noqueue state DOWN group default qlen 1000

    link/ether 52:54:00:4b:93:10 brd ff:ff:ff:ff:ff:ff

    inet 192.168.122.1/24 brd 192.168.122.255 scope global virbr0

       valid_lft forever preferred_lft forever

4: virbr0-nic: <BROADCAST,MULTICAST> mtu 1500 qdisc pfifo_fast master virbr0 state DOWN group default qlen 1000

    link/ether 52:54:00:4b:93:10 brd ff:ff:ff:ff:ff:ff

5: br0: <BROADCAST,MULTICAST,UP,LOWER_UP> mtu 1500 qdisc noqueue state UP group default qlen 1000

    link/ether 00:0c:29:e6:d6:27 brd ff:ff:ff:ff:ff:ff

    inet 192.168.5.101/24 brd 192.168.5.255 scope global noprefixroute br0

       valid_lft forever preferred_lft forever

    inet6 fe80::20c:29ff:fee6:d627/64 scope link

       valid_lft forever preferred_lft forever

[root@youxi1 ~]# ping www.baidu.com  //测试网络是否正常

PING www.a.shifen.com (180.101.49.12) 56(84) bytes of data.

64 bytes from 180.101.49.12 (180.101.49.12): icmp_seq=1 ttl=128 time=7.59 ms

64 bytes from 180.101.49.12 (180.101.49.12): icmp_seq=2 ttl=128 time=6.06 ms

64 bytes from 180.101.49.12 (180.101.49.12): icmp_seq=3 ttl=128 time=6.30 ms

^C

--- www.a.shifen.com ping statistics ---

3 packets transmitted, 3 received, 0% packet loss, time 2005ms

rtt min/avg/max/mdev = 6.062/6.652/7.594/0.679 ms
(5).创建一台虚拟机
KVM可以直接使用命令创建虚拟机,也可以在图形用户界面创建虚拟机,不过一般会直接使用命令安装,因为比较节省资源。
不过在那之前,首先需要将sdb进行分区,格式化并挂载。
[root@youxi1 ~]# fdisk /dev/sdb  //新建分区

欢迎使用 fdisk (util-linux 2.23.2)。

更改将停留在内存中,直到您决定将更改写入磁盘。

使用写入命令前请三思。

Device does not contain a recognized partition table

使用磁盘标识符 0x5ddf8670 创建新的 DOS 磁盘标签。

命令(输入 m 获取帮助):n

Partition type:

   p   primary (0 primary, 0 extended, 4 free)

   e   extended

Select (default p): p

分区号 (1-4,默认 1):

起始 扇区 (2048-104857599,默认为 2048):

将使用默认值 2048

Last 扇区, +扇区 or +size{K,M,G} (2048-104857599,默认为 104857599):

将使用默认值 104857599

分区 1 已设置为 Linux 类型,大小设为 50 GiB

命令(输入 m 获取帮助):w

The partition table has been altered!

Calling ioctl() to re-read partition table.

正在同步磁盘。

[root@youxi1 ~]# mkfs.xfs /dev/sdb1  //格式化

meta-data=/dev/sdb1              isize=512    agcount=4, agsize=3276736 blks

         =                       sectsz=512   attr=2, projid32bit=1

         =                       crc=1        finobt=0, sparse=0

data     =                       bsize=4096   blocks=13106944, imaxpct=25

         =                       sunit=0      swidth=0 blks

naming   =version 2              bsize=4096   ascii-ci=0 ftype=1

log      =internal log           bsize=4096   blocks=6399, version=2

         =                       sectsz=512   sunit=0 blks, lazy-count=1

realtime =none                   extsz=4096   blocks=0, rtextents=0

[root@youxi1 ~]# mount /dev/sdb1 /var/lib/libvirt/images/  //挂载

[root@youxi1 ~]# blkid  //查看sdb1的UUID

/dev/sda1: UUID="037d87f8-b6dd-426c-9d71-7ce5ec0d4103" TYPE="xfs"

/dev/sda2: UUID="qryeOm-pb2K-SeE0-10tR-0jSL-x15s-4yI6cl" TYPE="LVM2_member"

/dev/sdb1: UUID="771ee3b3-ba49-49bc-b3be-3736a329f532" TYPE="xfs"

/dev/sr0: UUID="2018-05-03-20-55-23-00" LABEL="CentOS 7 x86_64" TYPE="iso9660" PTTYPE="dos"

/dev/mapper/vg1-root: UUID="dffa058f-4c86-480b-8ff9-bfe973f7ca95" TYPE="xfs"

/dev/mapper/vg1-swap: UUID="289bf00b-3804-4b11-8c8d-1dc964fc3a8b" TYPE="swap"

[root@youxi1 ~]# echo "UUID=771ee3b3-ba49-49bc-b3be-3736a329f532 /var/lib/libvirt/images/ xfs defaults 0 0" >> /etc/fstab
1)图形界面新建虚拟机
首先确保有图形界面,没有的使用如下命令进行安装。在安装过程的同时,可以上传一个系统镜像
[root@youxi1 ~]# yum -y groupinstall "GNOME Desktop"

//如果遇到如下错误,请使用下面的升级包命令

Transaction check error:

file /boot/efi/EFI/centos from install of fwupdate-efi-12-5.el7.centos.x86_64 conflicts with file from package grub2-common-1:2.02-0.65.el7.centos.2.noarch

[root@youxi1 ~]# yum -y upgrade  //该命令升级所有包,但不改变软件和系统设置,内核不变

//接着重新安装图形界面

[root@youxi1 ~]# yum -y groupinstall "GNOME Desktop"

[root@youxi1 ~]# init 5  //转到图形化界面
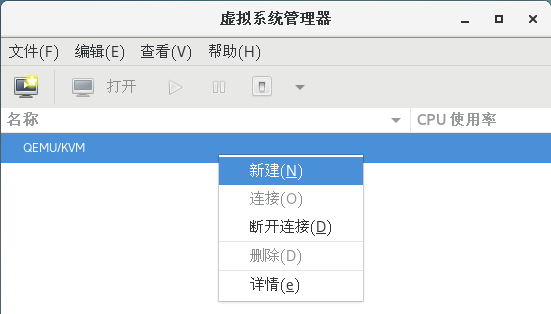
然后经过一系列的设置,注销新建的用户,回到root用户下总算可以开始新建虚拟机了。使用命令virt-manager调出虚拟系统管理器,当然也可以在应用程序-->系统工具-->虚拟系统管理器来调出。

选中QEMU/KVM,右键新建
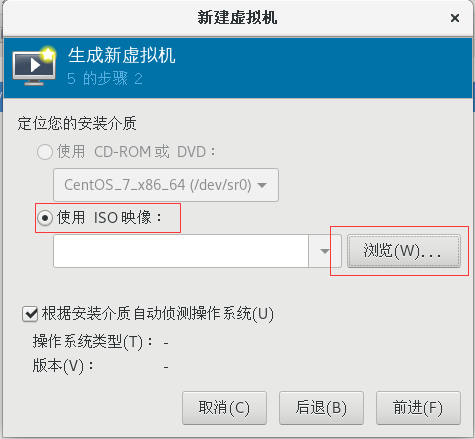
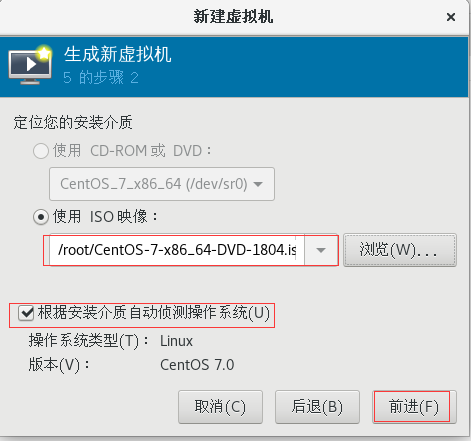
接着出现如下界面,选择本地安装介质,前进(Next)

使用ISO映像,点击浏览
会出现一个新的界面,点击本地浏览
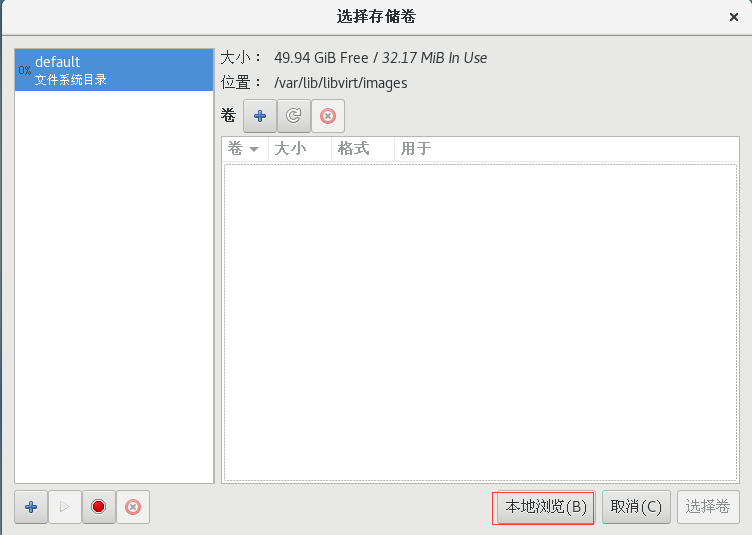
找到上传的ISO位置,最后点击打开即可

此时又会回到之前的“使用ISO映像”的页面,点击前进。如果是在/root/目录下会提示可能没有权限
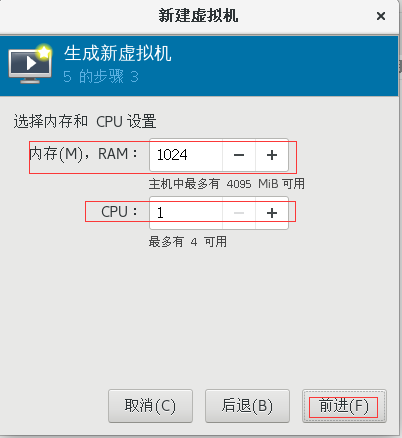
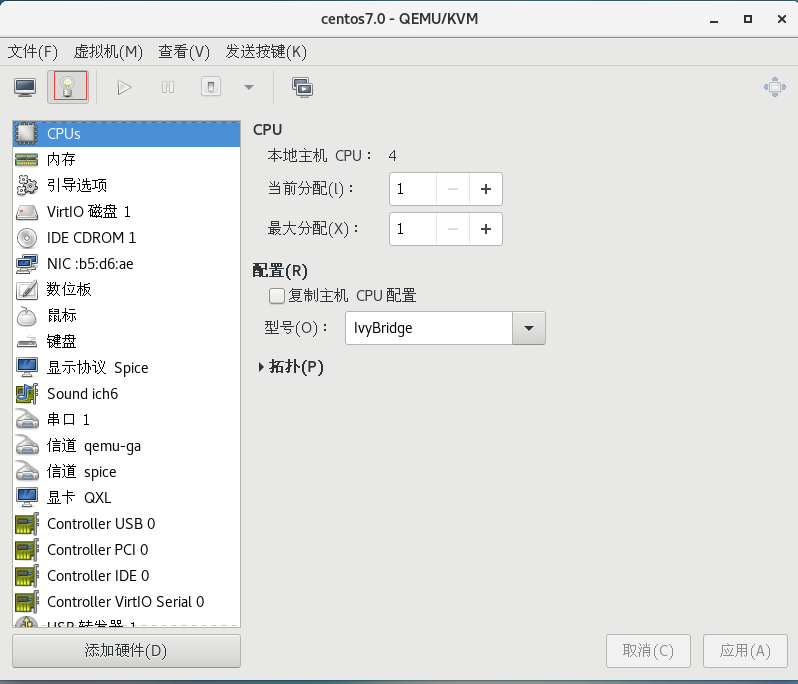
设置内存和CPU,然后点击前进
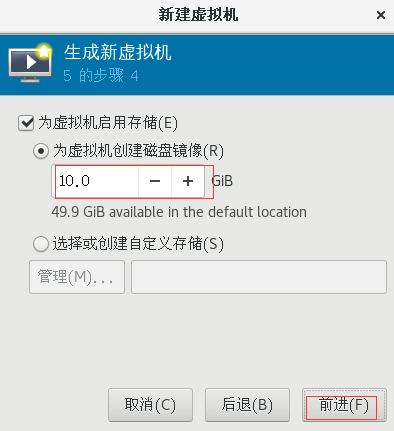
设置硬盘大小,前进
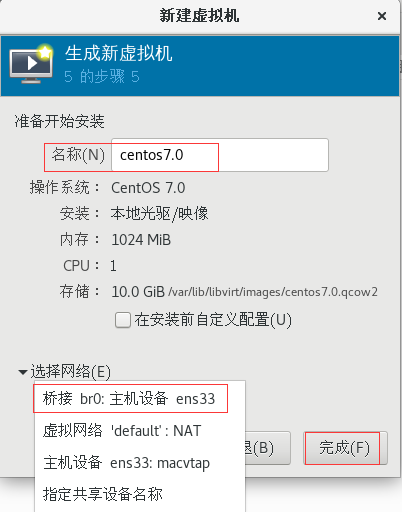
设置虚拟机名称,选择网络,完成
最后会跳出一个CentOS7的安装界面,正常安装即可。
在这个界面的菜单栏下方,小灯泡标志就是设置界面。
2)字符界面新建虚拟机
在安装前,请先看(6).扩展。我看了很多都是伪字符界面安装,都是用的VNC安装,找了一段时间看到了这位大佬的文章:https://blog.csdn.net/qeeezz11224/article/details/84575910
可以在新建KVM虚拟机之前使用命令指定虚拟机存储格式,最常见的是qemu-img命令。
使用virt-install新建一个KVM虚拟机。注意:由于我是复制下来的,所以看到的设置菜单的格式会有问题,大概看看,很简单的。感叹号!表示有问题,需要修改或等待刷新根据下方提示进行操作。
[root@youxi1 ~]# virt-install --virt-type kvm \

--name centos75 \

--vcpus 1 \

--memory 1024 \

--location /root/CentOS-7-x86_64-DVD-1804.iso \

--disk /var/lib/libvirt/images/centos75.img,size=10 \

--network bridge=br0 \

--graphics none \

--extra-args='console=ttyS0' \

--force

......

//中间跑一段时间,出现第一个界面

Installation

1) [x] Language settings 2) [!] Time settings

(English (United States)) (Timezone is not set.)

3) [!] Installation source 4) [!] Software selection

(Processing...) (Processing...)

5) [!] Installation Destination 6) [x] Kdump

(No disks selected) (Kdump is enabled)

7) [ ] Network configuration 8) [!] Root password

(Not connected) (Password is not set.)

9) [!] User creation

(No user will be created)

Please make your choice from above ['q' to quit | 'b' to begin installation |

'r' to refresh]:1  //光标是在这个位置,输入1设置语言,<Enter>回车

[anaconda] 1:main* 2:shell 3:log 4:storage-lo> Switch tab: Alt+Tab | Help: F1

//出现如下页面

================================================================================

================================================================================

Language settings

Available languages

1) Afrikaans 25) Hindi 48) Oriya

2) Amharic 26) Croatian 49) Punjabi

3) Arabic 27) Hungarian 50) Polish

4) Assamese 28) Interlingua 51) Portuguese

5) Asturian 29) Indonesian 52) Romanian

6) Belarusian 30) Icelandic 53) Russian

7) Bulgarian 31) Italian 54) Sinhala

8) Bengali 32) Japanese 55) Slovak

9) Bosnian 33) Georgian 56) Slovenian

10) Catalan 34) Kazakh 57) Albanian

11) Czech 35) Kannada 58) Serbian

12) Welsh 36) Korean 59) Swedish

13) Danish 37) Lithuanian 60) Tamil

14) German 38) Latvian 61) Telugu

15) Greek 39) Maithili 62) Tajik

16) English 40) Macedonian 63) Thai

17) Spanish 41) Malayalam 64) Turkish

18) Estonian 42) Marathi 65) Ukrainian

19) Basque 43) Malay 66) Urdu

20) Persian 44) Norwegian Bokmål 67) Vietnamese

21) Finnish 45) Nepali 68) Chinese

22) French 46) Dutch 69) Zulu

Press ENTER to continue  //没显示完,<Enter>回车一下

23) Galician 47) Northern Sotho

24) Gujarati

[b to return to language list, c to continue, q to quit]:68  //输入68中文,<Enter>回车

[anaconda] 1:main* 2:shell 3:log 4:storage-lo> Switch tab: Alt+Tab | Help: F1

//出现如下页面

================================================================================

================================================================================

Language settings

Available locales

1) Simplified Chinese 3) Traditional Chinese 4) Simplified Chinese

(China) (Hong Kong) (Singapore)

2) Traditional Chinese

(Republic of China)

Please select language support to install.

[b to return to language list, c to continue, q to quit]:  //输入1简体中文,<Enter>回车

[anaconda] 1:main* 2:shell  3:log  4:storage-lo> Switch tab: Alt+Tab | Help: F1

//之后会回到设置菜单界面,可以看到语言设置下方变成了简体中文

================================================================================

================================================================================

Installation

1) [x] Language settings 2) [!] Time settings

(Simplified Chinese (China)) (Timezone is not set.)

3) [x] Installation source 4) [x] Software selection

(Local media) (Minimal Install)

5) [!] Installation Destination 6) [x] Kdump

(No disks selected) (Kdump is enabled)

7) [ ] Network configuration 8) [!] Root password

(Not connected) (Password is not set.)

9) [!] User creation

(No user will be created)

Please make your choice from above ['q' to quit | 'b' to begin installation |

'r' to refresh]:2   //光标在此处,输入2设置时间,<Enter>回车

[anaconda] 1:main* 2:shell 3:log 4:storage-lo> Switch tab: Alt+Tab | Help: F1

//出现如下页面

================================================================================

================================================================================

Time settings

Timezone: not set

NTP servers:not configured

1) Set timezone

2) Configure NTP servers

Please make your choice from above ['q' to quit | 'c' to continue |

'r' to refresh]: 1  //输入1设置时区,<Enter>回车

[anaconda] 1:main* 2:shell 3:log 4:storage-lo> Switch tab: Alt+Tab | Help: F1

//出现如下页面

================================================================================

================================================================================

Timezone settings

Available regions

1) Europe 6) Pacific 10) Arctic

2) Asia 7) Australia 11) US

3) America 8) Atlantic 12) Etc

4) Africa 9) Indian

5) Antarctica

Please select the timezone.

Use numbers or type names directly [b to region list, q to quit]: 2  //选择大区,输入2亚洲,<Enter>回车

[anaconda] 1:main* 2:shell 3:log 4:storage-lo> Switch tab: Alt+Tab | Help: F1

//出现如下页面

================================================================================

================================================================================

Timezone settings

Available timezones in region Asia

1) Aden 29) Hong_Kong 56) Pontianak

2) Almaty 30) Hovd 57) Pyongyang

3) Amman 31) Irkutsk 58) Qatar

4) Anadyr 32) Jakarta 59) Qyzylorda

5) Aqtau 33) Jayapura 60) Riyadh

6) Aqtobe 34) Jerusalem 61) Sakhalin

7) Ashgabat 35) Kabul 62) Samarkand

8) Atyrau 36) Kamchatka 63) Seoul

9) Baghdad 37) Karachi 64) Shanghai

10) Bahrain 38) Kathmandu 65) Singapore

11) Baku 39) Khandyga 66) Srednekolymsk

12) Bangkok 40) Kolkata 67) Taipei

13) Barnaul 41) Krasnoyarsk 68) Tashkent

14) Beirut 42) Kuala_Lumpur 69) Tbilisi

15) Bishkek 43) Kuching 70) Tehran

16) Brunei 44) Kuwait 71) Thimphu

17) Chita 45) Macau 72) Tokyo

18) Choibalsan 46) Magadan 73) Tomsk

19) Colombo 47) Makassar 74) Ulaanbaatar

20) Damascus 48) Manila 75) Urumqi

21) Dhaka 49) Muscat 76) Ust-Nera

22) Dili 50) Nicosia 77) Vientiane

Press ENTER to continue  //<Enter>回车一下,还有区域没显示

23) Dubai 51) Novokuznetsk 78) Vladivostok

24) Dushanbe 52) Novosibirsk 79) Yakutsk

25) Famagusta 53) Omsk 80) Yangon

26) Gaza 54) Oral 81) Yekaterinburg

27) Hebron 55) Phnom_Penh 82) Yerevan

28) Ho_Chi_Minh

Please select the timezone.

Use numbers or type names directly [b to region list, q to quit]:64  //选择具体地点,输入64上海,<Enter>回车

[anaconda] 1:main* 2:shell 3:log 4:storage-lo> Switch tab: Alt+Tab | Help: F1

//之后会回到设置菜单界面,可以看到时间设置下方变成了亚洲/上海时区

================================================================================

================================================================================

Installation

1) [x] Language settings 2) [x] Time settings

(Simplified Chinese (China)) (Asia/Shanghai timezone)

3) [x] Installation source 4) [x] Software selection

(Local media) (Minimal Install)

5) [!] Installation Destination 6) [x] Kdump

(No disks selected) (Kdump is enabled)

7) [ ] Network configuration 8) [!] Root password

(Not connected) (Password is not set.)

9) [!] User creation

(No user will be created)

Please make your choice from above ['q' to quit | 'b' to begin installation |

'r' to refresh]:5   //这里输入5安装地址,<Enter>回车。3是安装源,4软件选择,有需要的可以设置

[anaconda] 1:main* 2:shell 3:log 4:storage-lo> Switch tab: Alt+Tab | Help: F1

//出现如下页面

================================================================================

================================================================================

Probing storage...

Installation Destination

[x] 1) : 10 GiB (vda)

1 disk selected; 10 GiB capacity; 10 GiB free ...

Please make your choice from above ['q' to quit | 'c' to continue |

'r' to refresh]: c  //输入c继续,<Enter>回车

[anaconda] 1:main* 2:shell 3:log 4:storage-lo> Switch tab: Alt+Tab | Help: F1

//出现如下页面

================================================================================

================================================================================

Autopartitioning Options

[ ] 1) Replace Existing Linux system(s)

[x] 2) Use All Space

[ ] 3) Use Free Space

Installation requires partitioning of your hard drive. Select what space to use

for the install target.

Please make your choice from above ['q' to quit | 'c' to continue |

'r' to refresh]: c  //这个需要根据自己选择,我这里就使用所有空间,输入c继续,<Enter>回车

[anaconda] 1:main* 2:shell 3:log 4:storage-lo> Switch tab: Alt+Tab | Help: F1

//出现如下页面

================================================================================

================================================================================

Partition Scheme Options

[ ] 1) Standard Partition

[ ] 2) Btrfs

[x] 3) LVM

[ ] 4) LVM Thin Provisioning

Select a partition scheme configuration.

Please make your choice from above ['q' to quit | 'c' to continue |

'r' to refresh]: c  //这里也是根据需要选择,我使用LVM,输入c继续,<Enter>回车

[anaconda] 1:main* 2:shell 3:log 4:storage-lo> Switch tab: Alt+Tab | Help: F1

//需要等待一段时间,回到菜单设置页面

================================================================================

================================================================================

Installation

1) [x] Language settings 2) [x] Time settings

(Simplified Chinese (China)) (Asia/Shanghai timezone)

3) [x] Installation source 4) [x] Software selection

(Local media) (Minimal Install)

5) [x] Installation Destination 6) [x] Kdump

(Automatic partitioning (Kdump is enabled)

selected) 8) [!] Root password

7) [ ] Network configuration (Password is not set.)

(Not connected)

9) [!] User creation

(No user will be created)

Please make your choice from above ['q' to quit | 'b' to begin installation |

'r' to refresh]: 8  //输入8设置root密码,<Enter>回车。6是内核崩溃转储机制,可以开启也可以关闭

[anaconda] 1:main* 2:shell 3:log 4:storage-lo> Switch tab: Alt+Tab | Help: F1

//出现如下页面

================================================================================

================================================================================

Please select new root password. You will have to type it twice.

Password:  //输入root密码,我这里是123456,<Enter>回车

Password (confirm):   //回车后才会出现,重复密码

[anaconda] 1:main* 2:shell 3:log 4:storage-lo> Switch tab: Alt+Tab | Help: F1

//出现如下页面,提示的是密码太简单了,是否继续使用,我是实验没关系所以yes

================================================================================

================================================================================

Question

The password you have provided is weak: The password fails the dictionary check

- it is too simplistic/systematic.

Would you like to use it anyway?

Please respond 'yes' or 'no': yes  //输入yes,<Enter>回车

//之后回到设置菜单页面

================================================================================

================================================================================

Installation

1) [x] Language settings 2) [x] Time settings

(Simplified Chinese (China)) (Asia/Shanghai timezone)

3) [x] Installation source 4) [x] Software selection

(Local media) (Minimal Install)

5) [x] Installation Destination 6) [x] Kdump

(Automatic partitioning (Kdump is enabled)

selected) 8) [x] Root password

7) [ ] Network configuration (Password is set.)

(Not connected)

9) [ ] User creation

(No user will be created)

Please make your choice from above ['q' to quit | 'b' to begin installation |

'r' to refresh]: 7  //输入7设置网络,<Enter>回车

[anaconda] 1:main* 2:shell 3:log 4:storage-lo> Switch tab: Alt+Tab | Help: F1

//出现如下页面

================================================================================

================================================================================

Network configuration

Wired (eth0) disconnected

Host name: localhost.localdomain  //这是默认的主机名

Current host name: localhost

1) Set host name

2) Configure device eth0

Please make your choice from above ['q' to quit | 'c' to continue |

'r' to refresh]: 1  //输入1设置主机名,<Enter>回车

[anaconda] 1:main* 2:shell 3:log 4:storage-lo> Switch tab: Alt+Tab | Help: F1

//出现如下页面

================================================================================

================================================================================

Enter new value for 'Host name' and press enter

kvm-CentOS7.5  //注意只能使用大小写字母、数值、减号、小数点,并且不能以减号开头或结尾

[anaconda] 1:main* 2:shell 3:log 4:storage-lo> Switch tab: Alt+Tab | Help: F1

//设置完成后,回到之前的界面

================================================================================

================================================================================

Network configuration

Wired (eth0) disconnected

Host name: kvm-CentOS7.5  //可以看到主机名改了

Current host name: localhost

1) Set host name

2) Configure device eth0

Please make your choice from above ['q' to quit | 'c' to continue |

'r' to refresh]: 2  //输入2设置eth0网卡设备,<Enter>回车

[anaconda] 1:main* 2:shell 3:log 4:storage-lo> Switch tab: Alt+Tab | Help: F1

//出现如下页面

================================================================================

================================================================================

Device configuration

1) IPv4 address or "dhcp" for DHCP

dhcp

2) IPv4 netmask

3) IPv4 gateway

4) IPv6 address[/prefix] or "auto" for automatic, "dhcp" for DHCP, "ignore" to

turn off

auto

5) IPv6 default gateway

6) Nameservers (comma separated)

7) [ ] Connect automatically after reboot

8) [ ] Apply configuration in installer

Configuring device eth0.

Please make your choice from above ['q' to quit | 'c' to continue |

'r' to refresh]:   //太多了,我这里整合一下

[anaconda] 1:main* 2:shell 3:log 4:storage-lo> Switch tab: Alt+Tab | Help: F1

//输入1设置IPv4地址,出现如下页面

================================================================================

================================================================================

Enter new value for 'IPv4 address or "dhcp" for DHCP' and press enter

192.168.5.151  //输入一个IPv4地址

[anaconda] 1:main* 2:shell 3:log 4:storage-lo> Switch tab: Alt+Tab | Help: F1

//输入2设置子网掩码,出现如下页面

================================================================================

================================================================================

Enter new value for 'IPv4 netmask' and press enter

255.255.255.0  //输入子网掩码

[anaconda] 1:main* 2:shell 3:log 4:storage-lo> Switch tab: Alt+Tab | Help: F1

//输入3设置IPv4网关,出现如下页面

================================================================================

================================================================================

Enter new value for 'IPv4 gateway' and press enter

192.168.5.2

[anaconda] 1:main* 2:shell 3:log 4:storage-lo> Switch tab: Alt+Tab | Help: F1

//输入6设置DNS服务器,出现如下页面

================================================================================

================================================================================

Enter new value for 'Nameservers (comma separated)' and press enter

192.168.5.2

[anaconda] 1:main* 2:shell  3:log  4:storage-lo> Switch tab: Alt+Tab | Help: F1

//输入7设置重新启动后自动连接

//输入8设置在安装程序中应用配置

//最后设置完成的界面如下

================================================================================

================================================================================

Device configuration

1) IPv4 address or "dhcp" for DHCP

192.168.5.151

2) IPv4 netmask

255.255.255.0

3) IPv4 gateway

192.168.5.2

4) IPv6 address[/prefix] or "auto" for automatic, "dhcp" for DHCP, "ignore" to

turn off

auto

5) IPv6 default gateway

6) Nameservers (comma separated)

192.168.5.2

7) [x] Connect automatically after reboot

8) [x] Apply configuration in installer

Configuring device eth0.

Please make your choice from above ['q' to quit | 'c' to continue |

'r' to refresh]: c  //输入c继续,<Enter>回车

[anaconda] 1:main* 2:shell 3:log 4:storage-lo> Switch tab: Alt+Tab | Help: F1

//回到上一个界面

================================================================================

================================================================================

Network configuration

Wired (eth0) connected

IPv4 Address: 192.168.5.151 Netmask: 255.255.255.0 Gateway: 192.168.5.2

DNS: 192.168.5.2  //网络信息

Host name: kvm-CentOS7.5  //主机名

Current host name: localhost

1) Set host name

2) Configure device eth0

Please make your choice from above ['q' to quit | 'c' to continue |

'r' to refresh]: c  //输入c继续,<Enter>回车

[anaconda] 1:main* 2:shell 3:log 4:storage-lo> Switch tab: Alt+Tab | Help: F1

//回到菜单设置页面

================================================================================

================================================================================

Installation

1) [x] Language settings 2) [x] Time settings

(Simplified Chinese (China)) (Asia/Shanghai timezone)

3) [x] Installation source 4) [!] Software selection

(Local media) (Source changed - please

5) [x] Installation Destination verify)

(Automatic partitioning 6) [x] Kdump

selected) (Kdump is enabled)

7) [x] Network configuration 8) [x] Root password

(Wired (eth0) connected) (Password is set.)

9) [ ] User creation

(No user will be created)

Please make your choice from above ['q' to quit | 'b' to begin installation |

'r' to refresh]: 4  //输入4软件选择,<Enter>回车。见鬼4怎么变了,跑一下吧

[anaconda] 1:main* 2:shell 3:log 4:storage-lo> Switch tab: Alt+Tab | Help: F1

//出现如下页面

================================================================================

================================================================================

Base environment

Software selection

Base environment

1) [x] Minimal Install 7) [ ] Server with GUI

2) [ ] Compute Node 8) [ ] GNOME Desktop

3) [ ] Infrastructure Server 9) [ ] KDE Plasma Workspaces

4) [ ] File and Print Server 10) [ ] Development and Creative

5) [ ] Basic Web Server Workstation

6) [ ] Virtualization Host

Please make your choice from above ['q' to quit | 'c' to continue |

'r' to refresh]: c  //就用最小化安装。输入c继续,<Enter>回车

[anaconda] 1:main* 2:shell 3:log 4:storage-lo> Switch tab: Alt+Tab | Help: F1

//回到设置菜单页面

================================================================================

================================================================================

Installation

1) [x] Language settings 2) [x] Time settings

(Simplified Chinese (China)) (Asia/Shanghai timezone)

3) [!] Installation source 4) [!] Software selection

(Processing...) (Processing...)

5) [x] Installation Destination 6) [x] Kdump

(Automatic partitioning (Kdump is enabled)

selected) 8) [x] Root password

7) [x] Network configuration (Password is set.)

(Wired (eth0) connected)

9) [ ] User creation

(No user will be created)

Please make your choice from above ['q' to quit | 'b' to begin installation |

'r' to refresh]: r  //正在加载等一会儿,输入r刷新一下,<Enter>回车

[anaconda] 1:main* 2:shell  3:log  4:storage-lo> Switch tab: Alt+Tab | Help: F1

//再看设置菜单页面

================================================================================

================================================================================

Installation

1) [x] Language settings 2) [x] Time settings

(Simplified Chinese (China)) (Asia/Shanghai timezone)

3) [x] Installation source 4) [x] Software selection

(Local media) (Minimal Install)

5) [x] Installation Destination 6) [x] Kdump

(Automatic partitioning (Kdump is enabled)

selected) 8) [x] Root password

7) [x] Network configuration (Password is set.)

(Wired (eth0) connected)

9) [ ] User creation

(No user will be created)

Please make your choice from above ['q' to quit | 'b' to begin installation |

'r' to refresh]: b  //正常了,输入b开始安装,<Enter>回车

[anaconda] 1:main* 2:shell 3:log 4:storage-lo> Switch tab: Alt+Tab | Help: F1

//下面就等待安装,时间会比较长,请耐心等待。最后会出现

Use of this product is subject to the license agreement found at /usr/share/centos-release/EULA

Installation complete. Press return to quit  //这里按回车

//然后会出现一堆停止或关闭参数,不用管他,这是虚拟机在关闭。最后还会出现一个报错,如下

误:操作失败: 这个域有活跃控制台会话  //这个报错是没有关系的,表明这个虚拟关机了
查看一下新建的centos75虚拟机,以及默认镜像格式
[root@youxi1 ~]# virsh list --all

 Id    名称                         状态

----------------------------------------------------

 2     centos75                       running

 -     centos7.0                      关闭

[root@youxi1 ~]# qemu-img info /var/lib/libvirt/images/centos75.img

image: /var/lib/libvirt/images/centos75.img

file format: qcow2  //默认格式就是qcow2的,所以我没有先创建系统镜像

virtual size: 10G (10737418240 bytes)

disk size: 1.3G

cluster_size: 65536

Format specific information:

compat: 1.1

lazy refcounts: true
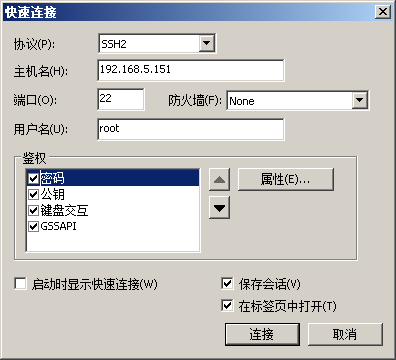
启动了,那么我们使用远程工具连接一下试试
 ----->
 ---->
----> ----->
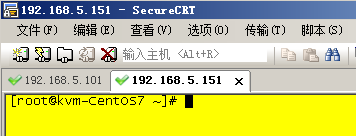
可以看到是成功连接了,随便输入个命令试试
[root@kvm-CentOS7 ~]# ip a sh

1: lo: <LOOPBACK,UP,LOWER_UP> mtu 65536 qdisc noqueue state UNKNOWN group default qlen 1000

    link/loopback 00:00:00:00:00:00 brd 00:00:00:00:00:00

    inet 127.0.0.1/8 scope host lo

       valid_lft forever preferred_lft forever

    inet6 ::1/128 scope host

       valid_lft forever preferred_lft forever

2: eth0: <BROADCAST,MULTICAST,UP,LOWER_UP> mtu 1500 qdisc pfifo_fast state UP group default qlen 1000

    link/ether 52:54:00:71:3c:50 brd ff:ff:ff:ff:ff:ff

    inet 192.168.5.151/24 brd 192.168.5.255 scope global noprefixroute eth0

       valid_lft forever preferred_lft forever

    inet6 fe80::4bf9:e184:aff2:ec5f/64 scope link noprefixroute

       valid_lft forever preferred_lft forever
上面是直连KVM虚拟机,但有时候会需要从物理机上进入KVM虚拟机,如下。但这有一个问题,我不知道怎么从KVM虚拟机上回到物理,除了关机。所以我建议使用远程软件连入物理机,再进入KVM虚拟机,使用完成后关闭窗口即可。
[root@youxi1 ~]# virsh console centos75  //此时是物理机

连接到域 centos75

换码符为 ^]

quit

密码:

Login incorrect

kvm-CentOS7 login: root

密码:

Last login: Mon Sep  9 09:25:33 on ttyS0

[root@kvm-CentOS7 ~]#   //进入到KVM虚拟机
(6).扩展:
1)KVM虚拟机管理常用命令
virsh list查看正在运行的虚拟机,virsh list --all
[root@youxi1 ~]# virsh list --all

 Id    名称                         状态

----------------------------------------------------

 -     centos7.0                      关闭

[root@youxi1 ~]# virsh list

 Id    名称                         状态

----------------------------------------------------
virsh start [虚拟机名称]启动虚拟机,virsh shutdown [虚拟机名称]关闭虚拟机,virsh autostart [虚拟机名称]设置虚拟机随物理机启动,virsh autostart --disable [虚拟机名称]取消虚拟机随物理机启动。注意:使用virsh autostart [虚拟机名称]时,请确保KVM虚拟机服务(服务名为libvirtd)开机启动。
[root@youxi1 ~]# virsh start centos7.0

域 centos7.0 已开始

[root@youxi1 ~]# virsh list

 Id    名称                         状态

----------------------------------------------------

 1     centos7.0                      running

[root@youxi1 ~]# virsh shutdown centos7.0

域 centos7.0 被关闭

[root@youxi1 ~]# virsh list --all

 Id    名称                         状态

----------------------------------------------------

 -     centos7.0                      关闭

[root@youxi1 ~]# systemctl is-enabled libvirtd

enabled

[root@youxi1 ~]# virsh autostart centos7.0

域 centos7.0标记为自动开始

[root@youxi1 ~]# virsh autostart --disable centos7.0

域 centos7.0取消标记为自动开始
2)KVM虚拟机创建命令
virt-install --name [虚拟机名称] --memory [内存分配] [options]
常用选项:
--virt-type [管理程序名称]  使用的管理程序名称,取代了以前的--accelerate选项,包含kvm、qemu、xen等

-n [虚拟机名称],--name [虚拟机名称]  指定虚拟机名称

--memory [内存分配]  指定内存大小分配

例如:--memory 1024 (in MiB)

   --memory 512,maxmemory=1024

   --memory 512,maxmemory=1024,hotplugmemorymax=2048,hotplugmemoryslots=2

--vcpus [CPU分配]  指定虚拟CPU数量

例如:--vcpus 5

   --vcpus 5,maxcpus=10,cpuset=1-4,6,8

   --vcpus sockets=2,cores=4,threads=2

--disk [存储分配]  指定虚拟机磁盘存储文件路径

例如:--disk size=10 (在默认位置创建 10GiB 镜像)

   --disk /my/existing/disk,cache=none

   --disk device=cdrom,bus=scsi

   --disk=?

--cdrom [光盘镜像]  指定安装系统的光盘镜像

-l [系统镜像],--location [系统镜像]  这个镜像可以是网络,也可以是本地

例如:nfs:host:/path, http://host/path,ftp://host/path

-w [网络接口],--network [网络接口]  指定虚拟机的网络接口

例如:

--network bridge=mybr0

--network network=my_libvirt_virtual_net

--network network=mynet,model=virtio,mac=00:11...

--network none

--network help

-x [额外参数],--extra-args [额外参数]  将附加参数添加到--location引导的内核中,提供额外的内核命令行参数,比如用于无人值守安装
3)VMware迁移到KVM
需要安装virt-v2v,命令yum -y install virt-v2v
Linux的桌面虚拟化技术KVM(一)——新建KVM虚拟机的更多相关文章
- Linux的桌面虚拟化技术KVM(五)——virsh常用命令
Linux的桌面虚拟化技术KVM(一)——新建KVM虚拟机 Linux的桌面虚拟化技术KVM(二)——远程桌面管理 Linux的桌面虚拟化技术KVM(三)——KVM虚拟机克隆和快照 Linux的桌面虚 ...
- Linux的桌面虚拟化技术KVM(四)——虚拟机镜像格式对比与转换
Linux的桌面虚拟化技术KVM(一)——新建KVM虚拟机 Linux的桌面虚拟化技术KVM(二)——远程桌面管理 Linux的桌面虚拟化技术KVM(三)——KVM虚拟机克隆和快照 (1).常用镜像格 ...
- Linux的桌面虚拟化技术KVM(三)——KVM虚拟机克隆和快照
Linux的桌面虚拟化技术KVM(一)——新建KVM虚拟机 Linux的桌面虚拟化技术KVM(二)——远程桌面管理 (1).KVM虚拟机克隆 KVM虚拟克隆命令virt-clone [选项] 常用选项 ...
- Linux的桌面虚拟化技术KVM(二)——远程桌面管理
Linux的桌面虚拟化技术KVM(一)——新建KVM虚拟机 远程桌面管理,指的是远程图形界面管理,所以要保证物理机要有图形化界面. (1).VNC管理 安装VNC-server服务,并进行配置 [ro ...
- KVM虚拟化技术(二)KVM介绍
KVM:Kernel Virtual Machine KVM是基于虚拟化扩展的x86硬件,是Linux完全原生的全虚拟化解决方案.部分半虚拟化支持,主要是通过半虚拟网络驱动程序的形式用于Linux和W ...
- 虚拟化技术:Xen与KVM的对比
作为开源的虚拟化技术,对比Xen和KVM可以看到,Xen以6个无与伦比的优势领先:更好的可用资源.平台支持.可管理性.实施.动态迁移和性能基准. 可用资源:Xen的问世要比KVM早4年之久(两者分别是 ...
- kvm 虚拟化技术 1.3之kvm克隆以及快照
1.kvm虚拟机克隆 克隆kvm虚拟机 ,克隆前需要提前关机 语法: virt-clone -o 原虚拟机 -n 新虚拟机 -f 新虚拟机镜像存放路径 选项中-o 表示 old ...
- KVM虚拟化技术(四)安装虚拟机
一.首先用比较简单的virt-manager来安装 # virt-manager 后面就是一般的安装系统流程了,这里不再复述 二.用virt-install命令行来安装 还是通过本地IOS文件来进行安 ...
- KVM虚拟化技术(三)KVM环境预配
一.平台操作系统安装 选择合适的操作系统,此处选用CentOS 7 系统可最小化安装,也可标准安装: 如果要远程连接,建议安装VNC-Server 将防火墙配置可通信,SELINUX设为permiss ...
随机推荐
- linux下新磁盘创建lvm、扩容lvm
1.首先查看磁盘fdisk -l2.进入磁盘fdisk /dev/sdbn 创建新磁盘p 创建主分区创建分区ID 1-4为主分区根据提示选择磁盘开始位置(默认空格就好)选择结束位置(新增磁盘大小)t ...
- Visual Studio 2017 许可证已过期解决方案
1.卸载并重安VS2017 2.安装后打开VS2017,点击帮助=>注册产品,输入序列号NJVYC-BMHX2-G77MM-4XJMR-6Q8QF(企业版), KBJFW-NXHK6-W4WJM ...
- 织梦cmsf表单提交到邮箱 织梦表单发送到邮箱 织梦自定义表单发邮箱
大家在做织梦做网站开发时会遇到一个问题:织梦的自定义表单是一个很鸡肋的功能,不仅在后台展示得奇丑,而且也没有提醒功能,使用起来很不方便.很多人用织梦自定义表单时,都想用户提交表单的时候可以发送到自己的 ...
- Open Judge 1.4 09
09:判断能否被3,5,7整除 总时间限制: 1000ms 内存限制: 65536kB 描述 给定一个整数,判断它能否被3,5,7整除,并输出以下信息:1.能同时被3,5,7整除(直接输出3 5 ...
- 题解 CF1097F 【Alex and a TV Show】
妙妙题-- 这道题这要求%2的个数,肯定有什么性质 于是我们想到了用\(bitset\)来处理 由于三操作有\(gcd\),于是我们又想到用反演来解决 我们回忆一下反演的柿子 设\(f(x)\)为x出 ...
- Ultra Edit中的数据对齐
有时会用到Ultra Edit的数据对齐功能.比如,要求64个符号一组,从低位开始对齐.这时,如果数据长度不是一行长度的整数, 就会产生高位对齐.低位不足的问题.为了调整,往往需要逐行调整,很不方便. ...
- mysql存储html代码之导出后无法导入问题
我用mysql的text类型存储了一些html代码,然后用navicat for mysql导出,然后再次导入的时候,就死活导不进去. mysql提示的错误是:this saves the data ...
- Python 之pyinstaller模块打包成exe文件
一.安装pyinstaller pip install pyinstaller 二.下载安装pyinstaler运行时所需要的windows扩展pywin32 https://github.com/m ...
- 巧用DNSlog实现无回显注入【转载】
原作者:afanti 原出处:https://www.cnblogs.com/afanti/p/8047530.html 0x00 简介 测试一些网站的时候,一些注入都是无回显的,我们可以写脚本来进行 ...
- arts 打卡12周
一 算法: 字符串转换整数 (atoi) 请你来实现一个 atoi 函数,使其能将字符串转换成整数. 首先,该函数会根据需要丢弃无用的开头空格字符,直到寻找到第一个非空格的字符为止. 当我们寻找 ...