Spring与MyBatis的整合(山东数漫江湖)
首先看一下项目结构图:
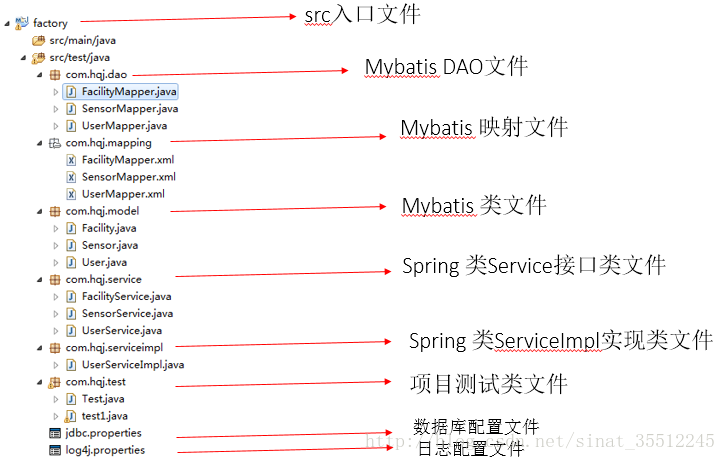
具体步骤如下:
1、建立JDBC属性文件
jdbc.properties (文件编码修改为 utf-8 )
driver=com.mysql.jdbc.Driver

url=jdbc:mysql://localhost:3306/projectview

username=root

password=729821- 1
- 2
- 3
- 4
辅助:数据库脚本:
INSERT INTO `test_user` VALUES (1, 'liuzhonghao', '6329869', '384037404@qq.com');

INSERT INTO `test_user` VALUES (2, 'xiahe', '6329869', '12345@qq.com');

INSERT INTO `test_user` VALUES (3, NULL, NULL, NULL);

INSERT INTO `test_user` VALUES (4, '123', '123', '123');

INSERT INTO `test_user` VALUES (5, '321', '321', '321');- 1
- 2
- 3
- 4
- 5
2、log4j的配置
#\u5B9A\u4E49LOG\u8F93\u51FA\u7EA7\u522B

log4j.rootLogger=INFO,Console,File

#\u5B9A\u4E49\u65E5\u5FD7\u8F93\u51FA\u76EE\u7684\u5730\u4E3A\u63A7\u5236\u53F0

log4j.appender.Console=org.apache.log4j.ConsoleAppender

log4j.appender.Console.Target=System.out

#\u53EF\u4EE5\u7075\u6D3B\u5730\u6307\u5B9A\u65E5\u5FD7\u8F93\u51FA\u683C\u5F0F\uFF0C\u4E0B\u9762\u4E00\u884C\u662F\u6307\u5B9A\u5177\u4F53\u7684\u683C\u5F0F

log4j.appender.Console.layout = org.apache.log4j.PatternLayout

log4j.appender.Console.layout.ConversionPattern=[%c] - %m%n

#\u6587\u4EF6\u5927\u5C0F\u5230\u8FBE\u6307\u5B9A\u5C3A\u5BF8\u7684\u65F6\u5019\u4EA7\u751F\u4E00\u4E2A\u65B0\u7684\u6587\u4EF6

log4j.appender.File =org.apache.log4j.RollingFileAppender

#\u6307\u5B9A\u8F93\u51FA\u76EE\u5F55

log4j.appender.File.File = logs/ssm.log

#\u5B9A\u4E49\u6587\u4EF6\u6700\u5927\u5927\u5C0F

log4j.appender.File.MaxFileSize = 10MB

# \u8F93\u51FA\u6240\u4EE5\u65E5\u5FD7\uFF0C\u5982\u679C\u6362\u6210DEBUG\u8868\u793A\u8F93\u51FADEBUG\u4EE5\u4E0A\u7EA7\u522B\u65E5\u5FD7

log4j.appender.File.Threshold = ALL

log4j.appender.File.layout =org.apache.log4j.PatternLayout

log4j.appender.File.layout.ConversionPattern =[%p] [%d{yyyy-MM-ddHH\:mm\:ss}][%c]%m%n- 1
- 2
- 3
- 4
- 5
- 6
- 7
- 8
- 9
- 10
- 11
- 12
- 13
- 14
- 15
- 16
- 17
- 18
- 19
3、建立工程
(1)User类
package com.hqj.model;

public class User {

    private Integer id;

    private String username;

    private String password;

    private String email;

    public Integer getId() {

        return id;

    }

    public void setId(Integer id) {

        this.id = id;

    }

    public String getUsername() {

        return username;

    }

    public void setUsername(String username) {

        this.username = username == null ? null : username.trim();

    }

    public String getPassword() {

        return password;

    }

    public void setPassword(String password) {

        this.password = password == null ? null : password.trim();

    }

    public String getEmail() {

        return email;

    }

    public void setEmail(String email) {

        this.email = email == null ? null : email.trim();

    }

    public User() {

        super();

        // TODO Auto-generated constructor stub

    }

    public User(Integer id, String username, String password, String email) {

        super();

        this.id = id;

        this.username = username;

        this.password = password;

        this.email = email;

    }

    @Override

    public String toString() {

        return "User [id=" + id + ", username=" + username + ", password="

                + password + ", email=" + email + "]";

    }

}- 1
- 2
- 3
- 4
- 5
- 6
- 7
- 8
- 9
- 10
- 11
- 12
- 13
- 14
- 15
- 16
- 17
- 18
- 19
- 20
- 21
- 22
- 23
- 24
- 25
- 26
- 27
- 28
- 29
- 30
- 31
- 32
- 33
- 34
- 35
- 36
- 37
- 38
- 39
- 40
- 41
- 42
- 43
- 44
- 45
- 46
- 47
- 48
- 49
- 50
- 51
- 52
- 53
- 54
- 55
- 56
- 57
- 58
- 59
- 60
- 61
- 62
(2)UserMapper类(Mybatis中的DAO类)
package com.hqj.dao;

import com.hqj.model.User;

public interface UserMapper {

    int deleteByPrimaryKey(Integer id);

    int insert(User record);

    int insertSelective(User record);

    User selectByPrimaryKey(Integer id);

    int updateByPrimaryKeySelective(User record);

    int updateByPrimaryKey(User record);

}- 1
- 2
- 3
- 4
- 5
- 6
- 7
- 8
- 9
- 10
- 11
- 12
- 13
- 14
- 15
- 16
- 17
(3)UserMapper类(Mybatis映射文件)
<?xml version="1.0" encoding="UTF-8" ?>

<!DOCTYPE mapper PUBLIC "-//mybatis.org//DTD Mapper 3.0//EN" "http://mybatis.org/dtd/mybatis-3-mapper.dtd" >

<mapper namespace="com.hqj.dao.UserMapper" >

  <resultMap id="BaseResultMap" type="com.hqj.model.User" >

    <id column="id" property="id" jdbcType="INTEGER" />

    <result column="username" property="username" jdbcType="VARCHAR" />

    <result column="password" property="password" jdbcType="VARCHAR" />

    <result column="email" property="email" jdbcType="VARCHAR" />

  </resultMap>

  <sql id="Base_Column_List" >

    id, username, password, email

  </sql>

  <select id="selectByPrimaryKey" resultMap="BaseResultMap" parameterType="java.lang.Integer" >

    select

    <include refid="Base_Column_List" />

    from test_user

    where id = #{id,jdbcType=INTEGER}

  </select>

  <delete id="deleteByPrimaryKey" parameterType="java.lang.Integer" >

    delete from test_user

    where id = #{id,jdbcType=INTEGER}

  </delete>

  <insert id="insert" parameterType="com.hqj.model.User" >

    insert into test_user (id, username, password,

      email)

    values (#{id,jdbcType=INTEGER}, #{username,jdbcType=VARCHAR}, #{password,jdbcType=VARCHAR},

      #{email,jdbcType=VARCHAR})

  </insert>

  <insert id="insertSelective" parameterType="com.hqj.model.User" >

    insert into test_user

    <trim prefix="(" suffix=")" suffixOverrides="," >

      <if test="id != null" >

        id,

      </if>

      <if test="username != null" >

        username,

      </if>

      <if test="password != null" >

        password,

      </if>

      <if test="email != null" >

        email,

      </if>

    </trim>

    <trim prefix="values (" suffix=")" suffixOverrides="," >

      <if test="id != null" >

        #{id,jdbcType=INTEGER},

      </if>

      <if test="username != null" >

        #{username,jdbcType=VARCHAR},

      </if>

      <if test="password != null" >

        #{password,jdbcType=VARCHAR},

      </if>

      <if test="email != null" >

        #{email,jdbcType=VARCHAR},

      </if>

    </trim>

  </insert>

  <update id="updateByPrimaryKeySelective" parameterType="com.hqj.model.User" >

    update test_user

    <set >

      <if test="username != null" >

        username = #{username,jdbcType=VARCHAR},

      </if>

      <if test="password != null" >

        password = #{password,jdbcType=VARCHAR},

      </if>

      <if test="email != null" >

        email = #{email,jdbcType=VARCHAR},

      </if>

    </set>

    where id = #{id,jdbcType=INTEGER}

  </update>

  <update id="updateByPrimaryKey" parameterType="com.hqj.model.User" >

    update test_user

    set username = #{username,jdbcType=VARCHAR},

      password = #{password,jdbcType=VARCHAR},

      email = #{email,jdbcType=VARCHAR}

    where id = #{id,jdbcType=INTEGER}

  </update>

</mapper>- 1
- 2
- 3
- 4
- 5
- 6
- 7
- 8
- 9
- 10
- 11
- 12
- 13
- 14
- 15
- 16
- 17
- 18
- 19
- 20
- 21
- 22
- 23
- 24
- 25
- 26
- 27
- 28
- 29
- 30
- 31
- 32
- 33
- 34
- 35
- 36
- 37
- 38
- 39
- 40
- 41
- 42
- 43
- 44
- 45
- 46
- 47
- 48
- 49
- 50
- 51
- 52
- 53
- 54
- 55
- 56
- 57
- 58
- 59
- 60
- 61
- 62
- 63
- 64
- 65
- 66
- 67
- 68
- 69
- 70
- 71
- 72
- 73
- 74
- 75
- 76
- 77
- 78
- 79
- 80
- 81
- 82
(4)UserService类(Spring中对应的类接口)
package com.hqj.service;

import com.hqj.model.User;

public interface UserService {

    public User getUserById(Integer id);

}
- 1
- 2
- 3
- 4
- 5
- 6
- 7
- 8
(5)UserServiceImpl类(Spring中对应的类接口的实现)
务必先看图片中的红字!易错点!!!
务必先看图片中的红字!易错点!!!
务必先看图片中的红字!易错点!!!
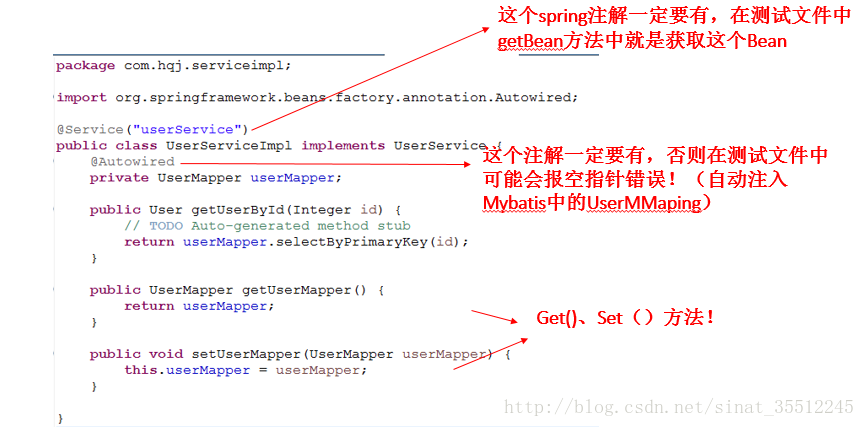
package com.hqj.serviceimpl;

import org.springframework.beans.factory.annotation.Autowired;

import org.springframework.stereotype.Service;

import com.hqj.dao.UserMapper;

import com.hqj.model.User;

import com.hqj.service.UserService;

@Service("userService")

public class UserServiceImpl implements UserService {

    @Autowired

    private UserMapper userMapper;

    public User getUserById(Integer id) {

        // TODO Auto-generated method stub

        return userMapper.selectByPrimaryKey(id);

    }

    public UserMapper getUserMapper() {

        return userMapper;

    }

    public void setUserMapper(UserMapper userMapper) {

        this.userMapper = userMapper;

    }

}
- 1
- 2
- 3
- 4
- 5
- 6
- 7
- 8
- 9
- 10
- 11
- 12
- 13
- 14
- 15
- 16
- 17
- 18
- 19
- 20
- 21
- 22
- 23
- 24
- 25
- 26
- 27
- 28
- 29
(6)测试类
务必先看图片中的红字!易错点!!!
务必先看图片中的红字!易错点!!!
务必先看图片中的红字!易错点!!!
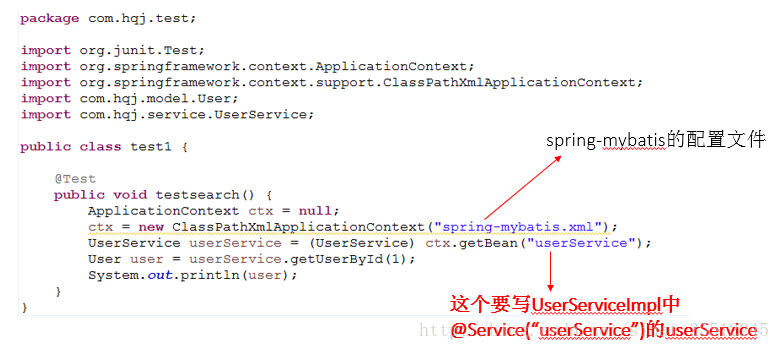
package com.hqj.test;

import org.junit.Test;

import org.springframework.context.ApplicationContext;

import org.springframework.context.support.ClassPathXmlApplicationContext;

import com.hqj.model.User;

import com.hqj.service.UserService;

public class test1 {

    @Test

    public void testsearch() {

        ApplicationContext ctx = null;

        ctx = new ClassPathXmlApplicationContext("spring-mybatis.xml");

        UserService userService = (UserService) ctx.getBean("userService");

        User user = userService.getUserById(1);

        System.out.println(user);

    }

}
- 1
- 2
- 3
- 4
- 5
- 6
- 7
- 8
- 9
- 10
- 11
- 12
- 13
- 14
- 15
- 16
- 17
- 18
- 19
- 20
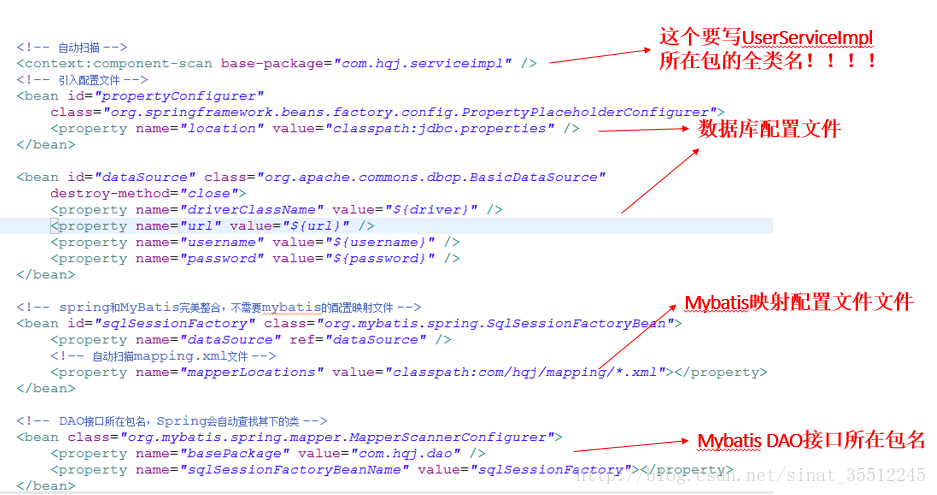
(7)spring-mybatis.xml配置文件(最重要的配置)
务必先看图片中的红字!易错点!!!
务必先看图片中的红字!易错点!!!
务必先看图片中的红字!易错点!!!
<?xml version="1.0" encoding="UTF-8"?>

<beans xmlns="http://www.springframework.org/schema/beans"

    xmlns:xsi="http://www.w3.org/2001/XMLSchema-instance" xmlns:p="http://www.springframework.org/schema/p"

    xmlns:context="http://www.springframework.org/schema/context"

    xmlns:mvc="http://www.springframework.org/schema/mvc"

    xsi:schemaLocation="http://www.springframework.org/schema/beans

 http://www.springframework.org/schema/beans/spring-beans-3.1.xsd

 http://www.springframework.org/schema/context

 http://www.springframework.org/schema/context/spring-context-3.1.xsd

 http://www.springframework.org/schema/mvc

 http://www.springframework.org/schema/mvc/spring-mvc-4.0.xsd">

    <!-- 自动扫描 -->

    <context:component-scan base-package="com.hqj.serviceimpl" />

    <!-- 引入配置文件 -->

    <bean id="propertyConfigurer"

        class="org.springframework.beans.factory.config.PropertyPlaceholderConfigurer">

        <property name="location" value="classpath:jdbc.properties" />

    </bean>

    <bean id="dataSource" class="org.apache.commons.dbcp.BasicDataSource"

        destroy-method="close">

        <property name="driverClassName" value="${driver}" />

        <property name="url" value="${url}" />

        <property name="username" value="${username}" />

        <property name="password" value="${password}" />

    </bean>

    <!-- spring和MyBatis完美整合,不需要mybatis的配置映射文件 -->

    <bean id="sqlSessionFactory" class="org.mybatis.spring.SqlSessionFactoryBean">

        <property name="dataSource" ref="dataSource" />

        <!-- 自动扫描mapping.xml文件 -->

        <property name="mapperLocations" value="classpath:com/hqj/mapping/*.xml"></property>

    </bean>

    <!-- DAO接口所在包名,Spring会自动查找其下的类 -->

    <bean class="org.mybatis.spring.mapper.MapperScannerConfigurer">

        <property name="basePackage" value="com.hqj.dao" />

        <property name="sqlSessionFactoryBeanName" value="sqlSessionFactory"></property>

    </bean>

    <!-- (事务管理)transaction manager, use JtaTransactionManager for global tx -->

    <bean id="transactionManager"

        class="org.springframework.jdbc.datasource.DataSourceTransactionManager">

        <property name="dataSource" ref="dataSource" />

    </bean>

</beans>- 1
- 2
- 3
- 4
- 5
- 6
- 7
- 8
- 9
- 10
- 11
- 12
- 13
- 14
- 15
- 16
- 17
- 18
- 19
- 20
- 21
- 22
- 23
- 24
- 25
- 26
- 27
- 28
- 29
- 30
- 31
- 32
- 33
- 34
- 35
- 36
- 37
- 38
- 39
- 40
- 41
- 42
- 43
- 44
- 45
- 46
- 47
测试成功的结果如下:

Spring与MyBatis的整合(山东数漫江湖)的更多相关文章
- SSM三大框架整合详细总结(Spring+SpringMVC+MyBatis)(山东数漫江湖)
使用 SSM ( Spring . SpringMVC 和 Mybatis )已经很久了,项目在技术上已经没有什么难点了,基于现有的技术就可以实现想要的功能,当然肯定有很多可以改进的地方.之前没有记录 ...
- Spring boot集成RabbitMQ(山东数漫江湖)
RabbitMQ简介 RabbitMQ是一个在AMQP基础上完整的,可复用的企业消息系统 MQ全称为Message Queue, 消息队列(MQ)是一种应用程序对应用程序的通信方法.应用程序通过读写出 ...
- Spring boot 集成Dubbox(山东数漫江湖)
前言 因为工作原因,需要在项目中集成dubbo,所以去查询dubbo相关文档,发现dubbo目前已经不更新了,所以把目光投向了dubbox,dubbox是当当网基于dubbo二次开发的一个项目,dub ...
- Spring Session加Redis(山东数漫江湖)
session是一个非常常见的概念.session的作用是为了辅助http协议,因为http是本身是一个无状态协议.为了记录用户的状态,session机制就应运而生了.同时session也是一个非常老 ...
- Spring mvc详解(山东数漫江湖)
Spring mvc框架 Spring web MVC 框架提供了模型-视图-控制的体系结构和可以用来开发灵活.松散耦合的 web 应用程序的组件.MVC 模式导致了应用程序的不同方面(输入逻辑.业务 ...
- 关于Spring和mybatis的整合
Spring同Mybatis的整合 1.引入相应的jar包.(Mybatis的jar包,Spring的jar包,mybatis-spring-1.1.1.jar). 2.编写相应的包(三层的包).搭建 ...
- 基于maven进行spring 和mybatis的整合(Myeclpise)
学习日记:基于maven进行spring和mybatis的整合,进行分页查询 什么是maven:maven是一个项目管理工具,使用maven可以自动管理java项目的整个生命周期,包括编译.构建.测试 ...
- Spring+SpringMVC+MyBatis+easyUI整合基础篇(六)maven整合SSM
写在前面的话 承接前文<Spring+SpringMVC+MyBatis+easyUI整合基础篇(五)讲一下maven>,本篇所讲述的是如何使用maven与原ssm项目整合,使得一个普 ...
- Spring+SpringMVC+MyBatis+easyUI整合基础篇(八)mysql中文查询bug修复
写在前面的话 在测试搜索时出现的问题,mysql通过中文查询条件搜索不出数据,但是英文和数字可以搜索到记录,中文无返回记录.本文就是写一下发现问题的过程及解决方法.此bug在第一个项目中点这里还存在, ...
随机推荐
- iOS- iOS 7 的后台多任务 (Multitasking) 对比之前的异同、具体机制、变化
简单来说,这玩意是对开发者友好,但对设备不友好的(可能会偷偷摸摸地占用流量和电量).对用户来说,如果你带宽够,对发热不敏感的话,会得到更好的应用体验. 从 iOS 4 开始,应用就可以在退到后台后,继 ...
- JSP在页面加载时调用servlet的方法
方法:先在JS里面写一个调用servlet的事件(可以利用ajax),然后利用<body>标签的onload调用这个事件. 代码如下: jsp文件代码如下: <%@ page lan ...
- MDK中的调试脚本分析
准备写一个简单的裸机程序放mini2440里面跑,看到芯片手册有2中启动方式,1.从Nor Flash启动 2.从Nand Flash中启动.断断续续弄了几天始终无法烧录进去,想起平时自己工作中调试程 ...
- CEntOS6.5从启动界面直接进入命令行界面
ctrl + alt + F1 ctrl + alt + F2 ctrl + alt + F3 ctrl + alt + F4 ctrl + alt + F5 ctrl + alt + F6 同时按下 ...
- django 安装/部署过程
一.软件安装 1.升级linux中的python 参考“centos升级python” 2.安装apache(httpd) 3.安装django,先要安装setuptools 参考“安装dj ...
- 阻塞 , 非阻塞 , 同步 ,异步 , I/O模型
•阻塞,非阻塞:进程/线程要访问的数据是否就绪,进程/线程是否需要等待: •同步,异步:访问数据的方式,同步需要主动读写数据,在读写数据的过程中还是会阻塞:异步只需要I/O操作完成的通知,并不主动读写 ...
- Eclipse闪退解决方案
1. 找到Eclipse目录下的eclipse.exe,右键点击->发送到桌面快捷方式,然后右键点击快捷方式,选择属性,修改“目标”(或target),其中红色代表eclipse的路径,绿色代表 ...
- HUAS 1483 mex(莫队算法)
考虑莫队算法,对于区间减小的情况,可以O(1)解决.对于区间增加的情况,可能需要O(n)解决.好在数据不卡莫队. 1200ms过了. 离线+线段树 760ms过了. # include <cst ...
- 【bzoj1579】[Usaco2009 Feb]Revamping Trails 道路升级 分层图最短路
题目描述 每天,农夫John需要经过一些道路去检查牛棚N里面的牛. 农场上有M(1<=M<=50,000)条双向泥土道路,编号为1..M. 道路i连接牛棚P1_i和P2_i (1 < ...
- Go语言【第一篇】:Go初识
Go语言特色 简洁.快速.安全 并行.有趣.开源 内存管理.数据安全.编译迅速 Go语言用途 Go语言被设计成一门应用于搭载Web服务器,存储集群或类似用途的巨型中央服务器的系统编程语言.对于高性能分 ...