ffmpeg超详细综合教程——摄像头直播
本文的示例将实现:读取PC摄像头视频数据并以RTMP协议发送为直播流。示例包含了
1、ffmpeg的libavdevice的使用
2、视频解码、编码、推流的基本流程
具有较强的综合性。
要使用libavdevice的相关函数,首先需要注册相关组件
- avdevice_register_all();
接下来我们要列出电脑中可用的dshow设备
- AVFormatContext *pFmtCtx = avformat_alloc_context();
- AVDeviceInfoList *device_info = NULL;
- AVDictionary* options = NULL;
- av_dict_set(&options, "list_devices", "true", 0);
- AVInputFormat *iformat = av_find_input_format("dshow");
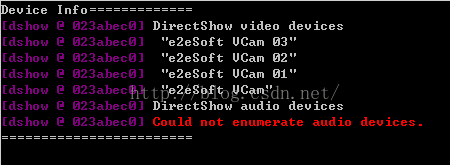
- printf("Device Info=============\n");
- avformat_open_input(&pFmtCtx, "video=dummy", iformat, &options);
- printf("========================\n");
可以看到这里打开设备的步骤基本与打开文件的步骤相同,上面的代码中设置了AVDictionary,这样与在命令行中输入下列命令有相同的效果
- ffmpeg -list_devices true -f dshow -i dummy
以上语句得到的结果如下
这里我的电脑上只有一个虚拟摄像头软件虚拟出来的几个dshow设备,没有音频设备,所以有如上的结果。
需要说明的是,avdevice有一个avdevice_list_devices函数可以枚举系统的采集设备,包括设备名和设备描述,非常适合用于让用户选择要使用的设备,但是不支持dshow设备,所以这里没有使用它。
下一步就可以像打开普通文件一样将上面的具体设备名作为输入打开,并进行相应的初始化设置,如下
- av_register_all();
- //Register Device
- avdevice_register_all();
- avformat_network_init();
- //Show Dshow Device
- show_dshow_device();
- printf("\nChoose capture device: ");
- if (gets(capture_name) == 0)
- {
- printf("Error in gets()\n");
- return -1;
- }
- sprintf(device_name, "video=%s", capture_name);
- ifmt=av_find_input_format("dshow");
- //Set own video device's name
- if (avformat_open_input(&ifmt_ctx, device_name, ifmt, NULL) != 0){
- printf("Couldn't open input stream.(无法打开输入流)\n");
- return -1;
- }
- //input initialize
- if (avformat_find_stream_info(ifmt_ctx, NULL)<0)
- {
- printf("Couldn't find stream information.(无法获取流信息)\n");
- return -1;
- }
- videoindex = -1;
- for (i = 0; i<ifmt_ctx->nb_streams; i++)
- if (ifmt_ctx->streams[i]->codec->codec_type == AVMEDIA_TYPE_VIDEO)
- {
- videoindex = i;
- break;
- }
- if (videoindex == -1)
- {
- printf("Couldn't find a video stream.(没有找到视频流)\n");
- return -1;
- }
- if (avcodec_open2(ifmt_ctx->streams[videoindex]->codec, avcodec_find_decoder(ifmt_ctx->streams[videoindex]->codec->codec_id), NULL)<0)
- {
- printf("Could not open codec.(无法打开解码器)\n");
- return -1;
- }
在选择了输入设备并进行相关初始化之后,需要对输出做相应的初始化。ffmpeg将网络协议和文件同等看待,同时因为使用RTMP协议进行传输,这里我们指定输出为flv格式,编码器使用H.264
- //output initialize
- avformat_alloc_output_context2(&ofmt_ctx, NULL, "flv", out_path);
- //output encoder initialize
- pCodec = avcodec_find_encoder(AV_CODEC_ID_H264);
- if (!pCodec){
- printf("Can not find encoder! (没有找到合适的编码器!)\n");
- return -1;
- }
- pCodecCtx=avcodec_alloc_context3(pCodec);
- pCodecCtx->pix_fmt = PIX_FMT_YUV420P;
- pCodecCtx->width = ifmt_ctx->streams[videoindex]->codec->width;
- pCodecCtx->height = ifmt_ctx->streams[videoindex]->codec->height;
- pCodecCtx->time_base.num = 1;
- pCodecCtx->time_base.den = 25;
- pCodecCtx->bit_rate = 400000;
- pCodecCtx->gop_size = 250;
- /* Some formats,for example,flv, want stream headers to be separate. */
- if (ofmt_ctx->oformat->flags & AVFMT_GLOBALHEADER)
- pCodecCtx->flags |= CODEC_FLAG_GLOBAL_HEADER;
- //H264 codec param
- //pCodecCtx->me_range = 16;
- //pCodecCtx->max_qdiff = 4;
- //pCodecCtx->qcompress = 0.6;
- pCodecCtx->qmin = 10;
- pCodecCtx->qmax = 51;
- //Optional Param
- pCodecCtx->max_b_frames = 3;
- // Set H264 preset and tune
- AVDictionary *param = 0;
- av_dict_set(¶m, "preset", "fast", 0);
- av_dict_set(¶m, "tune", "zerolatency", 0);
- if (avcodec_open2(pCodecCtx, pCodec,¶m) < 0){
- printf("Failed to open encoder! (编码器打开失败!)\n");
- return -1;
- }
- //Add a new stream to output,should be called by the user before avformat_write_header() for muxing
- video_st = avformat_new_stream(ofmt_ctx, pCodec);
- if (video_st == NULL){
- return -1;
- }
- video_st->time_base.num = 1;
- video_st->time_base.den = 25;
- video_st->codec = pCodecCtx;
- //Open output URL,set before avformat_write_header() for muxing
- if (avio_open(&ofmt_ctx->pb,out_path, AVIO_FLAG_READ_WRITE) < 0){
- printf("Failed to open output file! (输出文件打开失败!)\n");
- return -1;
- }
- //Show some Information
- av_dump_format(ofmt_ctx, 0, out_path, 1);
- //Write File Header
- avformat_write_header(ofmt_ctx,NULL);
完成输入和输出的初始化之后,就可以正式开始解码和编码并推流的流程了,这里要注意,摄像头数据往往是RGB格式的,需要将其转换为YUV420P格式,所以要先做如下的准备工作
- //prepare before decode and encode
- dec_pkt = (AVPacket *)av_malloc(sizeof(AVPacket));
- //enc_pkt = (AVPacket *)av_malloc(sizeof(AVPacket));
- //camera data has a pix fmt of RGB,convert it to YUV420
- img_convert_ctx = sws_getContext(ifmt_ctx->streams[videoindex]->codec->width, ifmt_ctx->streams[videoindex]->codec->height,
- ifmt_ctx->streams[videoindex]->codec->pix_fmt, pCodecCtx->width, pCodecCtx->height, PIX_FMT_YUV420P, SWS_BICUBIC, NULL, NULL, NULL);
- pFrameYUV = avcodec_alloc_frame();
- uint8_t *out_buffer = (uint8_t *)av_malloc(avpicture_get_size(PIX_FMT_YUV420P, pCodecCtx->width, pCodecCtx->height));
- avpicture_fill((AVPicture *)pFrameYUV, out_buffer, PIX_FMT_YUV420P, pCodecCtx->width, pCodecCtx->height);
下面就可以正式开始解码、编码和推流了
- //start decode and encode
- int64_t start_time=av_gettime();
- while (av_read_frame(ifmt_ctx, dec_pkt) >= 0){
- if (exit_thread)
- break;
- av_log(NULL, AV_LOG_DEBUG, "Going to reencode the frame\n");
- pframe = av_frame_alloc();
- if (!pframe) {
- ret = AVERROR(ENOMEM);
- return -1;
- }
- //av_packet_rescale_ts(dec_pkt, ifmt_ctx->streams[dec_pkt->stream_index]->time_base,
- // ifmt_ctx->streams[dec_pkt->stream_index]->codec->time_base);
- ret = avcodec_decode_video2(ifmt_ctx->streams[dec_pkt->stream_index]->codec, pframe,
- &dec_got_frame, dec_pkt);
- if (ret < 0) {
- av_frame_free(&pframe);
- av_log(NULL, AV_LOG_ERROR, "Decoding failed\n");
- break;
- }
- if (dec_got_frame){
- sws_scale(img_convert_ctx, (const uint8_t* const*)pframe->data, pframe->linesize, 0, pCodecCtx->height, pFrameYUV->data, pFrameYUV->linesize);
- enc_pkt.data = NULL;
- enc_pkt.size = 0;
- av_init_packet(&enc_pkt);
- ret = avcodec_encode_video2(pCodecCtx, &enc_pkt, pFrameYUV, &enc_got_frame);
- av_frame_free(&pframe);
- if (enc_got_frame == 1){
- //printf("Succeed to encode frame: %5d\tsize:%5d\n", framecnt, enc_pkt.size);
- framecnt++;
- enc_pkt.stream_index = video_st->index;
- //Write PTS
- AVRational time_base = ofmt_ctx->streams[videoindex]->time_base;//{ 1, 1000 };
- AVRational r_framerate1 = ifmt_ctx->streams[videoindex]->r_frame_rate;// { 50, 2 };
- AVRational time_base_q = { 1, AV_TIME_BASE };
- //Duration between 2 frames (us)
- int64_t calc_duration = (double)(AV_TIME_BASE)*(1 / av_q2d(r_framerate1)); //内部时间戳
- //Parameters
- //enc_pkt.pts = (double)(framecnt*calc_duration)*(double)(av_q2d(time_base_q)) / (double)(av_q2d(time_base));
- enc_pkt.pts = av_rescale_q(framecnt*calc_duration, time_base_q, time_base);
- enc_pkt.dts = enc_pkt.pts;
- enc_pkt.duration = av_rescale_q(calc_duration, time_base_q, time_base); //(double)(calc_duration)*(double)(av_q2d(time_base_q)) / (double)(av_q2d(time_base));
- enc_pkt.pos = -1;
- //Delay
- int64_t pts_time = av_rescale_q(enc_pkt.dts, time_base, time_base_q);
- int64_t now_time = av_gettime() - start_time;
- if (pts_time > now_time)
- av_usleep(pts_time - now_time);
- ret = av_interleaved_write_frame(ofmt_ctx, &enc_pkt);
- av_free_packet(&enc_pkt);
- }
- }
- else {
- av_frame_free(&pframe);
- }
- av_free_packet(dec_pkt);
- }
解码部分比较简单,编码部分需要自己计算PTS、DTS,比较复杂。这里通过帧率计算PTS和DTS
首先通过帧率计算每两帧之间的时间间隔,但是要换算
ffmpeg超详细综合教程——摄像头直播的更多相关文章
- [转载] ffmpeg超详细综合教程——摄像头直播
本文的示例将实现:读取PC摄像头视频数据并以RTMP协议发送为直播流.示例包含了 1.ffmpeg的libavdevice的使用 2.视频解码.编码.推流的基本流程 具有较强的综合性. 要使用liba ...
- VMware虚拟机下安装CentOS7.0超详细图文教程
1.本文说明: 官方的第一个文本档案.也就是0_README.txt,大概意思是这样(渣翻译,但是大概意思还是有的). CentOS-7.0-1406-x86_64-DVD.iso:这个镜像(DVD ...
- MySql5.6 Window超详细安装教程
林炳文Evankaka原创作品.转载请注明出处http://blog.csdn.net/evankaka 目录 一.安装包准备二.开始安装三.验证安装四.客户端工具 一.安装包准备 1.下载MySql ...
- MySql5.6Window超详细安装教程(msi 格式的安装)
转自:红黑联盟 http://www.2cto.com/database/201506/409821.html 一.安装包准备 1.下载MySql5.6 http://www.mysql.com/ ...
- 在Ubuntu下进行XMR Monero(门罗币)挖矿的超详细图文教程
大家都知道,最近挖矿什么的非常流行,于是我也在网上看了一些大神写的教程,以及跟一些大神请教过如何挖矿,但是网上的教程都感觉写得不够详细,于是今天我这里整理一个教程,希望能够帮到想要挖矿的朋友. 首先, ...
- 超详细实战教程丨多场景解析如何迁移Rancher Server
本文转自Rancher Labs 作者介绍 王海龙,Rancher中国社区技术经理,负责Rancher中国技术社区的维护和运营.拥有6年的云计算领域经验,经历了OpenStack到Kubernetes ...
- 【建议收藏】Redis超详细入门教程大杂烩
写在前边 Redis入门的整合篇.本篇也算是把2021年redis留下来的坑填上去,重新整合了一翻,点击这里,回顾我的2020与2021~一名大二后台练习生 NoSQL NoSQL(NoSQL = N ...
- 最新MATLAB R2021b超详细安装教程(附完整安装文件)
摘要:本文详细介绍Matlab R2021b的安装步骤,为方便安装这里提供了完整安装文件的百度网盘下载链接供大家使用.从文件下载到证书安装本文都给出了每个步骤的截图,按照图示进行即可轻松完成安装使用. ...
- 最新MATLAB R2020b超详细安装教程(附完整安装文件)
摘要:本文详细介绍Matlab R2020b的安装步骤,为方便安装这里提供了完整安装文件的百度网盘下载链接供大家使用.从文件下载到证书安装本文都给出了每个步骤的截图,按照图示进行即可轻松完成安装使用. ...
随机推荐
- Java_WebKit
1. http://tieba.baidu.com/p/2807579276 下载地址: http://qtjambi.org/downloads https://qt.gitorious.org/q ...
- spring3: AOP 之代理机制
Spring AOP通过代理模式实现,目前支持两种代理:JDK动态代理.CGLIB代理来创建AOP代理,Spring建议优先使用JDK动态代理. JDK动态代理:使用java.lang.reflect ...
- C#限制float有两位小数
string str = (float.Parse(recode)).ToString("f2");//recode是string类型
- 【Python】UnicodeEncodeError: 'ascii' codec can't encode characters in position 0-3
问题如下: UnicodeEncodeError: 'ascii' codec can't encode characters in position 0-3 解决方法: 程序开始加上下面两句 sys ...
- ionic2常见问题——修改应用图标及添加启动画面(官方命令行工具自动生成)
1.项目根目录->resources 分别存放应用图标及添加启动画面,替换成自己的图案既可. 2.这样在命令行中重新运行ionic resources ,就能看到应用图标和名字已经被替换了: 3 ...
- display:inline-block 和 float 水平排列区别?
文档流(Document flow):浮动元素会脱离文档流,并使得周围元素环绕这个元素.而inline-block元素仍在文档流内.因此设置inline-block不需要清除浮动.当然,周围元素不会环 ...
- flask 项目 部署服务器,package安装问题(无外网链接)
1.安装所需的环境/包 1) 在一台开发机器(有网络,编译成功)安装package: pipreqs 语法: pipreqs <项目路径> 将项目所使用的所有包目录将会导出至目录:requ ...
- android xml绘图p113-p117
1.Bitmap <?xml version="1.0" encoding="utf-8"?> <bitmap xmlns:android=& ...
- 【CSAPP】三、程序的机器级表示
本章基于两种相关的机器语言:Intel IA32和x86-64,前者注重32位,后者注重64位. 本章脉络:c\汇编\机器码之间的关系,数据的表示,控制结构如何实现.运行栈,局部变量的存储,数据结构. ...
- WAL日志文件名称格式详解
转自:http://blog.osdba.net/534.html WAL日志文件名称格式详解 PostgreSQL的WAL日志文件在pg_xlog目录下,一般情况下,每个文件为16M大小: osdb ...