Grunt 构建SeaJS
GitHub地址:https://github.com/MrLeo/SeaJS
目录结构
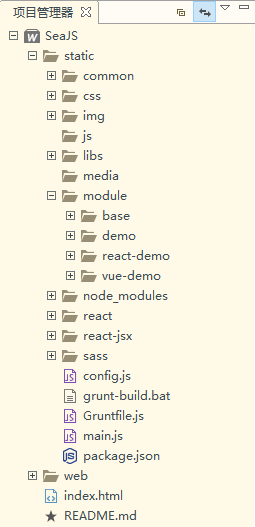
目录结构说明
web存放HTML文件
static存放所有HTML需要用到静态资源文件(css、js、img…)
module存放HTML对应的业务模块common存放与业务无关的模块
Get Start
准备工作
安装
Node.js及npm安装
grunt-cli(允许安装多版本grunt)
$ npm install -g grunt-cli
```
用命令行进入到项目所在目录
$ cd /d F:\WWW\SeaJS\static
```
安装
grunt及 插件 到项目所在目录(--save-dev)
$ npm install grunt --save-dev //grunt
$ npm install grunt-cmd-transport --save-dev //提取模块ID
$ npm install grunt-cmd-concat --save-dev //合并文件
$ npm install grunt-contrib-uglify --save-dev //压缩文件
$ npm install grunt-contrib-clean --save-dev //清理临时目录
```
构建项目
此文件被npm用于存储项目的元数据,以便将此项目发布为npm模块。你可以在此文件中列出项目依赖的grunt和Grunt插件,放置于devDependencies配置段内。
```

{

  "name": "SeaJS",

  "version": "1.0.0",

  "author": "Leo",

  "spm": {

    "alias": { //同 seajs.config 中设置的别名

    	"base": "module/base/base",

    	"jquery": "libs/jquery/jquery-1.8.3.min"

    }

  },

  "devDependencies": { //grunt 构建用到的依赖包

    "grunt": "*", //"*"代表最新版本;"~0.4.1"代表指定版本

    "grunt-cmd-transport": "*",

    "grunt-cmd-concat": "*",

    "grunt-contrib-uglify": "*",

    "grunt-contrib-clean": "*"

  }

}

```
此文件用来配置或定义任务(task)并加载Grunt插件的。Gruntfile.js 是有效的 JavaScript 文件,和package.json文件在同一目录层级。
```js

module.exports = function(grunt) {

    require('time-grunt')(grunt);//Time how long tasks take

    //require('load-grunt-tasks')(grunt);//Load grunt tasks automatically

	grunt.initConfig({

		pkg: grunt.file.readJSON("package.json"), //引入package.json的JSON元数据

		/**

		 * step 1:

		 * 创建一个临时目录

		 * 将需要合并的js文件转为具名函数,并保持独立地保存在这个临时目录

		 */

		transport: {//task任务

			options: {

				paths: ['.'], //模块的路径,'.'代表相对路径,默认的是 sea-modules

				alias: '<%= pkg.spm.alias %>' //模板字符串语法来从package.json引入模块别名

			},

			common: {//target

				options: {

					idleading: 'common-dist/', //构建后的模块ID的前缀

				},

				files: [{

					expand: true, //开启处理动态的src-dest文件映射

					filter: 'isFile', //匹配过滤src文件路径

					cwd: 'common', //所有src指定的匹配都将相对于此处指定的路径(但不包括此路径)

					src: '**/*.js', //相对于cwd路径的匹配模式(**代表当前路径以及子路径)

					dest: '.build/common' //目标文件路径前缀

				}]

			},

			base: {

				options: {

					idleading: 'module/base-dist/',

				},

				files: [{

					expand: true,

					filter: 'isFile',

					cwd: 'module/base',

					src: '**/*.js',

					dest: '.build/module/base'

				}]

			},

			demo: {

				options: {

					idleading: 'module/page-dist/demo/',

				},

				files: [{

					expand: true,

					filter: 'isFile',

					cwd: 'module/page/demo',

					src: '**/*.js',

					dest: '.build/module/page/demo'

				}]

			}

		},

		/**

		 * step 2:

		 * 将临时目录下独立的具名函数文件 合并为 1个 js 文件

		 * 将这个合并的 js 文件 拷贝到 我们的输出目录

		 */

		concat: {

			options: {

				separator: ';', // 定义一个用于插入合并输出文件之间的字符

				include: 'relative' //relative(默认)只会合并相对标识的依赖;;all会合并所有依赖

			},

			common: {

				files: [{

					expand: true,

					ext: '.js',

					cwd: '.build/common/',

					src: ['**/*.js'],

					dest: 'common-dist/'

				}]

			},

			demo: {

				files: {

					'module/page-dist/demo/index.js': ['.build/module/page/demo/index.js'],

					'module/page-dist/demo/index-debug.js': ['.build/module/page/demo/index-debug.js']

				}

			}

		},

		/**

		 * step 3:

		 * 压缩 这个 合并后的 文件

		 */

		uglify: {

			common: {

				options: {

					// 此处定义的banner注释将插入到输出文件的顶部

					banner: '/*! <%= pkg.author %>  @  <%= grunt.template.today("dd-mm-yyyy") %> */\n'

				},

				files: [{

					expand: true,

					ext: '.js',

					cwd: 'common-dist/',

					src: ['**/*.js', '!**/*-debug.js'],

					dest: 'common-dist/'

				}]

			},

			main: {

				options: {

					// 此处定义的banner注释将插入到输出文件的顶部

					banner: '/*! <%= pkg.author %>  @  <%= grunt.template.today("dd-mm-yyyy") %> */\n'

				},

				files: {

					'module/page-dist/demo/index.js': ['module/page-dist/demo/index.js']

				}

			}

		},

		/**

		 * step 4:

		 * 将这个临时目录删除

		 */

		clean: {

			spm: ['.build']

		}

	});

	grunt.loadNpmTasks('grunt-cmd-transport');

	grunt.loadNpmTasks('grunt-cmd-concat');

	grunt.loadNpmTasks('grunt-contrib-clean');

	grunt.loadNpmTasks('grunt-contrib-uglify');

	grunt.registerTask('build', ['transport', 'concat', 'uglify', 'clean']);

};

```
- 用命令行进入到 Gruntfile.js 所在目录,执行 grunt
grunt build
参考
- Grunt中文文档
- https://github.com/seajs/seajs/issues/672
- https://github.com/jixiangac/lili/tree/master/public/js
- http://www.cnblogs.com/hongchenok/p/3924633.html
- http://www.jackness.org/2015/01/02/grunt-实例之-构建-seajs-项目/
Grunt 构建SeaJS的更多相关文章
- 使用grunt构建seajs项目
1.安装nodejs 2.安装grunt-cli npm install -g grunt-cli 3.进入到项目目录,同时准备好package.json和Gruntfile.js文件 //packa ...
- ☀【SeaJS】SeaJS Grunt构建
如何使用Grunt构建一个中型项目?https://github.com/twinstony/seajs-grunt-build spmjshttp://docs.spmjs.org/doc/inde ...
- Grunt打包seajs项目
在使用seajs时,常常将若干脚本分为多次require进来,这样开发中比较方便,但是,会增加http请求次数,在生产环境中需要进行打包合并.压缩等操作. 以Grunt构建工具为例,对一个seajs项 ...
- grunt与seajs结合应用
9.seajs构建的问题 01.png和02.jpg 10.seajs与grunt如何结合开发.两个插件:grunt-cmd-transport grunt-cmd-contact ,去grunt官网 ...
- Grunt构建工具能做哪些事?
Grunt到底有什么作用?一般用来干嘛? 很多前端的工作,包括Less编译.javascript压缩.Css压缩等零零碎碎的工作, 都可以让Grunt来做. 实际上在项目开发中,一般是前端代码 与 后 ...
- 前端工程化系列[04]-Grunt构建工具的使用进阶
在前端工程化系列[02]-Grunt构建工具的基本使用和前端工程化系列[03]-Grunt构建工具的运转机制这两篇文章中,我们对Grunt以及Grunt插件的使用已经有了初步的认识,并探讨了Grunt ...
- 前端工程化系列[03]-Grunt构建工具的运转机制
在前端工程化系列[02]-Grunt构建工具的基本使用这篇文章中,已经对Grunt做了简单的介绍,此外,我们还知道了该如何来安装Grunt环境,以及使用一些常见的插件了,这篇文章主要介绍Grunt的核 ...
- 使用grunt构建前端项目
1. grunt构建工具是基于nodejs上的,所以在使用之前一定要先安装好nodejs 2. 安装好nodejs后,node -v查看node版本 npm-v 查看npm版本信息 3. 在需要用到的 ...
- 构建seajs业务模块之grunt VS spm build
在最开始,我并不知道grunt可以构建CMD模块.(以下spm指代spm build) 当时正困惑于如何用spm方便的构建业务模块,后来看到@twinstony (感谢@twinstony的分享)使用 ...
随机推荐
- 将远程数据库中的某表数据复制到本数据库(ORACLE)
1. 建立 DATABASE LINKCREATE PUBLIC DATABASE LINK ABCCONNECT TO SA IDENTIFIED BY PASSWORDUSING '(DESCRI ...
- java邮件发送 qq与163邮箱互发和qq和163邮箱发送其他邮箱实例
研究了近一天的时间,通过查阅相关资料,终于对java发送邮件的机制,原理有了一点点的理解,希望能够帮到大家! 1.首先要向你的项目里导入1个jar包:mail-1.4.4.jar即可(实现qq和163 ...
- 下拉选择框加listview删除
package com.downselect; import java.util.ArrayList; import android.R.array; import android.app.Activ ...
- 控制Input框输入的为大写字母
本来我的想法是Jquery来控制的,万万没想到...用Css就可以实现!!!! .toUp input{ text-transform:uppercase; } 感谢: http:// ...
- 重构25-Introduce Design By Contract checks(契约式设计)
契约式设计(DBC,Design By Contract)定义了方法应该包含输入和输出验证.因此,可以确保所有的工作都是基于可用的数据,并且所有的行为都是可预料的.否则,将返回异常或错误并在方法中进行 ...
- 剑指Offer02 替换空格
/************************************************************************* > File Name: 02_Replac ...
- LeetCode 55
Jump Game Given an array of non-negative integers, you are initially positioned at the first index o ...
- poj 2152 树形DP
思路:这个没思路,看了陈启峰的论文写得. #include<map> #include<set> #include<cmath> #include<queue ...
- Java计算机网络
计算机网络: 分布在不同的地域的计算机通过外接设备(路由器),实现共享和数据传输网络编程:网络编程主要是用来解决计算机和计算机之间的数据传输网络编程:不需要基于HTML就可以达到数据之间的传输,比如Q ...
- 发现个div float的小秘密
浮动时宽度塌缩了不再是父元素100%.