Win10手记-取色器ColorPicker的实现
最近个人项目需要用到ColorPicker,但是适用于WinRT和Win10的基本没用,所以只能自己造轮子了。
平台环境
- Windows 10
- Visual Studio 2015
思路
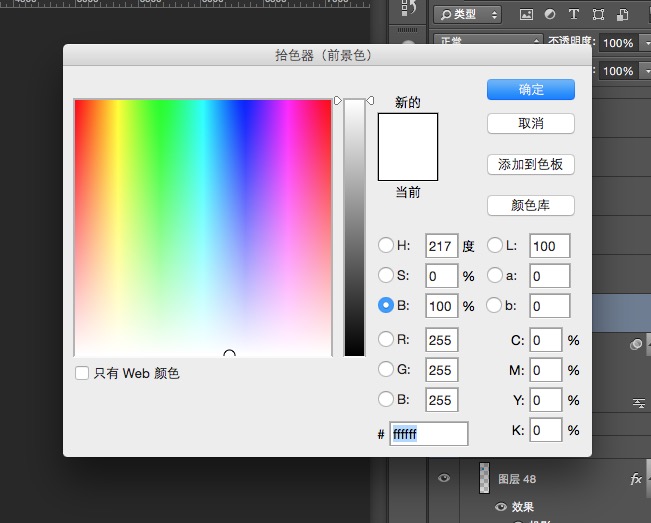
确定需求后,我查找了各方信息,发现PhotoShop的ColorPicker最符合我的需求,这里我们实现的仿PhotoShop HSB取色器,样式如下图。
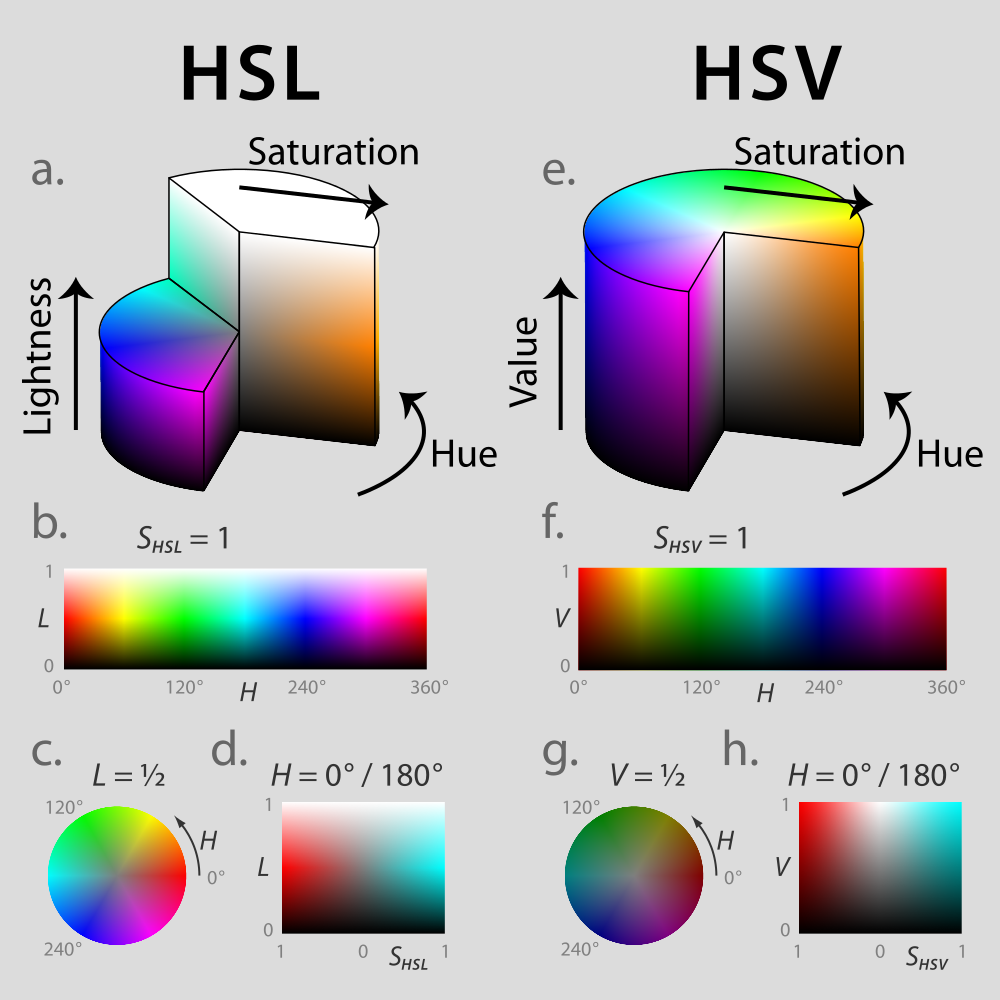
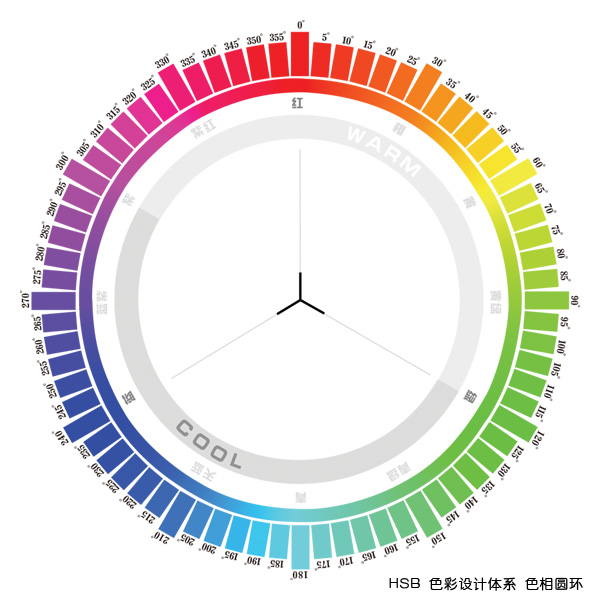
确定目标后,则需要研究具体的调色原理了。我们都知道,程序使用的一般都是RGB颜色,而这里使用的则是HSB颜色。顾名思义,HSB分别是指色相(Hue)纯度(Saturation)明度(Brightness),这三个参数构成了HSB颜色,这比RGB颜色更易于选取,能够同时提供的颜色种类最多,对应HSV。色相可以通过色环来表示,HSB三个参数均和RGB保持着数学上的关系。详细信息可见于维基百科:https://en.wikipedia.org/wiki/HSL_and_HSV
这里计算流程为先计算色相,然后固定亮度,最后计算饱和度。首先对于色相,计算相对简单,分析色环,即可发现处于不同度数区间对应的RGB值也是有规律的。
具体来说假定HSB值为(H,100%,100%)条件下,RGB值对应关系如下:
|
H Color Value |
|
|
----------------------------- |
|
|
0-60 G 0->255 |
|
|
60-120 R 255->0 |
|
|
120-180 B 0->255 |
|
|
180-240 G 255->0 |
|
|
240-360 R 0->255 |
|
|
300-360 B 255->0 |
|
接下来根据饱和度S来进一步计算出RGB,此时假定条件为(H,S,100%),计算公式如下:
r"= r'+ (255 - r') * s
g"= g'+ (255 - g') * s
b"= b'+ (255 - b') * s
其中r',g',b'分别为第一步计算出的RGB结果。
最后一步,亮度L值与RGB关系最简单,RGB只需要分别乘以亮度即可。
实现代码
核心计算类CWColorService
using System;

using System.Collections.Generic;

using System.Linq;

using System.Text;

using System.Threading.Tasks;

using Windows.UI;

namespace CWColorPicker.Core

{

    public class CWColorService

    {

        /// <summary>

        /// Convert HSB value to RGB value

        /// </summary>

        /// <param name="hsb">HSB value</param>

        /// <returns>RGB value</returns>

        public static int[] HSBToRGB(float[] hsb)

        {

            var rgb = new float[];

            var hValue = hsb[];

            /*

            Firstly, we need to calculate RGB value, when the HSB value is (h,100%,100%).

                H         Color     Value

              ----------------------------

               0-60         G       0->255

               60-120       R       255->0

               120-180      B       0->255

               180-240      G       255->0

               240-360      R       0->255

               300-360      B       255->0

            */

            if (hValue <= )

            {

                rgb[] = ;

                rgb[] = hValue / 60.0f * ;

            }

            else if (hValue <= )

            {

                hValue -= ;

                rgb[] = ;

                rgb[] = ( - hValue / 60.0f) * ;

            }

            else if (hValue <= )

            {

                hValue -= ;

                rgb[] = ;

                rgb[] = hValue / 60.0f * ;

            }

            else if (hValue <= )

            {

                rgb[] = ;

                hValue -= ;

                rgb[] = ( - hValue / 60.0f) * ;

            }

            else if (hValue <= )

            {

                rgb[] = ;

                hValue -= ;

                rgb[] = hValue / 60.0f * ;

            }

            else

            {

                hValue -= ;

                rgb[] = ;

                rgb[] = ( - hValue / 60.0f) * ;

            }

            /*

            Secondly, acorrding to the value of staturation, we can calculate the rgb value, when the value of hsb is (h,s,100%)

            -------------------------

            r"= r'+ (255 - r') * s

            g"= g'+ (255 - g') * s

            b"= b'+ (255 - b') * s

            */

            for (int i = ; i < ; i++)

            {

                rgb[i] += ( - rgb[i]) * hsb[];

            }

            var result = new int[];

            /*

            Finally, we need to calculate the real value of rgb, according to the value of brightness

            r = r" * br

            g = g" * br

            b = g" * br

            */

            for (int i = ; i < ; i++)

            {

                rgb[i] *= hsb[];

                result[i] = (int)(rgb[i] + 0.5);

            }

            return result;

        }

        /// <summary>

        /// Convert RGB value to HSB value

        /// </summary>

        /// <param name="rgb">RGB Value</param>

        /// <returns></returns>

        public static float[] RGBToHSB(int[] rgb)

        {

            var result = new float[];

            return result;

        }

        /// <summary>

        /// get color from rgb value

        /// </summary>

        /// <param name="r"></param>

        /// <param name="g"></param>

        /// <param name="b"></param>

        /// <returns></returns>

        public static Color ColorFromRGB(int r,int g,int b)

        {

            var color = Color.FromArgb(, (byte)r, (byte)g, (byte)b);

            return color;

        }

        public static Color ColorFromRGB(int[] rgb)

        {

            var color = ColorFromRGB(rgb[], rgb[], rgb[]);

            return color;

        }

    }

}
自定义Xaml控件
<UserControl

    x:Class="CWColorPicker.UI.CWColorPicker"

    xmlns="http://schemas.microsoft.com/winfx/2006/xaml/presentation"

    xmlns:x="http://schemas.microsoft.com/winfx/2006/xaml"

    xmlns:local="using:CWColorPicker.UI"

    xmlns:d="http://schemas.microsoft.com/expression/blend/2008"

    xmlns:mc="http://schemas.openxmlformats.org/markup-compatibility/2006"

    mc:Ignorable="d"

    d:DesignHeight="150"

    d:DesignWidth="150">

    <Grid x:Name="ColorPanel">

        <Image x:Name="ColorImage" Source="ms-appx:///Resource/color-pan.png" HorizontalAlignment="Stretch" VerticalAlignment="Stretch" PointerPressed="ColorImage_PointerPressed" Margin="0"></Image>

    </Grid>

</UserControl>
namespace CWColorPicker.UI

{

    public sealed partial class CWColorPicker : UserControl

    {

        /// <summary>

        /// current selected color

        /// </summary>

        public Color Color

        {

            get { return (Color)GetValue(ColorProperty); }

            set { SetValue(ColorProperty, value); }

        }

        // Using a DependencyProperty as the backing store for Color.  This enables animation, styling, binding, etc...

        public static readonly DependencyProperty ColorProperty =

            DependencyProperty.Register("Color", typeof(Color), typeof(CWColorPicker), new PropertyMetadata());

        /// <summary>

        /// current ponit in color picker

        /// </summary>

        public Point ColorPoint

        {

            get { return (Point)GetValue(ColorPointProperty); }

            set { SetValue(ColorPointProperty, value); }

        }

        // Using a DependencyProperty as the backing store for ColorPoint.  This enables animation, styling, binding, etc...

        public static readonly DependencyProperty ColorPointProperty =

            DependencyProperty.Register("ColorPoint", typeof(Point), typeof(CWColorPicker), new PropertyMetadata());

        /// <summary>

        /// ColorSelected Event

        /// </summary>

        public event EventHandler<CWColorSelectedArgs> ColorSelected;

        private void ColorChange(float[] hsb)

        {

            if (ColorSelected != null)

            {

                ColorSelected(this, new CWColorSelectedArgs(CWColorService.ColorFromRGB(CWColorService.HSBToRGB(hsb))));

            }

        }

        private void ColorChange(Color color)

        {

            if (ColorSelected != null)

            {

                ColorSelected(this, new CWColorSelectedArgs(color));

            }

        }

        public CWColorPicker()

        {

            this.InitializeComponent();

            initPanelImage();

        }

        /// <summary>

        /// load resource image from dll

        /// </summary>

        private async void initPanelImage()

        {

            var panel = new BitmapImage();

            var imageStream = Assembly.Load(new AssemblyName("CWColorPicker")).GetManifestResourceStream("CWColorPicker.Resource.color-pan.png");

            await panel.SetSourceAsync(imageStream.AsRandomAccessStream());

            this.ColorImage.Source = panel;

        }

        /// <summary>

        /// calculate the color according to the touch point

        /// </summary>

        /// <param name="sender"></param>

        /// <param name="e"></param>

        private void ColorImage_PointerPressed(object sender, PointerRoutedEventArgs e)

        {

            // Debug.WriteLine("pressed");

            //  Debug.WriteLine(e.GetCurrentPoint(this.ColorPanel).Position);

            var position = e.GetCurrentPoint(this.ColorImage).Position;

            var hsb = new float[];

            hsb[] = 1.0f;

            hsb[] = (float)(int)(position.X / this.ColorImage.ActualWidth * );

            hsb[] = float.Parse((position.Y / this.ColorImage.ActualHeight).ToString("0.00"));

            this.Color = CWColorService.ColorFromRGB(CWColorService.HSBToRGB(hsb));

            this.ColorPoint = position;

            ColorChange(this.Color);

        }

    }

}
其他代码及完整项目可以在Github上获取,地址:https://github.com/ChangweiZhang/CWColorPicker
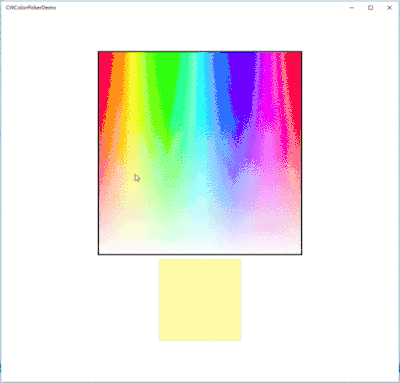
实现效果
Win10手记-取色器ColorPicker的实现的更多相关文章
- powerpoint取色器有什么用|ppt取色器使用教程
在使用powerpoint过程中常常发现一些功能我们很少用到,其实是自己不会用的原因,关于powerpoint取色器有什么用呢?接下来我们一起来学一下ppt取色器使用教程. powerpoint取色器 ...
- TakeColor 屏幕取色器 8.0 中文绿色版
软件名称: TakeColor 屏幕取色器软件语言: 简体中文授权方式: 免费软件运行环境: Win8 / Win7 / Vista / WinXP软件大小: 210KB图片预览: 软件简介:使用方便 ...
- C#取色器
闲来无事,就写了一个取色器.原理其实很简单,只需要两步, 获取鼠标光标的位置, 获取当前鼠标光标的位置的RGB颜色值. 获取鼠标光标的位置: System.Drawing.Point p = Mous ...
- 恢复Win10照片查看器
批处理文件: @echo off&cd\&color 0a&cls echo 恢复Win10照片查看器 reg add "HKLM\SOFTWARE\Microsof ...
- ColorPix——到目前为止最好用的屏幕取色器
分享一个颜色取色器网页.PPT.EXCEL配色不再烦恼 简单易用 大家做商业.企业报告的时候是不是经常遇到要调色的困扰呢?PPT.EXCEL等颜色选取会对报告有质的影响!!要更专业要更有美感!给大家分 ...
- Arava: 用 swing 写一个取色器
备哥以前发我了一个小工具,TakeColor 取色器.来复刻一个吧. 分析一下:顶部是菜单,左侧框显示当前鼠标所在的颜色(下面显示当前坐标和颜色值,默认RGB),中间框显示鼠标周围区域,右侧显示取色的 ...
- 设置Win10文件资源管理器默认打开“这台电脑”
当Windows系统进入Win7之后,任务栏默认的文件资源管理器图标功能是“库”:Win8/Win8.1的这一按钮打开的是“这台电脑”.进入Win10之后,目前这一功能默认变为“快速访问”(曾经被称为 ...
- win10 Qt 调试器未设置
安装win10后一直用vs调试,没有用qt调试,这次启动调试,发现提示调试器未设置. 解决办法: 需要重新安装wdk 10 https://developer.microsoft.com/zh-cn/ ...
- win10照片查看器不能看jpg等格式图片
1.首先,我们需要使用注册表编辑器来开启Win10系统照片查看器功能,因为其实这个功能是被隐藏了,那么按下Windows徽标键+R键,打开运行命令窗口,输入“regedit”命令. 2.打开注册表编辑 ...
随机推荐
- cdnbest里站点域名不同步到节点,报400错误的一般原因
报400错误一般是站点里的域名没有同步到节点上面的原因,产生的原因一般是下面两点原因: 1.检查节点列表如下图所示的状态是否打钩,这是节点和主控的通信状态,打叉表示连接有问题 这里打叉的几种原因(1) ...
- 图片转base64上传,视频同理。
body: <input type="file" id="img" type="file" onchange="up()&q ...
- PHP安装linux
PHP 7.1.26 安装 1. 下载安装包 例php-7.1.26.tar.gz 下载地址:http://cn2.php.net/downloads.php 2. 放入/root 3. 切换目录 # ...
- pythone函数基础(8)内置函数学习
内置函数学习# sorted# map# filter# max# sum# round# chr# ord# dir# bool# eval# exec# zipimport mathres = m ...
- application/json和application/x-www-form-urlencoded使用选择
一.参考资料 选application/x-www-form-urlencoded还是application/json? @RequestBody应用 二.理解 1.@RequestBody的作用 注 ...
- vue-computed计算属性
计算属性:用来封装你想对一个属性进行的操作 computed VS mothod实现的效果和定义一个methods中的function相同,但是他们的区别在于:methods的function当触发重 ...
- 我的java学习之旅--一些基础
(因为我粗略学过C,C++,Python,了解过他们的一些语法,所以为了使得java的入门更为顺畅,便会忽略一些和C语法相类似的地方,着重点明一些java自己的特色之处.也减轻一下自己写文字的负担.) ...
- day0-功能自动化的前提
自动化不是万能的,不是什么产品都适合自动化测试,那些产品适合自动化测试? 只要满足下面三个条件就可以进行自动化测试 一:软件需求变动不频繁 二:项目周期较长 自动化测试框架的设计.脚本的开发与调试需要 ...
- java多线程系列16 线程池
当系统系统规模较小,我们可以不使用线程池.但是当系统到达一定规模,频繁的创建和销毁线程池会消耗很多资源. 合理利用线程池能够带来三个好处. 1降低资源消耗.通过重复利用已创建的线程降低线程创建和销毁造 ...
- ubuntu 应用添加进环境变量
BG:公司同事使用的电脑系统大多为windows ,有部分mac和Ubuntu(我就是那个部分Ubuntu),某些情况为了统一格式,便下载了一些解压即可使用的软件,但是每次点开文件夹然后点开程序很繁琐 ...