mascara-2(MetaMask/mascara本地实现)-连接线上钱包
https://github.com/MetaMask/mascara
(beta) Add MetaMask to your dapp even if the user doesn't have the extension installed
可以开始分析一下这里的代码,从package.json中我们可以看到start中的内容:
  "scripts": {

    "test": "echo \"Error: no test specified\" && exit 1",

    "start": "node example/server/"

  },
那么就从example/server/开始,这里有两个文件index.js和util.js:
index.js
const express = require('express')

//const createMetamascaraServer = require('../server/'),这个是自己设置服务器,而不是使用wallet.metamask.io的时候使用的,之后再讲

const createBundle = require('./util').createBundle //这两个的作用其实就是实时监督app.js的变化并将其使用browserify转成浏览器使用的模式app-bundle.js

const serveBundle = require('./util').serveBundle

//

// Dapp Server

//

const dappServer = express()

// serve dapp bundle

serveBundle(dappServer, '/app-bundle.js', createBundle(require.resolve('../app.js')))

dappServer.use(express.static(__dirname + '/../app/')) //这样使用http://localhost:9010访问时就会去(__dirname + '/../app/')的位置调用index.html

// start the server

const dappPort = '' //网页监听端口

dappServer.listen(dappPort)

console.log(`Dapp listening on port ${dappPort}`)
util.js
const browserify = require('browserify')

const watchify = require('watchify')

module.exports = {

  serveBundle,

  createBundle,

}

function serveBundle(server, path, bundle){//就是当浏览器中调用了path时,上面可知为'/app-bundle.js'

  server.get(path, function(req, res){

    res.setHeader('Content-Type', 'application/javascript; charset=UTF-8') //设置header

    res.send(bundle.latest) //4 并且返回打包后的文件,即可以用于浏览器的app-bundle.js

  })

}

function createBundle(entryPoint){//entryPoint是'../app.js'的完整绝对路径

  var bundleContainer = {}

  var bundler = browserify({//这一部分的内容与browserify的插件watchify有关

    entries: [entryPoint],

    cache: {},

    packageCache: {},

    plugin: [watchify],//watchify让文件每次变动都编译

  })

  bundler.on('update', bundle)//2 当文件有变化,就会重新再打包一次,调用bundle()

  bundle()//1 先执行一次完整的打包

  return bundleContainer

  function bundle() {

    bundler.bundle(function(err, result){//3 即将browserify后的文件打包成一个

      if (err) {

        console.log(`Bundle failed! (${entryPoint})`)

        console.error(err)

        return

      }

      console.log(`Bundle updated! (${entryPoint})`)

      bundleContainer.latest = result.toString()//

    })

  }

}
⚠️下面的http://localhost:9001是设置的本地的server port(就是连接的区块链的端口),但是从上面的index.js文件可以看出它这里只设置了dapp server,端口为9010,所以这里我们不设置host,使用其默认的https://wallet.metamask.io,去调用页面版
mascara/example/app/index.html
<!doctype html>

<html lang="en">

<head>

  <meta charset="utf-8">

  <title>MetaMask ZeroClient Example</title>

</head>

<body>

  <button id="action-button-1">GET ACCOUNT</button>

  <div id="account"></div>

  <button id="action-button-2">SEND TRANSACTION</button>

  <div id="cb-value" ></div>
  <!-- browserify得到的app-bundle.js就是在这里使用 -->

  <script src="./app-bundle.js"></script>

  <iframe src="https://wallet.metamask.io"></iframe>

  <!-- <iframe src="http://localhost:9001"></iframe> 将这里换成了上面的-->

</body>

</html>
再来就是
const metamask = require('../mascara')

const EthQuery = require('ethjs-query')

window.addEventListener('load', loadProvider)

window.addEventListener('message', console.warn)

// metamask.setupWidget({host: 'http://localhost:9001'}),改了,看下面的lib/setup-widget.js

metamask.setupWidget()

async function loadProvider() {

  // const ethereumProvider = metamask.createDefaultProvider({host: 'http://localhost:9001'}),改了

  const ethereumProvider = metamask.createDefaultProvider()

  global.ethQuery = new EthQuery(ethereumProvider)

  const accounts = await ethQuery.accounts()

   window.METAMASK_ACCOUNT = accounts[] || 'locked'

  logToDom(accounts.length ? accounts[] : 'LOCKED or undefined', 'account') //在<div id="account"></div>处显示账户信息或者'LOCKED or undefined',一开始不点击get account也会显示

  setupButtons(ethQuery)

}

function logToDom(message, context){

  document.getElementById(context).innerText = message

  console.log(message)

}

function setupButtons (ethQuery) {

  const accountButton = document.getElementById('action-button-1')

  accountButton.addEventListener('click', async () => {//当点击了get account按钮就会显示你在wallet.metamask.io钱包上的账户的信息(当有账户且账户解锁)或者'LOCKED or undefined'

    const accounts = await ethQuery.accounts()

    window.METAMASK_ACCOUNT = accounts[] || 'locked'

    logToDom(accounts.length ? accounts[] : 'LOCKED or undefined', 'account')

  })

  const txButton = document.getElementById('action-button-2')

  txButton.addEventListener('click', async () => {//当点击send Transaction按钮时,将会弹出一个窗口确认交易

    if (!window.METAMASK_ACCOUNT || window.METAMASK_ACCOUNT === 'locked') return

    const txHash = await ethQuery.sendTransaction({//产生一个自己到自己的交易,钱数为0,但会花费gas

      from: window.METAMASK_ACCOUNT,

      to: window.METAMASK_ACCOUNT,

      data: '',

    })

    logToDom(txHash, 'cb-value')//然后在<div id="cb-value" ></div>处得到交易hash

  })

}
接下来就是const metamask = require('../mascara')中调用的
mascara/mascara.js
const setupProvider = require('./lib/setup-provider.js')

const setupDappAutoReload = require('./lib/auto-reload.js')

const setupWidget = require('./lib/setup-widget.js')

const config = require('./config.json')//设置了调用后会导致弹出窗口的方法

module.exports = {

  createDefaultProvider,

  // disabled for now

  setupWidget,

}

function createDefaultProvider (opts = {}) {//1使用这个来设置你连接的本地区块链等,如果没有设置则默认为连接一个在线版的metamask钱包

  const host = opts.host || 'https://wallet.metamask.io' //2 这里host假设设置index.js处写的http://localhost:9001,那么就会调用本地,而不会去调用线上钱包了https://wallet.metamask.io

  //

  // setup provider

  //

  const provider = setupProvider({//3这个就会去调用setup-provider.js中的getProvider(opts)函数,opts为{mascaraUrl: 'http://localhost:9001/proxy/'},或'http://wallet.metamask.io/proxy/'

    mascaraUrl: host + '/proxy/',

  })//14 然后这里就能够得到inpagePrivider

  instrumentForUserInteractionTriggers(provider)//15 就是如果用户通过provider.sendAsync异步调用的是config.json中指明的几个运行要弹出页面的方法的话

  //

  // ui stuff

  //

  let shouldPop = false//17如果用户调用的不是需要弹窗的方法,则设置为false

  window.addEventListener('click', maybeTriggerPopup)//18 当页面有点击的操作时,调用函数maybeTriggerPopup

  return !window.web3 ? setupDappAutoReload(provider, provider.publicConfigStore) : provider

  //

  // util

  //

  function maybeTriggerPopup(event){//19 查看是否需要弹出窗口

    if (!shouldPop) return//20 不需要则返回

    shouldPop = false//21需要则先设为false

    window.open(host, '', 'width=360 height=500')//22 然后打开一个窗口,host为你设置的区块链http://localhost:9001,或者在线钱包'https://wallet.metamask.io'设置的弹出页面

  }

  function instrumentForUserInteractionTriggers(provider){//用来查看调用的方法是否需要弹出窗口,如果需要就将shouldPop设为true

    if (window.web3) return provider

    const _super = provider.sendAsync.bind(provider)//16 将_super上下文环境设置为传入的provider环境

    provider.sendAsync = function (payload, cb) {//16 重新定义provider.sendAsync要先设置shouldPop = true

      if (config.ethereum['should-show-ui'].includes(payload.method)) {

        shouldPop = true

      }

      _super(payload, cb)//16 然后再次调用该_super方法,即在传入的provider环境运行provider.sendAsync函数,就是使用的还是之前的provider.sendAsync方法,而不是上面新定义的方法

    }

  }

}

// function setupWidget (opts = {}) {

// }
接下来就是对lib文档的讲解了
const setupIframe = require('./setup-iframe.js')

const MetamaskInpageProvider = require('./inpage-provider.js')

module.exports = getProvider

function getProvider(opts){//4 opts为{mascaraUrl: 'http://localhost:9001/proxy/'}或'http://wallet.metamask.io/proxy/'

  if (global.web3) {//5 如果测试到全局有一个web3接口,就说明连接的是在线钱包,那么就返回在线钱包的provider

    console.log('MetaMask ZeroClient - using environmental web3 provider')

    return global.web3.currentProvider

  }

  console.log('MetaMask ZeroClient - injecting zero-client iframe!')

  let iframeStream = setupIframe({//6 否则就说明我们使用的是自己的区块链,那么就要插入mascara iframe了,调用setup-iframe.js的setupIframe(opts)

    zeroClientProvider: opts.mascaraUrl,//7 opts = {zeroClientProvider: 'http://localhost:9001/proxy/'}或'http://wallet.metamask.io/proxy/'

  })//返回Iframe{src:'http://localhost:9001/proxy/',container:document.head,sandboxAttributes:['allow-scripts', 'allow-popups', 'allow-same-origin']}

  return new MetamaskInpageProvider(iframeStream)//11 13 MetamaskInpageProvider与页面连接,返回其self作为provider

}
const Iframe = require('iframe')//看本博客的iframe-metamask学习使用

const createIframeStream = require('iframe-stream').IframeStream

function setupIframe(opts) {//8 opts = {zeroClientProvider: 'http://localhost:9001/proxy/'}或'http://wallet.metamask.io/proxy/'

  opts = opts || {}

  let frame = Iframe({//9 设置<Iframe>内容属性

    src: opts.zeroClientProvider || 'https://wallet.metamask.io/',

    container: opts.container || document.head,

    sandboxAttributes: opts.sandboxAttributes || ['allow-scripts', 'allow-popups', 'allow-same-origin'],

  })

  let iframe = frame.iframe

  iframe.style.setProperty('display', 'none')//相当于style="display:none,将其设置为隐藏

  return createIframeStream(iframe)//10创建一个IframeStream流并返回,Iframe{src:'http://localhost:9001/proxy/',container:document.head,sandboxAttributes:['allow-scripts', 'allow-popups', 'allow-same-origin']}

}

module.exports = setupIframe
sandbox是安全级别,加上sandbox表示该iframe框架的限制:
| 值 | 描述 |
|---|---|
| "" | 应用以下所有的限制。 |
| allow-same-origin | 允许 iframe 内容与包含文档是有相同的来源的 |
| allow-top-navigation | 允许 iframe 内容是从包含文档导航(加载)内容。 |
| allow-forms | 允许表单提交。 |
| allow-scripts | 允许脚本执行。 |
mascara/lib/inpage-provider.js 详细学习看本博客MetaMask/metamask-inpage-provider
const pump = require('pump')

const RpcEngine = require('json-rpc-engine')

const createIdRemapMiddleware = require('json-rpc-engine/src/idRemapMiddleware')

const createStreamMiddleware = require('json-rpc-middleware-stream')

const LocalStorageStore = require('obs-store')

const ObjectMultiplex = require('obj-multiplex')

const config = require('../config.json')

module.exports = MetamaskInpageProvider

function MetamaskInpageProvider (connectionStream) {//12 connectionStream为生成的IframeStream

  const self = this

  // setup connectionStream multiplexing

  const mux = self.mux = new ObjectMultiplex()

  pump(

    connectionStream,

    mux,

    connectionStream,

    (err) => logStreamDisconnectWarning('MetaMask', err)

  )

  // subscribe to metamask public config (one-way)

  self.publicConfigStore = new LocalStorageStore({ storageKey: 'MetaMask-Config' })

  pump(

    mux.createStream('publicConfig'),

    self.publicConfigStore,

    (err) => logStreamDisconnectWarning('MetaMask PublicConfigStore', err)

  )

  // ignore phishing warning message (handled elsewhere)

  mux.ignoreStream('phishing')

  // connect to async provider

  const streamMiddleware = createStreamMiddleware()

  pump(

    streamMiddleware.stream,

    mux.createStream('provider'),

    streamMiddleware.stream,

    (err) => logStreamDisconnectWarning('MetaMask RpcProvider', err)

  )

  // handle sendAsync requests via dapp-side rpc engine

  const rpcEngine = new RpcEngine()

  rpcEngine.push(createIdRemapMiddleware())

  // deprecations

  rpcEngine.push((req, res, next, end) =>{

    const deprecationMessage = config['ethereum']['deprecated-methods'][req.method]//看你是不是用了eth_sign这个将要被弃用的方法

    if (!deprecationMessage) return next()//如果不是的话,就继续往下执行

    end(new Error(`MetaMask - ${deprecationMessage}`))//如果是的话,就返回弃用的消息,并推荐使用新方法eth_signTypedData

  })

  rpcEngine.push(streamMiddleware)

  self.rpcEngine = rpcEngine

}

// handle sendAsync requests via asyncProvider

// also remap ids inbound and outbound

MetamaskInpageProvider.prototype.sendAsync = function (payload, cb) {

  const self = this

  self.rpcEngine.handle(payload, cb)

}

MetamaskInpageProvider.prototype.send = function (payload) {

  const self = this

  let selectedAddress

  let result = null

  switch (payload.method) {

    case 'eth_accounts':

      // read from localStorage

      selectedAddress = self.publicConfigStore.getState().selectedAddress

      result = selectedAddress ? [selectedAddress] : []

      break

    case 'eth_coinbase':

      // read from localStorage

      selectedAddress = self.publicConfigStore.getState().selectedAddress

      result = selectedAddress || null

      break

    case 'eth_uninstallFilter':

      self.sendAsync(payload, noop)

      result = true

      break

    case 'net_version':

      const networkVersion = self.publicConfigStore.getState().networkVersion

      result = networkVersion || null

      break

    // throw not-supported Error

    default:

      let link = 'https://github.com/MetaMask/faq/blob/master/DEVELOPERS.md#dizzy-all-async---think-of-metamask-as-a-light-client'

      let message = `The MetaMask Web3 object does not support synchronous methods like ${payload.method} without a callback parameter. See ${link} for details.`

      throw new Error(message)

  }

  // return the result

  return {

    id: payload.id,

    jsonrpc: payload.jsonrpc,

    result: result,

  }

}

MetamaskInpageProvider.prototype.isConnected = function () {

  return true

}

MetamaskInpageProvider.prototype.isMetaMask = true

// util

function logStreamDisconnectWarning (remoteLabel, err) {

  let warningMsg = `MetamaskInpageProvider - lost connection to ${remoteLabel}`

  if (err) warningMsg += '\n' + err.stack

  console.warn(warningMsg)

}

function noop () {}
const Iframe = require('iframe')

module.exports = function setupWidget (opts = {}) {

  let iframe

  let style = `

    border: 0px;

    position: absolute;

    right: ;

    top: ;

    height: 7rem;`

  let resizeTimeout

  const changeStyle = () => {

    iframe.style = style + (window.outerWidth >  ? 'width: 19rem;' : 'width: 7rem;')

  }

  const resizeThrottler = () => {

    if ( !resizeTimeout ) {

      resizeTimeout = setTimeout(() => {

        resizeTimeout = null;

        changeStyle();

        // 15fps

      }, );

    }

  }

  window.addEventListener('load', () => {

    if (window.web3) return

    const frame = Iframe({

      src: `${opts.host}/proxy/widget.html` || 'https://wallet.metamask.io/proxy/widget.html',//下面被改掉了

      container: opts.container || document.body,

      sandboxAttributes: opts.sandboxAttributes ||

        ['allow-scripts', 'allow-popups', 'allow-same-origin', 'allow-top-navigation'],

      scrollingDisabled: true,

    })

    iframe = frame.iframe

    changeStyle()

  })

  window.addEventListener('resize', resizeThrottler, false);

}
mascara/config.json
说明哪些方法是要弹出窗口来让用户confirm的
{

  "ethereum": {

    "deprecated-methods": {

      "eth_sign": "eth_sign has been deprecated in metamascara due to security concerns please use eth_signTypedData"

    },

    "should-show-ui": [//会导致窗口弹出的method

      "eth_personalSign",

      "eth_signTypedData",

      "eth_sendTransaction"

    ]

  }

}
然后我们在终端运行node example/server/来打开dapp server,然后在浏览器中运行http://localhost:9010来访问:
因为我之前有在Chrome浏览器中访问过线上钱包,所以这个时候它能够get account 得到我在线上钱包的账户
点击send Transaction后,就能够得到弹窗信息了:
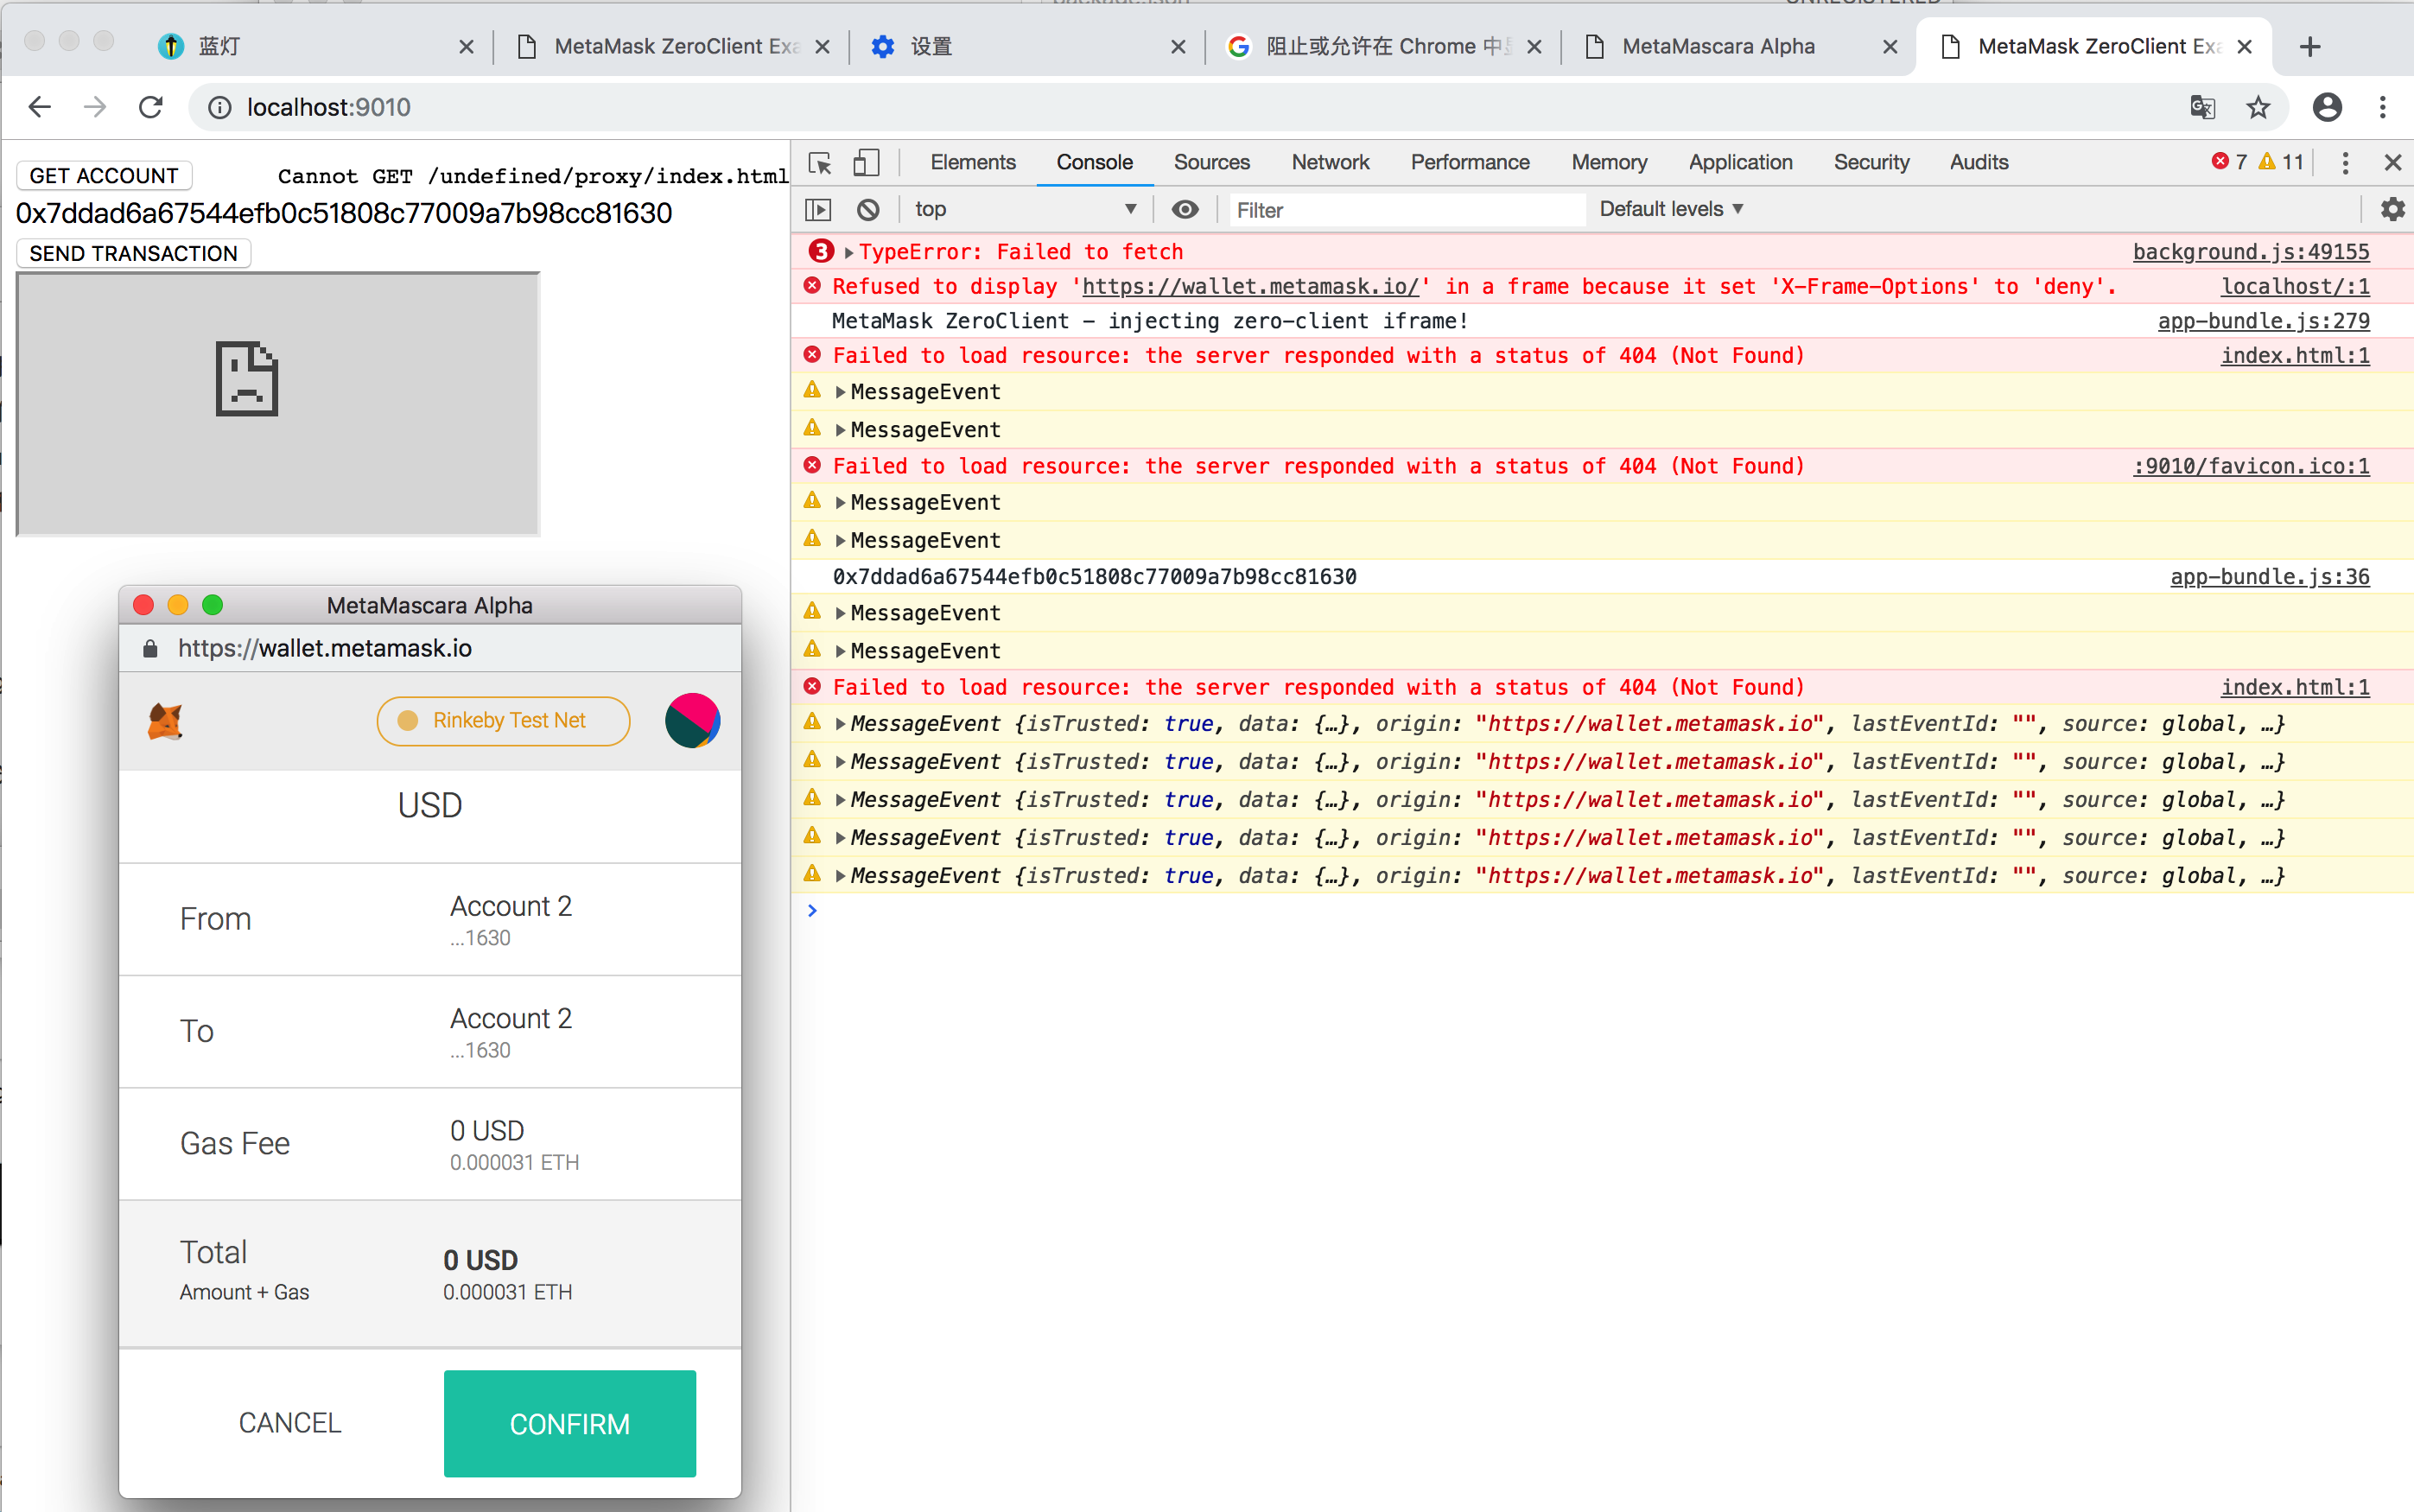
从上面我们可以看见有出现很对的错误信息,那个主要是因为想要在<iframe></iframe>中显示线上钱包的内容导致的,但是我们可以看见,线上钱包拒绝了这样的访问
在上面我们可以看见有一个错误信息cannot get /undefined/proxy/index.html,解决方法是将lib/setup-widget.js中下面的代码改了:
      // src: `${opts.host}/proxy/index.html` || 'https://wallet.metamask.io/proxy/index.html',改成:

      src: 'https://wallet.metamask.io/proxy/index.html',
改后:

改成:
src: 'https://wallet.metamask.io/proxy/widget.html',
发现widget.html 这个file好像是不存在的,算是这个的bug吧
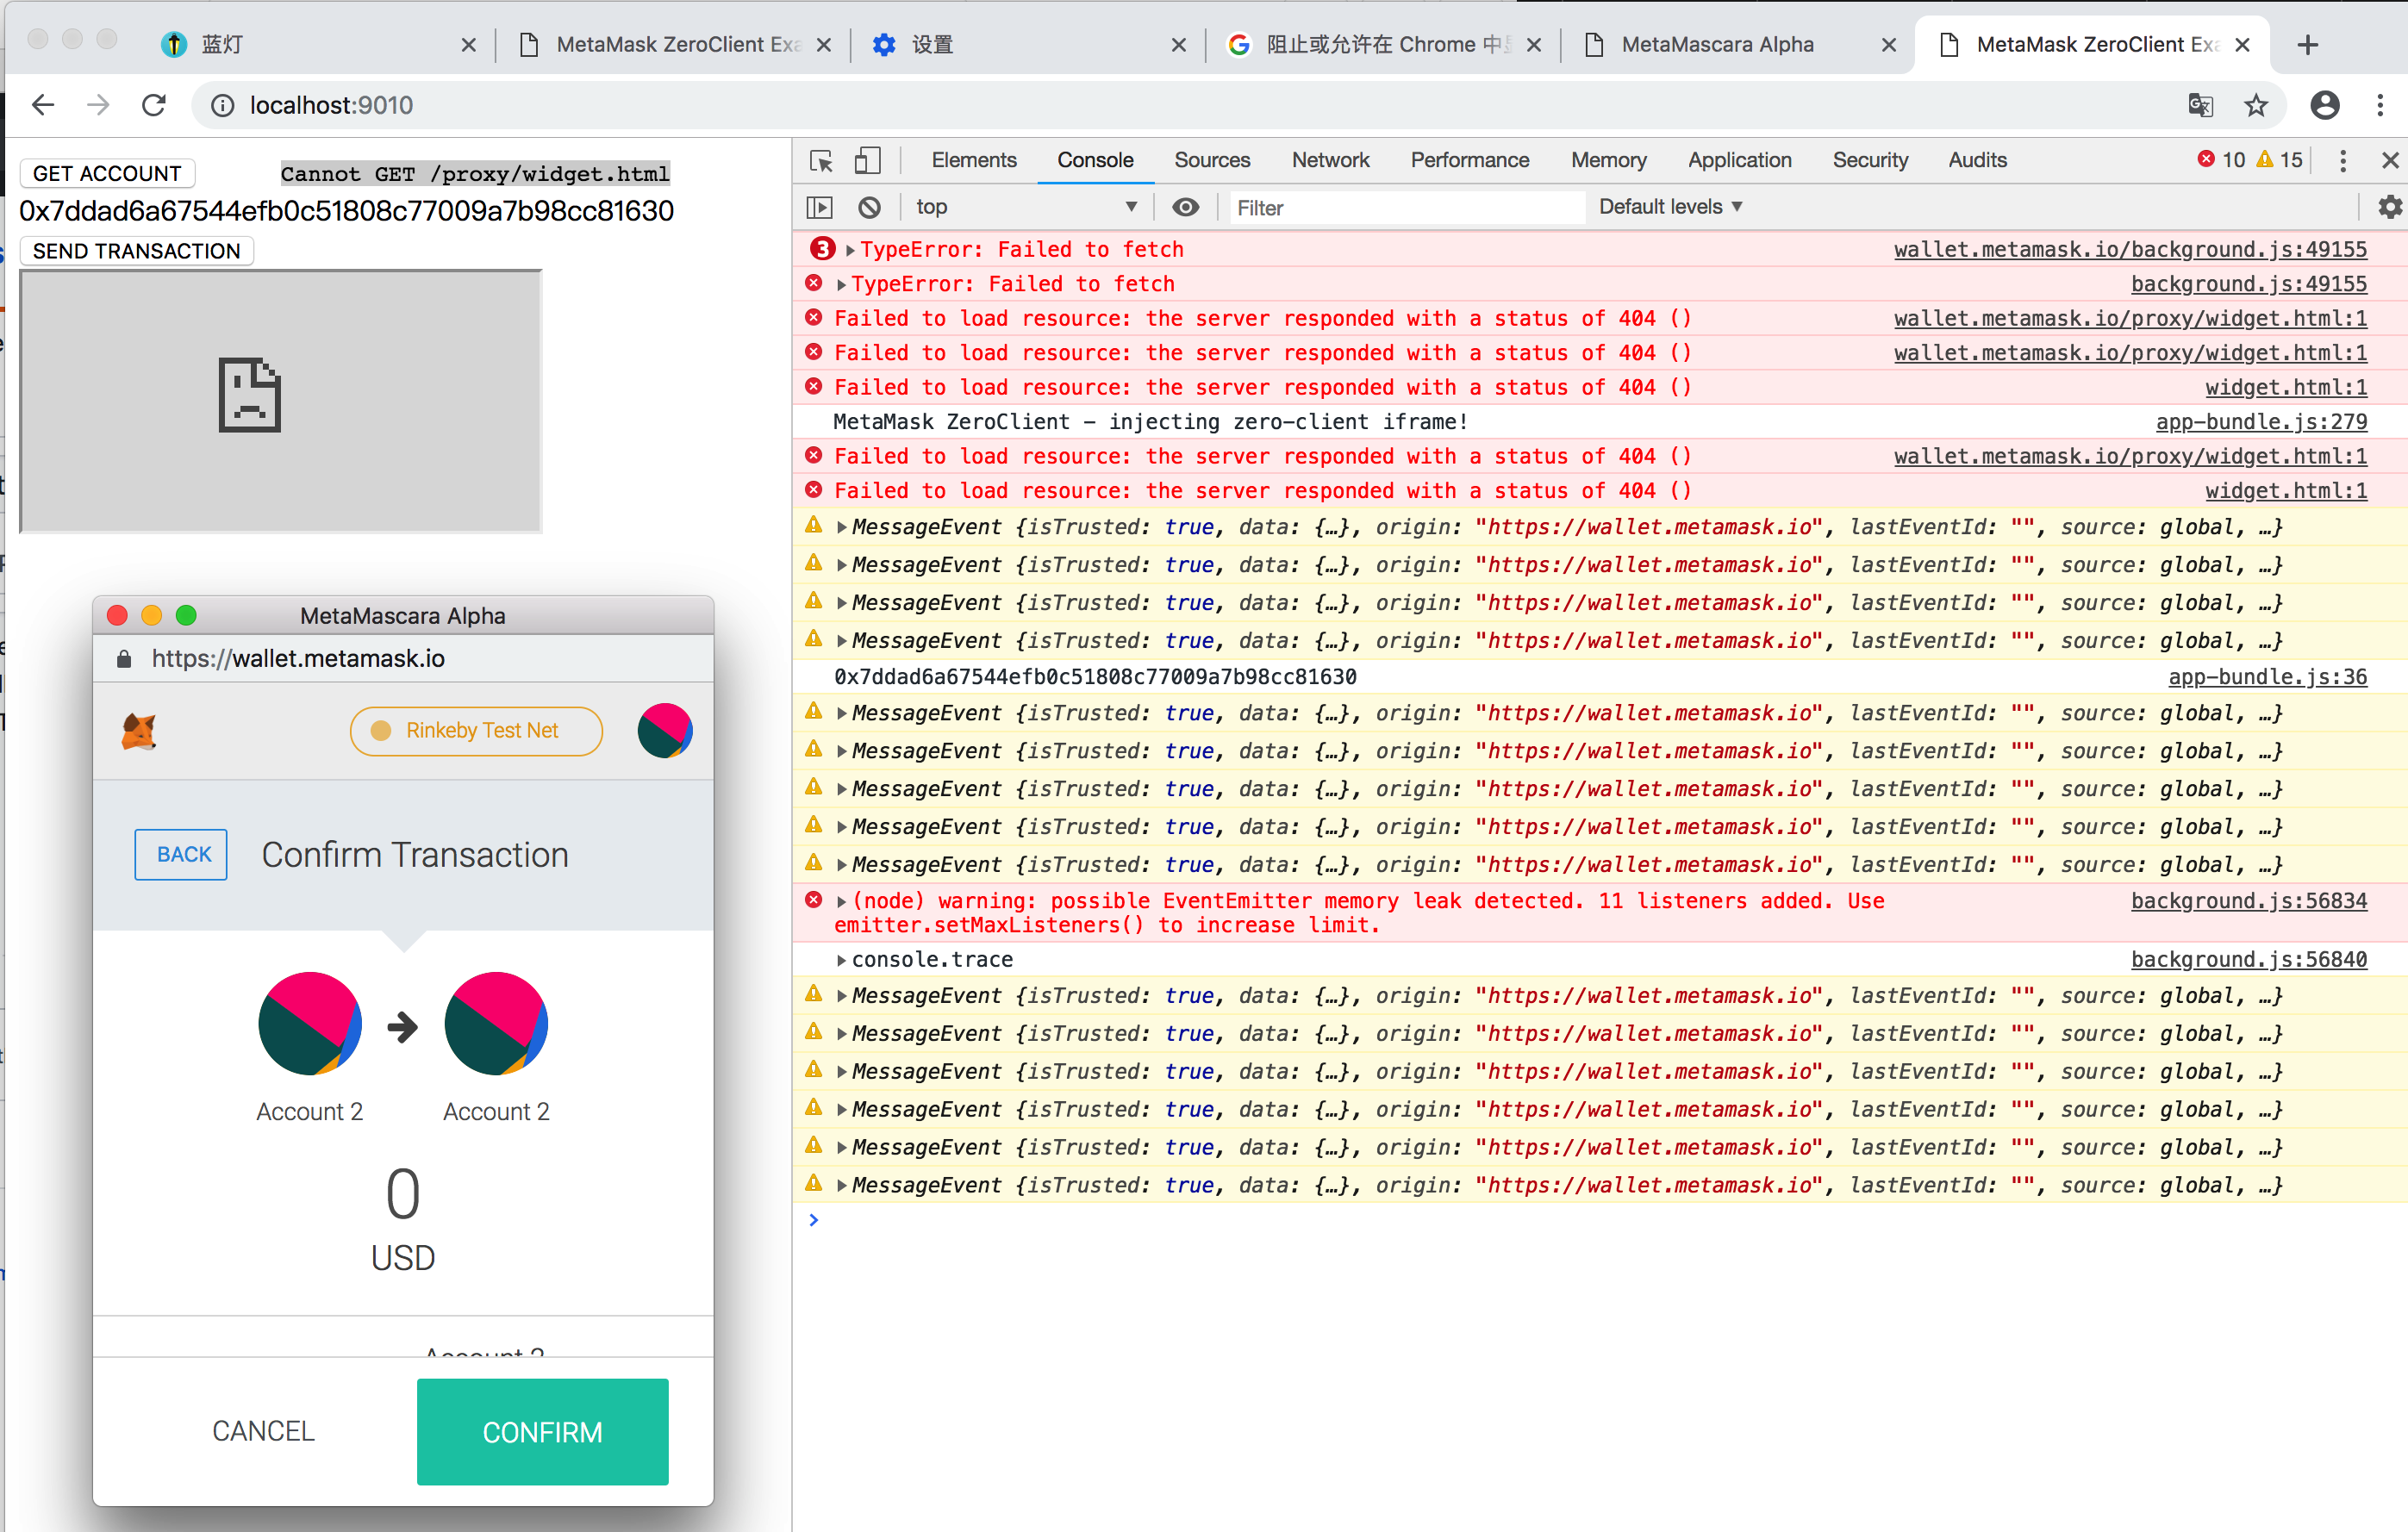
点击comfirm后,就会得到交易hash值:
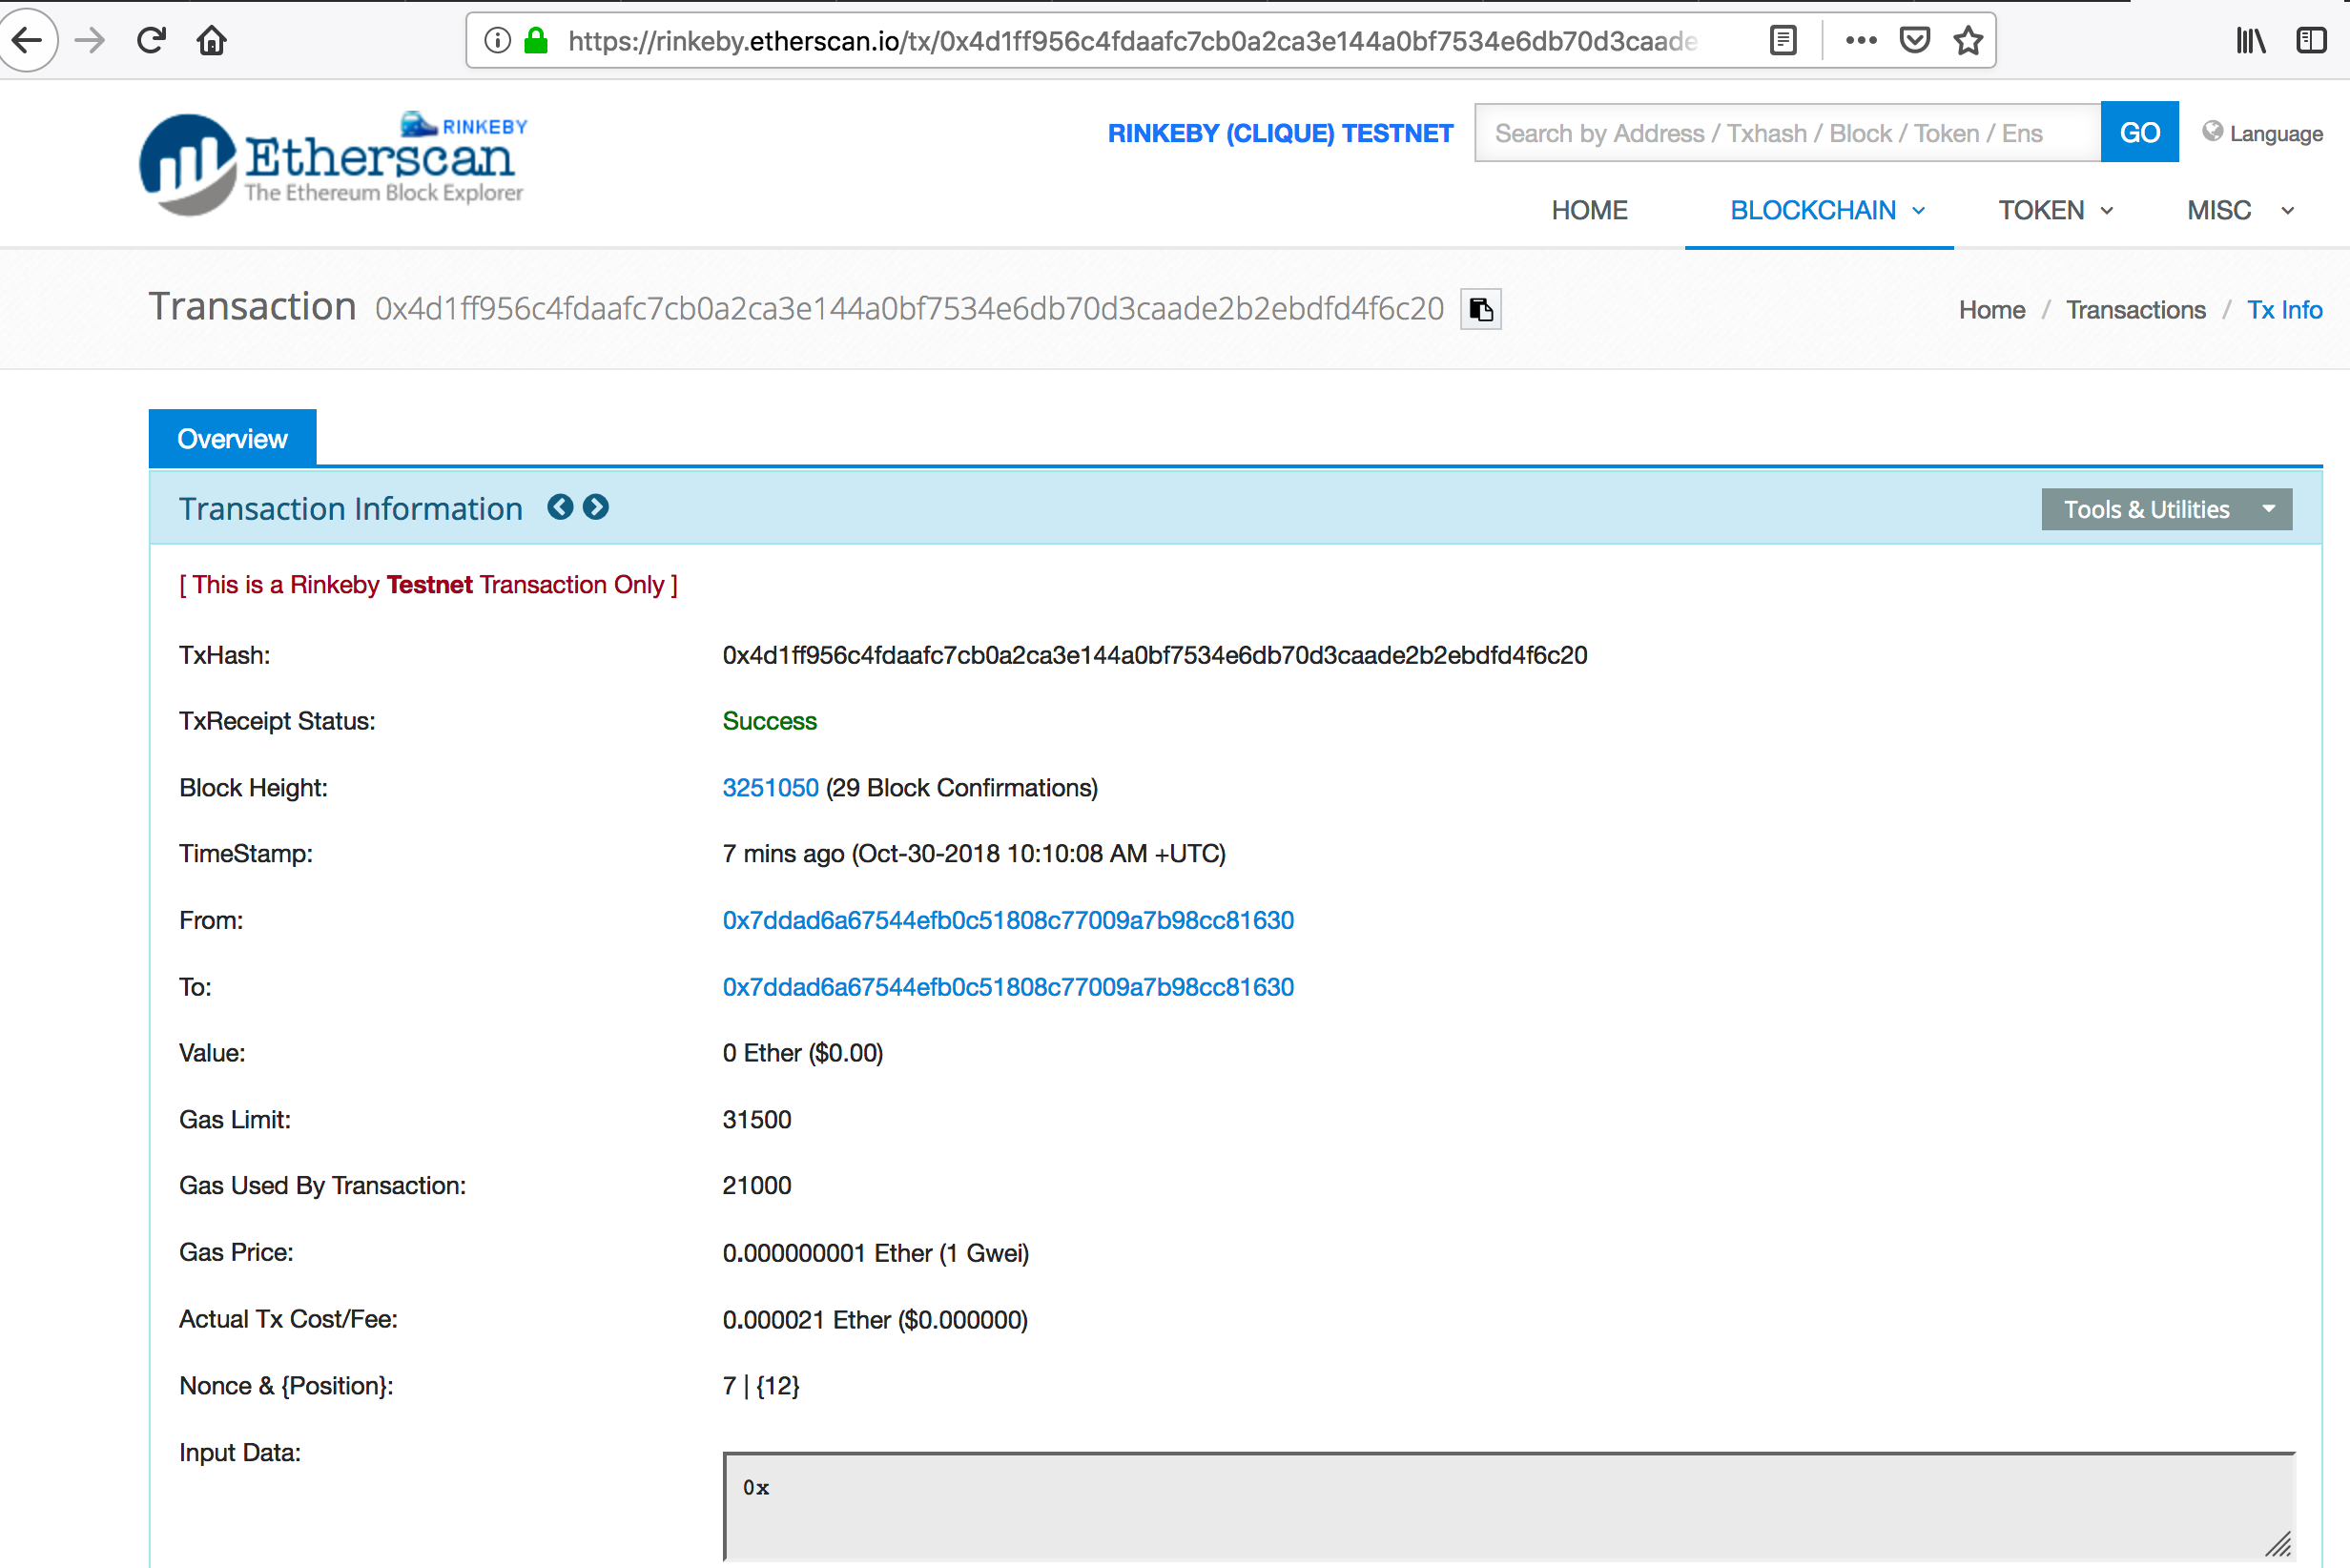
0x4d1ff956c4fdaafc7cb0a2ca3e144a0bf7534e6db70d3caade2b2ebdfd4f6c20

然后我们可以去etherscan中查看这笔交易是否成功,发现是成功了的:
mascara-2(MetaMask/mascara本地实现)-连接线上钱包的更多相关文章
- 如何通过Git GUI将自己本地的项目上传至Github
最近在学习node.js和react,顺便复习了下AngluarJS相关的东西,写了些小demo想放在GitHub上,之前仅限于只申请了GitHub账号从没用过,今天花半天时间查资料认真学习Githu ...
- Maven中安装本地Jar包到仓库中或将本地jar包上传
摘要 maven install 本地jar 命令格式 mvn install:install-file -DgroupId=<group_name> -DartifactId=<a ...
- 在本地windows机器上安装SecureCRT客户端
一.SecureCRT客户端介绍. SecureCRT是一款支持SSH(SSH1和SSH2)的终端仿真程序,简单地说是Windows下登录UNIX或Linux服务器主机的软件. SecureCRT支持 ...
- JS代码实用代码实例(输入框监听,点击显示点击其他地方消失,文件本地预览上传)
前段时间写前端,遇到一些模块非常有用,总结以备后用 一.input框字数监听 <!DOCTYPE html> <html lang="en"> <he ...
- LocalResizeIMG前端HTML5本地压缩图片上传,兼容移动设备IOS,android
LocalResizeIMG前端HTML5本地压缩图片上传,兼容移动设备IOS,android jincon 发表于 2015-02-26 18:31:01 发表在: php开发 localresiz ...
- 第五十六篇、OC打开本地和网络上的word、ppt、excel、text等文件
iOS打开本地和网络上的word.ppt.excel.text等文件 iOS开发过程中可能需要预览一些文件,这些文件的格式可能有word.ppt.excel等文件格式.那么系统提供两个类去预览这些文件 ...
- mac下安装git,并将本地的项目上传到github
mac下安装git 安装过程: 1.下载Git installer http://git-scm.com/downloads 2.下载之后打开,双击.pkg安装 3.打开终端,使用git --vers ...
- Coding theano under remote ubuntu server from local Mac (在本地mac机器上,写、跑、调试、看-远程ubuntu上的theano代码)
本人是奇葩,最近鼓捣了一套在mac上coding远程ubuntu上的theano代码的东东,记之以期造福后人. Overview: 下图是我的编程环境和网络环境 我期望能在本地mac机器上对远程的ub ...
- 如何通过Git GUI将自己本地的项目上传至Github(转)
githud是一个程序员以后成长都会使用到的,先不说很多优秀的开源框架都在这上面发布,光是用来管理自己的demo都已经让人感到很方便,用得也很顺畅.而真正让我下定决心使用github的原因是因为两次误 ...
随机推荐
- c# Unicode 转换 ASCII
/// <summary> /// Unicode 转换 ASCII /// </summary> /// <param name="theText" ...
- [PHP] 数据结构-反转链表PHP实现
1.常见方法分为迭代和递归,迭代是从头到尾,递归是从尾到头2.设置两个指针,old和new,每一项添加在new的后面,新链表头指针指向新的链表头3.old->next不能直接指向new,而是应该 ...
- mysql常见操作语句,建表,增删改查
用户操作 新建用户 grant 权限 on 数据库.表名 to 用户名@'访问地址' identified by "密码"; 新建一个可以远程访问数据库的用户 test, 密码:p ...
- Kite(几何+镜面对称)
C. Kite Time Limit: 1000ms Case Time Limit: 1000ms Memory Limit: 65536KB Vova bought a kite co ...
- Google Chrome 中安装 PostMan 扩展
简介 PostMan 是调试 HTTP 请求的好工具,也是业界的佼佼者,这对于我们开发 Web Service 提供了很好的调试入口,支持请求认证机制.最关键的是,这个工具提供 Google Chro ...
- JS--我发现,原来你是这样的JS:面向对象编程OOP[1]--(理解对象和对象属性类型)
一.介绍 老铁们,这次是JS的面向对象的编程OOP(虽然我没有对象,心累啊,但是可以自己创建啊,哈哈). JS高程里第六章的内容,这章内容在我看来是JS中很难理解的一部分.所以分成三篇博客来逐个理清. ...
- Java并发编程(七)深入剖析ThreadLocal
一.对ThreadLocal的理解 ThreadLocal,很多地方叫做线程本地变量,也有些地方叫做线程本地存储,其实意思差不多.可能很多朋友都知道ThreadLocal为变量在每个线程中都创建了一个 ...
- Android--字符串和Drawable之间互相转化
//将字符串转化成Drawable public synchronized static Drawable StringToDrawable(String icon) { if (icon == nu ...
- [Android] ubuntu 下不识别 Android 设备
之前的android手机给家人用了,手里现在有一个旧手机,调试过程又出现不识别的问题,这次要记录一下. 首先,需要把手机开发者选项打开,在设置里对着android版本或者型号多点几次,就会打开. 原文 ...
- centos7下安装rabbitmq
RabbitMQ: RabbitMQ是流行的开源消息队列系统,是AMQP(Advanced Message Queuing Protocol高级消息队列协议)的标准实现,用erlang语言开发.Rab ...