Zabbix4.0报警配置-企业微信报警
一:前期准备
1.1:企业号注册 https://qy.weixin.qq.com/
微信调用接口说明 http://qydev.weixin.qq.com/wiki/index.php?title=%E9%A6%96%E9%A1%B5
微信企业号接口调试地址 http://qydev.weixin.qq.com/debug
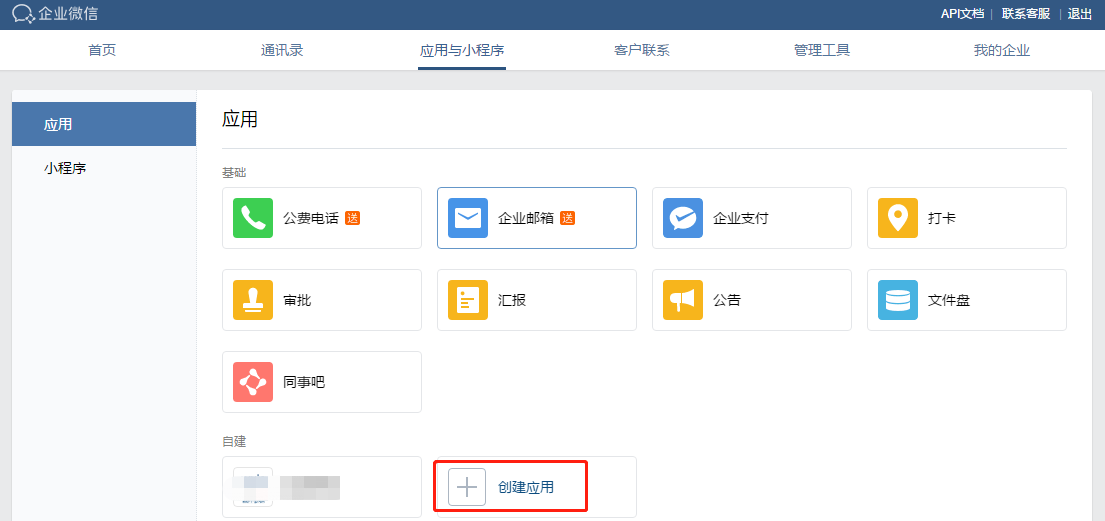
1.3:获取企业ID

1.4:获取Secret
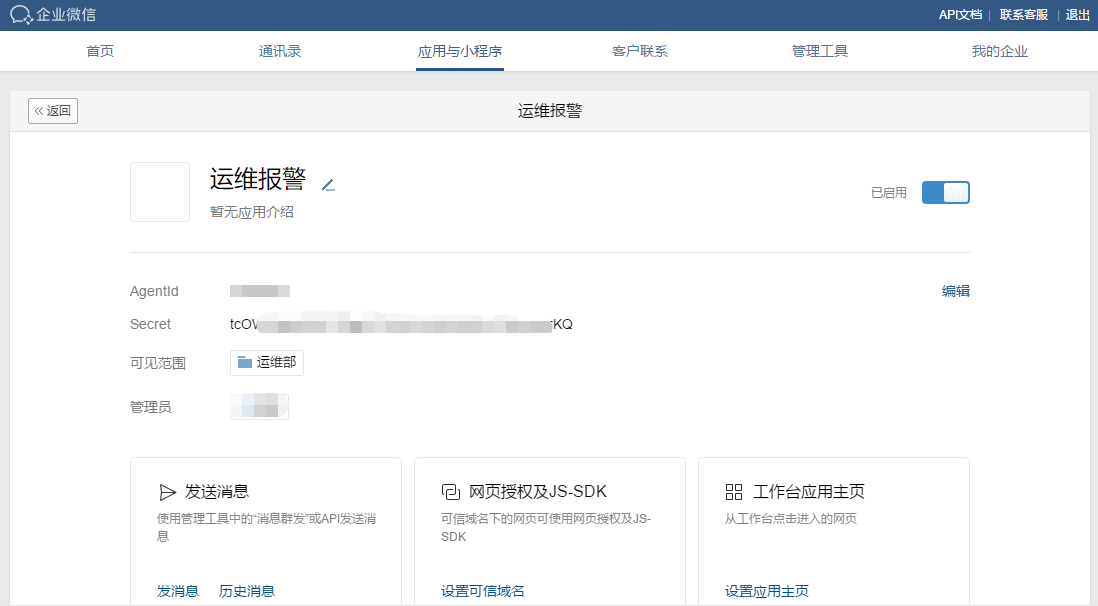
1.5:获取token
https://work.weixin.qq.com/api/devtools/devtool.php

1.6:通过命令行获取:(此处有问题可忽略)
/usr/bin/curl -s -G https://qyapi.weixin.qq.com/cgi-bin/gettoken?corpid=xxxx&corpsecret=xxxx |awk -F\":'{print $4}'|awk -F\" '{print $2}'
二:安装python3
2.1:安装openssl-devel依赖,让python支持https
yum install -y openssl-devel

yum -y install zlib-devel bzip2-devel openssl-devel ncurses-devel sqlite-devel readline-devel tk-devel gdbm-devel db4-devel libpcap-devel xz-devel libffi-devel gcc gcc-c++
2.2:下载并安装python3
wget https://www.python.org/ftp/python/3.7.2/Python-3.7.2.tgz
解压:
tar -zxvf Python-3.7.2.tgz
安装:
cp -r Python-3.7.2 /usr/local/python3
cd /usr/local/python3
./configure --prefix=/usr/local/python3
运行结果
creating Modules/Setup

creating Modules/Setup.local

creating Makefile

If you want a release build with all stable optimizations active (PGO, etc),

please run ./configure --enable-optimizations
make && make install
Looking in links: /tmp/tmp75uuoqa7

Collecting setuptools

Collecting pip

Installing collected packages: setuptools, pip

Successfully installed pip-18.1 setuptools-40.6.2
2.3:创建python3的软链接
ln -s /usr/local/python3/bin/python3 /usr/bin/python3
测试:
cd /
python -V
python3 -V
[root@zabbix /]# python -V

Python 2.7.5

[root@zabbix /]# python3 -V

Python 3.7.2
[root@zabbix /]# cd /usr/local/python3/

[root@zabbix python3]# ll

总用量 0

drwxr-xr-x 2 root root 295 2月  14 11:13 bin

drwxr-xr-x 3 root root  24 2月  14 11:13 include

drwxr-xr-x 4 root root  63 2月  14 11:13 lib

drwxr-xr-x 3 root root  17 2月  14 11:13 share

[root@zabbix python3]# cd bin

[root@zabbix bin]# ll

总用量 27336

lrwxrwxrwx 1 root root        8 2月  14 11:13 2to3 -> 2to3-3.7

-rwxr-xr-x 1 root root      109 2月  14 11:13 2to3-3.7

-rwxr-xr-x 1 root root      250 2月  14 11:13 easy_install-3.7

lrwxrwxrwx 1 root root        7 2月  14 11:13 idle3 -> idle3.7

-rwxr-xr-x 1 root root      107 2月  14 11:13 idle3.7

-rwxr-xr-x 1 root root      232 2月  14 11:13 pip3

-rwxr-xr-x 1 root root      232 2月  14 11:13 pip3.7

lrwxrwxrwx 1 root root        8 2月  14 11:13 pydoc3 -> pydoc3.7

-rwxr-xr-x 1 root root       92 2月  14 11:13 pydoc3.7

lrwxrwxrwx 1 root root        9 2月  14 11:13 python3 -> python3.7

-rwxr-xr-x 2 root root 13979384 2月  14 11:12 python3.7

lrwxrwxrwx 1 root root       17 2月  14 11:13 python3.7-config -> python3.7m-config

-rwxr-xr-x 2 root root 13979384 2月  14 11:12 python3.7m

-rwxr-xr-x 1 root root     3105 2月  14 11:13 python3.7m-config

lrwxrwxrwx 1 root root       16 2月  14 11:13 python3-config -> python3.7-config

lrwxrwxrwx 1 root root       10 2月  14 11:13 pyvenv -> pyvenv-3.7

-rwxr-xr-x 1 root root      449 2月  14 11:13 pyvenv-3.7

[root@zabbix bin]#
2.4:安装之后脚本要用到的python库
/usr/local/python3/bin/pip3 install requests
[root@zabbix zm]# /usr/local/python3/bin/pip3 install requests

Collecting requests

  Downloading https://files.pythonhosted.org/packages/7d/e3/20f3d364d6c8e5d2353c72a67778eb189176f08e873c9900e10c0287b84b/requests-2.21.0-py2.py3-none-any.whl (57kB)

    100% |████████████████████████████████| 61kB 238kB/s

Collecting idna<2.9,>=2.5 (from requests)

  Downloading https://files.pythonhosted.org/packages/14/2c/cd551d81dbe15200be1cf41cd03869a46fe7226e7450af7a6545bfc474c9/idna-2.8-py2.py3-none-any.whl (58kB)

    100% |████████████████████████████████| 61kB 16.9MB/s

Collecting chardet<3.1.0,>=3.0.2 (from requests)

  Downloading https://files.pythonhosted.org/packages/bc/a9/01ffebfb562e4274b6487b4bb1ddec7ca55ec7510b22e4c51f14098443b8/chardet-3.0.4-py2.py3-none-any.whl (133kB)

    100% |████████████████████████████████| 143kB 734kB/s

Collecting urllib3<1.25,>=1.21.1 (from requests)

  Downloading https://files.pythonhosted.org/packages/62/00/ee1d7de624db8ba7090d1226aebefab96a2c71cd5cfa7629d6ad3f61b79e/urllib3-1.24.1-py2.py3-none-any.whl (118kB)

    100% |████████████████████████████████| 122kB 16.4MB/s

Collecting certifi>=2017.4.17 (from requests)

  Downloading https://files.pythonhosted.org/packages/9f/e0/accfc1b56b57e9750eba272e24c4dddeac86852c2bebd1236674d7887e8a/certifi-2018.11.29-py2.py3-none-any.whl (154kB)

    100% |████████████████████████████████| 163kB 11.0MB/s

Installing collected packages: idna, chardet, urllib3, certifi, requests

Successfully installed certifi-2018.11.29 chardet-3.0.4 idna-2.8 requests-2.21.0 urllib3-1.24.1

You are using pip version 18.1, however version 19.0.2 is available.

You should consider upgrading via the 'pip install --upgrade pip' command.

[root@zabbix zm]# pip install --upgrade pip

Collecting pip

  Downloading https://files.pythonhosted.org/packages/d7/41/34dd96bd33958e52cb4da2f1bf0818e396514fd4f4725a79199564cd0c20/pip-19.0.2-py2.py3-none-any.whl (1.4MB)

    100% |████████████████████████████████| 1.4MB 283kB/s

Installing collected packages: pip

  Found existing installation: pip 18.1

    Uninstalling pip-18.1:

      Successfully uninstalled pip-18.1

Successfully installed pip-19.0.2

[root@zabbix zm]# pip -V

pip 19.0.2 from /usr/lib/python2.7/site-packages/pip (python 2.7)
有报错:
You are using pip version 18.1, however version 19.0.2 is available.

You should consider upgrading via the 'pip install --upgrade pip' command.
执行:
pip install --upgrade pip
pip3 install --upgrade pip
三:编辑zabbix报警脚本:
3.1:查看zabbix配置文件:
vim /etc/zabbix/zabbix_server.conf
查找如下内容:
AlertScriptsPath=/usr/lib/zabbix/alertscripts
进入zabbix脚本目录:
cd /usr/lib/zabbix/alertscripts/
3.2:新建zabbix脚本文件:
vim sendweixin.py
#!/usr/local/python3/bin/python3

# -*- coding:utf-8 -*-

import requests

import json

import sys

# 企业号及应用相关信息

corp_id = 'xxxxxxx'

corp_secret = 'xxxxxxx'

agent_id = xxxxxx

# 存放access_token文件路径

file_path = '/tmp/access_token.log'

def get_access_token_from_file():

    try:

        f = open(file_path,'r+')

        this_access_token = f.read()

        print('get success %s' % this_access_token)

        f.close()

        return this_access_token

    except Exception as e:

        print(e)

# 获取token函数,文本里记录的token失效时调用

def get_access_token():

    get_token_url = 'https://qyapi.weixin.qq.com/cgi-bin/gettoken?corpid=%s&corpsecret=%s' % (corp_id, corp_secret)

    print(get_token_url)

    r = requests.get(get_token_url)

    request_json = r.json()

    this_access_token = request_json['access_token']

    print(this_access_token)

    r.close()

    # 把获取到的access_token写入文本

    try:

        f = open(file_path,'w+')

        f.write(this_access_token)

        f.close()

    except Exception as e:

        print(e)

    # 返回获取到的access_token值

    return this_access_token

# snedMessage

# 死循环,直到消息成功发送

flag = True

while(flag):

    # 从文本获取access_token

    access_token = get_access_token_from_file()

    try:

        to_user = '@all'

        message = sys.argv[3]

        send_message_url = 'https://qyapi.weixin.qq.com/cgi-bin/message/send?access_token=%s' % access_token

        print(send_message_url)

        message_params = {

                            "touser":to_user,

                            "msgtype":"text",

                            "agentid":agent_id,

                            "text":{

                                "content" : message

                            },

                            "safe":0

                        }

        r = requests.post(send_message_url, data=json.dumps(message_params))

        print('post success %s ' % r.text)

        # 判断是否发送成功,如不成功则跑出异常,让其执行异常处理里的函数

        request_json = r.json()

        errmsg = request_json['errmsg']

        if errmsg != 'ok': raise

        # 消息成功发送,停止死循环

        flag = False

    except Exception as e:

        print(e)

        access_token = get_access_token()
还未验证成功!!!
感谢:
微信:
http://www.ttlsa.com/zabbix/use-wechat-send-zabbix-msg/
https://www.cnblogs.com/lemon-le/p/7204944.html
https://www.cnblogs.com/kumarhua/p/7645399.html
python:
https://www.cnblogs.com/xiaoerjun/p/9837029.html
https://www.cnblogs.com/JahanGu/p/7452527.html
https://www.cnblogs.com/dongml/p/8719421.html
Zabbix4.0报警配置-企业微信报警的更多相关文章
- Prometheus(五):Prometheus+Alertmanager 配置企业微信报警
此处默认已安装Prometheus服务,服务地址:192.168.56.200 一.设置企业微信 1.1.企业微信注册(已有企业微信账号请跳过) 企业微信注册地址:https://work.weix ...
- Zabbix 3.0 配置企业微信报警(注册---测试)
一.申请企业微信 1.登录企业微信官网,点击企业注册 二.配置企业微信 1.邀请管理员使用企业微信,如果有多个人直接添加新成员 2.管理员收到邀请,下载手机版企业微信,使用微信号登陆即可 3.创建应用 ...
- zabbix配置企业微信报警
+++++++++++++++++++++++++++++++++++++++++ 1. 工作中最长使用的就是微信,普及,开源,而且免费!!! 2. 在企业微信中要记录的值: · 部门id · 企业i ...
- Zabbix 3.0 配置企业微信报警(配置zabbix-web)
一.添加报警媒体类型 Name:自定义 Type:选择script Scripts name:填写脚本名称 Script parameters:脚本参数 --corpid=XXX --corpsecr ...
- Zabbix4.2.0使用Python连接企业微信报警
目录 1. 配置企业微信 2. 脚本配置 2.1 安装python依赖的库 2.2 编写脚本 2. 搭建FTP 3. 配置Zabbix监控FTP 3.1 添加FTP模板 3.2 添加报警媒介 3.3 ...
- Nagios通过企业微信报警
主要分两部分进行: 注册企业微信,自建应用,获取与发送消息相关的信息: 编写调用微信API脚本(bash),配置Nagios微信报警: 一.企业微信 1.注册企业微信:https://work.wei ...
- 分布式监控系统Zabbix-3.0.3-新版微信报警(企业微信取代企业号)
一般来说,Zabbix可以通过多种方式把告警信息发送到指定人,常用的有邮件,短信报警方式,但是现在越来越多的企业开始使用zabbix结合微信作为主要的告警方式,这样可以及时有效的把告警信息推送到接收人 ...
- 配置zabbix通过微信报警企业微信报警
如今势态: 报警的方式可谓是八仙过海各显神通,如电话报警,短信报警,邮件报警,QQ报警,微信报警等等. 电话报警:一般都是使用别的平台的工具,平台给你提供一个接口供你使用,大多数为限量收费款 短信报警 ...
- Prometheus 企业微信报警/inhibit抑制 /静默(二)
创建企业微信应用 注册企业微信:访问https://work.weixin.qq.com/,注册企业,随便填,不需要认证 创建应用 创建告警配置 vim /usr/local/prometheus-2 ...
随机推荐
- POJ 2533 裸的LIS
A numeric sequence of ai is ordered if a1 < a2 < ... < aN. Let the subsequence of the given ...
- day11 python之函数装饰器
一,什么是装饰器? 装饰器本质上就是一个python函数,他可以让其他函数在不需要做任何代码变动的前提下,增加额外的功能,装饰器的返回值也是一个函数对象. 装饰器的应用场景:比如插入日志,性能测试,事 ...
- u-boot2010.06移植阶段三--norflash驱动
2011-03-20 23:06:24 学习笔记: 效果图: 参考步骤: 一,把smdk2410 # 改成apple2440 # 1,在board/samsung/apple2440/apple24 ...
- Yii1打印当前请求所有执行的SQL及耗时
我们在熟悉新的项目了解业务的时候,可以有很多方式.看项目文档说明:和了解项目身边的人沟通:通过自己度代码调试,但是一步步调试打印语句或许有点慢,如果可以调出当前请求的所有语句,那么很快可以熟悉他的业务 ...
- 自制操作系统Antz(2)——进入保护模式 (上) jmp到保护模式
Antz系统更新地址: https://www.cnblogs.com/LexMoon/category/1262287.htm Linux内核源码分析地址:https://www.cnblogs.c ...
- aliplayer 视频播放报错
问题总结: 1.引用 阿里库时href和src 文件路径不加http <link rel="stylesheet" href="//g.alicdn.com/de/ ...
- 《Visual C# 从入门到精通》第一章使用变量、操作符和表达式——读书笔记
前言: 这个笔记是我个人总结,主要是熟练自己查看<Visual C# 从入门到精通>(第8版)这本书时,懵然起总结的想法,只是总结一些知识点,在工作项目会用得上,但是对毫无C#语言基础的, ...
- css js 兼容问题
js 兼容问题 1. document.form.item 问题问题:代码中存在 document.formName.item("itemName") 这样的语句,不能在FF下运 ...
- map的循环删除操作
1.错误示例 Map<String,InterfaceOutParam> outCodes1 = outParamList.stream().collect(Collectors.toMa ...
- Asp.net core 学习笔记 ( Data protection )
参考 : http://www.cnblogs.com/xishuai/p/aspnet-5-identity-part-one.html http://cnblogs.com/xishuai/p/a ...