hibernate_HelloWorld
环境准备
1、下载 hibernate 3.3.2;
2、下载 hibernate 3.4.0;
3、注意阅读 hibernate compatibility matrix(hibernate 网站,download),hibernate 3.5以后注解包和核心包打包在一起就可以不用管这条了;
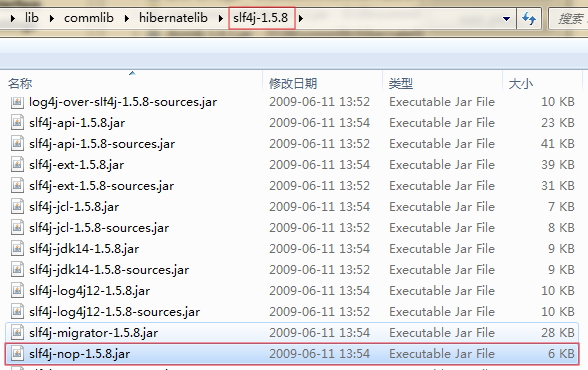
4、下载 slf1.5.8。
下载链接: http://pan.baidu.com/s/1qYjmu5m 密码: pn25

第一个hibernate应用程序
1、建立新的 java 项目,名为:hibernate_0100_HelloWorld
2、学习建立 User-library - hibernate,并加入相应的jar包
a) 项目右键-build path-configure build path-add library
b) 选择User-library,在其中新建library,命名为hibernate
详细步骤:http://www.cnblogs.com/ShawnYang/p/6691935.html
c) 在该library中加入 hibernate 所需 jar 包
i. hibernate core
ii./required
iii.slfnop jar


3、引入 mysql 的 JDBC 驱动包
4、在 mysql中建立对应的数据库以及表
a) create database hibernate;
b) user hibernate;
c) create table Student(id int primary key,name varchar(20),age int);
5、建立 hibernate 配置文件 hibernate.cfg.xml
a) 从参考文档中copy
b) 修改对应的数据库连接
c) 注释掉暂时用不上的内容
 <?xml version='1.0' encoding='utf-8'?>

 <!DOCTYPE hibernate-configuration PUBLIC

         "-//Hibernate/Hibernate Configuration DTD 3.0//EN"

         "http://hibernate.sourceforge.net/hibernate-configuration-3.0.dtd">

 <hibernate-configuration>

     <session-factory>

         <!-- Database connection settings -->

         <property name="connection.driver_class">com.mysql.jdbc.Driver</property>

         <property name="connection.url">jdbc:mysql://localhost:3306/hibernate</property>

         <property name="connection.username">root</property>

         <property name="connection.password">root</property>

         <!-- JDBC connection pool (use the built-in) -->

         <!-- <property name="connection.pool_size">1</property> -->

         <!-- SQL dialect -->

         <property name="dialect">org.hibernate.dialect.MySQLDialect</property>

         <!-- Enable Hibernate's automatic session context management -->

         <!-- <property name="current_session_context_class">thread</property> -->

         <!-- Disable the second-level cache  -->

         <property name="cache.provider_class">org.hibernate.cache.NoCacheProvider</property>

         <!-- Echo all executed SQL to stdout -->

         <property name="show_sql">true</property>

         <!-- Drop and re-create the database schema on startup -->

         <!-- <property name="hbm2ddl.auto">update</property> -->

         <mapping resource="com/bjsxt/hibernate/model/Student.hbm.xml"/>

     </session-factory>

 </hibernate-configuration>
6、建立 Student 类
 package com.bjsxt.hibernate.model;

 public class Student {

     private Integer id;

     private String name;

     private Integer age;

     public Integer getId() {

         return id;

     }

     public void setId(Integer id) {

         this.id = id;

     }

     public String getName() {

         return name;

     }

     public void setName(String name) {

         this.name = name;

     }

     public Integer getAge() {

         return age;

     }

     public void setAge(Integer age) {

         this.age = age;

     }

 }
7、建立 Student 映射文件 Student.hbm.xml
a)参考文档
 <?xml version="1.0"?>

 <!DOCTYPE hibernate-mapping PUBLIC

         "-//Hibernate/Hibernate Mapping DTD 3.0//EN"

         "http://hibernate.sourceforge.net/hibernate-mapping-3.0.dtd">

 <hibernate-mapping package="com.bjsxt.hibernate.model">

     <class name="Student" table="student">

         <id name="id" column="id"/>

         <property name="name" column="name"/>

         <property name="age" column="age"/>

     </class>

 </hibernate-mapping>
8、将映射文件加入到 hibernate.cfg.xml中
a) 参考文档
<mapping resource="com/bjsxt/hibernate/model/Student.hbm.xml"/>
9、写测试类Main,在Main中对Student对象进行直接的存储测试
a) 参考文档
 import org.hibernate.Session;

 import org.hibernate.SessionFactory;

 import org.hibernate.cfg.Configuration;

 import com.bjsxt.hibernate.model.Student;

 public class StudentTest {

     public static void main(String[] args) {

         Student s = new Student();

         s.setId(1);

         s.setName("s1");

         s.setAge(1);

         Configuration cfg = new Configuration();

         SessionFactory sf = cfg.configure().buildSessionFactory();

         Session session = sf.openSession();

         session.beginTransaction();

         session.save(s);

         session.getTransaction().commit();

         session.close();

         sf.close();

     }

 }
10、FAQ:
a) 要调用 new Configuration().configure().buildSessionFactory(),而不是省略configure,
否则会出 hibernate hibernate dialect must be sef 的异常。
11、Note:
a) 请务必建立自己动手查文档的能力
b) 重要的是
i.要建立自己动手查一手文档的信心;
ii.还有建立自己动手查一手文档的习惯;
iii.主动学习,放弃被动接收灌输的习惯。
链接: http://pan.baidu.com/s/1mi0VuPi 密码: 8dyv
示例项目所需jar包链接: http://pan.baidu.com/s/1qY6SRQ8 密码: vzpm
hibernate_HelloWorld的更多相关文章
- HIbernate学习笔记(一) 了解hibernate并搭建环境建立第一个hello world程序
Hibernate是一个开放源代码的ORM(对象关系映射)框架,它对JDBC进行了轻量级的封装,Java程序员可以使用面向对象的编程思维来操纵数据库,它通过对象属性和数据库表字段之间的映射关系,将对象 ...
随机推荐
- centos7上面关闭防火墙
CentOS 7.0默认使用的是firewall作为防火墙:若没有启用iptables 作为防火墙,则使用以下方式关闭防火墙: systemctl stop firewalld.service 关闭开 ...
- [AH2017/HNOI2017]礼物(FFT)
[Luogu3723] [DarkBZOJ4827] 题解 首先,有一个结论:两个手环增加非负整数亮度,等于其中一个增加一个整数亮度(可以为负) 设增加亮度为x.求\(\sum_{i=1}^{n}(a ...
- Jury Jeopardy (这是一道单纯的模拟题)
Description What would a programming contest be without a problem featuring an ASCII-maze? Do not de ...
- Python报错:UnicodeEncodeError 'gbk' codec can't encode character
今天在使用Python文件处理写网络上爬取的文件的时候,遇到了错误:UnicodeEncodeError: ‘gbk’ codec can’t encode character ‘\xa0’ in p ...
- maven 环境变量配置
新增变量:MAVEN_HOME:D:\tools\apache-maven-3.52 修改path,在path中新增如下: %MAVEN_HOME\bin%; 注意末尾增加分号 最后,到dos中查看m ...
- 使用Ext 创建树
ext使用的是ext3.4.0版本 <!DOCTYPE HTML PUBLIC "-//W3C//DTD HTML 4.0 Transitional//EN"> < ...
- python 矢量化的字符串
- Golang常用数据结构(对照python)
python golang init get set extend/update find index size loop list list l := list.New() l.PushBack ...
- Sqlite操作的一些关键类的官方说明与Intent的startactivityforresult方法
Intent: 该功能可以用于通过intent来跳转界面时候传递信号给原理的页面,以便做出一些处理: sqlite的使用: 该方法得到的sqlitedatabase可读可写,而getreadabled ...
- 当前activity透明度的获取与修改
WindowManager.LayoutParams lp = getWindow().getAttributes();//layoutparams是静态类不能通过new来完成. lp.alpha = ...
