andorid jar/库源码解析之zxing
Zxing:
作用:
生成和识别,二维码,条形码。
栗子:
生成二维码,赋值到ImageView上
- QRCodeWriter qrCodeWriter = new QRCodeWriter();
- Map<EncodeHintType, String> hints = new HashMap<>();
- hints.put(EncodeHintType.CHARACTER_SET, "utf-8"); //记得要自定义长宽
- BitMatrix encode = null;
- try {
- encode = qrCodeWriter.encode("hello,world!", BarcodeFormat.QR_CODE, width, height, hints);
- } catch (WriterException e) {
- e.printStackTrace();
- }
- int[] colors = new int[width * height];
- //利用for循环将要表示的信息写出来
- for (int i = 0; i < width; i++) {
- for (int j = 0; j < height; j++) {
- if (encode.get(i, j)) {
- colors[i * width + j] = Color.BLACK;
- } else {
- colors[i * width + j] = Color.WHITE;
- }
- }
- }
- Bitmap bit = Bitmap.createBitmap(colors, width, height, Bitmap.Config.RGB_565);
- imageView.setImageBitmap(bit);
生成条形码,赋值到ImageView上
- final int WHITE = 0xFFFFFFFF;
- final int BLACK = 0xFF000000;
- MultiFormatWriter writer = new MultiFormatWriter();
- BitMatrix result = null;
- try {
- BarcodeFormat barcodeFormat = BarcodeFormat.CODE_128;
- result = writer.encode("1234567123456", barcodeFormat, 400,
- 100, null);
- } catch (WriterException e) {
- // TODO Auto-generated catch block
- e.printStackTrace();
- }
- int width = result.getWidth();
- int height = result.getHeight();
- int[] pixels = new int[width * height];
- for (int y = 0; y < height; y++) {
- int offset = y * width;
- for (int x = 0; x < width; x++) {
- pixels[offset + x] = result.get(x, y) ? BLACK : WHITE;
- }
- }
- Bitmap bitmap = Bitmap.createBitmap(width, height,
- Bitmap.Config.ARGB_8888);
- bitmap.setPixels(pixels, 0, width, 0, 0, width, height);
- imageView2.setImageBitmap(bitmap);
识别二维码
- private void Test3() {
- recogQRcode(imageView);
- }
- public void recogQRcode(ImageView imageView){
- Bitmap QRbmp = ((BitmapDrawable) (imageView).getDrawable()).getBitmap(); //将图片bitmap化
- int width = QRbmp.getWidth();
- int height = QRbmp.getHeight();
- int[] data = new int[width * height];
- QRbmp.getPixels(data, 0, width, 0, 0, width, height); //得到像素
- RGBLuminanceSource source = new RGBLuminanceSource(width, height, data);
- BinaryBitmap bitmap1 = new BinaryBitmap(new HybridBinarizer(source));
- QRCodeReader reader = new QRCodeReader();
- Result re = null;
- try {
- //得到结果
- re = reader.decode(bitmap1);
- } catch (NotFoundException e) {
- e.printStackTrace();
- } catch (ChecksumException e) {
- e.printStackTrace();
- } catch (FormatException e) {
- e.printStackTrace();
- }
- lblMsg1.setText(re.getText());
- }
识别条形码
- Bitmap QRbmp = ((BitmapDrawable) (imageView2).getDrawable()).getBitmap(); //将图片bitmap化
- int width = QRbmp.getWidth();
- int height = QRbmp.getHeight();
- int[] data = new int[width * height];
- QRbmp.getPixels(data, 0, width, 0, 0, width, height); //得到像素
- RGBLuminanceSource source = new RGBLuminanceSource(width, height, data);
- //二进制图片转换成bitmap对象(说明:创建HybridBinarizer对象,需要传入LuminanceSource,所以传入source(二进制的图片),并且通过BinaryBitmap转换成bitmap对象)
- BinaryBitmap bitmap1 = new BinaryBitmap(new HybridBinarizer(source));
- //CodaBarReader codaBarReader= new CodaBarReader(); //codaBarReader 二维码
- try {
- //MultiFormatReader是读取图像的类(在core包)
- Result result = new MultiFormatReader().decode(bitmap1); //识别条形码,和二维码(说明:获取到我们需要的信息)
- lblMsg2.setText(result.getText());
- } catch (NotFoundException e) {
- e.printStackTrace();
- lblMsg2.setText("ex " + e.getMessage());
- }
源码解读:
A:生成二维码
1、创建一个 QRCodeWriter对象,调用 encode,传入需要生成二维码的数据,格式化参数,大小,和编码信息
2、调用Encoder的encode方法,a,确定当前使用的编码。b,判断生成二维码数据的编码模式(数字,byte,和 0x00-0x5f)。c,附加ECI部分(二维码格式中的一部分)。d,填充 FNC1信息到头部中。e,写入模式标记到头部中。
3、把二维码文本数据,按照不同的模式,写入到不同的结果bit集合中。
4、判断版本和容量,是否在范围内。
5、合并头部,数据长度,数据内容到一个bit集合。
6、填充数据,使bit数据时8的整数倍。
7、把位数据信息和纠错码,交织在一起,存入新的数据(算法复杂,具体参考二维码生成算法)。
8、调用 MatrixUtil.buildMatrix,构建二维码矩阵,并返回二维码信息。 QRCode中 使用 ByteMatrix 存储矩阵,内部是一个二维的bytes数组。 private final byte[][] bytes;
9、转换矩阵颜色,从 输入矩阵使用0==白色,1==黑色,而输出矩阵使用 0==黑色,255==白色(即8位灰度位图)。
10、创建一个color数组,把颜色数据存入。调用 Bitmap.createBitmap ,把color集合信息,传递给他,然后返回一个Bitmap就是二维码数据了。
B:生成条形码
1、创建一个 MultiFormatWriter 对象,并调用他的 encode方法,传入条形码数据,和编码信息,和条形码结果大小。
2、根据不同的编码,选择了不同的写入器,这里采用了 Code128Writer
3、a,判断条形码内容,长度限制[1,80]。...略
4、使用二进制,把二进制转换成图片。就是最后的结果了。。
C:识别二维码。(反向解析)
D:识别条形码。(反向解析)
源码:https://github.com/zxing/zxing
引入:
- api 'com.google.zxing:android-core:3.3.0'
api 'com.google.zxing:core:3.3.2'
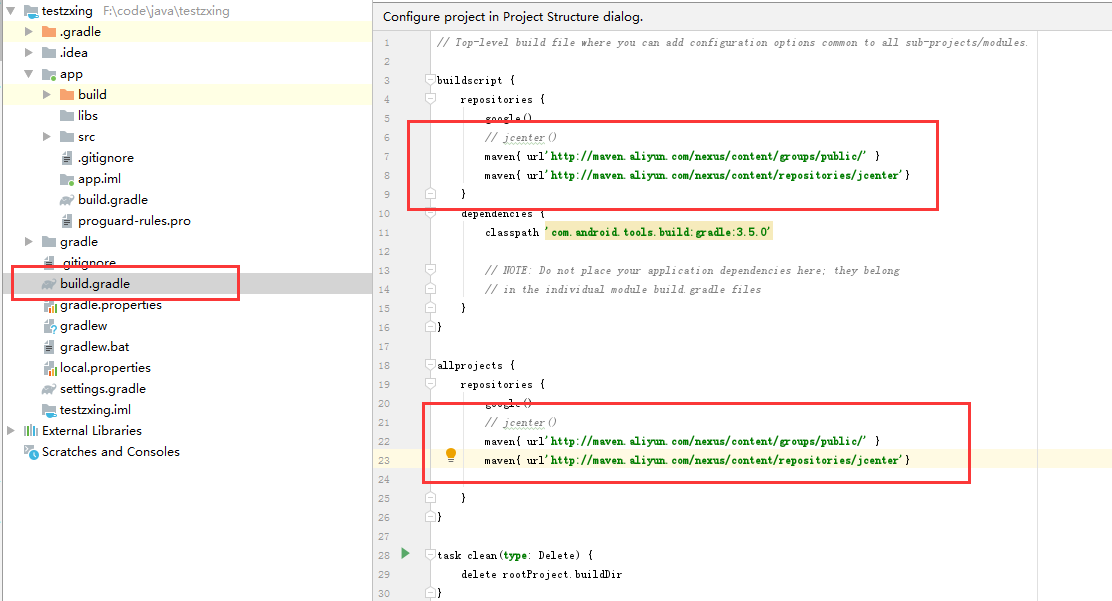
注意:(如果无法从google加载,就需要换一个来源,下面代码和图)
- maven{ url'http://maven.aliyun.com/nexus/content/groups/public/' }
- maven{ url'http://maven.aliyun.com/nexus/content/repositories/jcenter'}
andorid jar/库源码解析之zxing的更多相关文章
- andorid jar/库源码解析之Bolts
目录:andorid jar/库源码解析 Bolts: 作用: 用于链式执行跨线程代码,且传递数据 栗子: Task.call(new Callable<Boolean>() { @Ove ...
- andorid jar/库源码解析之EventBus
目录:andorid jar/库源码解析 EventBus: 作用: 用于不同Activity,Service等之间传递消息(数据). 栗子: A页面:onCreate定义 EventBus.ge ...
- andorid jar/库源码解析之Dagger/Dagger2
目录:andorid jar/库源码解析 Dagger.Dagger2: 作用: 1.用于解耦Activity和业务逻辑 2.在使用业务的时候,不需要重复编写new代码. 3.当业务变化的时候,不需要 ...
- andorid jar/库源码解析之okhttp3
目录:andorid jar/库源码解析 Okhttp3: 作用: 用于网络编程(http,https)的快速开发. 栗子: // okHttpClient定义成全局静态,或者单例,不然重复new可能 ...
- andorid jar/库源码解析之okio
目录:andorid jar/库源码解析 Okio: 作用: 说白了,就是一个IO库,基于java原生io.来进行操作,内部做了优化,简洁,高效.所以受到了一部分人的喜欢和使用 栗子: 读写文件. p ...
- andorid jar/库源码解析之retrofit2
目录:andorid jar/库源码解析 Retrofit2: 作用: 通过封装okhttp库,来进行web通讯,并且使用动态代理的方式,来调用接口地址,通过回调赋值结果. 栗子: 定义一个接口,用于 ...
- andorid jar/库源码解析之Butterknife
目录:andorid jar/库源码解析 Butterknife: 作用: 用于初始化界面控件,控件方法,通过注释进行绑定控件和控件方法 栗子: public class MainActivity e ...
- andorid jar/库源码解析之错误提示
目录:andorid jar/库源码解析 错误: 错误1: Error: Static interface methods are only supported starting with Andro ...
- andorid jar/库源码解析
前言 本篇作为开篇,会大体上说明,需要解读源码的,类库,或者jar. 序 原本,类库和jar的系列准备写到逆向系列课程的,但是那个东西,在写了两篇,就没有后续了,现在也不知道从哪里开始了, 只能等后期 ...
随机推荐
- vue-resource安装与使用
vue-resource是vue中使用的请求网络数据的插件,这个插件是依赖于vue的,简单说就是用来调接口的. 安装 cd 项目目录 npm i vue vue-resource --save-dev ...
- matplotlib PyQt5 nivigationBar 中pan和zoom功能的探索
为matplotlib生成的图添加编辑条,我们导入NavigationToolbar2QT from matplotlib.backends.backend_qt5agg import Navigat ...
- Python爬虫系列(四):Beautiful Soup解析HTML之把HTML转成Python对象
在前几篇文章,我们学会了如何获取html文档内容,就是从url下载网页.今天开始,我们将讨论如何将html转成python对象,用python代码对文档进行分析. (牛小妹在学校折腾了好几天,也没把h ...
- (一) Mybatis源码分析-解析器模块
Mybatis源码分析-解析器模块 原创-转载请说明出处 1. 解析器模块的作用 对XPath进行封装,为mybatis-config.xml配置文件以及映射文件提供支持 为处理动态 SQL 语句中的 ...
- java接口工厂模式理解
作为实际java开发经验还不到一年的我,第一次写博客,诚惶诚恐,怕把自己的谬误公之于众,误人子弟,不过转念一想,若是能有同行加以指点评判,将他们的真知灼见描述出来,那这篇文章就算抛转引玉了. 最近在阅 ...
- Gitflow分支管理策略
Gitflow存在两个记录项目历史的分支 Master分支:存储(官方的,正式的)项目发布历史记录的分支. develop分支:充当功能的集成分支. Develop分支将包含项目的完整历史记录,而ma ...
- 【Jenkins】参数化引用
我们在Jenkins里设置了参数如下 1. Jenkins中引用 shell引用 $env windows bat引用 %env% 在git等源码管理时,调用参数的格式${env} 2. jmete ...
- Python - 批量获取文件夹的大小输出为文件格式化保存
很多时候,查看一个文件夹下的每个文件大小可以轻易的做到,因为文件后面就是文件尺寸,但是如果需要查看一个文件夹下面所有的文件夹对应的尺寸,就发现需要把鼠标放到对应的文件夹上,稍等片刻才会出结果. 有时候 ...
- 4.JS跳转路由/刷新/返回页面
1.JS跳转路由(需要拿到父组件的history) clickHandle(){ let history = this.props.history; history.push( '/home') } ...
- Xss Game挑战
前言 最新学习了下xss的更深入的东西,学习了一波浏览器解析机制和XSS向量编码的知识. 这里就些xss的练习题巩固知识 学习的话结合如下两篇文章看,从例子和基础原理层面都有: http://boba ...