ggplot2(8) 精雕细琢
8.1 主题
主题系统控制着图形中的非数据元素外观,它不会影响几何对象和标度等数据元素。这题不能改变图形的感官性质,但它可以使图形变得更具美感,满足整体一致性的要求。主题的控制包括标题、坐标轴标签、图例标签等文字调整,以及网格线、背景、轴须的颜色搭配。
library(ggplot2movies)

## 主题改变的效果。

# (左)默认的灰色主题:灰色背景,白色网格线。

# (右) 黑白主题:白色背景,灰色网格线。

qplot(rating, data = movies, binwidth = 1)

last_plot() + theme_bw()
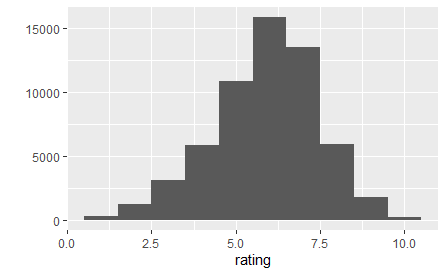
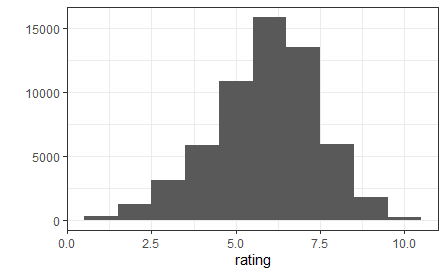
默认的theme_gray()使用淡灰色背景和白色网格线;另一固定主题theme_bw()为传统的白色背景和深灰色的网格线。上图展示了两个主题的异同。
8.1.1 内置主题
theme_gray()和theme_bw()都由唯一的参数base_size()来控制基础字体的大小。基础字体大小指的是轴标题的大小,图形标题比它大20%,轴须标签比它小20%。
- 全局性设置:theme_set(theme_grey())或者theme_set(theme_bw())。
- 局部性设置:只改表单个图形的主题,qplot(...) + theme_grey()。局部设置将会覆盖默认的全局设置。
8.1.2 主题元素和元素函数
主题由控制图形外观的多个元素组成。
| 主题元素 | 类型 | 描述 |
| axis.line | segment | 直线和坐标轴 |
| axis.text.x | text | x轴标签 |
| axis.text.y | text | y轴标签 |
| axis.ticks | segment | 轴须标签 |
| axis.title.x | text | 水平轴标签 |
| axis.title.y | text | 竖直轴标签 |
| legend.background | rect | 图例背景 |
| legend.key | rect | 图例符号 |
| legend.text | rect | 图例标签 |
| legend.title | text | 图例标题 |
| panel.background | rect | 面板背景 |
| panel.border | rect | 面板边界 |
| panel.grid.major | line | 主网络线 |
| panel.grid.minor | line | 次网络线 |
| plot.background | tect | 整个图形背景 |
| plot.title | text | 图形标题 |
| strip.background | tect | 分面标签背景 |
| strip.text.x | text | 水平条状文本 |
| strip.text.y | text | 竖直条状文本 |
- element_text():绘制标签和标题,可控制字体的family、face、colour、size、hjust、vjust、angle、lineheight。
hgramt <- hgram + labs(title = "This is a histogram")

hgramt + theme(plot.title = element_text(size = 20, colour = "red", face = "bold", angle = 180, hjust = 0.5))

角度的改变可能对轴须标签很有用处。
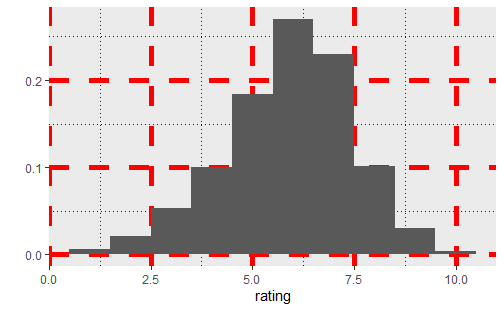
- element_line()绘制线条,可控制colour、size、linetype。
hgram + theme(panel.grid.major = element_line(colour = "red", size = 2, linetype = "dashed"),

              panel.grid.minor = element_line(colour = "blue", size = 0.5, linetype = "dotted"))
- element_rect()绘制主要供背景使用的矩形。可以控制填充颜色(fill)和边界的colour、size、linetype。
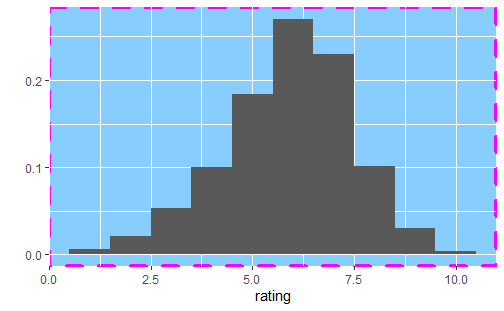
hgram + theme(plot.background = element_rect(fill = "yellow", colour = "red", size = 2, linetype = "dotted"),

              panel.background = element_rect(fill = "#87CEFF", colour = "#FF00FF", size = 1.5, linetype = "dashed"))

- element_blank()表示空主题,可删去我们不感兴趣的绘图元素。
last_plot() + theme(plot.background = element_blank())
使用theme_get()可得到当前的主题。theme()可在一幅图中对某些元素进行局部性修改,theme_update()可为后面图形的绘制进行全局性地修改。
old_theme <- theme_update(plot.background = element_rect(fill = "#FF83FA"),

    panel.background = element_rect(fill = "#9B30FF"), axis.text.x = element_text(colour = "#FFFF00"),

    axis.text.y = element_text(colour = "#FFFF00", hjust = 1), axis.title.x = element_text(colour = "#FFFF00",

        face = "bold"), axis.title.y = element_text(colour = "#FFFF00", face = "bold",

        angle = 90))

qplot(cut, data = diamonds, geom = "bar")

qplot(cty, hwy, data = mpg)

theme_set(old_theme)
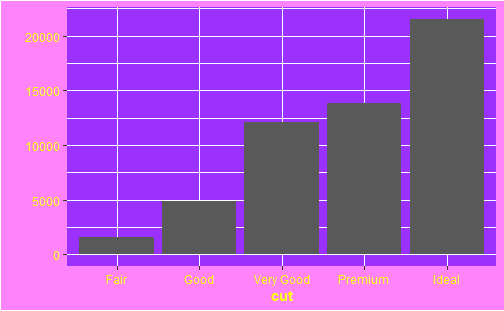
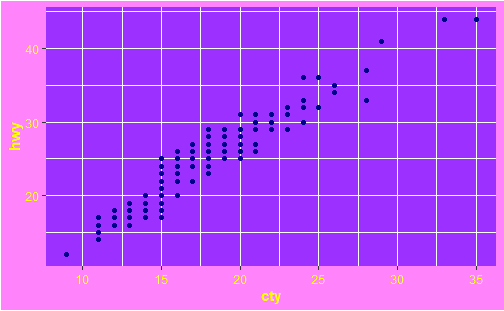
不会配色画出来的图是真的难看!这糟糕的配色看的我眼花头疼。
8.2 存储输出
基本图形输出有两种类型:矢量型和光栅型。矢量图是过程化的,意味着放大不会损失细节,光栅图以阵列形式存储,具有固定的最优观测大小。
ggsave()是为图形交互而优化过的函数。
- path:设定图形存储的路径,根据图形扩展名自动选择正确地图形设备。
- 三个控制输出尺寸的参数。width和height设置绝对尺寸大小,scale设置图形相对屏幕展示的尺寸大小。最好使用width和height,这样可精确控制输出尺寸。若空白,则使用当前屏幕图形设备尺寸。
- 对于光栅图形,dpi参数控制图形的分辨率,默认值为300,适合于大部分打印设备。600以用于高分辨率,72以用于屏幕(网页)展示。
qplot(mpg, wt, data = mtcars)

ggsave(file = "output.pdf")

pdf(file = "output.pdf", width = 6, height = 6)

# 在脚本中,你需要明确使用 print() 来打印图形

qplot(mpg, wt, data = mtcars)

qplot(wt, mpg, data = mtcars)

dev.off()
以上代码将两幅图存入output.PDF中。
| 软件 | 推荐的图形设备 |
| Illustrator | svg |
| latex | ps |
| MS Office | png(600dpi) |
| Open Office | png(600dpi) |
| pdflatex | pdf,png(600dpi) |
| web | png(72dpi) |
8.3 一页多图
图形准备:
(a <- qplot(date, unemploy, data = economics, geom = "line"))

(b <- qplot(uempmed, unemploy, data = economics) +

    geom_smooth(se = F))

(c <- qplot(uempmed, unemploy, data = economics, geom = "path"))
8.3.1 子图
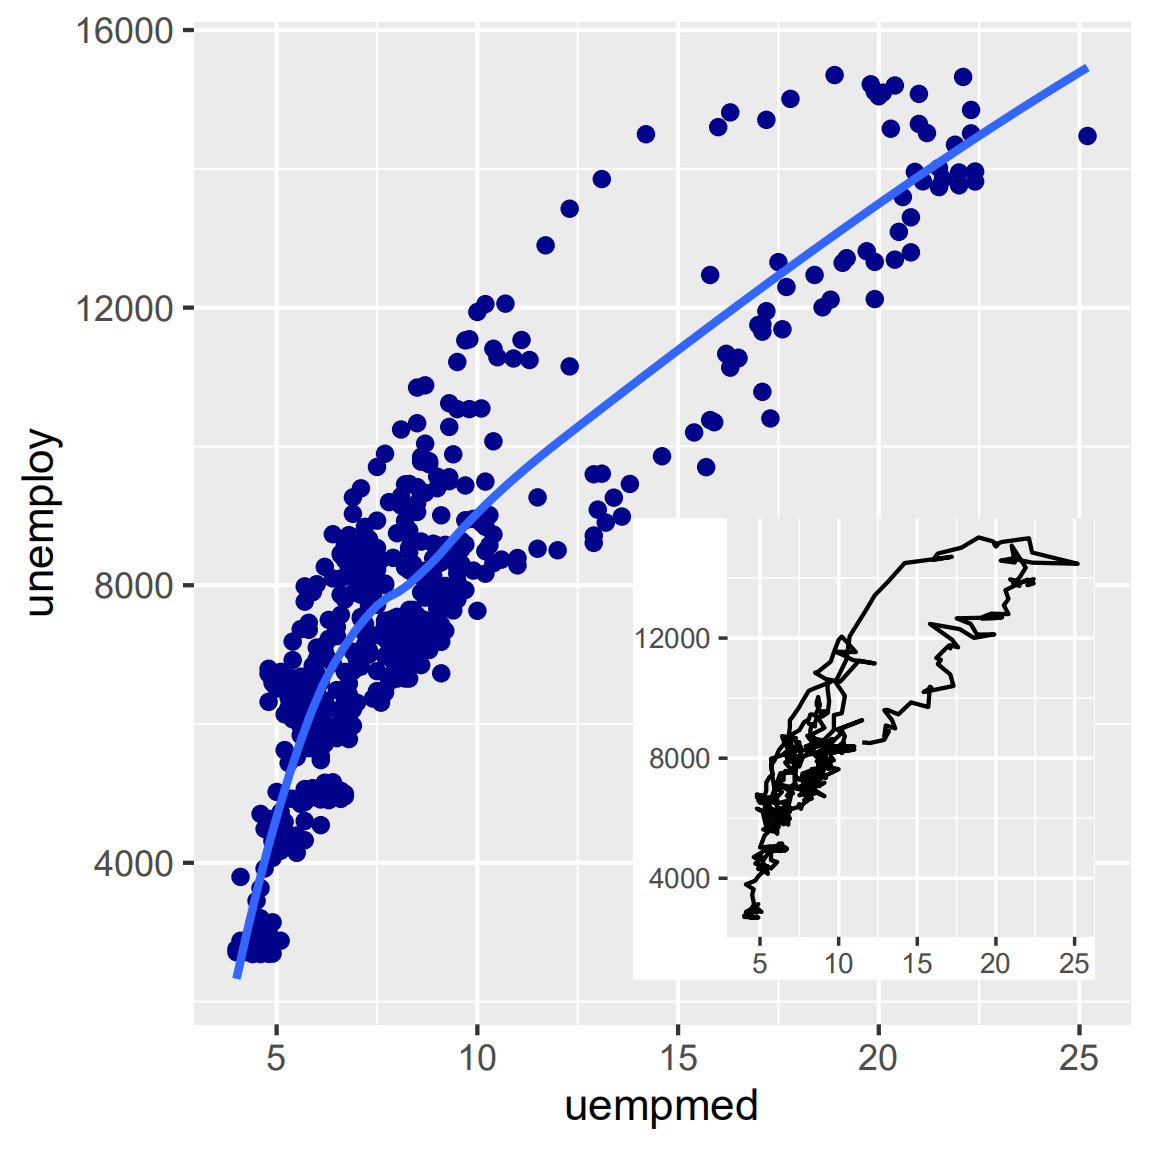
viewplot()函数可创建视图窗口,参数x、y、width、height控制视图窗口的大小和位置。默认的测量单位是“npc”,范围从0到1。
(0, 0)代表的位置是左下角,(1, 1)代表右上角,(0.5, 0.5)代表窗口中心。也可以使用unit(2, "cm")或unit(1, "inch")这样的绝对单位。
library(grid)

csmall <- c + theme_gray(9) + labs(x = NULL, y = NULL) + theme(plot.margin = unit(rep(0,

    4), "lines"))

subvp <- viewport(width = 0.4, height = 0.4, x = 0.75, y = 0.35)

pdf("polishing-subplot.pdf", width = 4, height = 4)

b

print(csmall, vp = subvp)

dev.off()
8.3.2 矩形网络
pdf("polishing-layout.pdf", width = 8, height = 6)

grid.newpage()

pushViewport(viewport(layout = grid.layout(2, 2)))

vplayout <- function(x, y) viewport(layout.pos.row = x, layout.pos.col = y)

print(a, vp = vplayout(1, 1:2))

print(b, vp = vplayout(2, 1))

print(c, vp = vplayout(2, 2))

dev.off()

总结
ggplot2(8) 精雕细琢的更多相关文章
- ggplot2 |legend参数设置,图形精雕细琢
本文首发于微信公众号“生信补给站”,https://mp.weixin.qq.com/s/A5nqo6qnlt_5kF3_GIrjIA 学习了ggplot2|详解八大基本绘图要素后,就可以根据自己的需 ...
- ggplot2|theme主题设置,详解绘图优化-“精雕细琢”-
本文首发于“生信补给站”公众号,https://mp.weixin.qq.com/s/hMjPj18R1cKBt78w8UfhIw 学习了ggplot2的基本绘图元素ggplot2|详解八大基本绘图要 ...
- R语言:ggplot2精细化绘图——以实用商业化图表绘图为例
本文版权归http://www.cnblogs.com/weibaar 本文旨在介绍R语言中ggplot2包的一些精细化操作,主要适用于对R画图有一定了解,需要更精细化作图的人,尤其是那些刚从exce ...
- [转]ggplot2用法简单介绍
简介 ggplot2包是基于Wilkinson在<Grammar of Graphics>一书中所提出的图形语法的具体实现, 这套图形语法把绘图过程归纳为data, transformat ...
- ggplot2|详解八大基本绘图要素
本文首发于微信公众号 *“ 生信补给站 ” ,期待您的关注!!!* 原文链接:https://mp.weixin.qq.com/s?__biz=MzIyNDI1MzgzOQ==&mid=265 ...
- ggplot2入门与进阶(上)
出处:http://www.cellyse.com/how_to_use_gggplot2_part1/ ggplot2包是基于Wilkinson在<Grammar of Graphics> ...
- ggplot2(11) 总结回顾&案例练习
从2020年2月20到2月27日,3月13日到2020年3月16日,学习了ggplot2:数据分析与图形艺术(哈德利·威克姆 著 统计之都 译),历时12天.另外,3月6日到3月9日参加了美赛,也用到 ...
- 跟我一起ggplot2(1)
ggplot2 R的作图工具包,可以使用非常简单的语句实现非常复杂漂亮的效果. qplot 加载qplot library(ggplot2) # 测试数据集,ggplot2内置的钻石数据 qplot( ...
- ggplot2 多图排版
和R自带的绘图系统不同,ggplot2不能直接通过par(mfrow) 或者 layout()来排版多张图片.终于发现,其实可以通过一个『gridExtra』包来搞定: require(gridExt ...
随机推荐
- leetcode第36题:有效的数独
解题思路:按行,列,3*3方格读取元素,存入字典中.若字典中该元素的值大于1,则返回false,否则返回true. class Solution: def isValidSudoku(self, bo ...
- LeetCode Day 1
目录 1.TwoSum 2.AddTwoNumbers 4.FindMedianSortedArrays 1.TwoSum 给定一个整数数组nums和一个目标值 target,请你在该数组中找出和为目 ...
- eclipse 大括号改为C语言一样的代码块
如图:找到Windows->Preferences->Java->Code Style->Formatter: 然后,点击右边的Edit按钮: 按如下图完成
- C++ 部分STL
map map可以理解为一个数组(但实质上并不是,只是方便理解),我们一般的数组不管定义成什么类型他的下标都是整型(int),map和这些数组的区别是他的下标可以是其他类型,由自己定义.map的创建. ...
- linux在线书籍
<Linux就该这么学-刘遄>https://www.linuxprobe.com/
- Ionic3学习笔记(十五)自定义 tab icon
本文为原创文章,转载请标明出处 美工做了一套 icon,自然是要用的.将 icon copy 到 assets 文件夹下. 例如 .icon-ios-home-custom 为 iOS icon 选中 ...
- SQLite数据库迁移MySQL(MariaDB)完整步骤
第一步(SQLite导出数据库): 命令方式导出数据库 > .output d:/data/lagou.sql //导出路径及文件名 > .dump //开始导出 修改lagou.sql文 ...
- java 字符串转日期格式
/** * 字符串转日期格式 * */ public static Date date(String date_str) { try { Calendar zcal = Calendar.getIns ...
- Elegy written in a country church-yard
分享一首好诗:托马斯·格雷的<墓地哀歌>. "ELEGY WRITTEN IN A COUNTRY CHURCH-YARD" The curfew tolls the ...
- 使用Commons Logging
Commons Logging 和Java标准库提供的日志不同,Commons Logging是一个第三方日志库,它是由Apache创建的日志模块,需要导入commons-logging-1.2.ja ...
