Python交互图表可视化Bokeh:2. 辅助参数
图表辅助参数设置
辅助标注、注释、矢量箭头
参考官方文档:https://bokeh.pydata.org/en/latest/docs/user_guide/annotations.html#color-bars
1. 辅助标注 - 线
import numpy as np

import pandas as pd

import matplotlib.pyplot as plt

% matplotlib inline

import warnings

warnings.filterwarnings('ignore')

# 不发出警告

from bokeh.io import output_notebook

output_notebook()

# 导入notebook绘图模块

from bokeh.plotting import figure,show

# 导入图表绘制、图标展示模块

upper = Span( location=1, dimension='width', line_color='olive', line_width=4,line_dash = [8,4] )

p.add_layout(upper)
# 辅助标注 - 线

from bokeh.models.annotations import Span

# 导入Span模块

x = np.linspace(0, 20, 200)

y = np.sin(x)

# 创建x,y数据

p = figure(y_range=(-2, 2))

p.line(x, y)

# 绘制曲线

upper = Span(location=1,           # 设置位置,对应坐标值

             dimension='width',    # 设置方向,width为横向,height为纵向

             line_color='olive', line_width=4,   # 设置线颜色、线宽

             line_dash = [8,4]

            )

p.add_layout(upper)

# 绘制辅助线1

lower = Span(location=-1, dimension='width', line_color='firebrick', line_width=4)

p.add_layout(lower)

# 绘制辅助线2

show(p)

2. 辅助标注 - 矩形
upper = BoxAnnotation(bottom=1, fill_alpha=0.1, fill_color='olive', line_width = 2, line_dash = [6,2], line_color = 'red')

p.add_layout(upper)

# 绘制辅助矩形1
# 辅助标注 - 矩形

from bokeh.models.annotations import BoxAnnotation

# 导入BoxAnnotation模块

x = np.linspace(0, 20, 200)

y = np.sin(x)

# 创建x,y数据

p = figure(y_range=(-2, 2))

p.line(x, y)

# 绘制曲线

upper = BoxAnnotation(bottom=1, fill_alpha=0.1, fill_color='olive', line_width = 2, line_dash = [6,2], line_color = 'red')

p.add_layout(upper)

# 绘制辅助矩形1

lower = BoxAnnotation(top=-1, fill_alpha=0.1, fill_color='firebrick')

p.add_layout(lower)

# 绘制辅助矩形2

center = BoxAnnotation(top=0.6, bottom=-0.3, left=7, right=12,  # 设置矩形四边位置

                       fill_alpha=0.1, fill_color='navy'        # 设置透明度、颜色

                      )

p.add_layout(center)

# 绘制辅助矩形3

show(p)

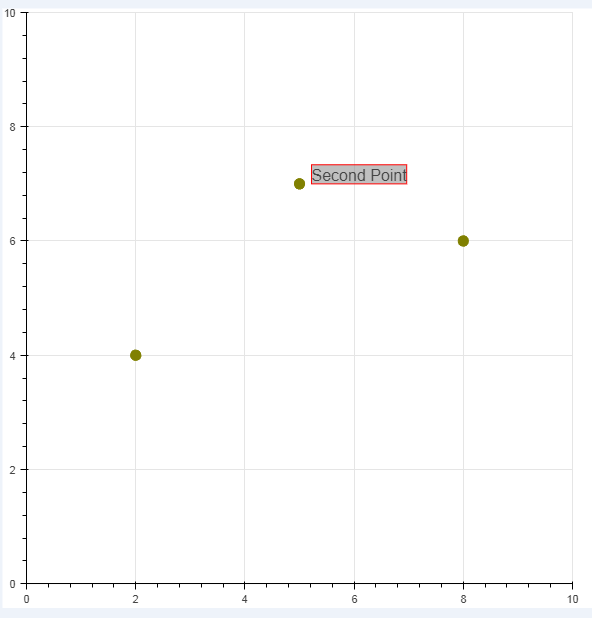
3. 绘图注释
label = Label(x=5, y=7,  x_offset=12, text="Second Point", text_font_size="12pt",

              border_line_color="red", background_fill_color="gray", background_fill_alpha = 0.5 )

p.add_layout(label)
# 绘图注释

from bokeh.models.annotations import Label# Label是标注的注释

# 导入Label模块,注意是annotations中的Label

p = figure(x_range=(0,10), y_range=(0,10))

p.circle([2, 5, 8], [4, 7, 6], color="olive", size=10)

# 绘制散点图

label = Label(x=5, y=7,       # 标注注释位置

              x_offset=12,    # x偏移,同理y_offset

              text="Second Point",      # 注释内容

              text_font_size="12pt",    # 字体大小

              border_line_color="red", background_fill_color="gray", background_fill_alpha = 0.5   # 背景线条颜色、背景颜色、透明度

             )

p.add_layout(label)

# 绘制注释

show(p)

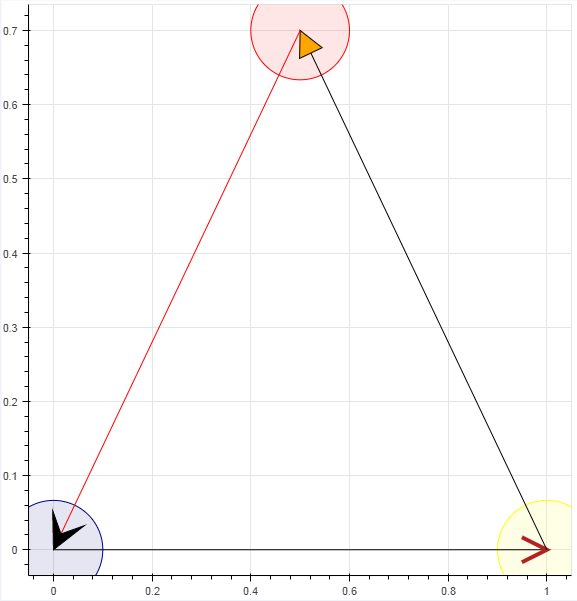
4. 注释箭头
p.add_layout(Arrow(end=OpenHead(line_color="firebrick", line_width=4),  # 设置箭头类型,及相关参数:OpenHead, NormalHead, VeeHead

                   x_start=0, y_start=0, x_end=1, y_end=0))
# 注释箭头

from bokeh.models.annotations import Arrow

from bokeh.models.arrow_heads import OpenHead, NormalHead, VeeHead   # 三种箭头类型

# 导入相关模块

p = figure(plot_width=600, plot_height=600)

p.circle(x=[0, 1, 0.5], y=[0, 0, 0.7], radius=0.1, color=["navy", "yellow", "red"], fill_alpha=0.1)

# 创建散点图

p.add_layout(Arrow(end=OpenHead(line_color="firebrick", line_width=4),  # 设置箭头类型,及相关参数:OpenHead, NormalHead, VeeHead

                   x_start=0, y_start=0, x_end=1, y_end=0))   # 设置箭头矢量方向

# 绘制箭头1

p.add_layout(Arrow(end=NormalHead(fill_color="orange"),

                   x_start=1, y_start=0, x_end=0.5, y_end=0.7))

# 绘制箭头2

p.add_layout(Arrow(end=VeeHead(size=35), line_color="red",

                   x_start=0.5, y_start=0.7, x_end=0, y_end=0))

# 绘制箭头3

show(p)

5. 调色盘
# 调色盘

# 颜色参考文档:http://bokeh.pydata.org/en/latest/docs/reference/palettes.html

# ColorBrewer:http://colorbrewer2.org/#type=sequential&scheme=BuGn&n=3

import bokeh.palettes as bp

from bokeh.palettes import brewer

print('所有调色板名称:\n',bp.__palettes__)

print('-------')

# 查看所有调色板名称

print('蓝色调色盘颜色:\n',bp.Blues)

print('-------')

# 查看蓝色调色盘颜色

n = 8

colori = brewer['YlGn'][n]

print('YlGn调色盘解析为%i个颜色,分别为:\n' % n, colori)

# 调色盘解析 → 不同颜色解析最多颜色有限
所有调色板名称:

 ['Accent3', 'Accent4', 'Accent5', 'Accent6', 'Accent7', 'Accent8', 'Blues3', 'Blues4', 'Blues5', 'Blues6', 'Blues7', 'Blues8', 'Blues9', 'BrBG3', 'BrBG4', 'BrBG5', 'BrBG6', 'BrBG7', 'BrBG8', 'BrBG9', 'BrBG10', 'BrBG11', 'BuGn3', 'BuGn4', 'BuGn5', 'BuGn6', 'BuGn7', 'BuGn8', 'BuGn9', 'BuPu3', 'BuPu4', 'BuPu5', 'BuPu6', 'BuPu7', 'BuPu8', 'BuPu9', 'Category10_3', 'Category10_4', 'Category10_5', 'Category10_6', 'Category10_7', 'Category10_8', 'Category10_9', 'Category10_10', 'Category20_3', 'Category20_4', 'Category20_5', 'Category20_6', 'Category20_7', 'Category20_8', 'Category20_9', 'Category20_10', 'Category20_11', 'Category20_12', 'Category20_13', 'Category20_14', 'Category20_15', 'Category20_16', 'Category20_17', 'Category20_18', 'Category20_19', 'Category20_20', 'Category20b3', 'Category20b4', 'Category20b5', 'Category20b6', 'Category20b7', 'Category20b8', 'Category20b9', 'Category20b10', 'Category20b11', 'Category20b12', 'Category20b13', 'Category20b14', 'Category20b15', 'Category20b16', 'Category20b17', 'Category20b18', 'Category20b19', 'Category20b20', 'Category20c3', 'Category20c4', 'Category20c5', 'Category20c6', 'Category20c7', 'Category20c8', 'Category20c9', 'Category20c10', 'Category20c11', 'Category20c12', 'Category20c13', 'Category20c14', 'Category20c15', 'Category20c16', 'Category20c17', 'Category20c18', 'Category20c19', 'Category20c20', 'Colorblind3', 'Colorblind4', 'Colorblind5', 'Colorblind6', 'Colorblind7', 'Colorblind8', 'Dark2_3', 'Dark2_4', 'Dark2_5', 'Dark2_6', 'Dark2_7', 'Dark2_8', 'GnBu3', 'GnBu4', 'GnBu5', 'GnBu6', 'GnBu7', 'GnBu8', 'GnBu9', 'Greens3', 'Greens4', 'Greens5', 'Greens6', 'Greens7', 'Greens8', 'Greens9', 'Greys3', 'Greys4', 'Greys5', 'Greys6', 'Greys7', 'Greys8', 'Greys9', 'Greys256', 'Inferno3', 'Inferno4', 'Inferno5', 'Inferno6', 'Inferno7', 'Inferno8', 'Inferno9', 'Inferno10', 'Inferno11', 'Inferno256', 'Magma3', 'Magma4', 'Magma5', 'Magma6', 'Magma7', 'Magma8', 'Magma9', 'Magma10', 'Magma11', 'Magma256', 'OrRd3', 'OrRd4', 'OrRd5', 'OrRd6', 'OrRd7', 'OrRd8', 'OrRd9', 'Oranges3', 'Oranges4', 'Oranges5', 'Oranges6', 'Oranges7', 'Oranges8', 'Oranges9', 'PRGn3', 'PRGn4', 'PRGn5', 'PRGn6', 'PRGn7', 'PRGn8', 'PRGn9', 'PRGn10', 'PRGn11', 'Paired3', 'Paired4', 'Paired5', 'Paired6', 'Paired7', 'Paired8', 'Paired9', 'Paired10', 'Paired11', 'Paired12', 'Pastel1_3', 'Pastel1_4', 'Pastel1_5', 'Pastel1_6', 'Pastel1_7', 'Pastel1_8', 'Pastel1_9', 'Pastel2_3', 'Pastel2_4', 'Pastel2_5', 'Pastel2_6', 'Pastel2_7', 'Pastel2_8', 'PiYG3', 'PiYG4', 'PiYG5', 'PiYG6', 'PiYG7', 'PiYG8', 'PiYG9', 'PiYG10', 'PiYG11', 'Plasma3', 'Plasma4', 'Plasma5', 'Plasma6', 'Plasma7', 'Plasma8', 'Plasma9', 'Plasma10', 'Plasma11', 'Plasma256', 'PuBu3', 'PuBu4', 'PuBu5', 'PuBu6', 'PuBu7', 'PuBu8', 'PuBu9', 'PuBuGn3', 'PuBuGn4', 'PuBuGn5', 'PuBuGn6', 'PuBuGn7', 'PuBuGn8', 'PuBuGn9', 'PuOr3', 'PuOr4', 'PuOr5', 'PuOr6', 'PuOr7', 'PuOr8', 'PuOr9', 'PuOr10', 'PuOr11', 'PuRd3', 'PuRd4', 'PuRd5', 'PuRd6', 'PuRd7', 'PuRd8', 'PuRd9', 'Purples3', 'Purples4', 'Purples5', 'Purples6', 'Purples7', 'Purples8', 'Purples9', 'RdBu3', 'RdBu4', 'RdBu5', 'RdBu6', 'RdBu7', 'RdBu8', 'RdBu9', 'RdBu10', 'RdBu11', 'RdGy3', 'RdGy4', 'RdGy5', 'RdGy6', 'RdGy7', 'RdGy8', 'RdGy9', 'RdGy10', 'RdGy11', 'RdPu3', 'RdPu4', 'RdPu5', 'RdPu6', 'RdPu7', 'RdPu8', 'RdPu9', 'RdYlBu3', 'RdYlBu4', 'RdYlBu5', 'RdYlBu6', 'RdYlBu7', 'RdYlBu8', 'RdYlBu9', 'RdYlBu10', 'RdYlBu11', 'RdYlGn3', 'RdYlGn4', 'RdYlGn5', 'RdYlGn6', 'RdYlGn7', 'RdYlGn8', 'RdYlGn9', 'RdYlGn10', 'RdYlGn11', 'Reds3', 'Reds4', 'Reds5', 'Reds6', 'Reds7', 'Reds8', 'Reds9', 'Set1_3', 'Set1_4', 'Set1_5', 'Set1_6', 'Set1_7', 'Set1_8', 'Set1_9', 'Set2_3', 'Set2_4', 'Set2_5', 'Set2_6', 'Set2_7', 'Set2_8', 'Set3_3', 'Set3_4', 'Set3_5', 'Set3_6', 'Set3_7', 'Set3_8', 'Set3_9', 'Set3_10', 'Set3_11', 'Set3_12', 'Spectral3', 'Spectral4', 'Spectral5', 'Spectral6', 'Spectral7', 'Spectral8', 'Spectral9', 'Spectral10', 'Spectral11', 'Viridis3', 'Viridis4', 'Viridis5', 'Viridis6', 'Viridis7', 'Viridis8', 'Viridis9', 'Viridis10', 'Viridis11', 'Viridis256', 'YlGn3', 'YlGn4', 'YlGn5', 'YlGn6', 'YlGn7', 'YlGn8', 'YlGn9', 'YlGnBu3', 'YlGnBu4', 'YlGnBu5', 'YlGnBu6', 'YlGnBu7', 'YlGnBu8', 'YlGnBu9', 'YlOrBr3', 'YlOrBr4', 'YlOrBr5', 'YlOrBr6', 'YlOrBr7', 'YlOrBr8', 'YlOrBr9', 'YlOrRd3', 'YlOrRd4', 'YlOrRd5', 'YlOrRd6', 'YlOrRd7', 'YlOrRd8', 'YlOrRd9']

-------

蓝色调色盘颜色:

 {3: ['#3182bd', '#9ecae1', '#deebf7'], 4: ['#2171b5', '#6baed6', '#bdd7e7', '#eff3ff'], 5: ['#08519c', '#3182bd', '#6baed6', '#bdd7e7', '#eff3ff'], 6: ['#08519c', '#3182bd', '#6baed6', '#9ecae1', '#c6dbef', '#eff3ff'], 7: ['#084594', '#2171b5', '#4292c6', '#6baed6', '#9ecae1', '#c6dbef', '#eff3ff'], 8: ['#084594', '#2171b5', '#4292c6', '#6baed6', '#9ecae1', '#c6dbef', '#deebf7', '#f7fbff'], 9: ['#08306b', '#08519c', '#2171b5', '#4292c6', '#6baed6', '#9ecae1', '#c6dbef', '#deebf7', '#f7fbff']}

-------

YlGn调色盘解析为8个颜色,分别为:

 ['#005a32', '#238443', '#41ab5d', '#78c679', '#addd8e', '#d9f0a3', '#f7fcb9', '#ffffe5']
Python交互图表可视化Bokeh:2. 辅助参数的更多相关文章
- Python交互图表可视化Bokeh:1. 可视交互化原理| 基本设置
Bokeh pandas和matplotlib就可以直接出分析的图表了,最基本的出图方式.是面向数据分析过程中出图的工具:Seaborn相比matplotlib封装了一些对数据的组合和识别的功能:用S ...
- Python交互图表可视化Bokeh:5 柱状图| 堆叠图| 直方图
柱状图/堆叠图/直方图 ① 单系列柱状图② 多系列柱状图③ 堆叠图④ 直方图 1.单系列柱状图 import numpy as np import pandas as pd import matplo ...
- Python交互图表可视化Bokeh:7. 工具栏
ToolBar工具栏设置 ① 位置设置② 移动.放大缩小.存储.刷新③ 选择④ 提示框.十字线 1. 位置设置 import numpy as np import pandas as pd impor ...
- Python交互图表可视化Bokeh:6. 轴线| 浮动| 多图表
绘图表达进阶操作 ① 轴线设置② 浮动设置③ 多图表设置 1. 轴线标签设置 设置字符串 import numpy as np import pandas as pd import matplotli ...
- Python交互图表可视化Bokeh:4. 折线图| 面积图
折线图与面积图 ① 单线图.多线图② 面积图.堆叠面积图 1. 折线图--单线图 import numpy as np import pandas as pd import matplotlib.py ...
- Python交互图表可视化Bokeh:3. 散点图
散点图 ① 基本散点图绘制② 散点图颜色.大小设置方法③ 不同符号的散点图 1. 基本散点图绘制 import numpy as np import pandas as pd import matpl ...
- Python绘制六种可视化图表详解,三维图最炫酷!你觉得呢?
Python绘制六种可视化图表详解,三维图最炫酷!你觉得呢? 可视化图表,有相当多种,但常见的也就下面几种,其他比较复杂一点,大都也是基于如下几种进行组合,变换出来的.对于初学者来说,很容易被这官网上 ...
- Python绘图与可视化
Python有很多可视化工具,本篇只介绍Matplotlib. Matplotlib是一种2D的绘图库,它可以支持硬拷贝和跨系统的交互,它可以在Python脚本.IPython的交互环境下.Web应用 ...
- Python 数据图表工具的比较
Python 的科学栈相当成熟,各种应用场景都有相关的模块,包括机器学习和数据分析.数据可视化是发现数据和展示结果的重要一环,只不过过去以来,相对于 R 这样的工具,发展还是落后一些. 幸运的是,过去 ...
随机推荐
- ubuntu安装jdk8
文章连接:https://www.cnblogs.com/lighten/p/6105463.html 1.简单的安装方法 安装JDK的最简单方法应该就是使用apt-get来安装了,但是源一般是Ope ...
- js---json对象拆分
var a={ "bb":"world", "a0":1, "a1":2, "b0":4, &quo ...
- Modbus库开发笔记:Modbus ASCII Master开发
这一节我们来封装Modbus ASCII Master应用,Modbus ASCII主站的开发与RTU主站的开发是一致的.同样的我们也不是做具体的应用,而是实现ASCII主站的基本功能.我们将ASCI ...
- 解决 安装或卸载软件时报错Error 1001 的问题
卸载或安装程序时出错1001:错误1001可能发生在试图更新.修复或卸载windows os中的特定程序时.此问题通常是由于程序的先前安装损坏而引起的. 错误“1001”通常会遇到,因为程序的先前安装 ...
- Java.ftp上传下载
1:jar的maven的引用: 1 <project xmlns="http://maven.apache.org/POM/4.0.0" xmlns:xsi="ht ...
- Confluence 6 修改 Home 目录的位置
当 Confluence 第一次启动的时候,Confluence 将会读取 confluence-init.properties 文件并从这个文件中确定如何去查找 Home 目录. 希望修改 home ...
- C语言访问一个链接
示例代码1: # include <Windows.h> int main(){ system("start http://""www.baidu.com&q ...
- 查看CPU 内存 硬盘 网络 查看进程使用的文件 uptime top ps -aux vmstat iostat iotop nload iptraf nethogs
#安装命令 yum install sysstat #包含 iostat vmstat yum install iotop yum install nload yum install iptraf ...
- rpm 命令使用 和 lsof -p 1406 使用
#安装RPM -v 显示详细信息 -h 显示进度 -i 安装 -U 升级 -q 查询 -ql 查看rpm 包装的文件 - qf 查看命令属于哪个RPM 包 -qi 查看RPM包的详细信息 [root@ ...
- 使用Docker方式运行Mysql(MariaDB)
两者差不多.我使用的是MariaDB. 下面的docker命令,挂了数据,配置,映射了端口,指定了root密码,服务端编码. 蛮快的! docker run \ --name mariadb \ -v ...
