android 6.0 高通平台sensor 工作机制及流程(原创)
最近工作上有碰到sensor的相关问题,正好分析下其流程作个笔记。
这个笔记分三个部分:
- sensor硬件和驱动的工作机制
- sensor 上层app如何使用
- 从驱动到上层app这中间的流程是如何
Sensor硬件和驱动的工作机制
先看看Accerometer +Gyro Sensor的原理图:

总结起来分四个部分(电源,地,通信接口,中断脚)。电源和地与平台和芯片本身有关系,与我们分析的没有多少关系,根据sensor的特性保证sensor正常工作的上电时序。关于通信接口,sensor与ap之间通信一般有两种接口(I2C/SPI)。因sensor数据量不大,I2C的速度足矣,目前使用I2C的居多。SDA是I2C的数据线,SCL是I2C的clock线。关于中断脚就是INT。Sensor有两个工作模式。一种是主动上报数据(每时每刻将获取到的数据上报给系统),另个一种是中断模式(当数据的变化大于了之前设置的触发条件),比如手机翻转大于45度,就会将当前的变化及当前数据上报给系统。
Sensor上层app的使用
先要注册指定sensor的事件监听,然在在有事件上报上来时,获取上报的数据。
具体代码如下:
- 1 SensorManager mSensorManager = (SensorManager)mContext.getSystemService(Context.SENSOR_SERVICE);
- 2 Sensor mSensor = mSensorManager.getDefaultSensor(Sensor.TYPE_ACCELEROMETER);
- 3
- 4 mSensorManager.registerListener(mSensorListener, mSensor, SensorManager.SENSOR_DELAY_GAME);
- 5 /*
- 6 public static final int SENSOR_DELAY_FASTEST = 0;
- 7 public static final int SENSOR_DELAY_GAME = 1;
- 8 public static final int SENSOR_DELAY_UI = 2;
- 9 public static final int SENSOR_DELAY_NORMAL = 3;
- 10 上报的速度可以根据需求来选择
- 11 */
- 12
- 13 SensorEventListener mSensorListener = new SensorEventListener(){
- 14 public void onAccuracyChanged(Sensor arg0, int arg1){
- 15 }
- 16
- 17 public void onSensorChanged(SensorEvent event){
- 18 if(event.sensor == null){
- 19 return;
- 20 }
- 21 Log.d(TAG, "onSensorChanged");
- 22 if(Sensor.TYPE_ACCELEROMETER == event.sensor.getType()) {
- 23 mGsensor = (float)event.values[SensorManager.DATA_Z];
- 24 mSensorManager.unregisterListener(this);
- 25 Log.e(TAG, "mgsensor = " + mGsensor);
- 26 mOnSensorChangedFlag = false;
- 27 }
- 28 }
- 29 }
从驱动到上层App这中间的流程如何
前面二段分别说了驱动上报数据和app读取数据,但中间的流程是如何的呢,这个是此篇博客的重点了。
驱动层上报数据后,HAL层怎么处理呢?这个属于input hal层的接收和分发了。来,我们来啃啃这个骨头:
frameworks/base/core/java/android/app/SystemServiceRegistry.java
- registerService(Context.SENSOR_SERVICE, SensorManager.class,
- new CachedServiceFetcher<SensorManager>() {
- @Override
- public SensorManager createService(ContextImpl ctx) {
- return new SystemSensorManager(ctx.getOuterContext(),
- ctx.mMainThread.getHandler().getLooper());
- }});
- mContext.getSystemService(Context.SENSOR_SERVICE) 返回的就是SystemSensorManager 的对象(也是继承SensorManager 类)。
- frameworks/base/core/java/android/hardware/SensorManager.java
- public Sensor getDefaultSensor(int type) {
- ......................................................................
- List<Sensor> l = getSensorList(type);
- boolean wakeUpSensor = false;
- if (type == Sensor.TYPE_PROXIMITY || type == Sensor.TYPE_SIGNIFICANT_MOTION ||
- type == Sensor.TYPE_TILT_DETECTOR || type == Sensor.TYPE_WAKE_GESTURE ||
- type == Sensor.TYPE_GLANCE_GESTURE || type == Sensor.TYPE_PICK_UP_GESTURE ||
- type == Sensor.TYPE_WRIST_TILT_GESTURE) {
- wakeUpSensor = true;
- }
- //返回支持唤醒的sensor
- for (Sensor sensor : l) {
- if (sensor.isWakeUpSensor() == wakeUpSensor) return sensor;
- }
- }
我们再看看getSensorList这里面有啥玩意。。。。
- public List<Sensor> getSensorList(int type) {
- .......................................................................
- final List<Sensor> fullList = getFullSensorList();
- //然后再种所有sensor中找出对应的sensor
- for (Sensor i : fullList) {
- if (i.getType() == type)
- list.add(i);
- }
- return list;
- }
- getFullSensorList这个函数返回的是mFullSensorsList。
mFullSensorList是SystemSensorManager 遍历所有的sensor得到的集合。
下一步我们再来看看registerListener是怎么回事。
frameworks/base/core/java/android/hardware/SystemSensorManager.java
- protected boolean registerListenerImpl(SensorEventListener listener, Sensor sensor, int delayUs, Handler handler, int maxBatchReportLatencyUs, int reservedFlags) {
- synchronized (mSensorListeners) {
- //先查看下此sensor的监听队列是否已经存在,如果不存在,就重新new个
- SensorEventQueue queue = mSensorListeners.get(listener);
- if (queue == null) {
- queue = new SensorEventQueue(listener, looper, this, fullClassName);
- mSensorListeners.put(listener, queue);
- return true;
- } else {
- return queue.addSensor(sensor, delayUs, maxBatchReportLatencyUs);
- }
- }
到这里就明显是一个消息队列回调的问题了,肯定是发现消息队列里有消息时就会回调具体的事件。我们继续撸代码。
- static final class SensorEventQueue extends BaseEventQueue {
- protected void dispatchSensorEvent(int handle, float[] values, int inAccuracy,
- long timestamp) {
- ......................................................
- // call onAccuracyChanged() only if the value changes
- final int accuracy = mSensorAccuracies.get(handle);
- if ((t.accuracy >= ) && (accuracy != t.accuracy)) {
- mSensorAccuracies.put(handle, t.accuracy);
- mListener.onAccuracyChanged(t.sensor, t.accuracy);
- }
- mListener.onSensorChanged(t);
- }
- }
从这里就可以看我们listener里实现的onAccuracyChanged,onSensorChanged是怎么被调用。
frameworks/base/core/java/android/hardware/SensorEventListener.java
- public interface SensorEventListener {
- public void onSensorChanged(SensorEvent event);
- public void onAccuracyChanged(Sensor sensor, int accuracy);
- }
就是一个接口,里面声明两个函数。
看到回调是在dispatchSensorEvent里做的,看看是谁调用的。。。
frameworks/base/core/jni/android_hardware_SensorManager.cpp
- class Receiver : public LooperCallback {
- virtual int handleEvent(int fd, int events, void* data) {
- ASensorEvent buffer[];
- while ((n = q->read(buffer, )) > ) {
- for (int i= ; i<n ; i++) {
- if (buffer[i].type == SENSOR_TYPE_META_DATA) {
- // This is a flush complete sensor event. Call dispatchFlushCompleteEvent
- // method.
- if (receiverObj.get()) {
- env->CallVoidMethod(receiverObj.get(),
- gBaseEventQueueClassInfo.dispatchFlushCompleteEvent,
- buffer[i].meta_data.sensor);
- }
- } else {
- if (receiverObj.get()) {
- env->CallVoidMethod(receiverObj.get(),
- gBaseEventQueueClassInfo.dispatchSensorEvent,
- buffer[i].sensor,
- mScratch,
- status,
- buffer[i].timestamp);
- }
- }
- }
- }
- }
读到的数据,根据数据的类型去回调不同的接口。dispatchSensorEvent就是在这里被调用的。
handleEvent这个是一个典型的eventQueue这事件处理,具体就不在这里分析了。
回调这些都有分析了,那事件是哪里加入到消息队列中的,那些消息又是怎么来的呢,话说问题问对了,就能找到往下查的路了。。哈哈
理论这些肯定会有sensor服务在开机的时候启动的,那服务在哪里,是怎么启动的呢。。。
frameworks/base/services/java/com/android/server/SystemServer.java
- private void startBootstrapServices() {
- ...................................................
- startSensorService();
- }
这个startSensorService是个jni函数,调用的是:
frameworks/base/services/core/jni/com_android_server_SystemServer.cpp
- static void android_server_SystemServer_startSensorService(JNIEnv* /* env */, jobject /* clazz */) {
- //创建一个线程做sensorinit的工作
- pthread_create( &sensor_init_thread, NULL, &sensorInit, NULL);
- }
- void* sensorInit(void *arg) {
- SensorService::instantiate();
- }
sensorService服务就做初始化了,服务启动时会做threadLoop(),
- bool SensorService::threadLoop()
- {
- ALOGD("nuSensorService thread starting...");
- const size_t minBufferSize = SensorEventQueue::MAX_RECEIVE_BUFFER_EVENT_COUNT;
- const size_t numEventMax = minBufferSize / ( + mVirtualSensorList.size());
- //device初始化
- SensorDevice& device(SensorDevice::getInstance());
- const size_t vcount = mVirtualSensorList.size();
- const int halVersion = device.getHalDeviceVersion();
- do {
- //调用device.poll
- ssize_t count = device.poll(mSensorEventBuffer, numEventMax);
- if (count < ) {
- ALOGE("sensor poll failed (%s)", strerror(-count));
- break;
- }
- }
再看看SensorDevice 里初始化和poll里做了啥 :
- SensorDevice::SensorDevice()
- : mSensorDevice(),
- mSensorModule()
- {
//get HAL module- status_t err = hw_get_module(SENSORS_HARDWARE_MODULE_ID,
- (hw_module_t const**)&mSensorModule);
- ALOGE_IF(err, "couldn't load %s module (%s)",
- SENSORS_HARDWARE_MODULE_ID, strerror(-err));
- if (mSensorModule) {
//open HAL module- err = sensors_open_1(&mSensorModule->common, &mSensorDevice);
- ...................................................
- }
SensorDevice初始化做了两个动作,一个是获取sensor HAL module,紧接着打开sensor hal module。
再一起看年poll里做啥了,
- ssize_t SensorDevice::poll(sensors_event_t* buffer, size_t count) {
- if (!mSensorDevice) return NO_INIT;
- ssize_t c;
- do {
- c = mSensorDevice->poll(reinterpret_cast<struct sensors_poll_device_t *> (mSensorDevice),
- buffer, count);
- } while (c == -EINTR);
- return c;
- }
poll也是调用 的是Hal module里的poll。
那sensor HAL里做了啥呢,模块做了啥呢?
sensor hal路径:hardware/libhardware/modules/sensors/
hardware/libhardware/modules/sensors/multihal.cpp
- static int open_sensors(const struct hw_module_t* hw_module, const char* name,
- struct hw_device_t** hw_device_out) {
- ALOGV("open_sensors begin...");
- //初始化加载高通的库
- lazy_init_modules();
- // Create proxy device, to return later.
- sensors_poll_context_t *dev = new sensors_poll_context_t();
- memset(dev, , sizeof(sensors_poll_device_1_t));
- dev->proxy_device.common.tag = HARDWARE_DEVICE_TAG;
- dev->proxy_device.common.version = SENSORS_DEVICE_API_VERSION_1_3;
- dev->proxy_device.common.module = const_cast<hw_module_t*>(hw_module);
- dev->proxy_device.common.close = device__close;
- dev->proxy_device.activate = device__activate;
- dev->proxy_device.setDelay = device__setDelay;
- dev->proxy_device.poll = device__poll;
- dev->proxy_device.batch = device__batch;
- dev->proxy_device.flush = device__flush;
- .......................................
- }
我们看看lazy_init_modules()这个,是把指定的的hal so加载起来。。
- /*
- 482 * Ensures that the sub-module array is initialized.
- 483 * This can be first called from get_sensors_list or from open_sensors.
- 484 */
- static void lazy_init_modules() {
- pthread_mutex_lock(&init_modules_mutex);
- if (sub_hw_modules != NULL) {
- pthread_mutex_unlock(&init_modules_mutex);
- return;
- }
- std::vector<std::string> *so_paths = new std::vector<std::string>();
- get_so_paths(so_paths);
- // dlopen the module files and cache their module symbols in sub_hw_modules
- sub_hw_modules = new std::vector<hw_module_t *>();
- dlerror(); // clear any old errors
- const char* sym = HAL_MODULE_INFO_SYM_AS_STR;
- for (std::vector<std::string>::iterator it = so_paths->begin(); it != so_paths->end(); it++) {
- const char* path = it->c_str();
- void* lib_handle = dlopen(path, RTLD_LAZY);
- if (lib_handle == NULL) {
- ALOGW("dlerror(): %s", dlerror());
- } else {
- ALOGI("Loaded library from %s", path);
- ALOGV("Opening symbol \"%s\"", sym);
- // clear old errors
- dlerror();
- struct hw_module_t* module = (hw_module_t*) dlsym(lib_handle, sym);
- const char* error;
- if ((error = dlerror()) != NULL) {
- ALOGW("Error calling dlsym: %s", error);
- } else if (module == NULL) {
- ALOGW("module == NULL");
- } else {
- ALOGV("Loaded symbols from \"%s\"", sym);
- sub_hw_modules->push_back(module);
- }
- }
- }
- pthread_mutex_unlock(&init_modules_mutex);
- }
- //获取的要加载so库的路径:/system/etc/sensors/hals.conf
- get_so_paths(so_paths);
- // dlopen the module files and cache their module symbols in sub_hw_modules
- sub_hw_modules = new std::vector<hw_module_t *>();
- dlerror(); // clear any old errors
- const char* sym = HAL_MODULE_INFO_SYM_AS_STR;
- for (std::vector<std::string>::iterator it = so_paths->begin(); it != so_paths->end(); it++) {
- const char* path = it->c_str();
- void* lib_handle = dlopen(path, RTLD_LAZY);
- if (lib_handle == NULL) {
- ALOGW("dlerror(): %s", dlerror());
- } else {
- ALOGI("Loaded library from %s", path);
- ALOGV("Opening symbol \"%s\"", sym);
- // clear old errors
- dlerror();
- struct hw_module_t* module = (hw_module_t*) dlsym(lib_handle, sym);
- const char* error;
- if ((error = dlerror()) != NULL) {
- ALOGW("Error calling dlsym: %s", error);
- } else if (module == NULL) {
- ALOGW("module == NULL");
- } else {
- ALOGV("Loaded symbols from \"%s\"", sym);
- sub_hw_modules->push_back(module);
- }
- }
- }
- pthread_mutex_unlock(&init_modules_mutex);
- }
这个路径下就一个库:sensors.ssc.so
再来看看poll看名字就能猜到是从数据队列里等数据,看代码:
- int sensors_poll_context_t::poll(sensors_event_t *data, int maxReads) {
- ALOGV("poll");
- int empties = ;
- int queueCount = ;
- int eventsRead = ;
- pthread_mutex_lock(&queue_mutex);
- queueCount = (int)this->queues.size();
- while (eventsRead == ) {
- while (empties < queueCount && eventsRead < maxReads) {
- SensorEventQueue* queue = this->queues.at(this->nextReadIndex);
- sensors_event_t* event = queue->peek();
确实是消息队列。。。
再来年看看加载的so库这个是高通的sensor hal库。
代码路径:vendor/qcom/proprietary/sensors/dsps/libhalsensors
看先从哪里插入数据的:
vendor/qcom/proprietary/sensors/dsps/libhalsensors/src/Utility.cpp
- bool Utility::insertQueue(sensors_event_t const *data_ptr){
- ..........................
- if (q_head_ptr == NULL) {
- /* queue is empty */
- q_tail_ptr = q_ptr;
- q_head_ptr = q_ptr;
- } else {
- /* append to tail and update tail ptr */
- q_tail_ptr->next = q_ptr;
- q_tail_ptr = q_ptr;
- }
- }
那看调用的有哪些呢?
Orientation.cpp (src): if (Utility::insertQueue(&la_sample)) {
PedestrianActivityMonitor.cpp (src): if (Utility::insertQueue(&sensor_data)) {
Pedometer.cpp (src): if (Utility::insertQueue(&la_sample)) {
PickUpGesture.cpp (src): if (Utility::insertQueue(&sensor_data)) {
QHeart.cpp (src): if (Utility::insertQueue(&la_sample)) {
RelativeMotionDetector.cpp (src): if (Utility::insertQueue(&sensor_data)) {
RotationVector.cpp (src): if (Utility::insertQueue(&la_sample)) {
Sensor.cpp (src): if (Utility::insertQueue(&flush_evt)){
....................................................................
都在各类sensor的processInd 这个函数中,每种sensor类型根据自身数据的特点,对其做数据结构做指定封装。也就是所谓的工厂模式。
有一个调用比较特别:SMGRSensor.cpp 中processReportInd函数,这个函数中
- void SMGRSensor::processReportInd(Sensor** mSensors, sns_smgr_periodic_report_ind_msg_v01* smgr_ind){
- ...............................
- handle = getHandleFromInd(smgr_ind->ReportId, smgr_data->DataType,
- smgr_data->SensorId);
- if (handle == - ) {
- HAL_LOG_ERROR(" %s: ReportId = %d DataType = %d SensorId = %d ", __FUNCTION__,
- smgr_ind->ReportId, smgr_data->DataType, smgr_data->SensorId);
- goto error;
- }
- /* Corresponds to screen orientation req, fill in the right type */
- if ((handle == HANDLE_ACCELERATION) && (smgr_ind->ReportId == HANDLE_MOTION_ACCEL)) {
- sensor_data.type = SENSOR_TYPE_SCREEN_ORIENTATION;
- sensor_data.sensor = HANDLE_MOTION_ACCEL;
- }
- if (mSensors[handle] != NULL) {
- (static_cast<SMGRSensor*>(mSensors[handle]))->processReportInd(smgr_ind, smgr_data, sensor_data);
- }
- ................................
- if (Utility::insertQueue(&sensor_data)) {
- Utility::signalInd(data_cb);
- }
- }
这里根据smgr_data->DataType又做了一次工厂模式的分发处理:
- GyroscopeUncalibrated.cpp (src): FUNCTION: processReportInd
- GyroscopeUncalibrated.cpp (src):void GyroscopeUncalibrated::processReportInd(
- GyroscopeUncalibrated.cpp (src): HAL_LOG_DEBUG("GyroscopeUncalibrated::processReportInd");
- GyroscopeUncalibrated.h (inc): FUNCTION: processReportInd
- GyroscopeUncalibrated.h (inc): void processReportInd(sns_smgr_periodic_report_ind_msg_v01* smgr_ind,
- HallEffect.cpp (src): FUNCTION: processReportInd
- HallEffect.cpp (src):void HallEffect::processReportInd(sns_smgr_periodic_report_ind_msg_v01* smgr_ind,
- HallEffect.h (inc): FUNCTION: processReportInd
- HallEffect.h (inc): void processReportInd(sns_smgr_periodic_report_ind_msg_v01* smgr_ind,
- Humidity.cpp (src): FUNCTION: processReportInd
- Humidity.cpp (src):void Humidity::processReportInd(sns_smgr_periodic_report_ind_msg_v01* smgr_ind,
- Humidity.h (inc): FUNCTION: processReportInd
- Humidity.h (inc): void processReportInd(sns_smgr_periodic_report_ind_msg_v01* smgr_ind,
- IRGesture.cpp (src): FUNCTION: processReportInd
- IRGesture.cpp (src):void IRGesture::processReportInd(sns_smgr_periodic_report_ind_msg_v01* smgr_ind,
- IRGesture.h (inc): FUNCTION: processReportInd
- IRGesture.h (inc): void processReportInd(sns_smgr_periodic_report_ind_msg_v01* smgr_ind,
- Light.cpp (src): FUNCTION: processReportInd
- Light.cpp (src):void Light::processReportInd(sns_smgr_periodic_report_ind_msg_v01* smgr_ind,
- Light.h (inc): FUNCTION: processReportInd
- Light.h (inc): void processReportInd(sns_smgr_periodic_report_ind_msg_v01* smgr_ind,
- Magnetic.cpp (src): FUNCTION: processReportInd
- Magnetic.cpp (src):void Magnetic::processReportInd(sns_smgr_periodic_report_ind_msg_v01* smgr_ind,
- Magnetic.h (inc): FUNCTION: processReportInd
- Magnetic.h (inc): void processReportInd(sns_smgr_periodic_report_ind_msg_v01* smgr_ind
- 又是根据类型不同,做了另一批类型sensor的处理。
继续反向推导,processReportInd其它这个也是processBufferingInd 调用的,processBufferingInd也是processInd 调用的。这就和其它的sensor到统一战线上了。都是processInd处理的。
关键就是这processInd了,这个是一个回调SMGRSensor_sensor1_cb函数里处理的。那这个回调是谁注册,又是什么调用的呢?
vendor/qcom/proprietary/sensors/dsps/libhalsensors/src/SensorsContext.cpp
这个里面会在SensorContext实例化时注册。
- SensorsContext::SensorsContext()
- : active_sensors(),
- is_accel_available(false),
- is_gyro_available(false),
- is_mag_available(false),
- is_prox_available(false),
- smgr_version()
- {
- 。。。。。。。。。。。。。。。。。。。
- err = sensor1_open(&sensor_info_sensor1_cb->sensor1_handle, &context_sensor1_cb, (intptr_t)this);
- 。。。。。。。。。
- }
那得去撸代码啊,不然不知道啥时候回调context_sensor1_cb这个函数啊。。。
这个函数在另一个库中了libsensor1。。
这个函数做的事情比较多,分三部分:
- sensor1_open( sensor1_handle_s **hndl,
- sensor1_notify_data_cb_t data_cbf,
- intptr_t cb_data )
- {
- .........................
- sensor1_init();
- ............................
- sockfd = socket(AF_UNIX, SOCK_SEQPACKET, ))
- strlcpy(address.sun_path, SENSOR_CTL_SOCKET, UNIX_PATH_MAX);
- connect(sockfd, (struct sockaddr *)&address, len)
- .....................................
- libsensor_add_waiting_client(&cli_data);
- libsensor_add_client( &new_cli, false )
- .....................................
- }
那第一步先看看sensor1_init做了啥?

相当于创建了一个读线程,一直在poll读消息队列里的消息,读到消息后,会封装数据,然后发一个信息去唤醒另外一个线程,唤醒的线程后面再说。
第二步再看看,创建了一个socket(一个客户端socket),去连接服务端的socket(服务端的socket又是什么东东),上个读线程读到的消息就是从socket读到的消息(libsensor_read_socket),那一定是服务端socket发送过来的嘛。。。
第三步增加client,再看看这个又做了啥?

这里又创建了一个回调线程,等有消息来时,唤醒本线程,然后回调sensor.ssc.库里的context_sensor1_cb。这个线程就谁唤醒的呢,哈哈,大家就能想到就是init中的那个读线程嘛。
总结sensor1_open就是创建一个读线程从socket客户端中读数据,读到数据后,就回调sensor.ssc库中的context_sensor1_cb,进而上报数据做进一步回调。
那问题来了,那个socket服务端又是怎么回事呢。。。慢慢接近真相了。。。。
这时又出现了一个服务SensorDaemon:
代码路径:vendor/qcom/proprietary/sensors/dsps/sensordaemon
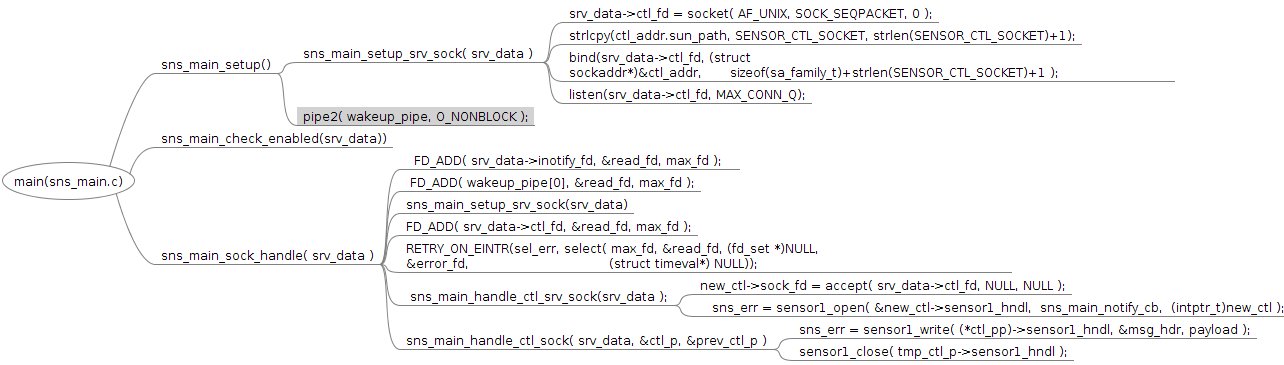
sns_main_setup 里创建了socket服务器端,然后监听客户端socket的监听,那什么时候往socket里写东西呢?
这就涉及另一个回调函数了sns_main_notify_cb。这个回调函数则好就是sensor1_open里注册的。这个sensor1_open 与 libsensor1里的sensor1_open不是同一个。
ok,那问题又来了,啥时候做的回调,和之前很类似,有一个读线程,初始化后处理polling状态,当收到消息时,就回调这个回调函数。

这个读线程的数据是从哪里来的呢,这就涉及到QMI service了。QMI service这部分代码就不是AP这边了,此份代码就在modem的adsp代码中了。
找时间再来续modem这边的adsp。
android 6.0 高通平台sensor 工作机制及流程(原创)的更多相关文章
- 高通平台sensor框架图【学习笔记】
- 高通平台msm8916修改开机logo【原创】
经过两天的奋战终于把开机logo给搞定了啊. 首先修改开机logo要从哪里入手呢?先分析一下源码看看. ---> void display_image_on_screen() { struct ...
- 【转】高通平台android 环境配置编译及开发经验总结
原文网址:http://blog.csdn.net/dongwuming/article/details/12784535 1.高通平台android开发总结 1.1 搭建高通平台环境开发环境 在高通 ...
- 高通平台 lcd driver 调试小结
一.概述 1.1 简介 本文档主要包括LCD模块的驱动流程分析.Framebuffer相关知识.Gralloc等相关内容,以及LCD调试的一些经验和相关bug的分析和讲解. 1.2 开发环境 And ...
- 高通平台的bootloader过程【转】
====================基本知识=======================LK是(L)ittle (K)ernel的缩写.高通平台android普遍采用LK作为其bootloade ...
- 高通平台Bootloader启动流程【转】
本文转载自:http://blog.csdn.net/fang_first/article/details/49615631 ====================基本知识============= ...
- 高通平台msm8909 LK 实现LCD 兼容
前段时间小米出现红米note2 换屏门,现在我们公司也要上演了:有两个供应商提供不同IC 的LCD panel. 软件区分的办法是读取LCD IC 的ID 寄存器,下面解析高通平台LK中LCD兼容的过 ...
- [修改高通平台WIFI MAC 地址] & [adb over wifi]
[修改高通平台WIFI MAC 地址]fccmd --helpfccmd startfccmd getwifimacfccmd setwifimac 74:AC:5F:F5:D7:40 [adb ov ...
- 云计算分布式大数据Hadoop实战高手之路第七讲Hadoop图文训练课程:通过HDFS的心跳来测试replication具体的工作机制和流程
这一讲主要深入使用HDFS命令行工具操作Hadoop分布式集群,主要是通过实验的配置hdfs-site.xml文件的心跳来测试replication具体的工作和流程. 通过HDFS的心跳来测试repl ...
随机推荐
- FastDFS 通过文件名获取文件信息
/** * 获取文件信息 * * param string group_name 文件所在的组名 * param string file_id 文件id(如: M00/09/BE/rBBZolgj6O ...
- nginx服务器http重定向到https的正确写法
http重定向到https使用了nginx的重定向命令.那么应该如何写重定向?之前老版本的nginx可能使用了以下类似的格式. rewrite ^/(.*)$ http://domain.com/$1 ...
- ThinkPhp 3.2 数据的连贯操作
ThinkPHP模型基础类提供的连贯操作方法(也有些框架称之为链式操作),可以有效的提高数据存取的代码清晰度和开发效率,并且支持所有的CURD操作. 使用也比较简单, 假如我们现在要查询一个User表 ...
- sift特征源码
先贴上我对Opencv3.1中sift源码的注释吧,虽然还有很多没看懂.先从detectAndCompute看起 void SIFT_Impl::detectAndCompute(InputArray ...
- Linux知识:/root/.bashrc与/etc/profile的异同
Linux知识:/root/.bashrc与/etc/profile的异同 要搞清bashrc与profile的区别,首先要弄明白什么是交互式shell和非交互式shell,什么是login shel ...
- JavaScript停止冒泡和阻止浏览器默认行为
JS停止冒泡 function myfn(e){ window.event? window.event.cancelBubble = true : e.stopPropagation(); } js阻 ...
- 碳膜电阻+1N5408二极管?
整定电流: 整定: 调整, 确定, 是指某一物理量,到达某个一个设定值时, 设备开始动作. 主要是指电路中的一些起 保护作用的 继电器, 如: 电机, 控制电路中的 过电流继电器, 的整定值. 如空气 ...
- nginx+Memcached 缓存设计
单页面缓存方案 单静态页缓存 解决问题场景 常见的缓存设计利用System.Web.Cache 保存在内存内,效率高,可以减轻数据库访问的压力.但是Web除了获取数据之外,还有呈现页面渲染,生成HTM ...
- c++ 接口和抽象类
其实对抽象类与接口的区别一直是搞不太清楚,最近正在学习<设计模式>,期间用到了很多c++多态的知识.这是才恍然发现,是应该整理下这方面的知识了.但在翻阅书本.上网查阅资料之际,发现有篇文章 ...
- JDK,JRE,JVM,三者的区别于联系?
万事开头难,从基础抓起! 下载JDK官网:http://www.oracle.com/technetwork/java/javase/downloads/index.html JDK:Java Dev ...