OpenHaptics编程环境搭建
SensAble Technologies公司是3D可触摸(力反馈)解决方案和技术领域中的领先开发商,其解决方案和技术不仅使用户能够看到并听到屏幕计算机应用,还可以对该应用进行实际“感应”。该公司的PHANTOM系列触觉与力反馈交互设备能使用户接触并操作虚拟物体。其触觉技术广泛应用于诸多领域,包括外科手术模拟、牙科整形、虚拟装配与虚拟维修、3D 设计(艺术和雕塑),以及机器人遥操作等领域。

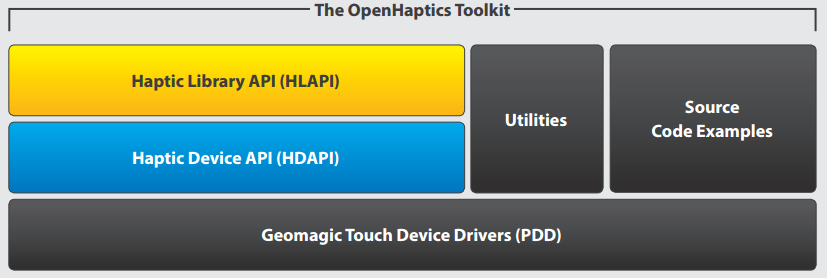
使用官方提供的OpenHaptics Toolkit可以方便的编写基于Phantom触觉力反馈设备的应用程序。OpenHaptics工具包包括QuickHaptics Micro API、Haptic Device API(HDAPI)、Haptic Library API (HLAPI)、PHANTOM Device Drivers(PDD)、实用工具和源代码示例。最底层的是PDD设备驱动程序,它支持公司所有系列的力反馈设备;HDAPI提供了一个底层接口,通过它能直接产生反馈力以及获取设备的状态信息;HLAPI则为熟悉OpenGL的编程人员提供了一个上层接口。
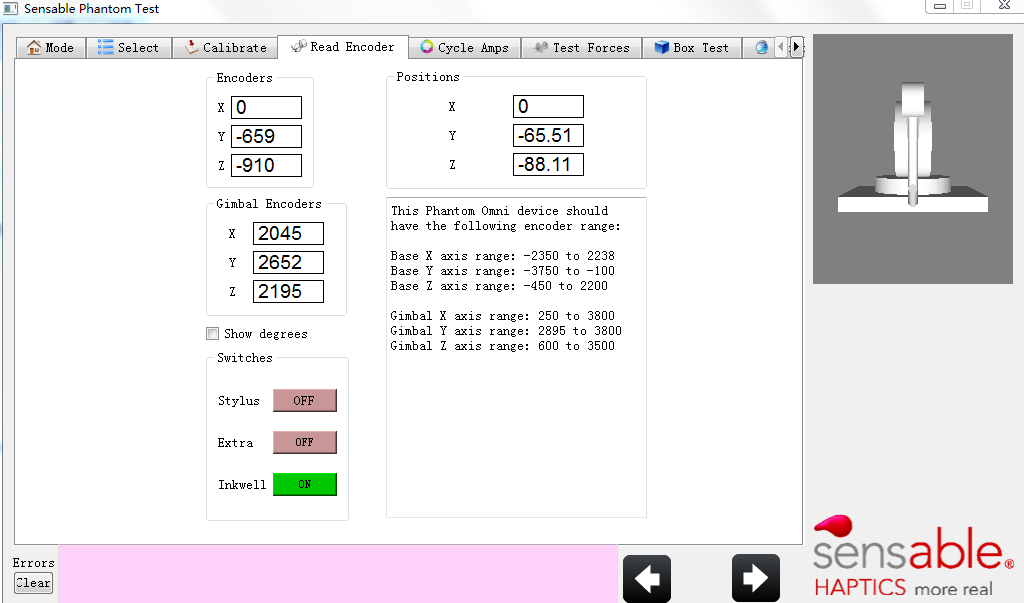
下面来搭建OpenHaptics的编程环境(Win7 64位系统 + VS2013 + OpenHaptics 3.4.0),先在这里下载设备驱动程序和OpenHaptics Toolkit。参考安装手册连接好电脑和Phantom设备后可以打开官方自带的Phantom Test程序进行测试,验证设备是否连接成功。
接下来使用HDAPI创建一个力反馈应用程序(以examples\HD\console\HelloHapticDevice为例),程序基本流程如下:
1. Initialize the device.
2. Create a scheduler callback.
3. Enable device forces.
4. Start the scheduler.
5. Cleanup the device and scheduler when the application is terminated.
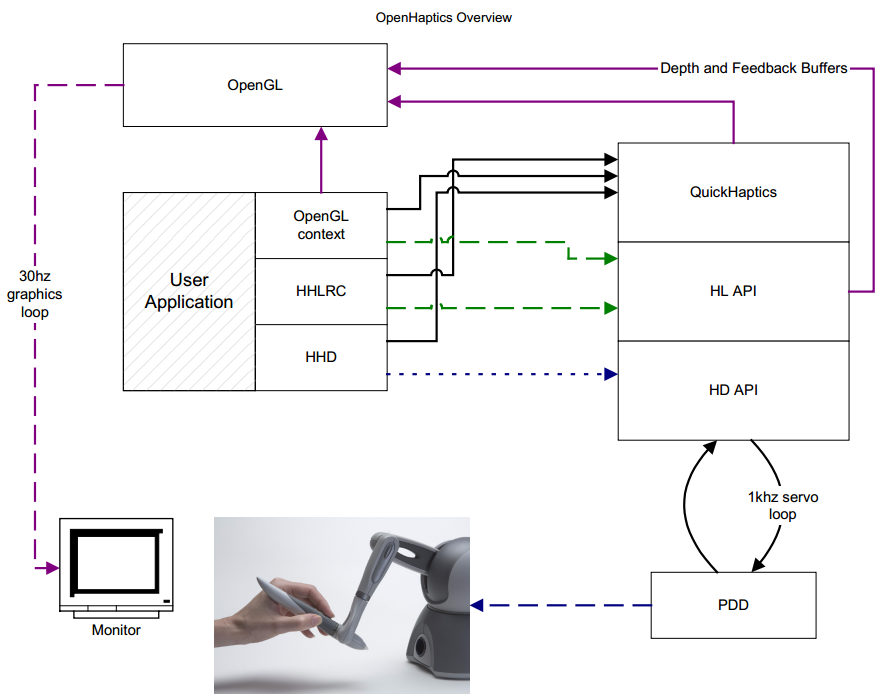
参考下面的程序结构图,为了实现流畅稳定的触觉力反馈,创建的任务将以1000Hz的频率运行在优先级高的线程中(The scheduler manages a high frequency, high priority thread for sending forces and retrieving state information from the device. Typically, force updates need to be sent at 1000 Hz frequency in order to create compelling and stable force feedback):
下面配置VS工程:
1)设置头文件包含目录(Set the correct include path, as shown below in “Additional Include Directories.”)

Examples for setting include paths:
$(OH_SDK_BASE)\include Main include directory for the HD library.
$(OH_SDK_BASE)\utilities\include Include directory for utilities.
2)添加库文件(Add the appropriate library modules as shown below in “Additional Dependencies”)

3)设置附加库目录(Make sure the linker paths are set correctly on the “Additional Library Directories” line so that the library fles can be found whenyour application links)

As for the header fle include paths, the library directories will use the OH_SDK_BASE environment variable. In general VisualStudio will automatically set the PlatformName to be one of Win32 or x64 and the ConfgurationName to be either Release or Debug.
配置好工程属性后就可以点击生成按钮,不过生成过程中出现了“error LNK2019:无法解析的外部符号”这种错误(很多人遇到过这个问题):

在网上搜索解决方案,3DSystems Haptics Forums上有一种办法是将utilities中的lib文件重新编译一遍,源文件就在utilities/src中:
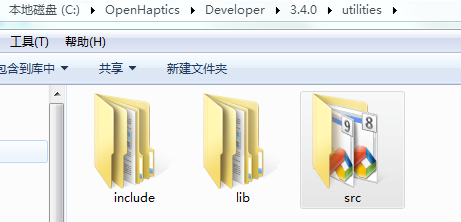
使用VS013重新生成Win32、x64平台下的Debug和Release版本的lib,然后将原先的替换掉,再进行编译就OK了。
下面看看HelloHapticDevice的代码:
/*****************************************************************************

Description:

  This application creates a gravity well, which will attract

  the device towards its center when the device enters its proximity.

*******************************************************************************/

#include <stdio.h>

#include <string.h>

#include <conio.h>

#include <HD/hd.h>

#include <HDU/hduError.h>

#include <HDU/hduVector.h>

HDCallbackCode HDCALLBACK gravityWellCallback(void *data);

/*******************************************************************************

 Main function.

 Initializes the device, starts the schedule, creates a schedule callback

 to handle gravity well forces, waits for the user to press a button, exits

 the application.

*******************************************************************************/

int main(int argc, char* argv[])

{

    HDErrorInfo error;

    HDSchedulerHandle hGravityWell;

    /* Initialize the device, must be done before attempting to call any hd

       functions. Passing in HD_DEFAULT_DEVICE causes the default device to be

       initialized. */

    HHD hHD = hdInitDevice(HD_DEFAULT_DEVICE);

    if (HD_DEVICE_ERROR(error = hdGetError()))

    {

        hduPrintError(stderr, &error, "Failed to initialize haptic device");

        fprintf(stderr, "\nPress any key to quit.\n");

        return -;

    }

    printf("Hello Haptic Device!\n");

    printf("Found device model: %s.\n\n", hdGetString(HD_DEVICE_MODEL_TYPE));

    /* Schedule the main callback that will render forces to the device. */

    hGravityWell = hdScheduleAsynchronous(gravityWellCallback, , HD_MAX_SCHEDULER_PRIORITY);

    hdEnable(HD_FORCE_OUTPUT);

    hdStartScheduler();

    /* Check for errors and abort if so. */

    if (HD_DEVICE_ERROR(error = hdGetError()))

    {

        hduPrintError(stderr, &error, "Failed to start scheduler");

        fprintf(stderr, "\nPress any key to quit.\n");

        return -;

    }

    /* Wait until the user presses a key.  Meanwhile, the scheduler

    runs and applies forces to the device. */

    printf("Feel around for the gravity well...\n");

    printf("Press any key to quit.\n\n");

    while (!kbhit())

    {

        /* Periodically check if the gravity well callback has exited. */

        if (!hdWaitForCompletion(hGravityWell, HD_WAIT_CHECK_STATUS))  // Checks if a callback is still scheduled for execution.

        {

            fprintf(stderr, "Press any key to quit.\n");

            break;

        }

    }

    /* For cleanup, unschedule callback and stop the scheduler. */

    hdStopScheduler();          // Typically call this as a frst step for cleanup and shutdown of devices

    hdUnschedule(hGravityWell); // removing the associated callback from the scheduler.

    hdDisableDevice(hHD);       // Disables a device. The handle should not be used afterward

    return ;

}

/*******************************************************************************

 Servo callback.

 Called every servo loop tick.  Simulates a gravity well, which sucks the device

 towards its center whenever the device is within a certain range.

*******************************************************************************/

HDCallbackCode HDCALLBACK gravityWellCallback(void *data)

{

    const HDdouble kStiffness = 0.075; /* N/mm */

    const HDdouble kGravityWellInfluence = ; /* mm */

    /* This is the position of the gravity well in cartesian(i.e. x,y,z) space. */

    static const hduVector3Dd wellPos = {,,};

    HDErrorInfo error;

    hduVector3Dd position;

    hduVector3Dd force;

    hduVector3Dd positionTwell;

    HHD hHD = hdGetCurrentDevice();  // Gets the handle of the current device

    /* Begin haptics frame.  ( In general, all state-related haptics calls

       should be made within a frame. ) */

    hdBeginFrame(hHD);

    /* Get the current position of the device. */

    hdGetDoublev(HD_CURRENT_POSITION, position);

    memset(force, , sizeof(hduVector3Dd));

    /* >  positionTwell = wellPos-position  <

       Create a vector from the device position towards the gravity

       well's center. */

    hduVecSubtract(positionTwell, wellPos, position);

    /* If the device position is within some distance of the gravity well's

       center, apply a spring force towards gravity well's center.  The force

       calculation differs from a traditional gravitational body in that the

       closer the device is to the center, the less force the well exerts;

       the device behaves as if a spring were connected between itself and

       the well's center. */

    if (hduVecMagnitude(positionTwell) < kGravityWellInfluence)

    {

        /* >  F = k * x  <

           F: Force in Newtons (N)

           k: Stiffness of the well (N/mm)

           x: Vector from the device endpoint position to the center

           of the well. */

        hduVecScale(force, positionTwell, kStiffness);

    }

    /* Send the force to the device. */

    hdSetDoublev(HD_CURRENT_FORCE, force);

    /* End haptics frame. */

    hdEndFrame(hHD);

    /* Check for errors and abort the callback if a scheduler error

       is detected. */

    if (HD_DEVICE_ERROR(error = hdGetError()))

    {

        hduPrintError(stderr, &error,

                      "Error detected while rendering gravity well\n");

        if (hduIsSchedulerError(&error))

        {

            return HD_CALLBACK_DONE;

        }

    }

    /* Signify that the callback should continue running, i.e. that

       it will be called again the next scheduler tick. */

    return HD_CALLBACK_CONTINUE;

}
该程序在循环执行的任务中实时获取操作手柄的位置信息,并以此来计算输出力来模拟弹簧力。这里有几个需要注意的地方:
1. Haptic Frames:
为了保证数据访问的一致性,OpenHaptics提供了一种Frame框架结构,反馈给用户力的过程一般都是在力反馈帧中处理的,使用hdBeginFrame和hdEndFrame作为访问的开始和结束。在同一帧中多次调用hdGet类函数获取信息会得到相同的结果;多次调用hdSet类函数设置同一状态,则最后的调用会替代掉以前的(Forces are not actually sent to the device until the end of the frame. Setting the same state twice will replace the frst with the second)。即在帧的结尾,所有的属性改变才会得以应用。
Haptic frames defne a scope within which the device state is guaranteed to be consistent. Frames are bracketed by hdBeginFrame() and hdEndFrame() statements. At the start of the frame, the device state is updated and stored for use in that frame so that all state queries in the frame reflects a snapshot of that data. At the end of the frame, new state such as forces is written out to the device . Most haptics operations should be run within a frame. Calling operations within a frame ensures consistency for the data being used because state remains the same within the frame. Getting state outside a frame typically returns the state from the last frame. Setting state outside a frame typically results in an error.
HDAPI力反馈程序框架如下图所示:
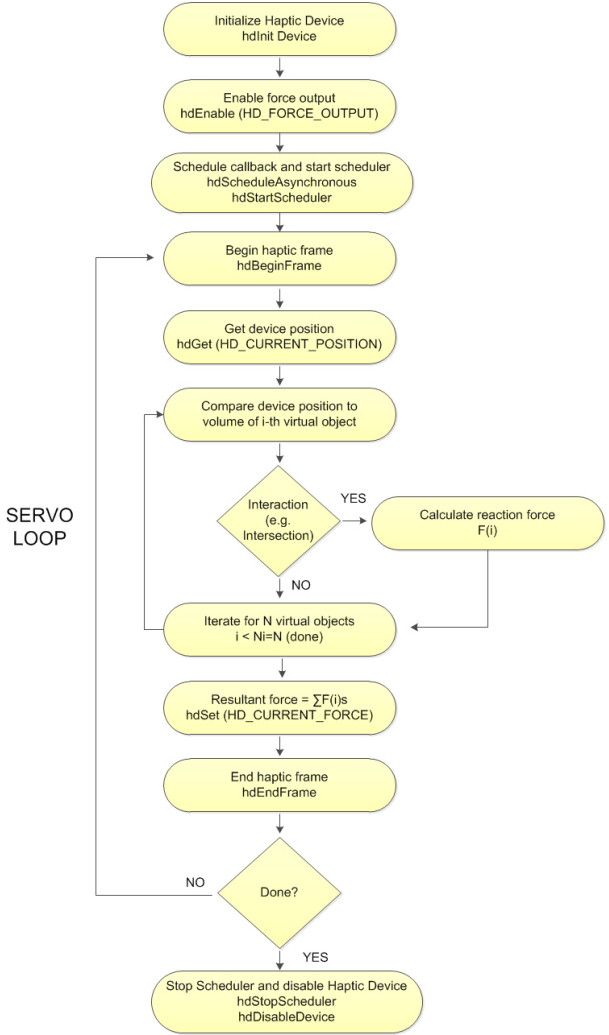
2. 同步调用与异步调用:
所谓同步就是在发出一个“调用”时,在没有得到结果之前,该“调用”就不返回;而异步则是相反,“调用”在发出之后这个调用就直接返回了,即当一个异步过程调用发出后,调用者不会立刻得到结果。Synchronous calls only return after they are completed, so the application thread waits for a synchronous call before continuing. Asynchronous calls return immediately after being scheduled.
同步调用主要用于获取设备当前状态,比如位置、力、开关状态等。Synchronous calls are primarily used for getting a snapshot of the state of the scheduler for the application. For example, if the application needs to query position or button state, or any other variable or state that the scheduler is changing, it should do so using a synchronous call.
下面是同步调用的一个例子:
// client data declaration

struct DeviceDisplayState

{

    HDdouble position[];

    HDdouble force[];

}

// usage of the above client data, within a simple callback.

HDCallbackCode HDCALLBACK DeviceStateCallback(void *pUserData)

{

    DeviceDisplayState *pDisplayState = (DeviceDisplayState *)pUserData;

    hdGetDoublev(HD_CURRENT_POSITION, pDisplayState->position);

    hdGetDoublev(HD_CURRENT_FORCE,    pDisplayState->force);

    return HD_CALLBACK_DONE;  // execute this only once

}

// get the current position of end-effector

DeviceDisplayState state;

hdScheduleSynchronous(DeviceStateCallback, &state, HD_MIN_SCHEDULER_PRIORITY);
异步调用主要用于循环处理任务中,例如根据力反馈设备操作末端的位置来计算并输出力。Asynchronous calls are often the best mechanism for managing the haptics loop. For example, an asynchronous callback can persist in the scheduler to represent a haptics effect: during each iteration, the callback applies the effect to the device.
HDCallbackCode HDCALLBACK CoulombCallback(void *data)

{

    HHD hHD = hdGetCurrentDevice();

    hdBeginFrame(hHD);

    HDdouble pos[];

    hdGetDoublev(HD_CURRENT_POSITION, pos); //retrieve the position of the end-effector.

    HDdouble force[];

    forceField(pos, force);                 // given the position, calculate a force

    hdSetDoublev(HD_CURRENT_FORCE, force);  // set the force to the device

    hdEndFrame(hHD);                        // flush the force

    return HD_CALLBACK_CONTINUE;            // run at every servo loop tick.

}

hdScheduleAsynchronous(AForceSettingCallback, , HD_DEFAULT_SCHEDULER_PRIORITY);
3. 任务返回值:
- HD_CALLBACK_DONE (只执行一次)
- HD_CALLBACK_CONTINUE(循环执行)
根据不同的返回值,回调函数会在当前帧运行完毕后判断是否在下一帧再次运 行,当返回值为HD_CALLBACK_CONTINUE时,此回调函数在下一帧时会继续重新 运行;而当返回值为HD_CALLBACK_DONE 时,此回调函数在下一帧时不再次运行。Callbacks can be set to run either once or multiple times, depending on the callback’s return value. If the return value requests for the callback to continue, it is rescheduled and run again during the next scheduler tick. Otherwise it is taken off the scheduler and considered complete, and control is returned to the calling thread in the case of synchronous operations.
4. 任务优先级:
Callbacks are scheduled with a priority, which determines what order they are run in the scheduler. For every scheduler tick, each callback is always executed. The order the callbacks are executed depends on the priority; highest priority items are run before lowest. Operations with equal priority are executed in arbitrary order.
下面再看一个获取设备信息的典型例子(examples\HD\console\QueryDevice):
#include <stdio.h>
#include <string.h>
#include <conio.h> #include <HD/hd.h>
#include <HDU/hduError.h>
#include <HDU/hduVector.h> /* Holds data retrieved from HDAPI. */
typedef struct
{
HDboolean m_buttonState; /* Has the device button has been pressed. */
hduVector3Dd m_devicePosition; /* Current device coordinates. */
HDErrorInfo m_error;
} DeviceData; static DeviceData gServoDeviceData; /*******************************************************************************
Checks the state of the gimbal button and gets the position of the device.
*******************************************************************************/
HDCallbackCode HDCALLBACK updateDeviceCallback(void *pUserData)
{
int nButtons = ; hdBeginFrame(hdGetCurrentDevice()); /* Retrieve the current button(s). */
hdGetIntegerv(HD_CURRENT_BUTTONS, &nButtons); /* In order to get the specific button 1 state, we use a bitmask to
test for the HD_DEVICE_BUTTON_1 bit. */
gServoDeviceData.m_buttonState =
(nButtons & HD_DEVICE_BUTTON_1) ? HD_TRUE : HD_FALSE; /* Get the current location of the device (HD_GET_CURRENT_POSITION)
We declare a vector of three doubles since hdGetDoublev returns
the information in a vector of size 3. */
hdGetDoublev(HD_CURRENT_POSITION, gServoDeviceData.m_devicePosition); /* Also check the error state of HDAPI. */
gServoDeviceData.m_error = hdGetError(); /* Copy the position into our device_data tructure. */
hdEndFrame(hdGetCurrentDevice()); return HD_CALLBACK_CONTINUE;
} /*******************************************************************************
Checks the state of the gimbal button and gets the position of the device.
*******************************************************************************/
HDCallbackCode HDCALLBACK copyDeviceDataCallback(void *pUserData)
{
DeviceData *pDeviceData = (DeviceData *)pUserData; // void *memcpy(void *dest, const void *src, size_t n);
memcpy(pDeviceData, &gServoDeviceData, sizeof(DeviceData)); return HD_CALLBACK_DONE;
} /*******************************************************************************
Prints out a help string about using this example.
*******************************************************************************/
void printHelp(void)
{
static const char help[] = { "\
Press and release the stylus button to print out the current device location.\n\
Press and hold the stylus button to exit the application\n" }; fprintf(stdout, "%s\n", help);
} /*******************************************************************************
This routine allows the device to provide information about the current
location of the stylus, and contains a mechanism for terminating the
application.
Pressing the button causes the application to display the current location
of the device.
Holding the button down for N iterations causes the application to exit.
*******************************************************************************/
void mainLoop(void)
{
static const int kTerminateCount = ;
int buttonHoldCount = ; /* Instantiate the structure used to capture data from the device. */
DeviceData currentData;
DeviceData prevData; /* Perform a synchronous call to copy the most current device state. */
hdScheduleSynchronous(copyDeviceDataCallback,
¤tData, HD_MIN_SCHEDULER_PRIORITY); memcpy(&prevData, ¤tData, sizeof(DeviceData)); printHelp(); /* Run the main loop until the gimbal button is held. */
while ()
{
/* Perform a synchronous call to copy the most current device state.
This synchronous scheduler call ensures that the device state
is obtained in a thread-safe manner. */
hdScheduleSynchronous(copyDeviceDataCallback,
¤tData,
HD_MIN_SCHEDULER_PRIORITY); /* If the user depresses the gimbal button, display the current
location information. */
if (currentData.m_buttonState && !prevData.m_buttonState)
{
fprintf(stdout, "Current position: (%g, %g, %g)\n",
currentData.m_devicePosition[],
currentData.m_devicePosition[],
currentData.m_devicePosition[]);
}
else if (currentData.m_buttonState && prevData.m_buttonState)
{
/* Keep track of how long the user has been pressing the button.
If this exceeds N ticks, then terminate the application. */
buttonHoldCount++; if (buttonHoldCount > kTerminateCount)
{
/* Quit, since the user held the button longer than
the terminate count. */
break;
}
}
else if (!currentData.m_buttonState && prevData.m_buttonState)
{
/* Reset the button hold count, since the user stopped holding
down the stylus button. */
buttonHoldCount = ;
} /* Check if an error occurred. */
if (HD_DEVICE_ERROR(currentData.m_error))
{
hduPrintError(stderr, ¤tData.m_error, "Device error detected"); if (hduIsSchedulerError(¤tData.m_error))
{
/* Quit, since communication with the device was disrupted. */
fprintf(stderr, "\nPress any key to quit.\n");
break;
}
} /* Store off the current data for the next loop. */
memcpy(&prevData, ¤tData, sizeof(DeviceData));
}
} /*******************************************************************************
Main function.
Sets up the device, runs main application loop, cleans up when finished.
*******************************************************************************/
int main(int argc, char* argv[])
{
HDSchedulerHandle hUpdateHandle = ;
HDErrorInfo error; /* Initialize the device, must be done before attempting to call any hd
functions. */
HHD hHD = hdInitDevice(HD_DEFAULT_DEVICE);
if (HD_DEVICE_ERROR(error = hdGetError()))
{
hduPrintError(stderr, &error, "Failed to initialize the device");
fprintf(stderr, "\nPress any key to quit.\n");
return -;
} /* Schedule the main scheduler callback that updates the device state. */
hUpdateHandle = hdScheduleAsynchronous(
updateDeviceCallback, , HD_MAX_SCHEDULER_PRIORITY); /* Start the servo loop scheduler. */
hdStartScheduler();
if (HD_DEVICE_ERROR(error = hdGetError()))
{
hduPrintError(stderr, &error, "Failed to start the scheduler");
fprintf(stderr, "\nPress any key to quit.\n");
return -;
} /* Run the application loop. */
mainLoop(); /* For cleanup, unschedule callbacks and stop the servo loop. */
hdStopScheduler();
hdUnschedule(hUpdateHandle);
hdDisableDevice(hHD); return ;
}
主函数中开启updateDeviceCallback异步任务后,该任务不停地刷新设备末端的位置以及按钮状态等信息,保存在静态全局变量gServoDeviceData中。在主程序的mainLoop循环中使用copyDeviceDataCallback同步调用方式获取设备状态信息,然后进行判断。按一下操作手柄上的按钮打印一条当前位置信息;长按按钮超过一定时间则退出mainLoop循环,结束程序。
值得注意的是主线程中函数获取Servo Loop线程(任务线程)中的数据,可以通过同步调用来实现,是一种线程安全(thread-safe)方式。线程安全就是多线程访问时,采用了加锁机制,当一个线程访问该类的某个数据时,进行保护,其他线程不能进行访问直到该线程读取完,其他线程才可使用。hdScheduleSynchronous:Typically used as a synchronization mechanism between the servo loop thread and other threads in the application. For example, if the main application thread needs to access the position or button state, it can do so through a synchronous scheduler call. Can be used for synchronously copying state from the servo loop.
在mainLoop函数中也可以直接访问全局变量gServoDeviceData来获取设备信息,但这种方式是线程不安全的,即不提供数据访问保护,有可能出现多个线程先后更改数据造成所得到的数据是脏数据。如果其他线程企图访问一个处于不可用状态的对象,该对象将不能正确响应从而产生无法预料的结果,如何避免这种情况发生是线程安全性的核心问题。
参考:
OpenHaptics Toolkit Programming Guide
3D Systems Inc. - OpenHaptics for Windows Developer Edition v3.4
3D Systems Inc. - OpenHaptics for Linux Developer Edition v3.4
OpenHaptics Software Discussions:errors of helloSphere re-compiling with .Net 2003
李大为. 基于OpenHaptics的六自由度串联机器人实时控制[J]. 计算机系统与应用, 2016, 25(11): 221-225
OpenHaptics编程环境搭建的更多相关文章
- Unix NetWork Programming(unix环境编程)——环境搭建(解决unp.h等源码编译问题)
此配置实例亲测成功,共勉,有问题大家留言. 环境:VMware 10 + unbuntu 14.04 为了unix进行网络编程,编程第一个unix程序时遇到的问题,不能包含unp.h文件,这个感觉和a ...
- Qt在Windows下的三种编程环境搭建
尊重作者,支持原创,如需转载,请附上原地址:http://blog.csdn.net/libaineu2004/article/details/17363165 从QT官网可以得知其支持的平台.编译器 ...
- Qt在Mac OS X下的编程环境搭建
尊重作者,支持原创,如需转载,请附上原地址:http://blog.csdn.net/libaineu2004/article/details/46234079 在Mac OS X下使用Qt开发,需要 ...
- Qt4.8在Windows下的三种编程环境搭建
Qt4.8在Windows下的三种编程环境搭建 Qt的版本是按照不同的图形系统来划分的,目前分为四个版本:Win32版,适用于Windows平台:X11版,适合于使用了X系统的各种Linux和Unix ...
- unix网络编程环境搭建
unix网络编程环境搭建 网络编程 环境 1.点击下载源代码 可以通过下列官网中的源代码目录下载最新代码: http://www.unpbook.com/src.html 2.解压文件 tar -xz ...
- ArduinoYun教程之Arduino编程环境搭建
ArduinoYun教程之Arduino编程环境搭建 Arduino编程环境搭建 通常,我们所说的Arduino一般是指我们可以实实在在看到的一块开发板,他可以是Arduino UNO.Arduino ...
- Qt在Mac OS X下的编程环境搭建(配置Qt库和编译器,有图,很清楚)
尊重作者,支持原创,如需转载,请附上原地址:http://blog.csdn.net/libaineu2004/article/details/46234079 在Mac OS X下使用Qt开发,需要 ...
- Qt在Windows下的三种编程环境搭建(图文并茂,非常清楚)good
尊重作者,支持原创,如需转载,请附上原地址:http://blog.csdn.net/libaineu2004/article/details/17363165 从QT官网可以得知其支持的平台.编译器 ...
- 【Qt开发】Qt在Windows下的三种编程环境搭建
从QT官网可以得知其支持的平台.编译器和调试器的信息如图所示: http://qt-project.org/doc/qtcreator-3.0/creator-debugger-engines.htm ...
随机推荐
- C#与Java 的区别
相同点:都是面向对象编程的语言,都能够实现面向对象的(封装,继承,多态)思想 不同点:1. c#中的命名空间是namespace类似于Java中的package(包),在Java中导入包用impo ...
- LaTeX技巧:LaTeX括号总结
功能 语法 显示 不好看 ( \frac{1}{2} ) 好一点 \left( \frac{1}{2} \right) 您可以使用\left和\right来显示不同的括号: 功能 语法 显示 ...
- 解决tensorflow在训练的时候权重是nan问题
搭建普通的卷积CNN网络. nan表示的是无穷或者是非数值,比如说你在tensorflow中使用一个数除以0,那么得到的结果就是nan. 在一个matrix中,如果其中的值都为nan很有可能是因为采用 ...
- C++二维数组 取地址 复制给 二维指针
本来应该是个简单的问题,但是我就不明白了,为什么会段错误了... #include<stdio.h> #define UINT32 unsigned int UINT32 NType1_X ...
- java-nio之zero copy深入分析
对于所有的io操作,底层一定是调用操作系统的api来进行读写.受限于不同的操作系统,操作方式一定是有差异的.以下read和write操作,可以看做服务器从磁盘硬件上读取文件数据,然后通过socket发 ...
- iOS 加密的3种方法
//需要导入 #import <CommonCrypto/CommonCryptor.h> ==============MD5加密============ NSString *str ...
- Deformable Convolutional Networks-v1-v2(可变形卷积网络)
如何评价 MSRA 视觉组最新提出的 Deformable ConvNets V2? <Deformable Convolutional Networks>是一篇2017年Microsof ...
- 2018.08.28 ali 梯度下降法实现最小二乘
- 要理解梯度下降和牛顿迭代法的区别 #include<stdio.h> // 1. 线性多维函数原型是 y = f(x1,x2,x3) = a * x1 + b * x2 + c * x ...
- java 反射机制--根据属性名获取属性值
1.考虑安全访问范围内的属性,没有权限访问到的属性不读取 /** * 根据属性名获取属性值 * * @param fieldName * @param object * @return */ priv ...
- struts2 18拦截器详解(九)
ScopedModelDrivenInterceptor 该拦截器处于defaultStack第八的位置,其主要功能是从指定的作用域内检索相应的model设置到Action中,该类中有三个相关的属性: ...
