wxpython Menus and toolbars
Menus and toolbars
A common part in a GUI application is a menubar. A menubar consists of objects called menus. Top-level menus have their labels on the menubar. The menus have menu items. Menu items are commands that perform a specific action inside the application. Menus can also have submenus, which have their own menu items. The following three classes are used to create menubars in wxPython. A wx.MenuBar, a wx.Menu and a wx.MenuItem.
Simple menu
In our first example, we will create a menubar with one file menu. The menu will have only one menu item. By selecting the item the application quits.
- #!/usr/bin/python
- # -*- coding: utf-8 -*-
- '''
- ZetCode wxPython tutorial
- This example shows a simple menu.
- author: Jan Bodnar
- website: www.zetcode.com
- last modified: September 2011
- '''
- import wx
- class Example(wx.Frame):
- def __init__(self, *args, **kwargs):
- super(Example, self).__init__(*args, **kwargs)
- self.InitUI()
- def InitUI(self):
- menubar = wx.MenuBar()
- fileMenu = wx.Menu()
- fitem = fileMenu.Append(wx.ID_EXIT, 'Quit', 'Quit application')
- menubar.Append(fileMenu, '&File')
- self.SetMenuBar(menubar)
- self.Bind(wx.EVT_MENU, self.OnQuit, fitem)
- self.SetSize((300, 200))
- self.SetTitle('Simple menu')
- self.Centre()
- self.Show(True)
- def OnQuit(self, e):
- self.Close()
- def main():
- ex = wx.App()
- Example(None)
- ex.MainLoop()
- if __name__ == '__main__':
- main()
This is a small example with minimal menubar functionality.
- menubar = wx.MenuBar()
First we create a menubar object.
- fileMenu = wx.Menu()
Next we create a menu object.
- fitem = fileMenu.Append(wx.ID_EXIT, 'Quit', 'Quit application')
We append a menu item into the menu object. The first parameter is the id of the menu item. The standard id will automatically add an icon and a shortcut, Ctrl+Q in our case. The second parameter is the name of the menu item. The last parameter defines the short help string that is displayed on the statusbar, when the menu item is selected. Here we did not create a wx.MenuItem explicitly. It was created by the Append() method behind the scenes. The method returns the created menu item. This reference will be used later to bind an event.
- self.Bind(wx.EVT_MENU, self.OnQuit, fitem)
We bind the wx.EVT_MENU of the menu item to the custom OnQuit() method. This method will close the application.
- menubar.Append(fileMenu, '&File')
- self.SetMenuBar(menubar)
After that, we append a menu into the menubar. The & character creates an accelerator key. The character that follows the & is underlined. This way the menu is accessible via the Alt+F shortcut. In the end, we call the SetMenuBar() method. This method belongs to the wx.Frame widget. It sets up the menubar.
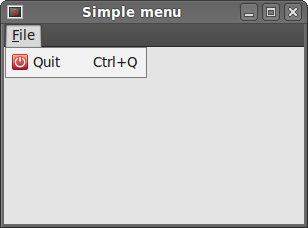 Figure: A simple menu example
Icons and shortcuts
The next example is essentially the same as the previous one. This time, we manually create awx.MenuItem.
- #!/usr/bin/python
- # -*- coding: utf-8 -*-
- '''
- ZetCode wxPython tutorial
- In this example, we manually create
- a menu item.
- author: Jan Bodnar
- website: www.zetcode.com
- last modified: September 2011
- '''
- import wx
- APP_EXIT = 1
- class Example(wx.Frame):
- def __init__(self, *args, **kwargs):
- super(Example, self).__init__(*args, **kwargs)
- self.InitUI()
- def InitUI(self):
- menubar = wx.MenuBar()
- fileMenu = wx.Menu()
- qmi = wx.MenuItem(fileMenu, APP_EXIT, '&Quit\tCtrl+Q')
- qmi.SetBitmap(wx.Bitmap('exit.png'))
- fileMenu.AppendItem(qmi)
- self.Bind(wx.EVT_MENU, self.OnQuit, id=APP_EXIT)
- menubar.Append(fileMenu, '&File')
- self.SetMenuBar(menubar)
- self.SetSize((250, 200))
- self.SetTitle('Icons and shortcuts')
- self.Centre()
- self.Show(True)
- def OnQuit(self, e):
- self.Close()
- def main():
- ex = wx.App()
- Example(None)
- ex.MainLoop()
- if __name__ == '__main__':
- main()
In this example, we create a quit menu item. We choose a custom icon and shortcut for the menu item.
- qmi = wx.MenuItem(fileMenu, APP_EXIT, '&Quit\tCtrl+Q')
- qmi.SetBitmap(wx.Bitmap('exit.png'))
- fileMenu.AppendItem(qmi)
We create a wx.MenuItem object. The & character specifies an accelerator key. The character following the ampersand is underlined. The actual shortcut is defined by the combination of characters. We have specified Ctrl+Q characters. So if we press Ctrl+Q, we close the application. We put a tab character between the & character and the shortcut. This way, we manage to put some space between them. To provide an icon for a menu item, we call a SetBitmap() method. A manually created menu item is appended to the menu by calling the AppendItem() method.
- self.Bind(wx.EVT_MENU, self.OnQuit, id=APP_EXIT)
When we select the created menu item, the OnQuit() method is called.
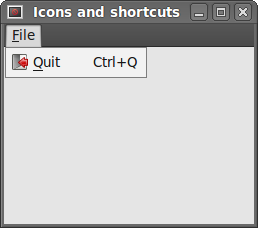 Figure: Icons and shortcuts
Submenus and separators
Each menu can also have a submenu. This way we can place similar commands into groups. For example we can place commands that hide/show various toolbars like personal bar, address bar, status bar or navigation bar into a submenu called toolbars. Within a menu, we can seperate commands with a separator. It is a simple line. It is common practice to separate commands like New, Open, Save from commands like Print, Print preview with a single separator. In our example we will see, how we can create submenus and menu separators.
- #!/usr/bin/python
- # -*- coding: utf-8 -*-
- '''
- ZetCode wxPython tutorial
- In this example, we create a submenu and a menu
- separator.
- author: Jan Bodnar
- website: www.zetcode.com
- last modified: September 2011
- '''
- import wx
- class Example(wx.Frame):
- def __init__(self, *args, **kwargs):
- super(Example, self).__init__(*args, **kwargs)
- self.InitUI()
- def InitUI(self):
- menubar = wx.MenuBar()
- fileMenu = wx.Menu()
- fileMenu.Append(wx.ID_NEW, '&New')
- fileMenu.Append(wx.ID_OPEN, '&Open')
- fileMenu.Append(wx.ID_SAVE, '&Save')
- fileMenu.AppendSeparator()
- imp = wx.Menu()
- imp.Append(wx.ID_ANY, 'Import newsfeed list...')
- imp.Append(wx.ID_ANY, 'Import bookmarks...')
- imp.Append(wx.ID_ANY, 'Import mail...')
- fileMenu.AppendMenu(wx.ID_ANY, 'I&mport', imp)
- qmi = wx.MenuItem(fileMenu, wx.ID_EXIT, '&Quit\tCtrl+W')
- fileMenu.AppendItem(qmi)
- self.Bind(wx.EVT_MENU, self.OnQuit, qmi)
- menubar.Append(fileMenu, '&File')
- self.SetMenuBar(menubar)
- self.SetSize((350, 250))
- self.SetTitle('Submenu')
- self.Centre()
- self.Show(True)
- def OnQuit(self, e):
- self.Close()
- def main():
- ex = wx.App()
- Example(None)
- ex.MainLoop()
- if __name__ == '__main__':
- main()
In the above example, we create New, Open, and Save standard menu items. These are separated from a submenu with a horizontal separator. A submenu has additional three menu items.
- fileMenu.Append(wx.ID_NEW, '&New')
- fileMenu.Append(wx.ID_OPEN, '&Open')
- fileMenu.Append(wx.ID_SAVE, '&Save')
Here we have three common menu items: New, Open, and Save.
- fileMenu.AppendSeparator()
A menu separator is appended with the AppendSeparator() method.
- imp = wx.Menu()
- imp.Append(wx.ID_ANY, 'Import newsfeed list...')
- imp.Append(wx.ID_ANY, 'Import bookmarks...')
- imp.Append(wx.ID_ANY, 'Import mail...')
- fileMenu.AppendMenu(wx.ID_ANY, 'I&mport', imp)
A submenu is also a wx.Menu. Three menu items are appended to the menu. The submenu is appended to the file menu with the AppenMenu() method.
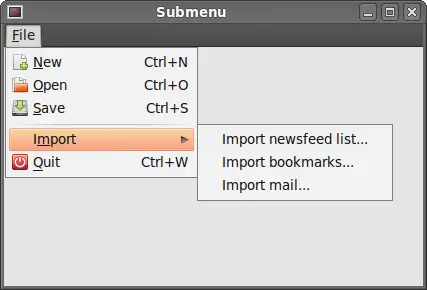 Figure: A submenu example
Check menu item
There are tree kinds of menu items.
- normal item
- check item
- radio item
In the following example, we will demonstrate the check menu item. A check menu item is visually represented by a tick in the menu.
- #!/usr/bin/python
- # -*- coding: utf-8 -*-
- '''
- ZetCode wxPython tutorial
- This example creates a checked
- menu item.
- author: Jan Bodnar
- website: www.zetcode.com
- last modified: September 2011
- '''
- import wx
- class Example(wx.Frame):
- def __init__(self, *args, **kwargs):
- super(Example, self).__init__(*args, **kwargs)
- self.InitUI()
- def InitUI(self):
- menubar = wx.MenuBar()
- fileMenu = wx.Menu()
- viewMenu = wx.Menu()
- self.shst = viewMenu.Append(wx.ID_ANY, 'Show statubar',
- 'Show Statusbar', kind=wx.ITEM_CHECK)
- self.shtl = viewMenu.Append(wx.ID_ANY, 'Show toolbar',
- 'Show Toolbar', kind=wx.ITEM_CHECK)
- viewMenu.Check(self.shst.GetId(), True)
- viewMenu.Check(self.shtl.GetId(), True)
- self.Bind(wx.EVT_MENU, self.ToggleStatusBar, self.shst)
- self.Bind(wx.EVT_MENU, self.ToggleToolBar, self.shtl)
- menubar.Append(fileMenu, '&File')
- menubar.Append(viewMenu, '&View')
- self.SetMenuBar(menubar)
- self.toolbar = self.CreateToolBar()
- self.toolbar.AddLabelTool(1, '', wx.Bitmap('texit.png'))
- self.toolbar.Realize()
- self.statusbar = self.CreateStatusBar()
- self.statusbar.SetStatusText('Ready')
- self.SetSize((350, 250))
- self.SetTitle('Check menu item')
- self.Centre()
- self.Show(True)
- def ToggleStatusBar(self, e):
- if self.shst.IsChecked():
- self.statusbar.Show()
- else:
- self.statusbar.Hide()
- def ToggleToolBar(self, e):
- if self.shtl.IsChecked():
- self.toolbar.Show()
- else:
- self.toolbar.Hide()
- def main():
- ex = wx.App()
- Example(None)
- ex.MainLoop()
- if __name__ == '__main__':
- main()
We have a view menu, where we have two check menu items. These two menu items will show and hide a statusbar and a toolbar.
- self.shst = viewMenu.Append(wx.ID_ANY, 'Show statubar',
- 'Show Statusbar', kind=wx.ITEM_CHECK)
- self.shtl = viewMenu.Append(wx.ID_ANY, 'Show toolbar',
- 'Show Toolbar', kind=wx.ITEM_CHECK)
If we want to append a check menu item, we set a kind parameter to wx.ITEM_CHECK. The default parameter is wx.ITEM_NORMAL. The Append() method returns a wx.MenuItem.
- viewMenu.Check(self.shst.GetId(), True)
- viewMenu.Check(self.shtl.GetId(), True)
When the application starts, both statusbar and toolbar are visible. So we check both menu items with the Check() method.
- def ToggleStatusBar(self, e):
- if self.shst.IsChecked():
- self.statusbar.Show()
- else:
- self.statusbar.Hide()
We show or hide the statusbar according to the state of the check menu item. We find out the state of the check menu item with the IsChecked() method. Same with toolbar.
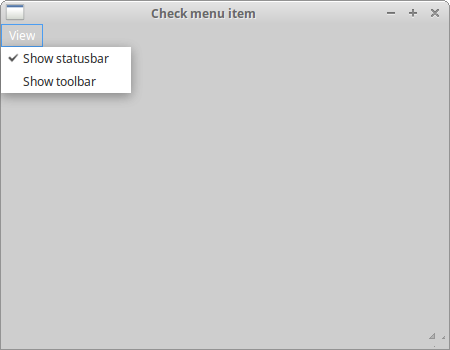 Figure: Check menu item
Context menu
A context menu is a list of commands that appears under some context. For example, in a Firefox web browser, when we right click on a web page, we get a context menu. Here we can reload a page, go back or view page source. If we right click on a toolbar, we get another context menu for managing toolbars. Context menus are sometimes called popup menus.
- #!/usr/bin/python
- # -*- coding: utf-8 -*-
- '''
- ZetCode wxPython tutorial
- In this example, we create a context menu.
- author: Jan Bodnar
- website: www.zetcode.com
- last modified: September 2011
- '''
- import wx
- class MyPopupMenu(wx.Menu):
- def __init__(self, parent):
- super(MyPopupMenu, self).__init__()
- self.parent = parent
- mmi = wx.MenuItem(self, wx.NewId(), 'Minimize')
- self.AppendItem(mmi)
- self.Bind(wx.EVT_MENU, self.OnMinimize, mmi)
- cmi = wx.MenuItem(self, wx.NewId(), 'Close')
- self.AppendItem(cmi)
- self.Bind(wx.EVT_MENU, self.OnClose, cmi)
- def OnMinimize(self, e):
- self.parent.Iconize()
- def OnClose(self, e):
- self.parent.Close()
- class Example(wx.Frame):
- def __init__(self, *args, **kwargs):
- super(Example, self).__init__(*args, **kwargs)
- self.InitUI()
- def InitUI(self):
- self.Bind(wx.EVT_RIGHT_DOWN, self.OnRightDown)
- self.SetSize((250, 200))
- self.SetTitle('Context menu')
- self.Centre()
- self.Show(True)
- def OnRightDown(self, e):
- self.PopupMenu(MyPopupMenu(self), e.GetPosition())
- def main():
- ex = wx.App()
- Example(None)
- ex.MainLoop()
- if __name__ == '__main__':
- main()
In the example, we create a context menu for the main window. It has two items. One will minimize the application, the other one will terminate it.
- class MyPopupMenu(wx.Menu):
- def __init__(self, parent):
- super(MyPopupMenu, self).__init__()
We create a separate wx.Menu class.
- mmi = wx.MenuItem(self, wx.NewId(), 'Minimize')
- self.AppendItem(mmi)
- self.Bind(wx.EVT_MENU, self.OnMinimize, mmi)
A menu item is created. Appended to the context menu. An event handler is binded to this menu item.
- self.Bind(wx.EVT_RIGHT_DOWN, self.OnRightDown)
If we right click on the frame, we call the OnRightDown() method. For this, we use thewx.EVT_RIGHT_DOWN event binder.
- def OnRightDown(self, e):
- self.PopupMenu(MyPopupMenu(self), e.GetPosition())
In the OnRightDown() method, we call the PopupMenu() method. This method shows the context menu. The first parameter is the menu to be shown. The second parameter is the position, where the context menu appears. The context menus appear at the point of the mouse cursor. To get the actual mouse position, we call the GetPosition() method of the supplied event object.
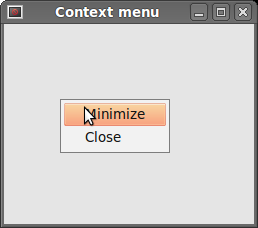 Figure: Context menu
Toolbars
Menus group all commands that we can use in an application. Toolbars provide a quick access to the most frequently used commands.
To create a toolbar, we call the CreateToolBar() method of the frame widget.
- #!/usr/bin/python
- # -*- coding: utf-8 -*-
- '''
- ZetCode wxPython tutorial
- This example creates a simple toolbar.
- author: Jan Bodnar
- website: www.zetcode.com
- last modified: September 2011
- '''
- import wx
- class Example(wx.Frame):
- def __init__(self, *args, **kwargs):
- super(Example, self).__init__(*args, **kwargs)
- self.InitUI()
- def InitUI(self):
- toolbar = self.CreateToolBar()
- qtool = toolbar.AddLabelTool(wx.ID_ANY, 'Quit', wx.Bitmap('texit.png'))
- toolbar.Realize()
- self.Bind(wx.EVT_TOOL, self.OnQuit, qtool)
- self.SetSize((250, 200))
- self.SetTitle('Simple toolbar')
- self.Centre()
- self.Show(True)
- def OnQuit(self, e):
- self.Close()
- def main():
- ex = wx.App()
- Example(None)
- ex.MainLoop()
- if __name__ == '__main__':
- main()
In our example, we have a toolbar with one tool. The tool will close the application, when we click on it.
- toolbar = self.CreateToolBar()
We create a toolbar. By default, the toolbar is horizontal, has no borders and displays icons.
- qtool = toolbar.AddLabelTool(wx.ID_ANY, 'Quit', wx.Bitmap('texit.png'))
To create a toolbar tool, we call the AddLabelTool() method. The second parameter is the tool's label, the third is the tool's image. Note that the label is not visible, because the default style shows only icons.
- toolbar.Realize()
After we have put our items to the toolbar, we call the Realize() method. Calling this method is not obligatory on Linux. On windows it is.
- self.Bind(wx.EVT_TOOL, self.OnQuit, qtool)
To handle toolbar events, we use the wx.EVT_TOOL event binder.
 Figure: Simple toolbar
If we want to create more than one toolbars, we must do it differently.
- #!/usr/bin/python
- # -*- coding: utf-8 -*-
- '''
- ZetCode wxPython tutorial
- In this example, we create two horizontal
- toolbars.
- author: Jan Bodnar
- website: www.zetcode.com
- last modified: September 2011
- '''
- import wx
- class Example(wx.Frame):
- def __init__(self, *args, **kwargs):
- super(Example, self).__init__(*args, **kwargs)
- self.InitUI()
- def InitUI(self):
- vbox = wx.BoxSizer(wx.VERTICAL)
- toolbar1 = wx.ToolBar(self)
- toolbar1.AddLabelTool(wx.ID_ANY, '', wx.Bitmap('tnew.png'))
- toolbar1.AddLabelTool(wx.ID_ANY, '', wx.Bitmap('topen.png'))
- toolbar1.AddLabelTool(wx.ID_ANY, '', wx.Bitmap('tsave.png'))
- toolbar1.Realize()
- toolbar2 = wx.ToolBar(self)
- qtool = toolbar2.AddLabelTool(wx.ID_EXIT, '', wx.Bitmap('texit.png'))
- toolbar2.Realize()
- vbox.Add(toolbar1, 0, wx.EXPAND)
- vbox.Add(toolbar2, 0, wx.EXPAND)
- self.Bind(wx.EVT_TOOL, self.OnQuit, qtool)
- self.SetSizer(vbox)
- self.SetSize((300, 250))
- self.SetTitle('Toolbars')
- self.Centre()
- self.Show(True)
- def OnQuit(self, e):
- self.Close()
- def main():
- ex = wx.App()
- Example(None)
- ex.MainLoop()
- if __name__ == '__main__':
- main()
In the above example, we create two horizontal toolbars.
- toolbar1 = wx.ToolBar(self)
- ...
- toolbar2 = wx.ToolBar(self)
We create two toolbar objects. And put them into a vertical box.
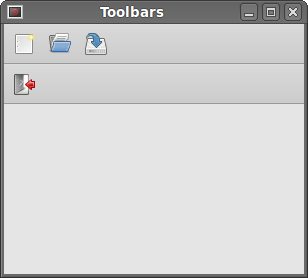 Figure: Toolbars
Enable, disable
In the following example, we will show, how we can enable and disable toolbar buttons. We will also see a separator line.
- #!/usr/bin/python
- # -*- coding: utf-8 -*-
- '''
- ZetCode wxPython tutorial
- In this example, we create two horizontal
- toolbars.
- author: Jan Bodnar
- website: www.zetcode.com
- last modified: September 2011
- '''
- import wx
- class Example(wx.Frame):
- def __init__(self, *args, **kwargs):
- super(Example, self).__init__(*args, **kwargs)
- self.InitUI()
- def InitUI(self):
- self.count = 5
- self.toolbar = self.CreateToolBar()
- tundo = self.toolbar.AddLabelTool(wx.ID_UNDO, '', wx.Bitmap('tundo.png'))
- tredo = self.toolbar.AddLabelTool(wx.ID_REDO, '', wx.Bitmap('tredo.png'))
- self.toolbar.EnableTool(wx.ID_REDO, False)
- self.toolbar.AddSeparator()
- texit = self.toolbar.AddLabelTool(wx.ID_EXIT, '', wx.Bitmap('texit.png'))
- self.toolbar.Realize()
- self.Bind(wx.EVT_TOOL, self.OnQuit, texit)
- self.Bind(wx.EVT_TOOL, self.OnUndo, tundo)
- self.Bind(wx.EVT_TOOL, self.OnRedo, tredo)
- self.SetSize((250, 200))
- self.SetTitle('Undo redo')
- self.Centre()
- self.Show(True)
- def OnUndo(self, e):
- if self.count > 1 and self.count <= 5:
- self.count = self.count - 1
- if self.count == 1:
- self.toolbar.EnableTool(wx.ID_UNDO, False)
- if self.count == 4:
- self.toolbar.EnableTool(wx.ID_REDO, True)
- def OnRedo(self, e):
- if self.count < 5 and self.count >= 1:
- self.count = self.count + 1
- if self.count == 5:
- self.toolbar.EnableTool(wx.ID_REDO, False)
- if self.count == 2:
- self.toolbar.EnableTool(wx.ID_UNDO, True)
- def OnQuit(self, e):
- self.Close()
- def main():
- ex = wx.App()
- Example(None)
- ex.MainLoop()
- if __name__ == '__main__':
- main()
In our example, we have three toolbar buttons. One button is for exiting the application. The other two buttons are undo and redo buttons. They simulate undo/redo functionality in an application. (For a real example, see tips and tricks) We have 4 changes. The undo and redo buttons are disabled accordingly.
- self.toolbar.EnableTool(wx.ID_REDO, False)
- self.toolbar.AddSeparator()
In the beginning, the redo button is disabled. We do it by calling the EnableTool() method. We can create some logical groups within a toolbar. We can separate various groups of buttons by a small vertical line. To do this, we call the AddSeparator() method.
- def OnUndo(self, e):
- if self.count > 1 and self.count <= 5:
- self.count = self.count - 1
- if self.count == 1:
- self.toolbar.EnableTool(wx.ID_UNDO, False)
- if self.count == 4:
- self.toolbar.EnableTool(wx.ID_REDO, True)
We simulate undo and redo functionality. We have 4 changes. If there is nothing left to undo, the undo button is disabled. After undoing the first change, we enable the redo button. Same logic applies for the OnRedo() method.
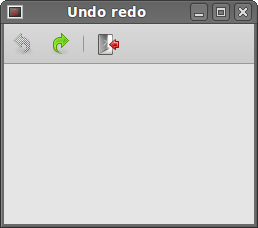 Figure: Undo redo
wxpython Menus and toolbars的更多相关文章
- 【推介】TMS的控件之“TMS Unicode Component Pack”和“TMS Advanced Toolbars & Menus”
TMS Unicode Component Pack是一款支持多语言的界面控件包,提供超过60种控件来为你的Delphi和C++Builder应用程序添加Unicode支持. 介绍: TMS Unic ...
- [Android] Visual Studio Emulator For Android 相关
1.修改设备名 C:\Users\[用户名]\AppData\Local\Microsoft\VisualStudioEmulator\Android\Containers\Local\Devices ...
- IntelliJ IDEA 14.x 快捷键/个性化设置
常用快捷键设置(设置成跟Eclipse差不多) 按照路径:File -> Settings -> Appearance & Behavior -> Keymap -> ...
- 2.[WP Developer体验Andriod开发]Andriod Studio结合Visual Studio Emulator for Android调试Android App
0. 工欲善其事必先利其器 上一篇博客对比了一下Android和WinPhnoe的布局容器,后续篇章重点放在Android的开发上了. 说到开发就绕不开调试程序,调试Android App我们有2种选 ...
- Programming with gtkmm 3
https://developer.gnome.org/gtkmm-tutorial/unstable/index.html.zh_CN 1. 序言 1.1. 本书 1.2. gtkmm 2. 安 ...
- QAction类详解:
先贴一段描述:Qt文档原文: Detailed Description The QAction class provides an abstract user interface action tha ...
- (英文版)使用Visual Studio 2015 编写 MASM 汇编程序!
原文地址:http://kipirvine.com/asm/gettingStartedVS2015/index.htm#CreatingProject Getting Started with MA ...
- IDEA15 File工具栏中没有 Import Project
使用IDEA准备导入项目时发现没有Import Project选项... 解决办法: Settings > Appearance & Bechavior > Menus and T ...
- [未完成]关于Eclipse4RCP书中内容总结
原文地址http://www.vogella.com/tutorials/EclipseRCP/article.html Table of Contents 1. Eclipse 4 1.1. Wha ...
随机推荐
- Jmeter拓展插件可查看和lr一样的图形结果
利用插件可通过图形直观查看CPU.Memory等的运行情况 1. JmeterPlugins.jar插件下载地址:http://jmeter-plugins.org/downloads/all 下载并 ...
- 009 Android Fragment动态用法(实现动态菜单栏)设置控件为满屏状态
·1.MainActivity采用线性布局 2.在app--->res--->layout,右击new--->xml---->layout xml FILE <1> ...
- Myeclipse经常弹出Subversion Native Library Not Available
- ThinkPHP5.0的助手函数汇总
load_trait:快速导入Traits,PHP5.5以上无需调用 /** * 快速导入Traits PHP5.5以上无需调用 * @param string $class trait库 * @pa ...
- centos 7 gitlab部署 以及汉化
=============================================== 2018-04-26 08:56:48 ============================== ...
- (转)一条SQL更新语句是如何执行的
名词 MySQL 里经常说到的 WAL 技术,Write-Ahead Logging 第一个日志模块 redo log 也叫日志重写,是InnoDB 引擎特有的日志 - write pos and c ...
- isqlplus的使用
1 再安装Oracle的机器上开启服务[命令services.msc] 2 浏览器输入下面的网址: 虚拟机[安装orcale的机器]:http://localhost:5560/isqlplus/ 本 ...
- Android代码中实现WAP方式联网
无论是移动.联通还是电信,都至少提供了两种类型的的APN:WAP方式和NET方式.其中NET方式跟WIFI方式一样,无需任何设置,可自由访问所有类型网站,而WAP方式,需要手机先设置代理服务器和端口号 ...
- 使用jxl读取excel内容,并转换成Json,用于Datagrid
一.上传excel文件,得到InputStream,由InputStream得到Jxl中的Workbook,取出内容,存到二维数组中. 1.使用 Jquery Uploadify 插件(http:// ...
- 8086实时时钟实验(一)——《x86汇编语言:从实模式到保护模式》05
1.代码清单 ;代码清单9-1 ;文件名:c09_1.asm ;文件说明:用户程序 ;创建日期:2011-4-16 22:03 ;=================================== ...