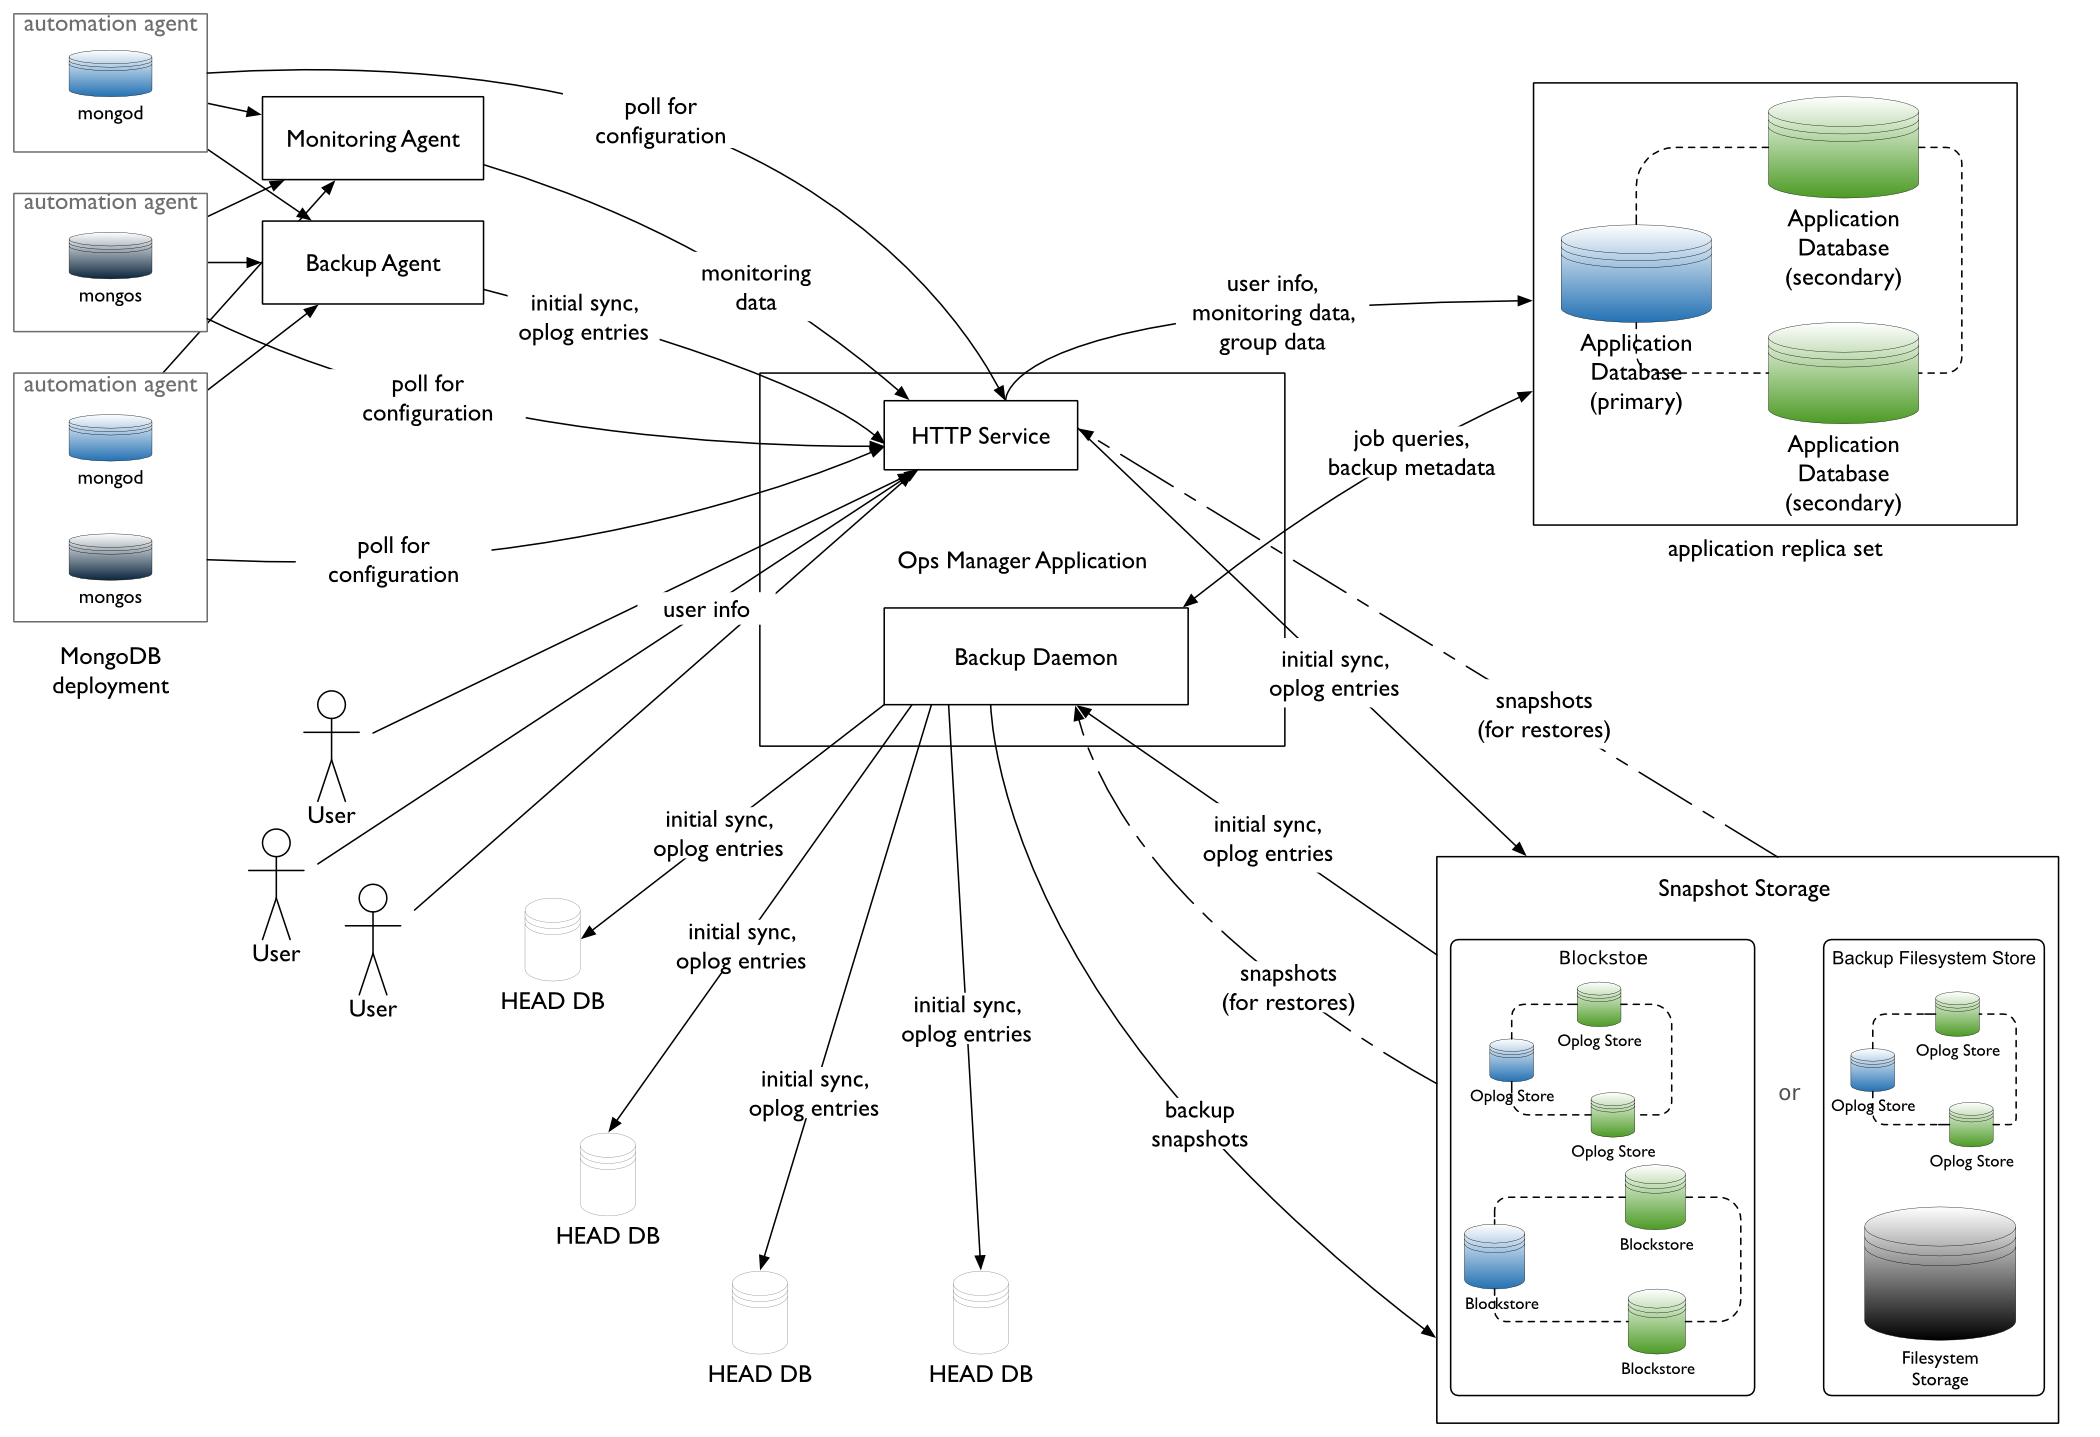
通过Ops Manager安装管理mongodb-3.4集群
| node1 |
Ops Manager,mongodb,agent |
| node2 | mongodb,agent |
| node3 | mongodb,agent |
参考文档
- https://docs.opsmanager.mongodb.com/current/core/installation-checklist/
- https://docs.opsmanager.mongodb.com/current/core/requirements/#onprem-system-requirements
- https://docs.mongodb.com/manual/administration/production-notes/
NUMA Settings
sysctl -w vm.zone_reclaim_mode=
NTP Settings
yum install -y ntp

/etc/init.d/ntpd start
Turn off Atime
vim /etc/fstab

/dev/mapper/VolGroup-lv_data /data                       ext4    defaults,noatime,nodiratime
ulimt settings
ulimit -a

修改/etc/security/limits.conf

    mongod soft nproc

    mongod hard nproc
Disable Transparent Huge Pages
通过启动脚本可以在每次启动时关闭THP
vim /etc/init.d/disable-transparent-hugepages

#以下为脚本内容

#!/bin/bash

### BEGIN INIT INFO

# Provides:          disable-transparent-hugepages

# Required-Start:    $local_fs

# Required-Stop:

# X-Start-Before:    mongod mongodb-mms-automation-agent

# Default-Start:

# Default-Stop:

# Short-Description: Disable Linux transparent huge pages

# Description:       Disable Linux transparent huge pages, to improve

#                    database performance.

### END INIT INFO

case $ in

  start)

    if [ -d /sys/kernel/mm/transparent_hugepage ]; then

      thp_path=/sys/kernel/mm/transparent_hugepage

    elif [ -d /sys/kernel/mm/redhat_transparent_hugepage ]; then

      thp_path=/sys/kernel/mm/redhat_transparent_hugepage

    else

      return

    fi

    echo 'never' > ${thp_path}/enabled

    echo 'never' > ${thp_path}/defrag

    re='^[0-1]+$'

    if [[ $(cat ${thp_path}/khugepaged/defrag) =~ $re ]]

    then

      # RHEL

      echo   > ${thp_path}/khugepaged/defrag

    else

      # RHEL

      echo 'no' > ${thp_path}/khugepaged/defrag

    fi

    unset re

    unset thp_path

    ;;

esac
执行脚本
chmod +x /etc/init.d/disable-transparent-hugepages

chkconfig --add disable-transparent-hugepages

/etc/init.d/disable-transparent-hugepages start
检查是否生效
cat /sys/kernel/mm/transparent_hugepage/enabled

cat /sys/kernel/mm/transparent_hugepage/defrag

#有以下输出表示正确

always madvise [never]
Install the Ops Manager Application Database
Ops Manager需要先安装mongodb,创建其数据库副本集后才能部署安装。
创建yum repo
在每台节点上执行以下命令创建官方3.4版本的repo文件
官方的yum源比较慢,推荐使用阿里云yum源
#官方repo

cat > /etc/yum.repos.d/mongodb-org-3.4.repo << EOF

[mongodb-org-3.4]

name=MongoDB Repository

baseurl=https://repo.mongodb.org/yum/redhat/\$releasever/mongodb-org/3.4/x86_64/

gpgcheck=

enabled=

gpgkey=https://www.mongodb.org/static/pgp/server-3.4.asc

EOF

# 阿里云repo

cat > /etc/yum.repos.d/mongodb-org-3.4.repo << EOF

[mongodb-org-3.4]

name=MongoDB Repository

#baseurl=https://repo.mongodb.org/yum/redhat/$releasever/mongodb-org/3.4/x86_64/

baseurl=https://mirrors.aliyun.com/mongodb/yum/redhat/\$releasever/mongodb-org/3.4/x86_64/

gpgcheck=

enabled=

gpgkey=https://www.mongodb.org/static/pgp/server-3.4.asc

EOF
安装mongod
在每台节点上执行以下步骤
yum install -y mongodb-org

chkconfig mongod on
修改配置
vim /etc/mongod.conf

#修改为数据分区,需创建该目录,并确保mongod用户可读写

# Where and how to store data.

storage:

  dbPath: /data/mongo

  journal:

    enabled: true

#默认监听本地lo,注释掉

# network interfaces

net:

  port:

#  bindIp: 127.0.0.1  # Listen to local interface only, comment to listen on all interfaces.
启动服务
service mongod start
部署Ops Manager副本集
参考 https://docs.mongodb.com/manual/tutorial/deploy-replica-set/
通过修改配置文件的方式创建Ops Manager所需副本集。
注:也可以通过命令行方式指定副本集启动。修改配置文件的方式便于通过init script管理。
在所有节点上修改配置
vim mongod.conf

#添加以下内容

replication:

  replSetName: rs_ops_manager

#重启生效

service mongod restart
在任一节点上执行mongo shell,添加副本集节点,此处使用node1节点
mongo --host localhost --port

#Initiate the replica set

rs.initiate()

#display the replica set configuration object

rs.conf()

#Add the remaining members to the replica set

rs.add("node2_fqdn")

rs.add("node3_fqdn")

#Check the status of the replica set

rs.status()
Install Ops Manager
#下载安装

wget -c https://downloads.mongodb.com/on-prem-mms/rpm/mongodb-mms-3.4.2.389-1.x86_64.rpm

rpm -ivh mongodb-mms-<version>.x86_64.rpm
Configure the Ops Manager connection to the Ops Manager Application Database
vim /opt/mongodb/mms/conf/conf-mms.properties

#设置mongo.mongoUri

mongo.mongoUri=mongodb://node1:27017,node2:27017,node3:27017/?replicaSet=rs_ops_manager

/etc/init.d/mongodb-mms start 启动
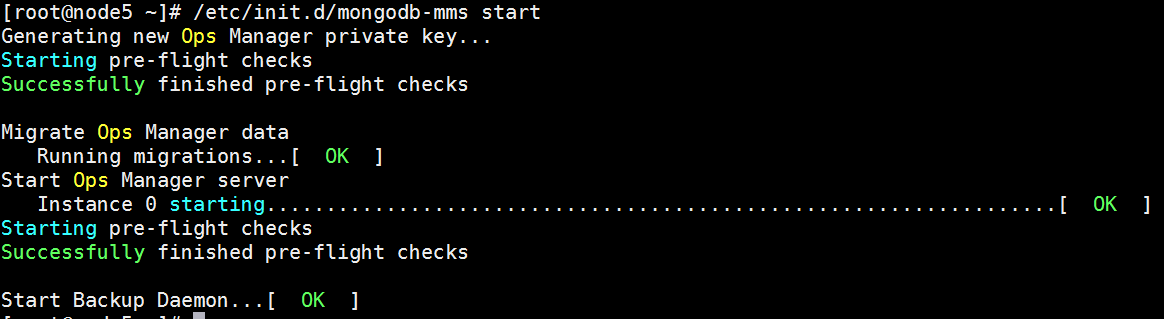
Open the Ops Manager home page and register the first user.
- http://<host>:8080
- Click the Register link and follow the prompts to register the first user and create the first group. The first user is automatically assigned the Global Owner role.
配置本地二进制包进行安装MongoDB
参考:https://docs.opsmanager.mongodb.com/v3.4/tutorial/configure-local-mode/
Configure Local Mode for Ops Manager Servers without Internet Access(Optional)
Set Ops Manager to Local Mode.
- Click Admin in the upper right corner to open system administration.
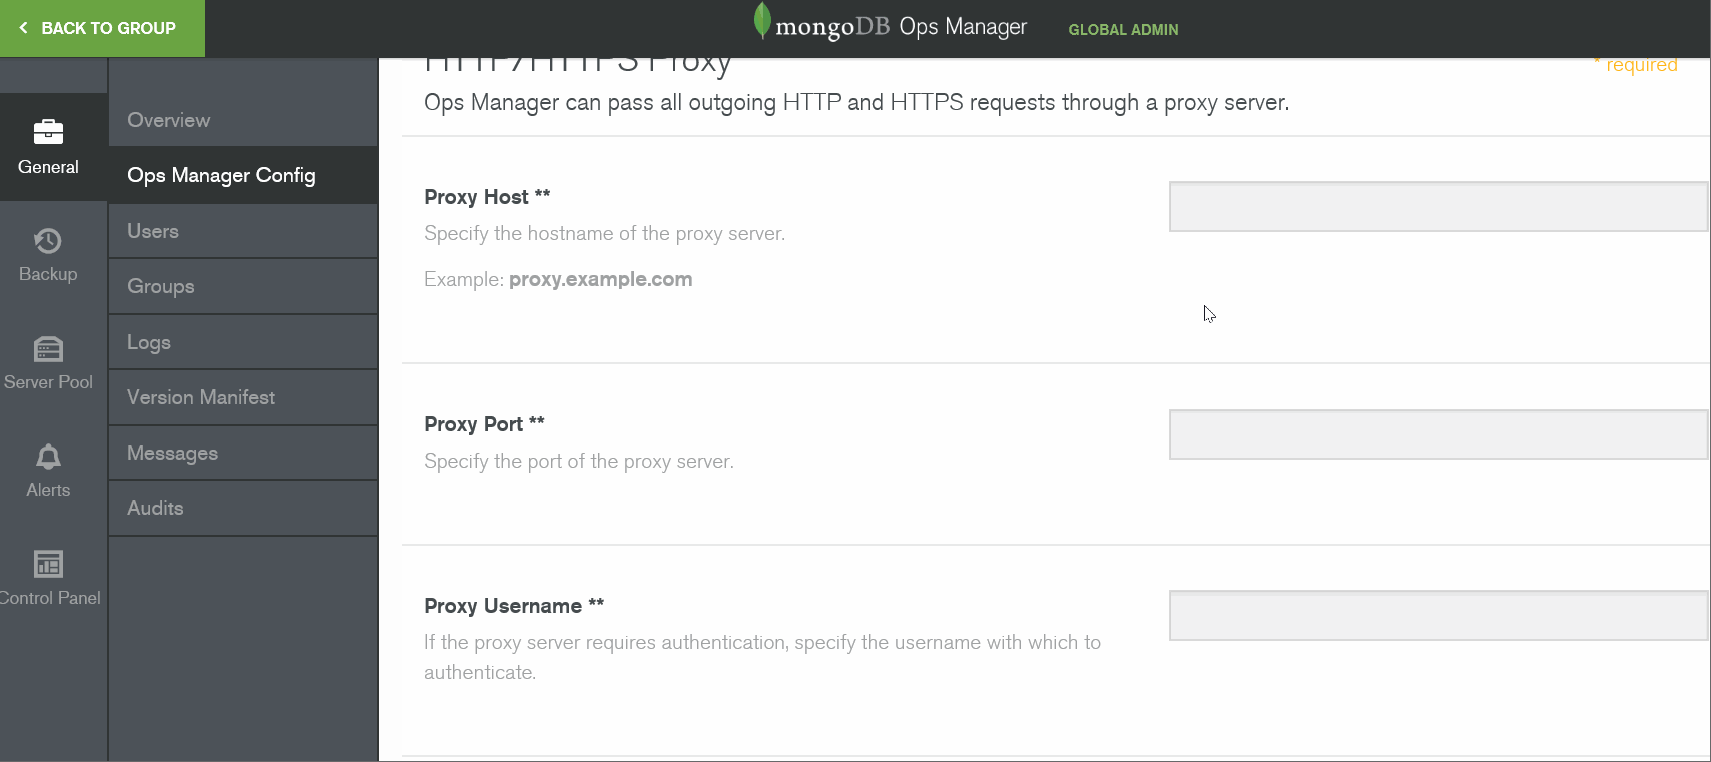
- From the General tab, click Ops Manager Config.
- Click the Miscellaneous button at the top of the page.
- For Version Manifest Source, select Local.
- Note the directory specified in Versions Directory. This is the directory on your Ops Manager servers where you will store the MongoDB binaries.
- For Backup Version Auto Download, select false.
Download the required MongoDB archives
wget -c http://fastdl.mongodb.org/linux/mongodb-linux-x86_64-rhel62-3.4.2.tgz
Populate all Ops Manager servers with the necessary MongoDB binaries and archives
tar xzf mongodb-linux-x86_64-rhel62-3.4..tgz -C /opt/mongodb/mms/mongodb-releases/

chown -R mongodb-mms.mongodb-mms /opt/mongodb/mms/mongodb-releases/mongodb-linux-x86_64-rhel62-3.4./
chown -R mongodb-mms:mongodb-mms /opt/mongodb/mms/mongodb-releases chmod -R 640 /opt/mongodb/mms/mongodb-releasesDownload the version manifest for Ops Manager.
- From a computer that can access both the Internet and the Ops Manager servers, download the version manifest fromhttps://opsmanager.mongodb.com/static/version_manifest/3.4.json.
- Open the manifest JSON file.
- Select all of the contents and copy them to the clipboard.
Paste the contents the version manifest into the Ops Manager application on each Ops Manager server.
- In Ops Manager, click Admin in the upper right corner to open system administration.
- Click the General tab.
- Click Version Manifest.
- Click the Update the MongoDB Version Manifest button.
- Paste the version manifest.
For each group, specify which versions are available for download by Automation Agents.
- In Ops Manager, click Back To Group in the upper left to exit system administration.
- Click the Group link at the top of the page and select the desired group.
- Click Deployment, then the More drop-down list, then Version Manager.
- Select the checkboxes for the versions of MongoDB that you have made available on the Ops Manager Application server.
Review and approve your changes.
Ops Manager displays your proposed changes.
If you are satisfied, click Confirm & Deploy.
Otherwise, click Cancel and you can make additional changes.
Configure Ops Manager agents
参考https://docs.opsmanager.mongodb.com/current/tutorial/install-automation-agent-with-rpm-package/
在node1,node2,node3上安装mongodb-mms-automation-agent-manager

curl -OL http://172.17.20.127:8080/download/agent/automation/mongodb-mms-automation-agent-manager-latest.x86_64.rpm

rpm -U mongodb-mms-automation-agent-manager-latest.x86_64.rpm
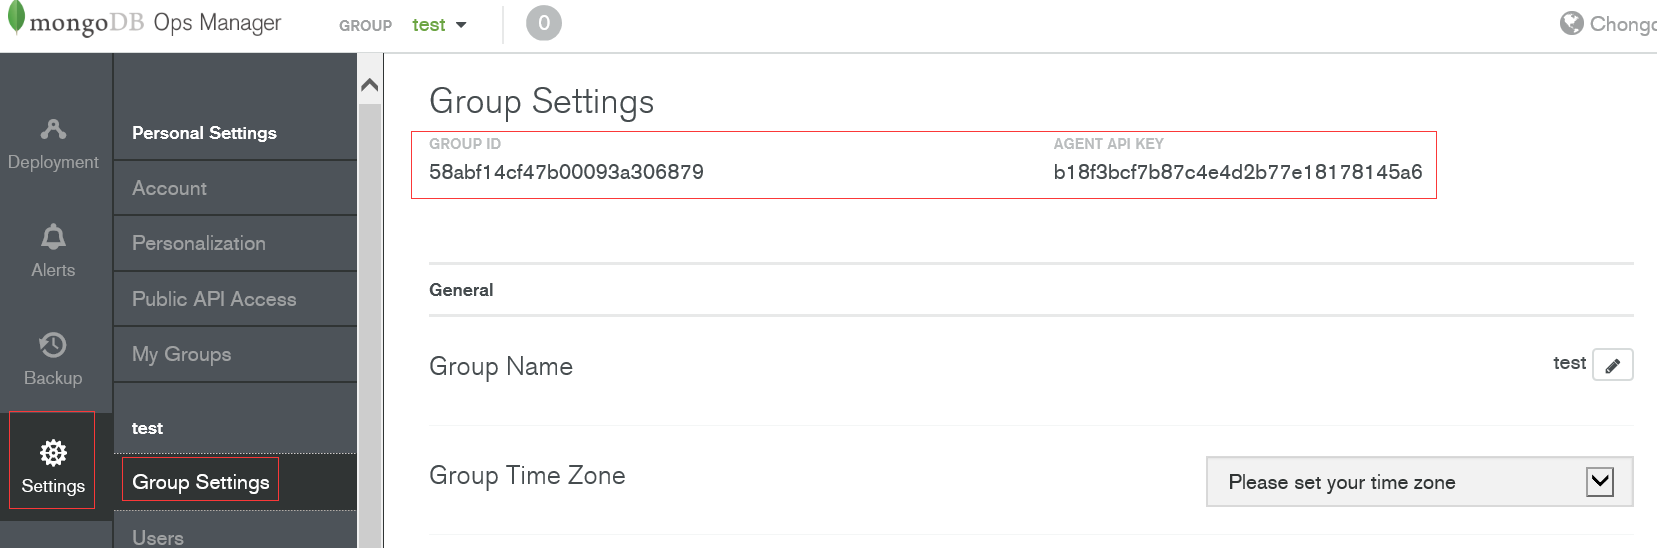
按上图ID修改
vim /etc/mongodb-mms/automation-agent.config
#get id and key from Group Settings
mmsGroupId=<Group ID>
mmsApiKey=<agent API key>
mmsBaseUrl=<application URL> #启动agent/etc/init.d/mongodb-mms-automation-agentstart
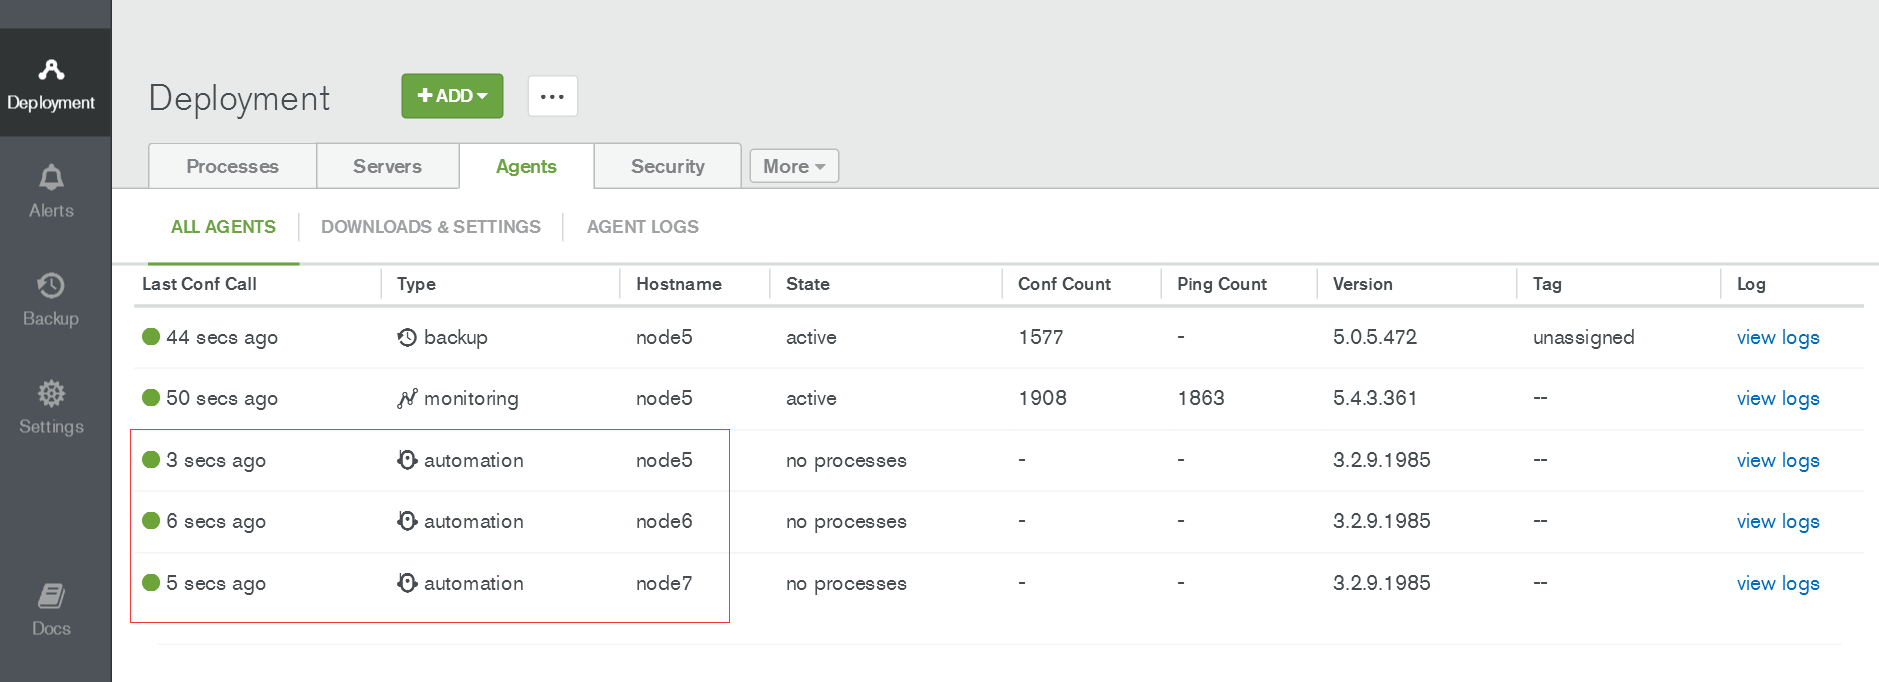
查看各个节点的agent是否连接上
通过Ops Manager安装配置管理mongodb集群
导入已经存在的mongodb集群到Ops Manager
准备工作
解压mongodb压缩包,避免部署的时候在线下载这个包

tar xvf mongodb-linux-x86_64-rhel62-3.4..tgz -C /var/lib/mongodb-mms-automation/mongodb-linux-x86_64-3.4.

chown -R mongod.mongod /var/lib/mongodb-mms-automation/mongodb-linux-x86_64-3.4./

检查各个节点的mongodb-mms-automation-agent是否连接上了
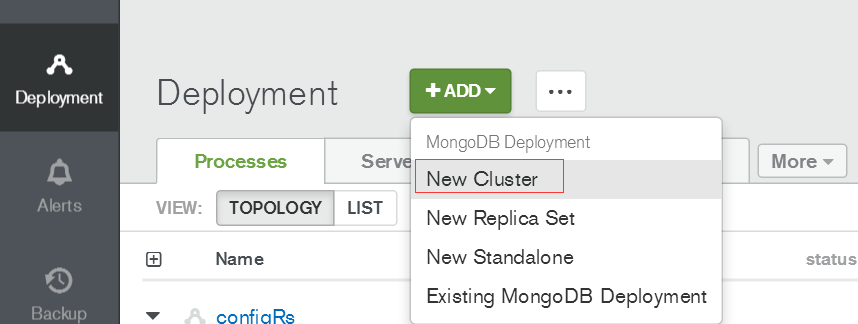
点击ADD添加已经存在的集群

查看集群状态(mongodb启动程序有警告,所以status有警告)

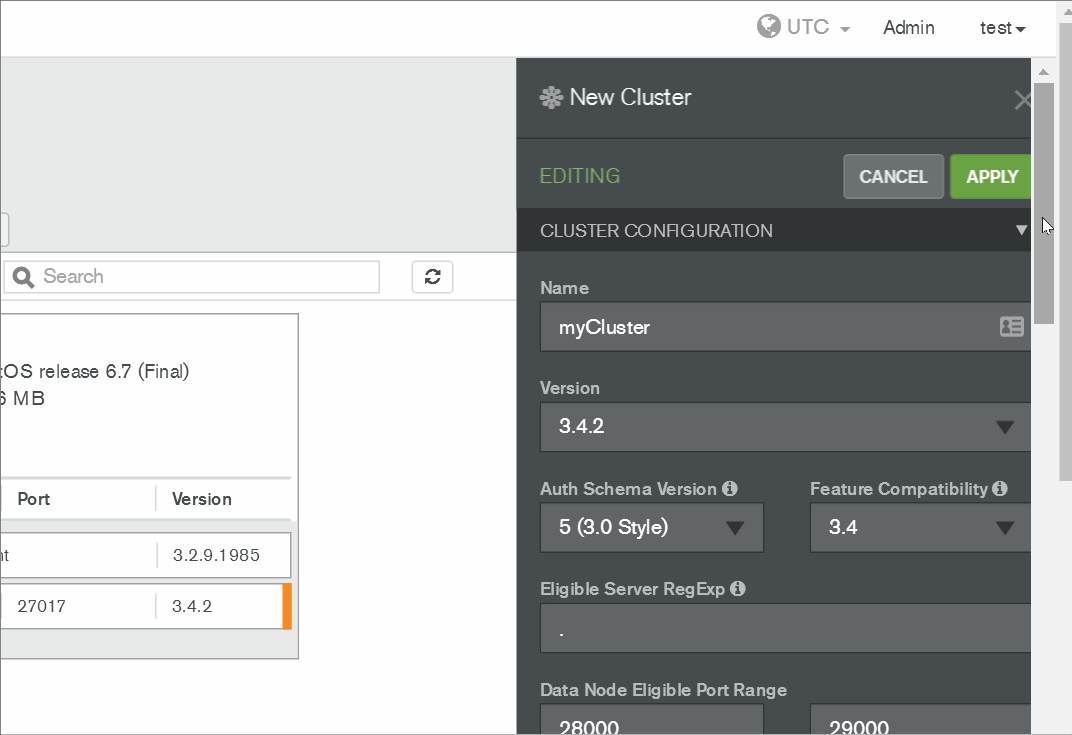
通过Ops Manager自动化部署mongodb shard集群
#创建mongodb数据存放目录,后面部署时要填写

mkdir /mongodata

chown mongod:mongod /mongodata
确认后点击REVIEW&DEPLOY
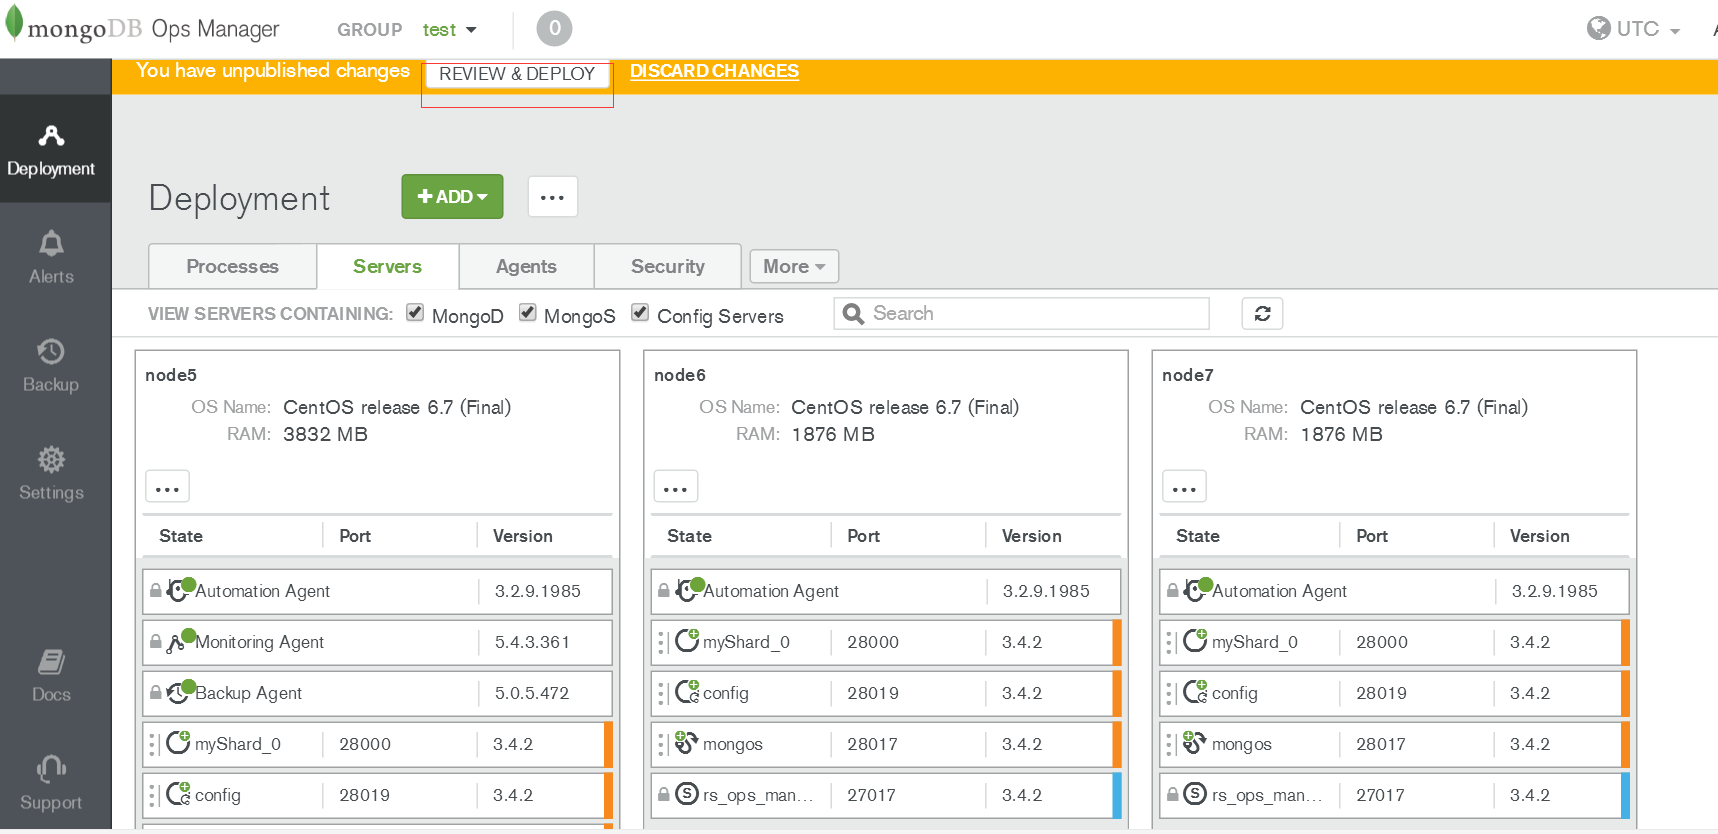
部署中可查看日志/var/log/mongodb-mms-automation/automation-agent.log排查错误,错误解决后点击REVIEW&DEPLOY继续部署。
其他配置可参考官网
- Create or Import a MongoDB Deployment
- Manage Deployments
- Alerts and Monitoring
- Back Up and Restore Deployments
4.x版本的可参考:https://blog.51cto.com/candon123/2162461
通过Ops Manager安装管理mongodb-3.4集群的更多相关文章
- Cloudera Manager安装之利用parcels方式安装3或4节点集群(包含最新稳定版本或指定版本的安装)(添加服务)(CentOS6.5)(五)
参考博客 Cloudera Manager安装之利用parcels方式安装单节点集群 Cloudera Manager安装之Cloudera Manager 5.3.X安装(三)(tar方式.rpm ...
- Cloudera Manager安装之利用parcels方式(在线或离线)安装3或4节点集群(包含最新稳定版本或指定版本的安装)(添加服务)(Ubuntu14.04)(五)
前期博客 Cloudera Manager安装之Cloudera Manager 5.6.X安装(tar方式.rpm方式和yum方式) (Ubuntu14.04) (三) 如果大家,在启动的时候,比如 ...
- Centos7的安装、Docker1.12.3的安装,以及Docker Swarm集群的简单实例
目录 [TOC] 1.环境准备 本文中的案例会有四台机器,他们的Host和IP地址如下 c1 -> 10.0.0.31 c2 -> 10.0.0.32 c3 -> 10.0.0. ...
- (转)MongoDB分片实战 集群搭建
环境准备 Linux环境 主机 OS 备注 192.168.32.13 CentOS6.3 64位 普通PC 192.168.71.43 CentOS6.2 64位 服务器,NUMA CPU架构 Mo ...
- [转载] Centos7的安装、Docker1.12.3的安装,以及Docker Swarm集群的简单实例
1.环境准备 本文中的案例会有四台机器,他们的Host和IP地址如下 c1 -> 10.0.0.31 c2 -> 10.0.0.32 c3 -> 10.0.0.33 c4 -&g ...
- MongoDB之分片集群与复制集
分片集群 1.1.概念 分片集群是将数据存储在多台机器上的操作,主要由查询路由mongos.分片.配置服务器组成. ●查询路由根据配置服务器上的元数据将请求分发到相应的分片上,本身不存储集群的元数据, ...
- 搭建一个分布式MongoDB鉴权集群
今天休假在家,测试并搭建了一个replica set shard MongoDB鉴权集群.replica set shard 鉴权集群中文资料比较少,本文是个人笔记,同时也希望对后来者有所帮助.本文仅 ...
- 管理和维护RHCS集群
导读 管理和维护RHCS集群是一个非常复杂和繁琐的工作,要维护好一个RHCS集群,必须熟悉RHCS的基本运行原理,在集群管理方面,RHCS提供了两种方式:即Luci图形界面方式和命令行方式,这儿重点讲 ...
- mongodb 3.4 集群搭建升级版 五台集群
最新版mongodb推荐使用yaml语法来做配置,另外一些旧的配置在最新版本中已经不在生效,所以我们在生产实际搭建mongodb集群的时候做了一些改进.如果大家不熟悉什么是分片.副本集.仲裁者的话请先 ...
随机推荐
- IO流之递归
递归: 递归,指在当前方法内调用自己的这种现象 public void method(){ System.out.println(“递归的演示”); //在当前方法内调用自己 method(); } ...
- mysql 字符串转换呈毫秒值
SELECT CEIL((UNIX_TIMESTAMP('2011-05-31 23:59:59') - UNIX_TIMESTAMP('2011-05-31 00:59:59'))/1000/60/ ...
- lxml模块(应用xpath技术)
一.lxml介绍 第三方库lxml是第一款表现出高性能特征的python xml库,天生支持Xpath1.0.XSLT1.0.定制元素类,甚至python风格的数据绑定接口.lxml是通过Cpytho ...
- Topcoder SRM 698 Div1 250 RepeatString(dp)
题意 [题目链接]这怎么发链接啊..... Sol 枚举一个断点,然后类似于LIS一样dp一波 这个边界条件有点迷啊..fst了两遍... #include<bits/stdc++.h> ...
- with和catch改变作用域链
总结笔记: with和catch会将对象中标识符的解析添加到作用域链的最前端, 标识符的解析就是with()和catch()括号中的对象. var x = 10, y = 10; with ({x: ...
- MicroService
- 使用putty远程登录Ubuntu时,报Network error:Connection refused错误
putty远程登录Ubuntu,弹出Network error:Connection refused的错误提示框,就是因为Ubuuntu没有安装ssh服务.执行命令: sudo apt-get ins ...
- 跨平台移动开发_PhoneGap 使用Geolocation基于所在地理位置坐标调用百度地图API
使用Geolocation基于所在地理位置坐标调用百度地图API 效果图 示例代码 <!DOCTYPE html> <html> <head> <title& ...
- angular.uirouter
首先给大家介绍angular-ui-router的基本用法.如何引用依赖angular-ui-router angular.module('app',["ui.router"]). ...
- Rational ClearCase 系列
Base + UCM 系列参考:http://blog.csdn.net/hhg208/article/details/5749050