TableLayout跟TableRow 是一组搭配应用的布局,TableLayout置底,TableRow在TableLayout的上方,而Button、TextView等控件就在TableRow之上,别的,TableLayout之上也可以零丁放控件。TableLayout是一个应用错杂的布局,最简单的用法就仅仅是拖沓控件做出个界面,但实际上,会经常在代码里应用TableLayout,例如做出表格的结果。本文首要介绍TableLayout的根蒂根基应用办法。
重要的几个属性如下:
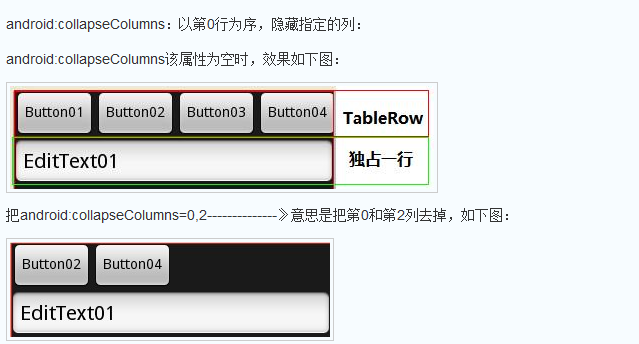
1.android:collapseColumns://隐藏指定的列
①设置 TableLayout 内的 TableRow 中需要隐藏的列的列索引,多个用“,”隔开
②以第0行为序,隐藏指定的列:把android:collapseColumns=0,3 意思是把第0和第3列隐藏
2.android:shrinkColumns://收缩指定的列以适合屏幕、不会挤出屏幕 ① 设置 TableLayout 内的 TableRow 中需要拉伸(该列会拉伸到所有可用空间)的列的列索引,多列个用“,”隔开(多列 每列填充空隙大小一样)
②以第0行为序,自动延伸指定的列填充可用部分: 当LayoutRow里面的控件还没有布满布局时,shrinkColumns不起作用。
③设置了shrinkColumns=1,4,布局完全没有改变,因为LayoutRow里面还剩足够的空间。当LayoutRow布满控件时,设置了shrinkColumns=2,5,则控件自动向垂直方向填充空间

3.android:stretchColumns://尽量把指定的列表填充空白部分
①设置 TableLayout 内的 TableRow 中需要收缩(为了使其他列不会被挤到屏幕 外,此列会自动收缩)的列的列索引,多个用“,”隔开
② 以第0行为序,尽量把指定的列填充空白部分:设置stretchColumns=2,5,第1,4列被尽量填充同时向右填充,直到2,5被压挤到最后边)。

补充:
①表格布局的子对象不能指定 layout_width 属性.宽度永远是 MATCH_PARENT。
②不过子对象可以定义 layout_height 属性;其默认值是WRAP_CONTENT. 如果子对象是 TableRow,其高度永远是 WRAP_CONTENT。
实例:

001 |
<LinearLayout xmlns:android="http://schemas.android.com/apk/res/android" |
002 |
xmlns:tools="http://schemas.android.com/tools" |
003 |
android:layout_width="match_parent" |
004 |
android:layout_height="match_parent" |
005 |
android:orientation="vertical" |
006 |
tools:context=".AndroidTableLayoutActivity" > |
008 |
<!-- 定义第一个表格,指定第2列允许收缩,第3列允许拉伸 --> |
011 |
android:id="@+id/tablelayout01" |
012 |
android:layout_width="match_parent" |
013 |
android:layout_height="wrap_content" |
014 |
android:shrinkColumns="1" |
015 |
android:stretchColumns="2" > |
017 |
<!-- 直接添加按钮,自己占用一行 --> |
020 |
android:id="@+id/btn01" |
021 |
android:layout_width="wrap_content" |
022 |
android:layout_height="wrap_content" |
023 |
android:text="独自一行" > |
029 |
android:id="@+id/btn02" |
030 |
android:layout_width="wrap_content" |
031 |
android:layout_height="wrap_content" |
036 |
android:id="@+id/btn03" |
037 |
android:layout_width="wrap_content" |
038 |
android:layout_height="wrap_content" |
039 |
android:text="允许被收缩允许被收缩允许被收缩允许被收缩" > |
043 |
android:id="@+id/btn04" |
044 |
android:layout_width="wrap_content" |
045 |
android:layout_height="wrap_content" |
046 |
android:text="允许被拉伸允许被拉伸允许被拉伸" > |
050 |
<!-- 定义第2个表格,指定第2列隐藏 --> |
053 |
android:id="@+id/tablelayout02" |
054 |
android:layout_width="match_parent" |
055 |
android:layout_height="wrap_content" |
056 |
android:collapseColumns="1" > |
061 |
android:id="@+id/btn05" |
062 |
android:layout_width="wrap_content" |
063 |
android:layout_height="wrap_content" |
068 |
android:id="@+id/btn06" |
069 |
android:layout_width="wrap_content" |
070 |
android:layout_height="wrap_content" |
071 |
android:text="被隐藏列" > |
075 |
android:id="@+id/btn07" |
076 |
android:layout_width="wrap_content" |
077 |
android:layout_height="wrap_content" |
078 |
android:text="允许被拉伸" > |
082 |
<!-- 定义第3个表格,指定第2列填满空白 --> |
085 |
android:id="@+id/tablelayout03" |
086 |
android:layout_width="match_parent" |
087 |
android:layout_height="wrap_content" |
088 |
android:stretchColumns="1" > |
093 |
android:id="@+id/btn08" |
094 |
android:layout_width="wrap_content" |
095 |
android:layout_height="wrap_content" |
100 |
android:id="@+id/btn09" |
101 |
android:layout_width="wrap_content" |
102 |
android:layout_height="wrap_content" |
103 |
android:text="填满剩余空白" > |
107 |
<!-- 定义第3个表格,指定第2列横跨2列 --> |
110 |
android:id="@+id/tablelayout04" |
111 |
android:layout_width="match_parent" |
112 |
android:layout_height="wrap_content" > |
117 |
android:id="@+id/btn10" |
118 |
android:layout_width="wrap_content" |
119 |
android:layout_height="wrap_content" |
124 |
android:id="@+id/btn11" |
125 |
android:layout_width="wrap_content" |
126 |
android:layout_height="wrap_content" |
127 |
android:layout_column="2" |
128 |
android:text="填满剩余空白" > |
- Android ActionBar详解(三):ActionBar实现切换Tabs标签
实现切换Tabs标签; Activity代码: public class ActionBarTabs extends Activity { @Override protected void onCre ...
- Html5移动端页面自适应布局详解(阿里rem布局)
在移动设备上进行网页的重构或开发,首先得搞明白的就是移动设备上的viewport,通读网上的各种对于viewport的解释之后 大概viewport可以理解为三种 1.layout viewport ...
- (转)android Fragments详解三:实现Fragment的界面
为fragment添加用户界面 fragment一般作为activity的用户界面的一部分,把它自己的layout嵌入到activity的layout中. 一个 要为fragment提供layo ...
- 【转】Android编译系统详解(三)——编译流程详解
原文网址:http://www.cloudchou.com/android/post-276.html 本文原创作者:Cloud Chou. 欢迎转载,请注明出处和本文链接 1.概述 编译Androi ...
- Android Fragment详解(三): 实现Fragment的界面
为fragment添加用户界面: Fragment一般作为activity的用户界面的一部分,把它自己的layout嵌入到activity的layout中. 一个 要为fragment提供layout ...
- Android ActionBar详解(三)--->ActionBar的Home导航功能
FirstActivity如下: package cc.testsimpleactionbar2; import android.os.Bundle; import android.app.Activ ...
- Android Loader详解三:重启与回调
重启装载器 当你使用initLoader()时,如果指定ID的装载器已经存在,则它使用这个装载器.如果不存在呢,它将创建一个新的.但是有时你却是想丢弃旧的然后开始新的数据. 要想丢弃旧数据,你应使用r ...
- Android 布局详解
Android 布局详解 1.重用布局 当一个布局文件被多处使用时,最好<include>标签来重用布局. 例如:workspace_screen.xml的布局文件,在另一个布局文件中被重 ...
- Grid 网格布局详解
Grid网格布局详解: Grid布局与Flex布局有着一定的相似性,Grid布局是将容器划分成行和列,产生单元格,可以看做是二维布局. 基本概念: 采用网格布局的区域,称为"容器" ...
随机推荐
- UVA 10026 Shoemaker's Problem
Shoemaker's Problem Shoemaker has N jobs (orders from customers) which he must make. Shoemaker can w ...
- 附2 hystrix详述(2)- 配置
一.hystrix在生产中的建议 1.保持timeout的默认值(1000ms),除非需要修改(其实通常会修改) 2.保持threadpool的的线程数为10个,除非需要更多 3.依赖标准的报警和监控 ...
- .Net垃圾收集机制—了解算法与代龄
垃圾收集器在本质上就是负责跟踪所有对象被引用到的地方,关注对象不再被引用的情况,回收相应的内存.在.NET平台中同样如此,有效的提高.NET垃圾回收性能,能够提高程序执行效率. 其实垃圾收集并不是伴随 ...
- IOS 设置圆角用户头像
在App中有一个常见的功能,从系统相册或者打开照相机得到一张图片,然后作为用户的头像.从相册中选取的图片明明都是矩形的图片,但是展示到界面上却变成圆形图片,这个神奇的效果是如何实现的呢? 请大家跟着下 ...
- THINKPHP URL模块大小写导致404问题
最近我使用THINKPHP开发了一个项目在本地的集成开发环境wampserver做开发时并没有出现问题 上传到linux系统也没有出现问题,但当上传到windows平台上就出现了问题"文件4 ...
- PHP经典项目案例-(一)博客管理系统5
本篇实现发表博客. 八.发表博客 (1).界面实现file.php <tr> <td colSpan=3 valign="baseline" style ...
- 子查询二(在HAVING子句中使用子查询)
HAVING子句的主要功能是对分组后的数据进行过滤,如果子查询在HAVING中表示要进行分组过滤,一般返回单行单列的数据 示例一.查询部门编号,人数,平均工资,并且要求这些部门的平均工资高于公司的平均 ...
- windows下npm默认的全局路径
C:\Users\用户名\AppData\Roaming\npm\node_modules
- CAE医疗综合视听中心管理系统
http://caehealthcare.com/eng/audiovisual-solutions/learning-space https://vimeo.com/108897296http:// ...
- interllij13新建maven web工程
1. 打开intellij,左边的可以别管它(历史) ②选择create new project(新建一个项目),选择Maven,并选择一个web模板,然后next. 3. 给自己的项目取名,grou ...