spring---aop(5)---Spring AOP的配置的背后的配置
写在前面
Spring AOP中Pointcut,dvice 和 Advisor三个概念
1)切入点 Pointcut
在介绍Pointcut之前,有必要先介绍 Join Point(连接点)概念。
连接点:程序运行中的某个阶段点,比如方法的调用、异常的抛出等。比如方法doSome();Pointcut是JoinPoint的集合,它是程序中需要注入Advice 的位置的集合,指明Advice要在什么样的条件下才能被触发。org.springframework.aop.Pointcut接口用来指定到特定的类和方法。
2)通知Advice
它是某个连接点所采用的处理逻辑,也就是向连接点注入的代码。例如:输出的日志信息 就是一个Advice。
3)Advisor
Advisor是Pointcut和Advice的配置器,它包括Pointcut和Advice,是将Advice注入程序中Pointcut位置的代码。
<aop:aspectj-autoproxy/>

<aop:config proxy-target-class="true">

       <aop:pointcut id="servicePointcut" expression="execution(* com.cpic..*Service.*(..))" />

       <aop:advisor pointcut-ref="servicePointcut" advice-ref="txAdvice" order="3" />

</aop:config>

<tx:advice id="txAdvice" transaction-manager="transactionManager">

       <tx:attributes>

           <tx:method name="add*" />

       </tx:attributes>

</tx:advice>
接下来就需要看下配置完成之后是如何生成代理对象的
还是要从对xml中的配置<aop:config>标签的解析来入手。同样是从标签解析接口开始,即找BeanDefinitionParser的实现类,最终我们会找到AspectJAutoProxyBeanDefinitionParser是用来处理aspectj-autoproxy标签的,而ConfigBeanDefinitionParser则是用来处理aop:config标签的。看下ConfigBeanDefinitionParser的解析过程:
public BeanDefinition parse(Element element, ParserContext parserContext) {

        CompositeComponentDefinition compositeDef =

                new CompositeComponentDefinition(element.getTagName(), parserContext.extractSource(element));

        parserContext.pushContainingComponent(compositeDef);

        configureAutoProxyCreator(parserContext, element);

        List<Element> childElts = DomUtils.getChildElements(element);

        for (Element elt: childElts) {

            String localName = parserContext.getDelegate().getLocalName(elt);

            if (POINTCUT.equals(localName)) {

                parsePointcut(elt, parserContext);

            }

            else if (ADVISOR.equals(localName)) {

                parseAdvisor(elt, parserContext);

            }

            else if (ASPECT.equals(localName)) {

                parseAspect(elt, parserContext);

            }

        }

        parserContext.popAndRegisterContainingComponent();

        return null;

    }
以上过程比较费劲,有兴趣的可以弄清楚。这里主要注册一些Advisor,同时注册了一个AspectJAwareAdvisorAutoProxyCreator,并且设置xml中所配置的proxy-target-class和expose-proxy到它的属性中。AspectJAwareAdvisorAutoProxyCreator本身存储着配置信息,然后使用这些配置创建出来代理对象,在它的父类AbstractAutoProxyCreator的createProxy方法中:
protected Object createProxy(
Class<?> beanClass, String beanName, Object[] specificInterceptors, TargetSource targetSource) { ProxyFactory proxyFactory = new ProxyFactory();
// Copy our properties (proxyTargetClass etc) inherited from ProxyConfig.
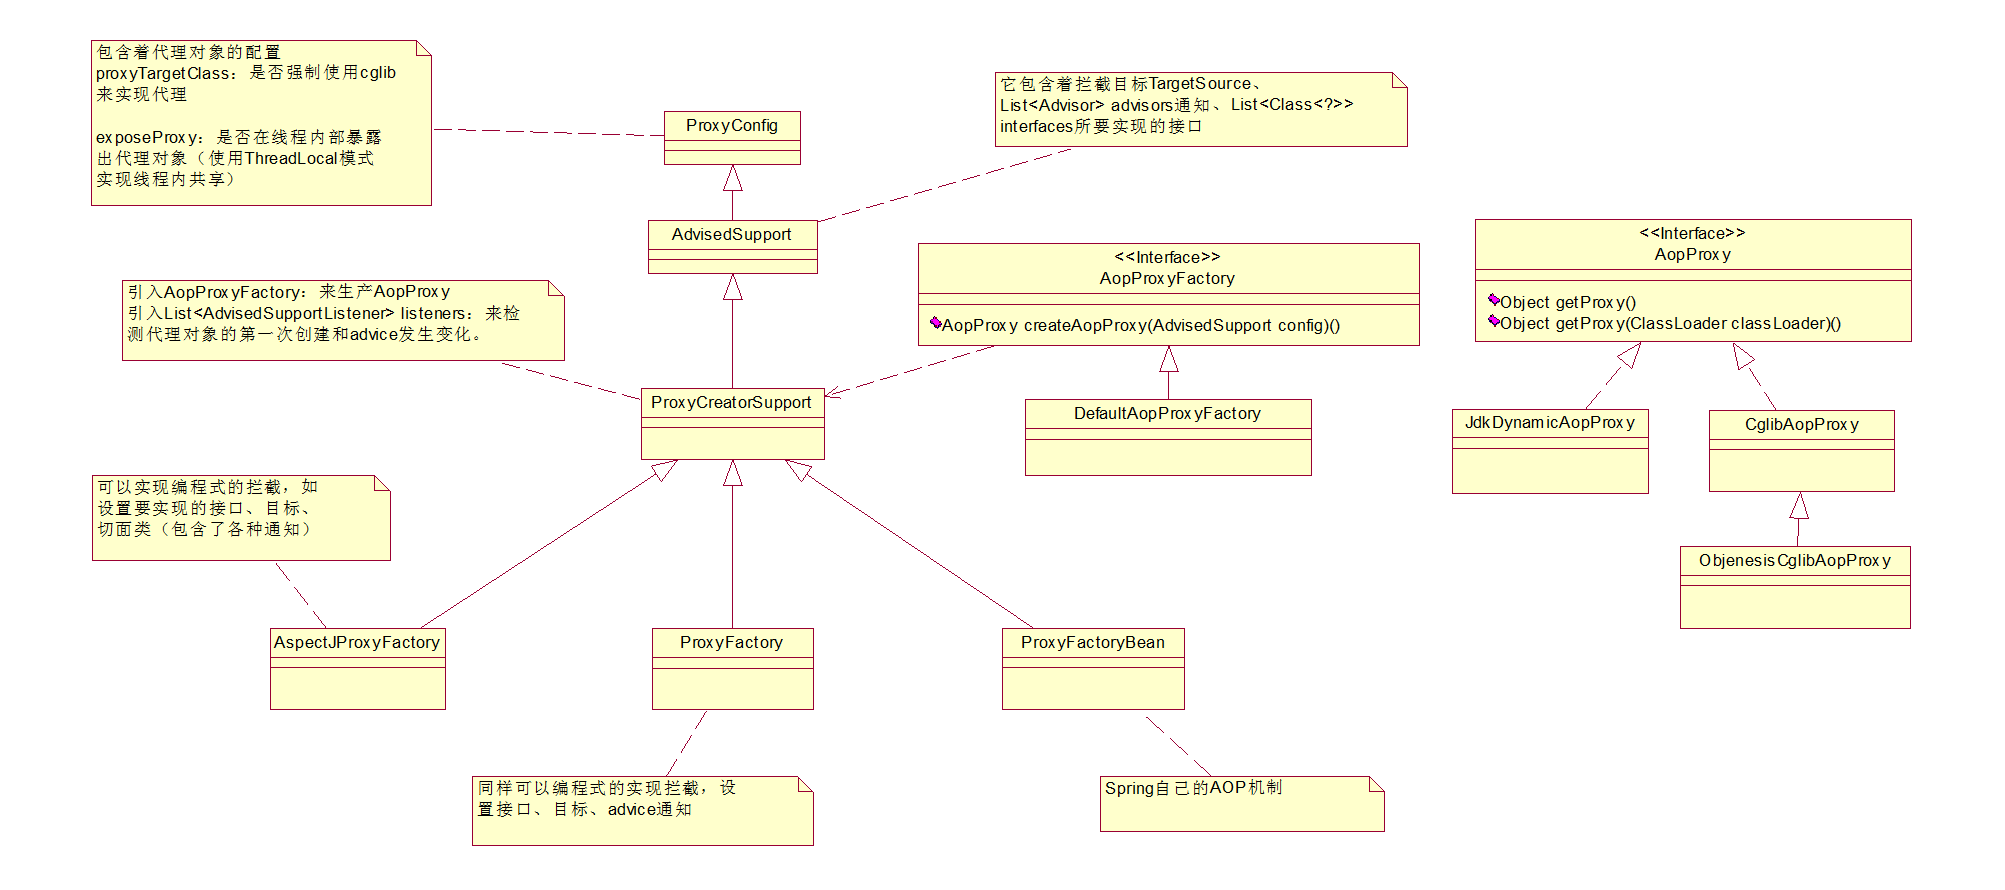
//重点1 proxyFactory.copyFrom(this);将ProxyConfig信息复制到ProxyFactory 中。ProxyFactory、AspectJAwareAdvisorAutoProxyCreator都继承了ProxyConfig,ProxyConfig拥有代理的一些配置信息。看下ProxyConfig:
proxyFactory.copyFrom(this);
//重点2
if (!proxyFactory.isProxyTargetClass()) {
if (shouldProxyTargetClass(beanClass, beanName)) {
proxyFactory.setProxyTargetClass(true);
}
else {
evaluateProxyInterfaces(beanClass, proxyFactory);
}
}
Advisor[] advisors = buildAdvisors(beanName, specificInterceptors);
for (Advisor advisor : advisors) {
proxyFactory.addAdvisor(advisor);
}
proxyFactory.setTargetSource(targetSource);
customizeProxyFactory(proxyFactory);
proxyFactory.setFrozen(this.freezeProxy);
if (advisorsPreFiltered()) {
proxyFactory.setPreFiltered(true);
}
//重点3
return proxyFactory.getProxy(this.proxyClassLoader);
}
然后我们就详细的说明下整个过程:
重点1:proxyFactory.copyFrom(this);将ProxyConfig信息复制到ProxyFactory 中。ProxyFactory、AspectJAwareAdvisorAutoProxyCreator都继承了ProxyConfig,ProxyConfig拥有代理的一些配置信息。
看下ProxyConfig:
public class ProxyConfig implements Serializable {

    //是否强制使用CGLIB 代理对象

    private boolean proxyTargetClass = false;

    //是否优化

    private boolean optimize = false;

    boolean opaque = false;

    //是否在线程内部暴露出代理对象

    boolean exposeProxy = false;

    private boolean frozen = false;

}
重点2:复制完配置信息后,看下proxyTargetClass 属性是否为false,则查看目标类是否含有接口,若无则仍然设置proxyTargetClass为true,若有则把接口设置到ProxyFactory中。然后在设置些Advisor、targetSource等其他参数,为创建代理对象做准备。来看下上述Advisor[] advisors = buildAdvisors(beanName, specificInterceptors);的具体内容:
    protected Advisor[] buildAdvisors(String beanName, Object[] specificInterceptors) {

        // Handle prototypes correctly...

        Advisor[] commonInterceptors = resolveInterceptorNames();

        List<Object> allInterceptors = new ArrayList<Object>();

        if (specificInterceptors != null) {

            allInterceptors.addAll(Arrays.asList(specificInterceptors));

            if (commonInterceptors != null) {

                if (this.applyCommonInterceptorsFirst) {

                    allInterceptors.addAll(0, Arrays.asList(commonInterceptors));

                }

                else {

                    allInterceptors.addAll(Arrays.asList(commonInterceptors));

                }

            }

        }

        Advisor[] advisors = new Advisor[allInterceptors.size()];

        for (int i = 0; i < allInterceptors.size(); i++) {

            ////重点重点重点重点重点重点重点(对配置信息中的specificInterceptors全部封装成Advisor。再看下具体的封装过程,在上述wrap方法中 )

            advisors[i] = this.advisorAdapterRegistry.wrap(allInterceptors.get(i));

        }

        return advisors;

    }
具体的封装过程(如果是Advisor直接返回不处理,接下来必须是Advice,然后通过MethodInterceptor和AdvisorAdapter 对Advice进行包装。)
    @Override

    public Advisor wrap(Object adviceObject) throws UnknownAdviceTypeException {

        if (adviceObject instanceof Advisor) {

            return (Advisor) adviceObject;

        }

        if (!(adviceObject instanceof Advice)) {

            throw new UnknownAdviceTypeException(adviceObject);

        }

        Advice advice = (Advice) adviceObject;

        if (advice instanceof MethodInterceptor) {

            // So well-known it doesn't even need an adapter.

            return new DefaultPointcutAdvisor(advice);

        }

        for (AdvisorAdapter adapter : this.adapters) {

            // Check that it is supported.

            if (adapter.supportsAdvice(advice)) {

                return new DefaultPointcutAdvisor(advice);

            }

        }

        throw new UnknownAdviceTypeException(advice);

    }
重点3:使用DefaultAopProxyFactory来创建AopProxy,有了AopProxy我们就能创建代理对象了。看下AopProxy的创建过程:
@Override

    public AopProxy createAopProxy(AdvisedSupport config) throws AopConfigException {

        if (config.isOptimize() || config.isProxyTargetClass() || hasNoUserSuppliedProxyInterfaces(config)) {

            Class<?> targetClass = config.getTargetClass();

            if (targetClass == null) {

                throw new AopConfigException("TargetSource cannot determine target class: " +

                        "Either an interface or a target is required for proxy creation.");

            }

            if (targetClass.isInterface()) {

                return new JdkDynamicAopProxy(config);

            }

            return new ObjenesisCglibAopProxy(config);

        }

        else {

            return new JdkDynamicAopProxy(config);

        }

    }
这里决定着到底采用jdk动态代理还是cglib方式来创建代理对象。
条件1:config.isOptimize()是否进行优化,默认是false。
条件2:config.isProxyTargetClass()就是ProxyConfig的proxyTargetClass属性,是否强制使用cglib代理。但它为true也不是肯定就采用cglib,因为下面还有一个判断条件,即目标类是接口,则使用jdk动态代理的方式。
条件3:hasNoUserSuppliedProxyInterfaces(config)目标类没有实现接口,或者有但是是接口类型是SpringProxy
只要上述三个条件有一个为true并且目标类不是接口就会采用cglib方式来创建代理对象,其他情况使用jdk动态代理的方式来创建。
有了JdkDynamicAopProxy和ObjenesisCglibAopProxy则可以顺利创建出代理对象,便可以跳到这篇文章http://www.cnblogs.com/chihirotan/p/7063781.html,至此整个过程就连接通了。
总结
我们先看下ProxyFactory是什么东西。 把下面的图理解透了,就掌握了SpringAOP的整个运行机制
spring---aop(5)---Spring AOP的配置的背后的配置的更多相关文章
- spring tx:advice 和 aop:config 配置事务
<?xml version="1.0" encoding="UTF-8"?> <beans xmlns="http://www.sp ...
- spring AOP 之二:@AspectJ注解的3种配置
@AspectJ相关文章 <spring AOP 之二:@AspectJ注解的3种配置> <spring AOP 之三:使用@AspectJ定义切入点> <spring ...
- [转]spring tx:advice 和 aop:config 配置事务
<?xml version="1.0" encoding="UTF-8"?> <beans xmlns="http://www. ...
- 《Java Spring框架》Spring切面(AOP)配置详解
1. Spring 基本概念 AOP(Aspect Oriented Programming)称为面向切面编程,在程序开发中主要用来解决一些系统层面上的问题,比如日志,事务,权限等待,Struts2 ...
- Spring之AOP原理、代码、使用详解(XML配置方式)
Spring 的两大核心,一是IOC,另一个是AOP,本博客从原理.AOP代码以及AOP使用三个方向来讲AOP.先给出一张AOP相关的结构图,可以放大查看. 一.Spring AOP 接口设计 1.P ...
- 阶段3 2.Spring_08.面向切面编程 AOP_9 spring基于注解的AOP配置
复制依赖和改jar包方式 src下的都复制过来. 复制到新项目里了 bean.xml里面复制上面一行代码到下面.把aop改成context. 配置spring容器创建时要扫描的包 Service的配置 ...
- Spring MVC 中使用AOP 进行统一日志管理--XML配置实现
1.介绍 上一篇博客写了使用AOP进行统一日志管理的注解版实现,今天写一下使用XML配置实现版本,与上篇不同的是上次我们记录的Controller层日志,这次我们记录的是Service层的日志.使用的 ...
- 死磕Spring之AOP篇 - Spring AOP注解驱动与XML配置
该系列文章是本人在学习 Spring 的过程中总结下来的,里面涉及到相关源码,可能对读者不太友好,请结合我的源码注释 Spring 源码分析 GitHub 地址 进行阅读. Spring 版本:5.1 ...
- Spring的IOC和AOP之深剖
今天,既然讲到了Spring 的IOC和AOP,我们就必须要知道 Spring主要是两件事: 1.开发Bean:2.配置Bean.对于Spring框架来说,它要做的,就是根据配置文件来创建bean实例 ...
随机推荐
- C 语言问题
1. 如何生成 "半全局变量", 就是那种只能被部分源文件中的部分函数访问变量? 答: 这在C语言中办不到. 如果不能或不方便在一个源文件中放下所有的函数, 那么有三种的解决方案 ...
- 好用的工具---screen命令
问 题场景:要在服务器上配置环境,但是我的电脑无法直接连到服务器上,通常要经过好几次ssh跳转.配环境需要设置好几个用户,这自然需要同时打开好几个连 接服务器的终端窗口,每个连接到服务器的终端窗口都要 ...
- idea开发工具下载安装教程
我用这款工具主要用于java开发 在安装这个工具之前需要配置java的环境 java的jdk环境配置 jdk:1.8 jdk官网下载链接 --->点我 进入之后,下拉 选择 jdk1.8版本 ...
- 一、springboot入门
构建spring boot工程一般采用两种方式 gradle .maven maven方式 pom.xml spring-boot-starter:核心模块,包括自动配置支持.日志和YAML spri ...
- Mac ssh
mac的终端默认在打开一个新的tab/window的时候需要重新输入ssh的密码, 很不方便.本文完成在mac中设置,实现secureCRT/xshell里的克隆会话功能, 即新开一个terminal ...
- Oracle 函数 “把当前的用户(审核人,审核通过后)插入到数据表中”
create or replace function mcode_apply_update_personnel(p_mca_no VARCHAR2, -- 参数(实参) p_action VARCHA ...
- 使用vs2015编辑c++模板程序报错2019
笔者这几天在熟悉vs2015工具编辑c++,(从前用的都是vc++6.0).发现还真是不容易使用,简单的一个小程序会报错一大堆你看不懂的问题.现将我发现的重要的一个问题呈现给大家. 在使用类模板设计对 ...
- HTML5 Differences from HTML4
Abstract "HTML5 Differences from HTML4" describes the differences of the HTML5 specificati ...
- inherited 的研究。
结论: 1. inherited默认调用的是父类的同名 同参数方法.(常用,如果是同名 同参数方法 比如 overide 的,可以省略,只写个inherited就可.) 2. 子类的方法里可以 inh ...
- HDU 3861 The King’s Problem(强连通分量+最小路径覆盖)
题目链接:http://acm.hdu.edu.cn/showproblem.php?pid=3861 题目大意: 在csdn王国里面, 国王有一个新的问题. 这里有N个城市M条单行路,为了让他的王国 ...