阿里云作为yum源操作
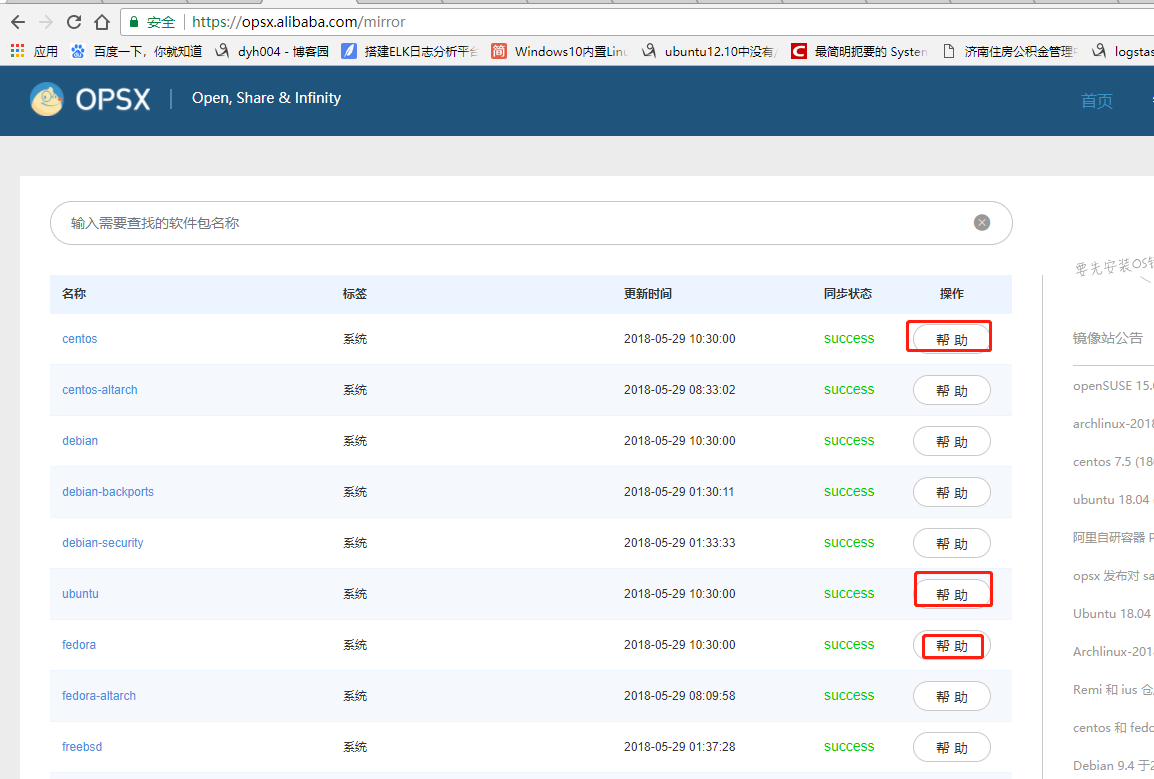
阿里云提供的yum镜像地址为:https://opsx.alibaba.com/mirror
找到自己的使用系统,点击帮助,可以查看更换说明
替换centOS的yum源,如下图
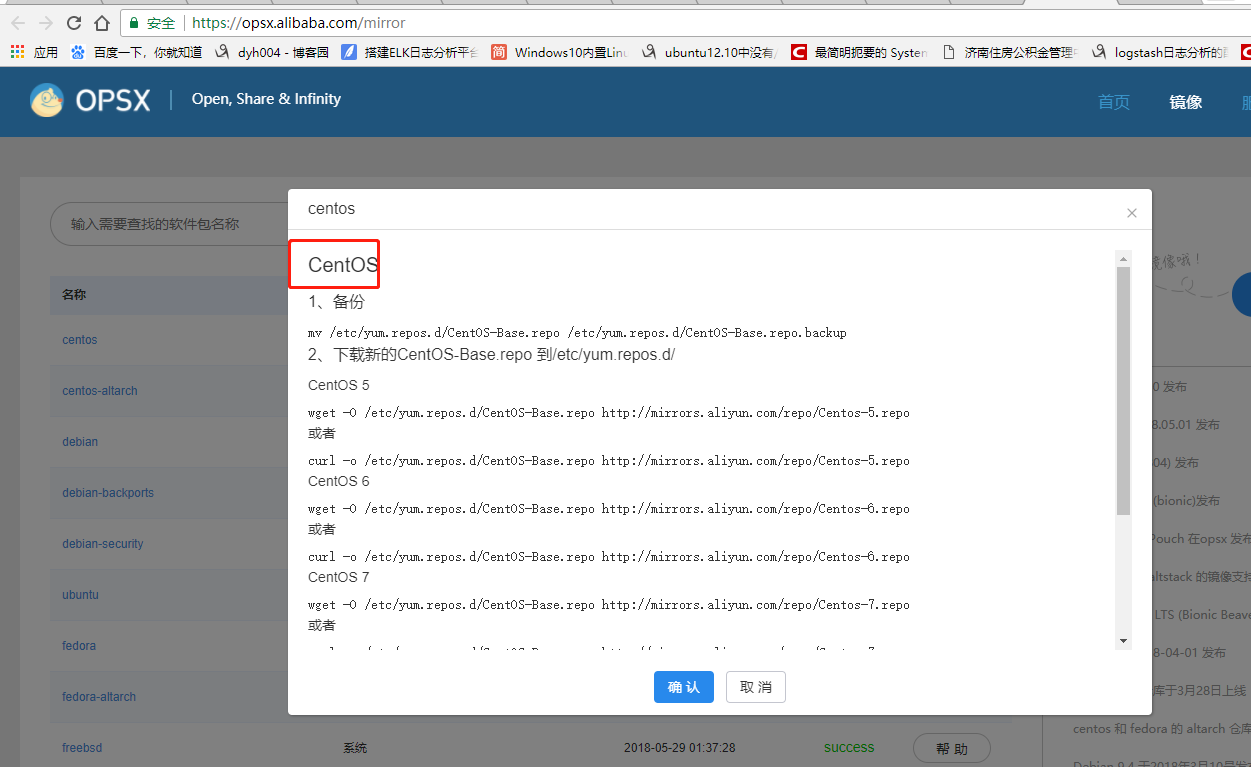
具体操作:
- CentOS
- 、备份
- mv /etc/yum.repos.d/CentOS-Base.repo /etc/yum.repos.d/CentOS-Base.repo.backup
- 、下载新的CentOS-Base.repo 到/etc/yum.repos.d/
- CentOS
- wget -O /etc/yum.repos.d/CentOS-Base.repo http://mirrors.aliyun.com/repo/Centos-5.repo
- 或者
- curl -o /etc/yum.repos.d/CentOS-Base.repo http://mirrors.aliyun.com/repo/Centos-5.repo
- CentOS
- wget -O /etc/yum.repos.d/CentOS-Base.repo http://mirrors.aliyun.com/repo/Centos-6.repo
- 或者
- curl -o /etc/yum.repos.d/CentOS-Base.repo http://mirrors.aliyun.com/repo/Centos-6.repo
- CentOS
- wget -O /etc/yum.repos.d/CentOS-Base.repo http://mirrors.aliyun.com/repo/Centos-7.repo
- 或者
- curl -o /etc/yum.repos.d/CentOS-Base.repo http://mirrors.aliyun.com/repo/Centos-7.repo
- 、之后运行yum makecache生成缓存
- 相关链接
- 官方主页: http://www.centos.org/
- 邮件列表: http://www.centos.org/modules/tinycontent/index.php?id=16
- 论坛: http://www.centos.org/modules/newbb/
- 文档: http://www.centos.org/docs/
- Wiki: http://wiki.centos.org/
替换fedora的yum源
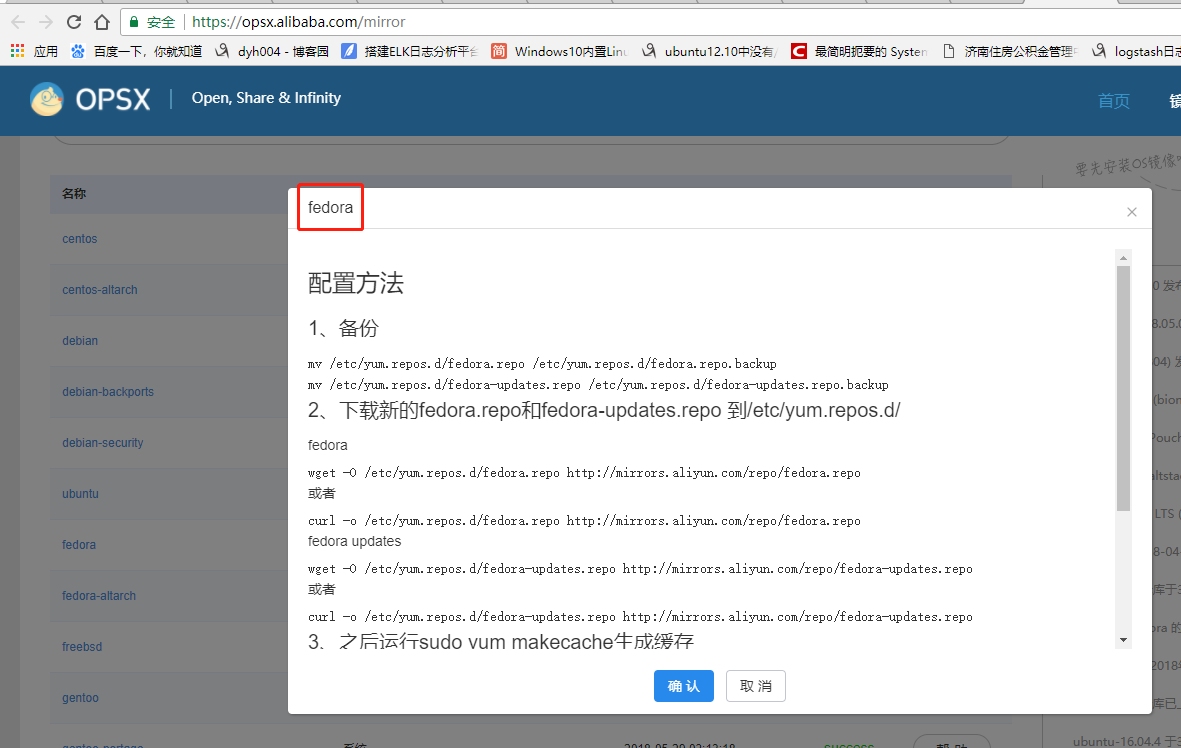
具体操作,如下:
- 配置方法
- 、备份
- mv /etc/yum.repos.d/fedora.repo /etc/yum.repos.d/fedora.repo.backup
- mv /etc/yum.repos.d/fedora-updates.repo /etc/yum.repos.d/fedora-updates.repo.backup
- 、下载新的fedora.repo和fedora-updates.repo 到/etc/yum.repos.d/
- fedora
- wget -O /etc/yum.repos.d/fedora.repo http://mirrors.aliyun.com/repo/fedora.repo
- 或者
- curl -o /etc/yum.repos.d/fedora.repo http://mirrors.aliyun.com/repo/fedora.repo
- fedora updates
- wget -O /etc/yum.repos.d/fedora-updates.repo http://mirrors.aliyun.com/repo/fedora-updates.repo
- 或者
- curl -o /etc/yum.repos.d/fedora-updates.repo http://mirrors.aliyun.com/repo/fedora-updates.repo
- 、之后运行sudo yum makecache生成缓存
- 相关链接
- 官方主页: http://fedoraproject.org/
- 邮件列表: http://fedoraproject.org/wiki/Communicate
- 论坛: http://forums.fedoraforum.org/
- 文档: http://docs.fedoraproject.org/
- Wiki: http://fedoraproject.org/wiki/
- 镜像列表: http://mirrors.fedoraproject.org/publiclist
替换ubunt的yum源:
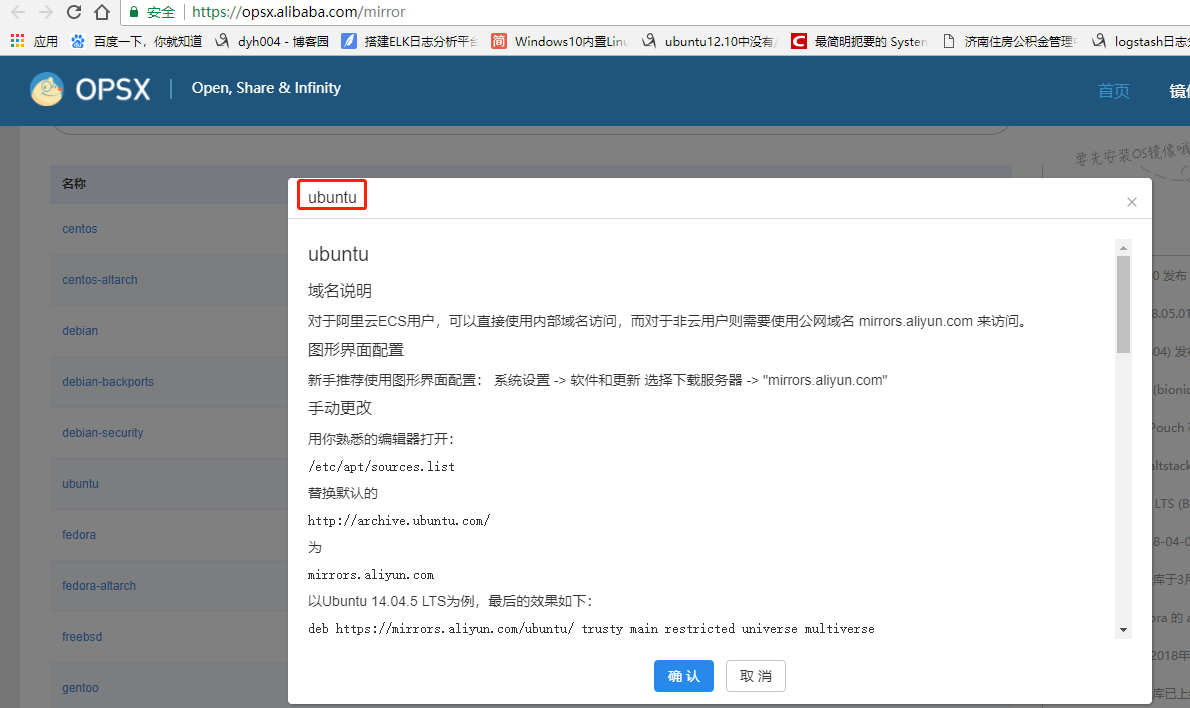
具体操作:
- ubuntu
- 域名说明
- 对于阿里云ECS用户,可以直接使用内部域名访问,而对于非云用户则需要使用公网域名 mirrors.aliyun.com 来访问。
- 图形界面配置
- 新手推荐使用图形界面配置: 系统设置 -> 软件和更新 选择下载服务器 -> "mirrors.aliyun.com"
- 手动更改
- 用你熟悉的编辑器打开:
- /etc/apt/sources.list
- 替换默认的
- http://archive.ubuntu.com/
- 为
- mirrors.aliyun.com
- 以Ubuntu 14.04. LTS为例,最后的效果如下:
- deb https://mirrors.aliyun.com/ubuntu/ trusty main restricted universe multiverse
- deb-src https://mirrors.aliyun.com/ubuntu/ trusty main restricted universe multiverse
- deb https://mirrors.aliyun.com/ubuntu/ trusty-security main restricted universe multiverse
- deb-src https://mirrors.aliyun.com/ubuntu/ trusty-security main restricted universe multiverse
- deb https://mirrors.aliyun.com/ubuntu/ trusty-updates main restricted universe multiverse
- deb-src https://mirrors.aliyun.com/ubuntu/ trusty-updates main restricted universe multiverse
- deb https://mirrors.aliyun.com/ubuntu/ trusty-backports main restricted universe multiverse
- deb-src https://mirrors.aliyun.com/ubuntu/ trusty-backports main restricted universe multiverse
- ## Not recommended
- # deb https://mirrors.aliyun.com/ubuntu/ trusty-proposed main restricted universe multiverse
- # deb-src https://mirrors.aliyun.com/ubuntu/ trusty-proposed main restricted universe multiverse
- ubuntu 16.04 配置如下
- deb http://mirrors.aliyun.com/ubuntu/ xenial main
- deb-src http://mirrors.aliyun.com/ubuntu/ xenial main
- deb http://mirrors.aliyun.com/ubuntu/ xenial-updates main
- deb-src http://mirrors.aliyun.com/ubuntu/ xenial-updates main
- deb http://mirrors.aliyun.com/ubuntu/ xenial universe
- deb-src http://mirrors.aliyun.com/ubuntu/ xenial universe
- deb http://mirrors.aliyun.com/ubuntu/ xenial-updates universe
- deb-src http://mirrors.aliyun.com/ubuntu/ xenial-updates universe
- deb http://mirrors.aliyun.com/ubuntu/ xenial-security main
- deb-src http://mirrors.aliyun.com/ubuntu/ xenial-security main
- deb http://mirrors.aliyun.com/ubuntu/ xenial-security universe
- deb-src http://mirrors.aliyun.com/ubuntu/ xenial-security universe
- ubuntu 18.04(bionic) 配置如下
- deb http://mirrors.aliyun.com/ubuntu/ bionic main restricted universe multiverse
- deb-src http://mirrors.aliyun.com/ubuntu/ bionic main restricted universe multiverse
- deb http://mirrors.aliyun.com/ubuntu/ bionic-security main restricted universe multiverse
- deb-src http://mirrors.aliyun.com/ubuntu/ bionic-security main restricted universe multiverse
- deb http://mirrors.aliyun.com/ubuntu/ bionic-updates main restricted universe multiverse
- deb-src http://mirrors.aliyun.com/ubuntu/ bionic-updates main restricted universe multiverse
- deb http://mirrors.aliyun.com/ubuntu/ bionic-proposed main restricted universe multiverse
- deb-src http://mirrors.aliyun.com/ubuntu/ bionic-proposed main restricted universe multiverse
- deb http://mirrors.aliyun.com/ubuntu/ bionic-backports main restricted universe multiverse
- deb-src http://mirrors.aliyun.com/ubuntu/ bionic-backports main restricted universe multiverse
- 参考链接
- 官方主页: http://www.ubuntu.com/
- 邮件列表: http://www.ubuntu.com/support/community/mailinglists
- 论坛: http://ubuntuforums.org/
- 中文论坛: http://forum.ubuntu.org.cn/
- Wiki: https://wiki.ubuntu.com/
- 帮助: https://help.ubuntu.com/
同样的道理,替换其他系统yum源(阿里作为yum源的操作)
阿里云作为yum源操作的更多相关文章
- 更改yum网易 阿里云的yum源。
一,鉴于用国外的Yum源,速度比较慢,所以想到将国外的yum源,改为国内的Yum源,著名的有网易 阿里云源.如何更改呢? 二,更改yum源为网易的. 首先备份/etc/yum.repos.d/Cent ...
- CemtOS7更改yum网易 阿里云的yum源。
一,鉴于用国外的Yum源,速度比较慢,所以想到将国外的yum源,改为国内的Yum源,著名的有网易 阿里云源.如何更改呢? 二,更改yum源为网易的. 首先备份/etc/yum.repos.d/Cent ...
- 更改yum网易、阿里云的yum源
更改yum源为网易的. 首先备份/etc/yum.repos.d/CentOS-Base.repomv /etc/yum.repos.d/CentOS-Base.repo /etc/yum.repos ...
- CentOS7用阿里云Docker Yum源在线安装Docker 17.03.2
参考文档 安装步骤 删除已安装的Docker 配置阿里云Docker Yum源 安装指定版本 启动Docker服务 参考文档 官方Docker安装文档:https://docs.docker. ...
- CentOS7用阿里云Docker Yum源在线安装Docker
一.参考文档 官方Docker安装文档:https://docs.docker.com/install/linux/docker-ce/centos 阿里云Docker安装文档:https://yq. ...
- CentOS 7 配置阿里云本地yum源
删除原有的yum源: rm -f /etc/yum.repos.d/* 重新下载阿里云的yum源: wget -O /etc/yum.repos.d/CentOS-Base.repo http://m ...
- 如何在 Centos7 中使用阿里云的yum源
如何在 Centos7 中使用阿里云的yum源 1. 备份原来的yum源 mv /etc/yum.repos.d/CentOS-Base.repo /etc/yum.repos.d/CentOS-Ba ...
- centos配置ADSL拨号 配置阿里云的yum源
如果系统yum源有问题可以更改yum源配置阿里云的yum源1)下载repo文件 wget http://mirrors.aliyun.com/repo/Centos-7.repo(没有 wget命令可 ...
- CentOS7使用阿里云的yum源
替换成阿里云的yum源速度更快一些,替换很简单,简单记录一下步骤 1.备份原来的yum源 sudo cp /etc/yum.repos.d/CentOS-Base.repo /etc/yum.repo ...
随机推荐
- Cygwin下编译的程序不使用Cygwin.dll即可运行的命令 及常用命令简介
cc -mno-cygwin foo.c 1.$ ps PS的相关用法: QuoteUsage ps [-aefl] [-u uid]-f = show process uids, ppids-l = ...
- java----OO的概念和设计原则(转)
一.OO(面向对象)的设计基础 面向对象(OO):就是基于对象概念,以对象为中心,以类和继承为构造机制,充分利用接口和多态提供灵活性, 来认识.理解.刻划客观世界和设计.构建相应的软件系统.面向对象的 ...
- NumPy的使用(一)
# -*- coding: utf8 -*- from numpy import* a=arange(15).reshape(3,5) print a print a.shape print a.nd ...
- spring applicationContext.xml最全约束
<?xml version="1.0" encoding="UTF-8"?> <beans xmlns="http://www.sp ...
- Navicat 连接MySQL数据库 报错2059 - authentication plugin 'caching_sha2_password'的解决办法
#在数据库的命令行中输入以下代码即可解决,密码必须要修改 可以再次执行将密码改回来. use mysql; ALTER USER 'root'@'localhost' IDENTIFIED WITH ...
- c/c++ 深拷贝
解决上一篇浅拷贝的问题 浅拷贝的问题根源是,类里有指针类型的成员变量,所以需要自己编写拷贝构造函数和重载=函数 #include <iostream> #include <strin ...
- Windows Server 2016-管理Active Directory复制任务
Repadmin.exe可帮助管理员诊断运行Microsoft Windows操作系统的域控制器之间的Active Directory复制问题. Repadmin.exe内置于Windows Serv ...
- 约瑟夫环简介,问题以及java实现
问题:一群猴子排成一圈,按1,2,--.,n依次编号.然后从第一只开始数,数到第m只,把它踢出圈,从它后面再开始数,再数到第m只,再把它踢出去-------.,如此不停的进行下去,直到最后只剩下一只猴 ...
- SpringCloud之初识Feign ----- 分布式负载自动拼接请求的URL
在前面的学习中,我们使用了Ribbon的负载均衡功能,大大简化了远程调用时的代码: String baseUrl = "http://user-service/user/"; Us ...
- 数据合并处理concat
var data = [ {name: '海门', value: 9}, {name: '鄂尔多斯', value: 12}, {name: '招远', value: 12}, {name: '舟山' ...