django之ajax结合sweetalert使用,分页器和bulk_create批量插入 07
sweetalert插件
有这么一个需求:
当用户进行一个删除数据的操作时,弹出一个二次确认的动态框样式?
其实,这里就可以使用sweetalert插件实现。
首先先下载该插件:Bootstrap-sweetalert项目
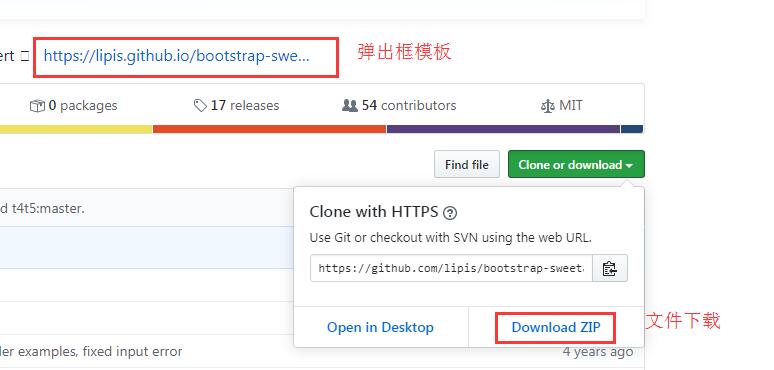
上图下载完毕,解压后找到dist文件夹,拷贝到当前项目的static文件夹下,导入此文件的两个文件,和bootstrap框架中的css、js文件导入方式相同。
要引入的弹出框模板在这里:A beautiful "replacement" for JavaScript's alert
示例:
本示例选择的弹出框和模板如下:

swal({

  title: "Are you sure?",

  text: "You will not be able to recover this imaginary file!",

  type: "warning",

  showCancelButton: true,

  confirmButtonClass: "btn-danger",

  confirmButtonText: "Yes, delete it!",

  cancelButtonText: "No, cancel plx!",

  closeOnConfirm: false,

  closeOnCancel: false

},

function(isConfirm) {

  if (isConfirm) {

    swal("Deleted!", "Your imaginary file has been deleted.", "success");

  } else {

    swal("Cancelled", "Your imaginary file is safe :)", "error");

  }

});
# models.py

from django.db import models

# Create your models here.

class User(models.Model):

    username = models.CharField(max_length=32)

    age = models.IntegerField()

    gender_choices = (

        (1,'male'),

        (2,'female'),

        (3,'others')

    )

    gender= models.IntegerField(choices=gender_choices)
# urls.py

from app01 import views

urlpatterns = [

    url(r'^admin/', admin.site.urls),

    url(r'^home/', views.home,name='xxx'),

]

# views.py

from django.shortcuts import render

# Create your views here.

from app01 import models

from django.http import JsonResponse

def home(request):

    import time

    if request.is_ajax():

        back_dic={'code':1000,'msg':''}

        delete_id = request.POST.get('delete_id')

        time.sleep(3)

        models.User.objects.filter(pk=delete_id).delete()

        back_dic['msg']= '数据已经被删掉了!'

        return JsonResponse(back_dic)

    queryset_obj = models.User.objects.all()

    return render(request,'home.html',locals())
<!--home.html-->

<!DOCTYPE html>

<html lang="en">

<head>

    <meta charset="UTF-8">

    <title>Title</title>

    <script src="https://cdn.bootcss.com/jquery/3.4.1/jquery.min.js"></script>

    {% load static %}

    <link rel="stylesheet" href="{% static 'bootstrap-3.3.7/css/bootstrap.min.css' %}">

    <link rel="stylesheet" href="{% static 'dist/sweetalert.css' %}">

    <script src="{% static 'bootstrap-3.3.7/js/bootstrap.min.js' %}"></script>

    <script src="{% static 'dist/sweetalert.js' %}"></script>

    <style>

        div.sweet-alert h2{

            padding: 10px;

        }

    </style>

</head>

<body>

<div class="container-fluid">

    <div class="row">

        <div class="col-md-8 col-md-offset-2">

            <h2 class="text-center">数据显示</h2>

            <br>

            <table class="table table-striped table-bordered table-hover">

                <thead>

                <tr>

                    <th>序号</th>

                    <th>姓名</th>

                    <th>年龄</th>

                    <th>性别</th>

                    <th class="text-center">操作</th>

                </tr>

                </thead>

                <tbody>

                {% for userObj in queryset_obj %}

                    <tr>

                        <td>{{ forloop.counter }}</td>

                        <td>{{ userObj.usernmae }}</td>

                        <td>{{ userObj.age }}</td>

                        <td>{{ userObj.get_gender_display }}</td>

                        <td class="text-center">

                            {#href为空时,代表重新刷新页面,所以浏览器页面点击删除按钮弹出框转瞬即逝#}

                            <a href="" class="btn btn-primary btn-sm ">编辑</a>

                            {#在for循环内部不能使用id,因为id要唯一不重复,只能用class属性,所以给class加了一个cancel#}

                            <a href="#" class="btn btn-danger btn-sm cancel" userId={{ userObj.pk }}>删除</a>

                        </td>

                    </tr>

                {% endfor %}

                </tbody>

            </table>

        </div>

    </div>

</div>

<script>

    $('.cancel').click(function () {

        {#获取的是被点击的a标签对象#}

        var $btn=$(this);

        {#swal可以填三个参数,最后一个是控制弹出框小图标颜色的提示信息,有info和warning两种#}

        swal({

                title: "确定?",

                text: "删除将不能恢复改文件了!",

                type: "warning",

                showCancelButton: true,

                confirmButtonClass: "btn-danger",

                confirmButtonText: "删除!",

                cancelButtonText: "不,取消!",

                closeOnConfirm: false,

                closeOnCancel: false,

                {#获取加速的动态#}

                showLoaderOnConfirm:true

            },

            function (isConfirm) {

                if (isConfirm) {

                    //朝后端发送ajax请求

                    $.ajax({

                        url:'',

                        type:'post',

                        data:{'delete_id':$btn.attr('userId')},

                        success:function (data) {

                            if (data.code==1000) {

                                 swal("删除成功!",data.msg,"success");

                                 // 通过DOM操作 来直接操作标签,删除标签tr,就是当前用户要删除的这条数据记录

                                 $btn.parent().parent().remove()

                            }

                        }

                    });

                } else {

                    swal("取消", "文件安全啦! :)", "错误");

                }

            });

    })

</script>

</body>

</html>

bulk_create 批量插入数据
当要实现批量插入数据的时候,就可以bulk_create,能大幅度缩短插入的时间;
def index(request):

    # 普通插入方式:

    # for i in range(1000):

    #         models.Book.objects.create(title='第%s本书'%i)

    # 使用bulk_create批量插入

    book_list = []

    for i in range(2000):

        book_list.append(models.Book(title='第%s本书'%i))

    models.Book.objects.bulk_create(book_list)  # 这里直接放的是列表

    book_queryset=models.Book.objects.all()

    return render(request,'index.html',locals())
<!--index.html-->

<!DOCTYPE html>

<html lang="en">

<head>

    <meta charset="UTF-8">

    <title>Title</title>

    <script src="https://cdn.bootcss.com/jquery/3.4.1/jquery.min.js"></script>

    <link rel="stylesheet" href="https://cdn.bootcss.com/twitter-bootstrap/3.4.1/css/bootstrap.min.css">

    <script src="https://cdn.bootcss.com/twitter-bootstrap/3.4.1/js/bootstrap.min.js"></script>

</head>

<body>

 {% for book_obj in book_queryset %}

     <p>{{ book_obj.title }}</p>

 {% endfor %}

</body>

</html>
分页器
简易版本的分页器的推导
def index(request):

    # 获取用户想要查看的页码

    current_page = int(request.GET.get('page', 1))

    book_queryset = models.Book.objects.all() # 获取所有书籍对象

    book_num = book_queryset.count() # 统计所有书籍条数目

    book_page,more = divmod(book_num,10) # 统计书籍的分页

    per_page_num = 10 # 定义每页展示10条

    start_page = (current_page - 1) * per_page_num  # 每页其实条数

    end_page = current_page * per_page_num  # 每页终止的条数

    if more:

        book_page += 1

    html = ''

    xxx = current_page  # 对用户的当前选页赋值一个变量

    if current_page < 6:

        xxx = 6  # 当用户选择小于6的数字,数字不会变成负数

    for i in range(xxx-5,xxx+6):  # 共展示给用户的指定的10页

        if current_page==i:

            # 将10页内容的标签以字符串的形式进行拼接,如果是当前页,显示激活态

            html+='<li class="active"><a href="?page=%s">%s</a></li>'%(i,i)

        else:

            html+='<li><a href="?page=%s">%s</a></li>'%(i,i)  # 不是当前页的正常显示

    book_queryset=book_queryset[start_page:end_page]

    return render(request,'index.html',locals())
<!DOCTYPE html>
<html lang="en">
<head>
<meta charset="UTF-8">
<title>Title</title>
<script src="https://cdn.bootcss.com/jquery/3.4.1/jquery.min.js"></script>
{% load static %}
<link rel="stylesheet" href="{% static 'bootstrap-3.3.7/css/bootstrap.min.css' %}">
<link rel="stylesheet" href="{% static 'dist/sweetalert.css' %}">
<script src="{% static 'bootstrap-3.3.7/js/bootstrap.min.js' %}"></script>
<script src="{% static 'dist/sweetalert.js' %}"></script>
</head>
<body>
<div class="container-fluid">
<div class="row">
<div class="col-md-8 col-md-offset-2">
{% for book_obj in book_queryset %}
<p>{{ book_obj.title }}</p>
{% endfor %}
<nav aria-label="Page navigation">
<ul class="pagination">
<li>
<a href="#" aria-label="Previous">
<span aria-hidden="true">«</span>
</a>
</li>
{{ html|safe }}
<li>
<a href="#" aria-label="Next">
<span aria-hidden="true">»</span>
</a>
</li>
</ul>
</nav>
</div>
</div>
</div>
</body>
</html>
自定义分页器的使用(组件)
类封装的组件,包括bootstrap中分页的框架也都封装进去了。
class Pagination(object):

    def __init__(self,current_page,all_count,per_page_num=2,pager_count=11):

        """

        封装分页相关数据

        :param current_page: 当前页

        :param all_count:    数据库中的数据总条数

        :param per_page_num: 每页显示的数据条数

        :param pager_count:  最多显示的页码个数

        用法:

        queryset = model.objects.all()

        page_obj = Pagination(current_page,all_count)

        page_data = queryset[page_obj.start:page_obj.end]

        获取数据用page_data而不再使用原始的queryset

        获取前端分页样式用page_obj.page_html

        """

        try:

            current_page = int(current_page)

        except Exception as e:

            current_page = 1

        if current_page <1:

            current_page = 1

        self.current_page = current_page

        self.all_count = all_count

        self.per_page_num = per_page_num

        # 总页码

        all_pager, tmp = divmod(all_count, per_page_num)

        if tmp:

            all_pager += 1

        self.all_pager = all_pager

        self.pager_count = pager_count

        self.pager_count_half = int((pager_count - 1) / 2)

    @property

    def start(self):

        return (self.current_page - 1) * self.per_page_num

    @property

    def end(self):

        return self.current_page * self.per_page_num

    def page_html(self):

        # 如果总页码 < 11个:

        if self.all_pager <= self.pager_count:

            pager_start = 1

            pager_end = self.all_pager + 1

        # 总页码  > 11

        else:

            # 当前页如果<=页面上最多显示11/2个页码

            if self.current_page <= self.pager_count_half:

                pager_start = 1

                pager_end = self.pager_count + 1

            # 当前页大于5

            else:

                # 页码翻到最后

                if (self.current_page + self.pager_count_half) > self.all_pager:

                    pager_end = self.all_pager + 1

                    pager_start = self.all_pager - self.pager_count + 1

                else:

                    pager_start = self.current_page - self.pager_count_half

                    pager_end = self.current_page + self.pager_count_half + 1

        page_html_list = []

        # 添加前面的nav和ul标签

        page_html_list.append('''

                    <nav aria-label='Page navigation>'

                    <ul class='pagination'>

                ''')

        first_page = '<li><a href="?page=%s">首页</a></li>' % (1)

        page_html_list.append(first_page)

        if self.current_page <= 1:

            prev_page = '<li class="disabled"><a href="#">上一页</a></li>'

        else:

            prev_page = '<li><a href="?page=%s">上一页</a></li>' % (self.current_page - 1,)

        page_html_list.append(prev_page)

        for i in range(pager_start, pager_end):

            if i == self.current_page:

                temp = '<li class="active"><a href="?page=%s">%s</a></li>' % (i, i,)

            else:

                temp = '<li><a href="?page=%s">%s</a></li>' % (i, i,)

            page_html_list.append(temp)

        if self.current_page >= self.all_pager:

            next_page = '<li class="disabled"><a href="#">下一页</a></li>'

        else:

            next_page = '<li><a href="?page=%s">下一页</a></li>' % (self.current_page + 1,)

        page_html_list.append(next_page)

        last_page = '<li><a href="?page=%s">尾页</a></li>' % (self.all_pager,)

        page_html_list.append(last_page)

        # 尾部添加标签

        page_html_list.append('''

                                           </nav>

                                           </ul>

                                       ''')

        return ''.join(page_html_list)
调用以上接口:
# views.py

def index(request):

    book_queryset = models.Book.objects.all()

    # 自定义分页器的使用

    current_page = request.GET.get('page', 1)

    all_count = book_queryset.count()

    page_obj=Pagination(current_page,all_count,per_page_num=10,pager_count=5)

    page_queryset = book_queryset[page_obj.start:page_obj.end]

    return render(request,'index.html',locals())
// index.html

<!DOCTYPE html>

<html lang="en">

<head>

    <meta charset="UTF-8">

    <title>Title</title>

    <script src="https://cdn.bootcss.com/jquery/3.4.1/jquery.min.js"></script>

    {% load static %}

    <link rel="stylesheet" href="{% static 'bootstrap-3.3.7/css/bootstrap.min.css' %}">

    <link rel="stylesheet" href="{% static 'dist/sweetalert.css' %}">

    <script src="{% static 'bootstrap-3.3.7/js/bootstrap.min.js' %}"></script>

    <script src="{% static 'dist/sweetalert.js' %}"></script>

</head>

<body>

<div class="container-fluid">

    <div class="row">

        <div class="col-md-8 col-md-offset-2">

            {% for book_obj in page_queryset %}

                <p>{{ book_obj.title }}</p>

            {% endfor %}

            {{ page_obj.page_html|safe }}

        </div>

    </div>

</div>

</body>

</html>
*django 08====>*表多对多建立方式、form组件及钩子函数
django之ajax结合sweetalert使用,分页器和bulk_create批量插入 07的更多相关文章
- Django—ajax、前端后端编码格式,bulk_create批量插入语数据库、自定义分页
一.ajax简介: XML也是一门标记语言该语法应用场景 1.写配置文件 2.可以写前端页面(odoo框架中 erp) 每家公司都会有属于这家公司独有的内部管理软件:专门用来开发企业内部管理软件 框架 ...
- Django --- ajax结合sweetalert使用,分页器,bulk_create批量创建数据
目录 ajax结合sweetalert使用 bulk_create批量插入数据 分页器的使用 ajax结合sweetalert使用 ajax可以在不刷新页面的情况下与后端进行交互,在对数据进行操作的时 ...
- Django-choices字段值对应关系(性别)-MTV与MVC科普-Ajax发json格式与文件格式数据-contentType格式-Ajax搭配sweetalert实现删除确认弹窗-自定义分页器-批量插入-07
目录 models 字段补充 choices 参数/字段(用的很多) MTV与MVC模型 科普 Ajax 发送 GET.POST 请求的几种常见方式 用 Ajax 做一个小案例 准备工作 动手用 Aj ...
- django----Sweetalert bulk_create批量插入数据 自定义分页器
目录 一.Sweetalert使用AJAX操作 二.bulk_create 三.分页器 divmod 分页器组件 自定义分页器的使用 一.Sweetalert使用AJAX操作 sweetalert ...
- django基础之day08,利用bulk_create 批量插入成千上万条数据
bulk_create批量插入数据 models.py文件 class Book(models.Model): title=models.CharField(max_length=32) urls.p ...
- django与ajax:ajax结合sweetalter ,批量插入数据 ;分页器组件
目录 一.ajax结合sweetalter 二.bulk_create批量插入数据 三.简易版分页器推导 1. 推导步骤 四.自定义分页器的使用 1. 自定义分页器模板 2. 使用方法 (1)后端代码 ...
- Django学习——ajax发送其他请求、上传文件(ajax和form两种方式)、ajax上传json格式、 Django内置序列化(了解)、分页器的使用
1 ajax发送其他请求 1 写在form表单 submit和button会触发提交 <form action=""> </form> 注释 2 使用inp ...
- ajax结合sweetalert实现删除按钮动态效果
目录 一.ajax结合sweetalert实现删除按钮动态效果 二.bulk_create批量插入数据 1. 一条一条插入 2. 批量插入 三.自定义分页器 一.ajax结合sweetalert实现删 ...
- Django批量插入数据和分页器
目录 一.ajax结合sweetalert实现删除按钮动态效果 二.bulk_create批量插入数据 1. 一条一条插入 2. 批量插入 三.自定义分页器 一.ajax结合sweetalert实现删 ...
随机推荐
- PAT B1015A1062德才论(25)
题目描述 宋代史学家司马光在<资治通鉴>中有一段著名的"德才论":"是故才德全尽谓之圣人,才德兼亡谓之愚人,德胜才谓之君子,才胜德谓之小人.凡取人之术,苟不得 ...
- 【hash】A Horrible Poem
[题目链接] # 10038. 「一本通 2.1 练习 4」A Horrible Poem [参考博客] A Horrible Poem (字符串hash+数论) [题目描述] 给出一个由小写英文字母 ...
- paramiko-ssh-sftp实例
import paramiko transport = paramiko.Transport(('192.168.71.136', 22)) transport.connect(username='r ...
- 数值优化(Numerical Optimization)学习系列-目录
数值优化(Numerical Optimization)学习系列-目录 置顶 2015年12月27日 19:07:11 下一步 阅读数 12291更多 分类专栏: 数值优化 版权声明:本文为博主原 ...
- linux常用的bash指令
文本处理 awk sed grep sort uniq cat cut echo fmt tr nl egrep fgrep wc 进程监视 ps top htop atop lsof 网络 nmap ...
- 第一次碰到%*s这个鬼东西。。
printf("%*s",5,"123"); 输出为 ##123 (其中##表示空格) 这个鬼东西是用来控制格式的. 当然也可以用来输出空格个数
- 10.Bash的安装
10.Bash的安装本节提供了在 Bash支持的不同系统上的基本安装指导.本版本支持 GNU操作系统,几乎每个 UNIX版本,以及几个非 UNIX 系统,例如 BeOS 和 Interix.还有针对 ...
- 【原创】大叔问题定位分享(34)Spring的RestTemplate请求json数据后内容被修改
先看代码 org.springframework.web.client.RestTemplate public RestTemplate() { this.messageConverters = ne ...
- Java基础第三天--内部类、常用API
形参和返回值 抽象类名作为形参和返回值 方法的形参是抽象类名,其实需要的是该抽象类的子类对象 方法的返回值是抽象类名,其实返回的是该抽象类的子类对象 接口名作为形参和返回值 方法的形象是接口名,其实需 ...
- opencv 仿射变换 投射变换, 单应性矩阵
仿射 estimateRigidTransform():计算多个二维点对或者图像之间的最优仿射变换矩阵 (2行x3列),H可以是部分自由度,比如各向一致的切变. getAffineTransform( ...